React Native の expo-av の使い方

「React Native」の 「expo-av」の使い方をまとめました。
・Expo SDK 51
前回
1. expo-av
「expo-av」は、「Expo」を利用した「React Native」アプリでオーディオおよびビデオの再生をサポートするライブラリです。「Expo」は「React Native」アプリの開発を簡単にするツールキットになります。
・オーディオの再生
・オーディオの録音
・ビデオの再生
・再生コントロール (再生、一時停止、停止、シークなど)
2. オーディオの再生
オーディオの再生の手順は、次のとおりです。
2-1. React Nativeプロジェクトの作成
(1) React Nativeプロジェクトの作成。
npx react-native init my_app
cd my_app
(2) パッケージのインストール。
npx install-expo-modules
npm install expo-av
2-2. アセットの配置
(1) プロジェクト下にassetsフォルダを作成し、オーディオ(sample.mp3)を配置。
・my_app
・assets
・sample.mp3
2-3. iOSのセットアップ
(1) podのインストール。
cd ios
pod install
cd ..
(2) Xcodeで署名し、iPhoneにインストールできることを確認。
2-4. オーディオの再生
(1) コードの編集。
・App.tsx
import React, { useEffect, useState } from 'react';
import { Button, View } from 'react-native';
import { Audio } from 'expo-av';

// アプリ
const App = () => {
  const [sound, setSound] = useState<Audio.Sound | null>(null);

  // 音声ファイルの読み込み
  const loadSound = async () => {
    const { sound } = await Audio.Sound.createAsync(
      require('./assets/sample.mp3')
    );
    setSound(sound);
  };

  // 音声ファイルの再生
  const playSound = async () => {
    if (sound) {
      await sound.replayAsync();
    }
  };

  // 初期化
  useEffect(() => {
    loadSound();

    return () => {
      if (sound) {
        sound.unloadAsync();
      }
    };
  }, []);

  // UI
  return (
    <View style={{ flex: 1, justifyContent: 'center', alignItems: 'center' }}>
      <Button title="オーディオの再生" onPress={playSound} />
    </View>
  );
}

export default App;
(2) コードの実行。
npm start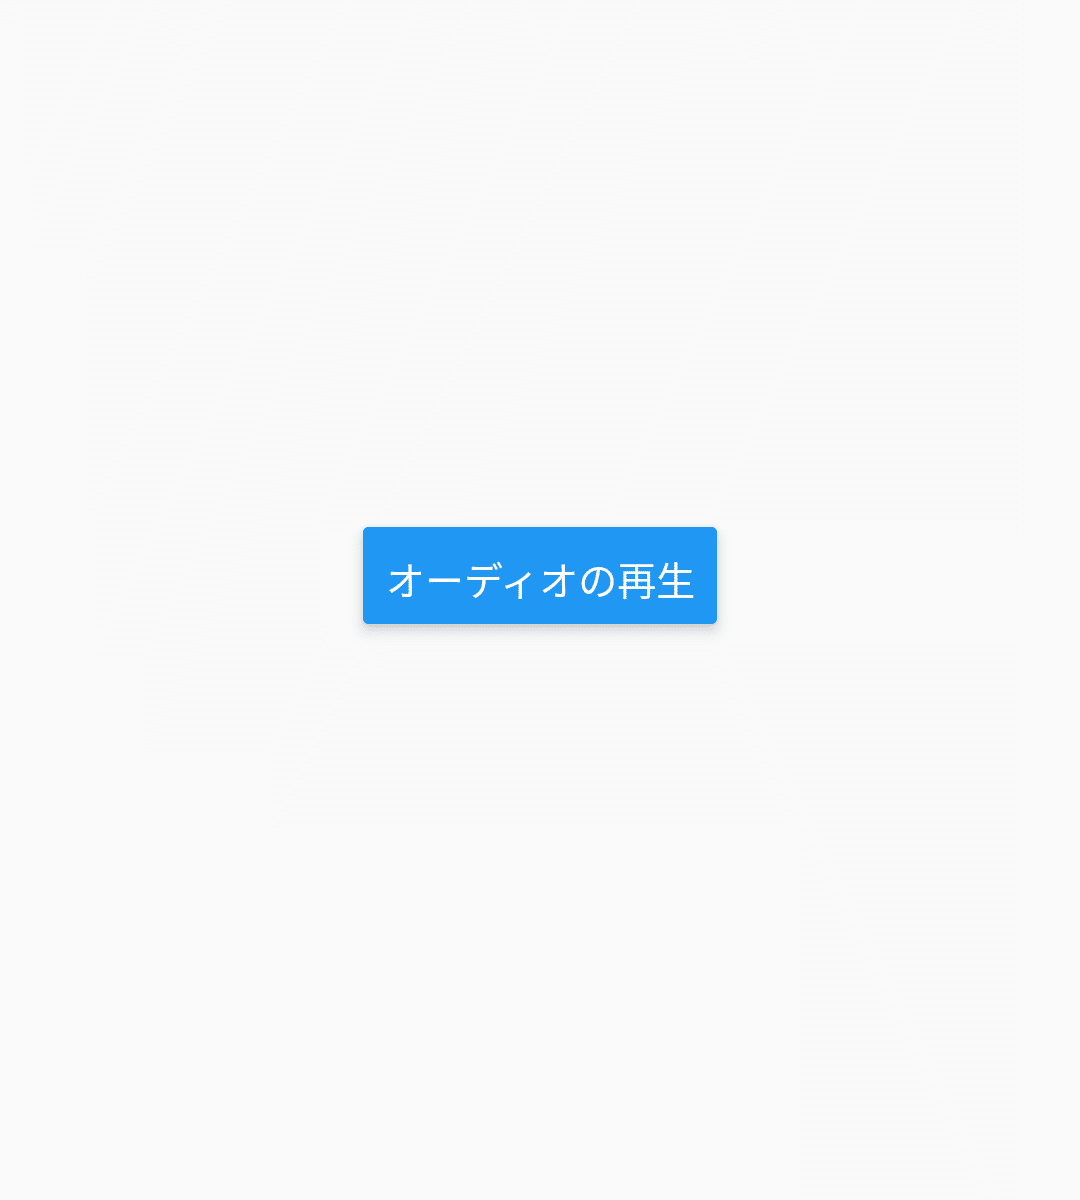
3. オーディオの録音
オーディオの再生の手順は、次のとおりです。
3-1. React Nativeプロジェクトの作成
(1) React Nativeプロジェクトの作成。
npx react-native init my_app
cd my_app
(2) パッケージのインストール。
npx install-expo-modules
npm install expo-av
3-2. iOSのセットアップ
(1) podのインストール。
cd ios
pod install
cd ..
(2) Xcodeで署名し、iPhoneにインストールできることを確認。
(3) 「Info.plist」に以下の項目を追加。
	<key>NSMicrophoneUsageDescription</key>
	<string>このアプリはマイクを使用します。</string>
3-3. Androidのセットアップ
(1) AndroidManifest.xmlに以下の項目を追加。
<uses-permission android:name="android.permission.RECORD_AUDIO" />3-4. オーディオの録音
(1) コードの編集。
・App.tsx
import React, { useState, useEffect } from 'react';
import { View, Text, Button } from 'react-native';
import { Audio } from 'expo-av';

// アプリ
const App = () => {
  const [hasPermission, setHasPermission] = useState<boolean | null>(null);
  const [recording, setRecording] = useState<Audio.Recording | null>(null);
  const [recordedURI, setRecordedURI] = useState<string | null>(null);
  const [sound, setSound] = useState<Audio.Sound | null>(null);

  // 初期化
  useEffect(() => {
    (async () => {
      const { status } = await Audio.requestPermissionsAsync();
      setHasPermission(status === 'granted');
    })();
  }, []);

  // 初期化
  useEffect(() => {
    return sound
      ? () => {
          sound.unloadAsync();
        }
      : undefined;
  }, [sound]);

  // 録音の開始
  const startRecording = async () => {
    try {
      if (!hasPermission) return;

      // AudioModeパラメータの指定
      await Audio.setAudioModeAsync({
        allowsRecordingIOS: true,
        playsInSilentModeIOS: true,
      });

      // 録音の開始
      const newRecording = new Audio.Recording();
      await newRecording.prepareToRecordAsync(Audio.RecordingOptionsPresets.HIGH_QUALITY);
      await newRecording.startAsync();
      setRecording(newRecording);
    } catch (err) {
      console.error('Error:', err);
    }
  };

  // 録音の停止
  const stopRecording = async () => {
    if (!recording) return;

    try {
      // 録音の停止
      await recording.stopAndUnloadAsync();
      const uri = recording.getURI();
      setRecordedURI(uri);
      setRecording(null);
    } catch (err) {
      console.error('Error:', err);
    }
  };

  const playSound = async () => {
    if (recordedURI) {
      const { sound } = await Audio.Sound.createAsync({ uri: recordedURI });
      setSound(sound);
      await sound.playAsync();
    }
  };

  // UI
  if (hasPermission === null) {
    return <Text>マイクの許可をリクエストしています...</Text>;
  }
  if (hasPermission === false) {
    return <Text>マイクにアクセスできません</Text>;
  }
  return (
    <View style={{ flex: 1, justifyContent: 'center', alignItems: 'center' }}>
      <Button
        title={recording ? "録音の停止" : "録音の開始"}
        onPress={recording ? stopRecording : startRecording}
      />
      {recordedURI && (
        <Button
          title="再生"
          onPress={playSound}
        />
      )}
      {recordedURI && <Text>Recording saved at: {recordedURI}</Text>}
    </View>
  );
}

export default App;「AudioMode」のパラメータは、次のとおりです。
・allowsRecordingIOS : iOSで音声録音を許可するかどうか (default:false)
・interruptionModeIOS : iOSでオーディオセッションが中断された時の動作
・InterruptionModeIOS.MixWithOthers (他の音声とミックスする)
・InterruptionModeIOS.DoNotMix (他の音声とミックスしない)
・InterruptionModeIOS.DuckOthers (他の音声の音量を下げる)
・playsInSilentModeIOS : iOSでサイレントモードでも音声を再生するかどうか (default:false)
・playThroughEarpieceAndroid : オーディオがAndroidイヤホンにルーティングされるかどうか (default:false)
・shouldDuckAndroid : Androidで他のアプリが音声を再生している時に音量を下げるかどうか (default:true)
・interruptionModeAndroid : Androidでオーディオセッションが中断された時の動作
・InterruptionModeAndroid.DoNotMix (他の音声とミックスしない)
・InterruptionModeAndroid.DuckOthers (他の音声の音量を下げる)
・staysActiveInBackground : アプリがバックグラウンドにいる間も再生し続けるかどうか (default:false)
「HIGH_QUALITY」のパラメータは次のとおりです。
RecordingOptionsPresets.HIGH_QUALITY = {
  isMeteringEnabled: true,
  android: {
    extension: '.m4a',
    outputFormat: AndroidOutputFormat.MPEG_4,
    audioEncoder: AndroidAudioEncoder.AAC,
    sampleRate: 44100,
    numberOfChannels: 2,
    bitRate: 128000,
  },
  ios: {
    extension: '.m4a',
    outputFormat: IOSOutputFormat.MPEG4AAC,
    audioQuality: IOSAudioQuality.MAX,
    sampleRate: 44100,
    numberOfChannels: 2,
    bitRate: 128000,
    linearPCMBitDepth: 16,
    linearPCMIsBigEndian: false,
    linearPCMIsFloat: false,
  },
  web: {
    mimeType: 'audio/webm',
    bitsPerSecond: 128000,
  },
};
(2) コードの実行。
npm start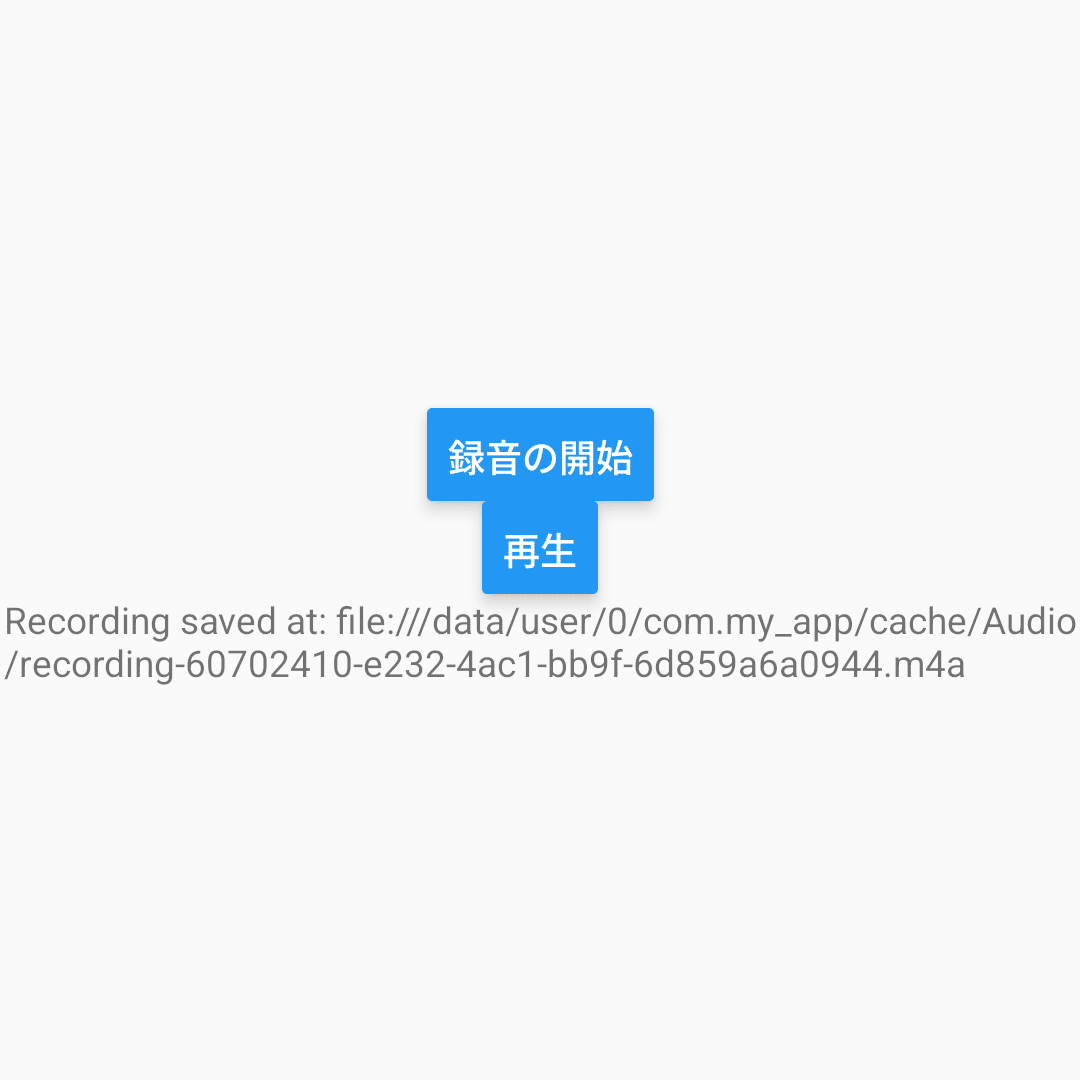
4. ビデオの再生
4-1. React Nativeプロジェクトの作成
(1) React Nativeプロジェクトの作成。
npx react-native init my_app
cd my_app
(2) パッケージのインストール。
npx install-expo-modules
npm install expo-av
4-2. アセットの配置
(1) プロジェクト下にassetsフォルダを作成し、ビデオ(sample.mp4)を配置。
・my_app
・assets
・sample.mp4
4-3. iOSのセットアップ
(1) podのインストール。
cd ios
pod install
cd ..
(2) Xcodeで署名し、iPhoneにインストールできることを確認。
4-4. ビデオの再生
(1) コードの編集。
・App.tsx
import React from 'react';
import { View, Text } from 'react-native';
import { Video, ResizeMode } from 'expo-av';

// アプリ
const App = () => {
  const videoRef = React.useRef<Video>(null);

  // UI
  return (
    <View style={{ flex: 1, justifyContent: 'center', alignItems: 'center' }}>
      <Video
        ref={videoRef}
        style={{ width: '100%', height: '100%'}}
        source={require('./assets/sample.mp4')}
        resizeMode={ResizeMode.CONTAIN}
        isLooping
        isMuted
        shouldPlay
      />
    </View>
  );
}

export default App;
(2) コードの実行。
npm start