iOSアプリ開発 入門 (8) - UIViewのアニメーション

iOSアプリのUIViewのアニメーションについてまとめました。
iOS14
前回
1. UIViewのアニメーション
UIViewのアニメーションには、以下の3種類のアニメーションがあります。
・プロパティのアニメーション : UIView.animate()
・制約のアニメーション : UIView.animate()
・画面遷移のアニメーション : UIView.transition()
2. UIViewのアニメーションのサンプル
UIViewのアニメーションのサンプルは、次のとおりです。
◎ リソース
サンプルのリソースには、次の2つの画像を用意します。
・heniheni@2x.png

・sorami@2x.png

◎ レイアウト
サンプルのレイアウトには、「ImageView」を1つ(制約なし)、「UIButton」を3つ(制約あり)を配置します。
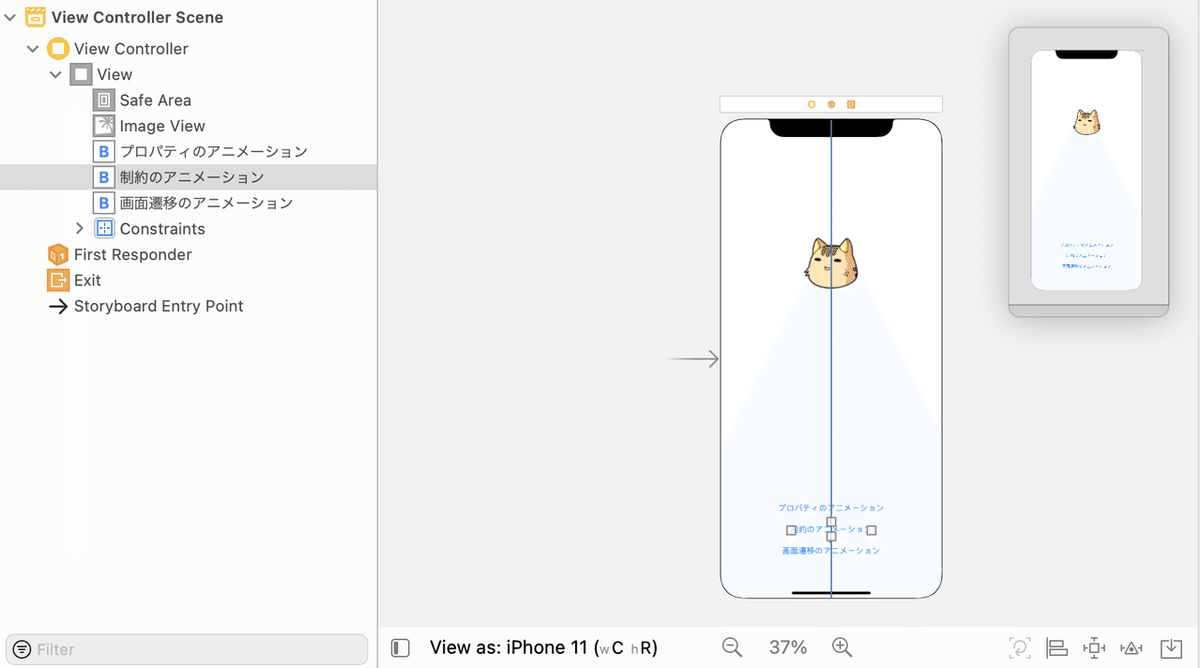
「ImageView」と「UIButton下の制約」は、次で説明するコードの@IBoutlet変数に関連付けます。
◎ コード
コードは、次のとおりです。
import UIKit

// ViewController
class ViewController: UIViewController {
    @IBOutlet weak var imageView: UIImageView! // イメージビュー
    @IBOutlet weak var buttonBottomConstraint: NSLayoutConstraint! // ボタン下の制約

    // ビューのロード時に呼ばれる
    override func viewDidLoad() {
        super.viewDidLoad()
    }

    // ボタン押下時に呼ばれる
    @IBAction func onButtonClick(sender: UIButton) {
        // プロパティのアニメーション
        if sender.tag == 0 {
            // プロパティのアニメーションの実行
            UIView.animate(withDuration: 0.5, // アニメーション合計継続時間(秒)
                delay: 0.0, // アニメーション開始時間(秒)
                options: [.curveLinear], // オプション(等速)
                animations: {
                    // プロパティの変更
                    if self.imageView.frame.origin.y == 200 {
                        self.imageView.frame.origin.y = 400
                    } else {
                        self.imageView.frame.origin.y = 200
                    }
                }, completion: {(finished: Bool) in
                    // アニメーション完了時の処理
                })
        }
        // 制約のアニメーション
        else if sender.tag == 1 {
            // 制約の値の変更
            if self.buttonBottomConstraint.constant == 40 {
                self.buttonBottomConstraint.constant = 100
            } else {
                self.buttonBottomConstraint.constant = 40
            }

            // 制約のアニメーションの実行
            UIView.animate(withDuration: 0.5, // アニメーション合計継続時間(秒)
                delay: 0.0, // アニメーション開始時間(秒)
                options: [.curveLinear], // オプション(等速)
                animations: {
                    // 制約によるプロパティの変更
                    self.view.layoutIfNeeded()
                }, completion: {(finished: Bool) in
                    // アニメーション完了時の処理
                })
        }
        // 画面遷移のアニメーション
        else if sender.tag == 2 {
            // 画面遷移のアニメーションの実行
            UIView.transition(with: self.imageView,
                duration: 0.5, // アニメーション合計継続時間(秒)
                options: [.transitionFlipFromLeft, .curveLinear], // オプション(左からのフリップ, 等速)
                animations: {
                    // 画面の変更
                    if self.imageView.tag != 1 {
                        self.imageView.tag = 1
                        self.imageView.image = UIImage(named:"sorami")
                    } else {
                        self.imageView.tag = 0
                        self.imageView.image = UIImage(named:"heniheni")
                    }
                },
                completion:  {(finished: Bool) in
                    // アニメーション完了時の処理
                })
        }
    }
}
3. プロパティのアニメーション
UIViewのプロパティのアニメーションを行うには、UIView.animate()を使います。
class func animate(withDuration: TimeInterval,
delay: TimeInterval,
options: UIView.AnimationOptions,
animations: () -> Void,
completion: ((Bool) -> Void)?)
・duration : アニメーションの合計継続時間(秒)。
・delay : アニメーションの開始時間(秒)。
・options : オプション。
・animations : アニメーション可能なプロパティを変更するブロック。
・completion : アニメーション完了時に呼ばれるブロック。
「ImageView」のY座標を200から400(または400から200)に変更するコードは、次のとおりです。
// プロパティのアニメーションの実行
UIView.animate(withDuration: 0.5, // アニメーション合計継続時間(秒)
    delay: 0.0, // アニメーション開始時間(秒)
    options: [.curveLinear], // オプション(等速)
    animations: {
        // プロパティの変更
        if self.imageView.frame.origin.y == 200 {
            self.imageView.frame.origin.y = 400
        } else {
            self.imageView.frame.origin.y = 200
        }
    }, completion: {(finished: Bool) in
        // アニメーション完了時の処理
    })
◎ アニメーション可能なプロパティ
・frame : 座標とサイズ
・bounds : 座標とサイズ
・center : 中心座標
・transform : 移動、回転、拡縮
・alpha : 透明度
・backgroundcolor : 背景色
◎ 繰り返しのオプション
・repeat : アニメーションを無期限に繰り返す。
・autoreverse : アニメーションを再生後に逆再生(repeatと組み合わせる必要あり)。
◎ 速度のオプション
・curveEaseInOut : 低速 → 高速 → 低速。
・curveEaseIn : 低速 → 高速。
・curveEaseOut : 高速 → 低速。
・curveLinear : 一定速度。
◎ アニメーション中の操作のオプション
・beginFromCurrentState : アニメーション中に現在の状態からアニメーション開始。
・allowUserInteraction : アニメーション中にユーザー操作を許可。
・allowAnimatedContent : アニメーション中にビューの再描画を許可。
◎ フレームレートのオプション
・preferredFramesPerSecond30 : 毎秒30フレーム。
・preferredFramesPerSecond60 : 毎秒60フレーム。
4. 制約のアニメーション
プロパティと同様に、「AutoLayout」の「制約」の値もアニメーションさせることができます。
制約「buttonBottomConstraint」の値を40から100(または100から40)に変更するコードは、次のとおりです。
// 制約の値の変更
if self.buttonBottomConstraint.constant == 40 {
    self.buttonBottomConstraint.constant = 100
} else {
    self.buttonBottomConstraint.constant = 40
}

// 制約のアニメーションの実行
UIView.animate(withDuration: 0.5, // アニメーション合計継続時間(秒)
    delay: 0.0, // アニメーション開始時間(秒)
    options: [.curveLinear], // オプション(等速)
    animations: {
        // 制約によるプロパティの変更
        self.view.layoutIfNeeded()
    }, completion: {(finished: Bool) in
        // アニメーション完了時の処理
})制約の値の変更をanimationsブロック外で行い、animationsブロック内では、view.layoutIfNeeded()を呼びます。
5. 画面遷移のアニメーション
UIViewの画面遷移のアニメーションを行うには、UIView.transition()を使います。
class func transition(with: UIView,
duration: TimeInterval,
options: UIView.AnimationOptions,
animations: (() -> Void)?,
completion: ((Bool) -> Void)?)
・view : ビュー。
・duration : アニメーションの合計継続時間(秒)。
・options : オプション。
・animations : アニメーション可能なプロパティを変更するブロック。
・completion : アニメーション完了時に呼ばれるブロック。
「ImageView」のimageを"heniheni"から"sorami"(または"sorami"から"heniheni")に変更するコードは、次のとおりです。
// 画面遷移のアニメーションの実行
UIView.transition(with: self.imageView,
    duration: 0.5, // アニメーション合計継続時間(秒)
    options: [.transitionFlipFromLeft, .curveLinear], // オプション(左からのフリップ, 等速)
    animations: {
        // 画面の変更
        if self.imageView.tag != 1 {
            self.imageView.tag = 1
            self.imageView.image = UIImage(named:"sorami")
        } else {
            self.imageView.tag = 0
            self.imageView.image = UIImage(named:"heniheni")
        }
    },
    completion:  {(finished: Bool) in
        // アニメーション完了時の処理
    })
◎ トランジションのオプション
・transitionFlipFromLeft : 垂直軸を中心に左から右に反転。
・transitionFlipFromRight : 垂直軸を中心に右から左に反転。
・transitionFlipFromTop : 水平軸を中心に上から下に反転。
・transitionFlipFromBottom : 水平軸を中心に下から上に反転。
・transitionCrossDissolve : ディゾルブ(フェードイン・アウト)。
・transitionCurlUp : ビューを下から上にページめくり。
・transitionCurlDown : ビューを上から下にページめくり。
・showHideTransitionViews : トランジション中のビューの表示・非表示を許可。
次回
この記事が気に入ったらサポートをしてみませんか?