
ROS入門 (47) - mycobot風ロボットのURDFを作成して、Unityに配置して、ロボット情報をパブリッシュ

mycobot風ロボット(頭が円柱なだけ)のURDFを作成して、Unityに配置して、ロボット情報をパブリッシュする手順をまとめました。MoveIt!で制御する前準備になります。
・Melodic
前回
1. ROS側の準備
ROS側の準備の手順は、次のとおりです。
(1) Dockerイメージの起動時に、ポート番号「10000」「5005」のオープンを指定。
UnityとROSの間の通信は、ポート番号「10000」「5005」が必要です。
$ docker run -v ~/ros1_ws:/home/ubuntu/catkin_ws:cached -p 6080:80 -p 10000:10000 -p 5005:5005 --shm-size=1024m tiryoh/ros-desktop-vnc:melodic(3) 「ROS-TCP-Endpoint」パッケージのインストール。
「ROS-TCP-Endpoint」を使います。
$ cd ~/catkin_ws/src
$ git clone https://github.com/Unity-Technologies/ROS-TCP-Endpoint
2. Unity側の準備
Unity側の準備の手順は、次のとおりです。
(1) Unityのメニュー「Window → Package Manager」で「Package Manager」を開く。
(2) 「Package Manager」で「+ → Add Package from Git URL」を選択し、以下のURLを入力し、「Add」ボタンを押す。
「ROS-TCP-Connector」がインポートされます。
https://github.com/Unity-Technologies/ROS-TCP-Connector.git?path=/com.unity.robotics.ros-tcp-connector(3) 「Package Manager」で「+ → Add Package from Git URL」を選択し、以下のURLを入力し、「Add」ボタンを押す。
「URDF Importer」がインポートされます。
https://github.com/Unity-Technologies/URDF-Importer.git?path=/com.unity.robotics.urdf-importer(4) Unityのメニュー「Robotics → ROS Settings」で「ROS1」を指定。
3. mycobot風ロボットのURDFの作成
mycobot風ロボットのURDFを準備します。
・mycobot_style.urdf
<?xml version="1.0"?>
<robot name="mycobot_style">
  <!--world-->
  <link name="world" />

  <!--base_link-->
  <link name="base_link">
    <visual>
      <geometry>
        <box size="0.2 0.2 0.05" />
      </geometry>
      <material name="white">
        <color rgba="1.0 1.0 1.0 1.0" />
      </material>
      <origin rpy="0 0 0" xyz="0 0 0.025" />
    </visual>
    <collision>
      <geometry>
        <box size="0.3 0.3 0.05" />
      </geometry>
      <origin rpy="0 0 0" xyz="0 0 0.025" />
    </collision>
    <inertial>
      <mass value="1.0" />
      <origin rpy="0 0 0" xyz="0 0 0.025" />
      <inertia ixx="0.0027" iyy="0.0027" izz="0.005" ixy="0" ixz="0" iyz="0" />
    </inertial>
  </link>
  <joint name="fixed" type="fixed">
    <parent link="world" />
    <child link="base_link" />
  </joint>


  <!--torso-->
  <link name="torso">
    <visual>
      <geometry>
        <cylinder length="0.5" radius="0.05" />
      </geometry>
      <material name="white" />
      <origin rpy="0 0 0" xyz="0 0 0.25" />
    </visual>
    <collision>
      <geometry>
        <cylinder length="0.5" radius="0.05" />
      </geometry>
      <origin rpy="0 0 0" xyz="0 0 0.25" />
    </collision>
    <inertial>
      <mass value="1.0" />
      <origin rpy="0 0 0" xyz="0 0 0.25" />
      <inertia ixx="0.02146" iyy="0.02146" izz="0.00125" ixy="0" ixz="0" iyz="0" />
    </inertial>
  </link>
  <joint name="hip" type="revolute">
    <axis xyz="0 0 1" />
    <limit lower="-3.14" upper="3.14" effort="0.5293" velocity="6.159937255" />
    <parent link="base_link" />
    <child link="torso" />
    <origin rpy="0 0 0" xyz="0.0 0.0 0.05" />
  </joint>


  <!--upper_arm-->
  <link name="upper_arm">
    <visual>
      <geometry>
        <cylinder length="0.4" radius="0.05" />
      </geometry>
      <material name="white" />
      <origin rpy="0 0 0" xyz="0 0 0.2" />
    </visual>
    <collision>
      <geometry>
        <cylinder length="0.4" radius="0.05" />
      </geometry>
      <origin rpy="0 0 0" xyz="0 0 0.2" />
    </collision>
    <inertial>
      <mass value="1.0" />
      <origin rpy="0 0 0" xyz="0 0 0.2" />
      <inertia ixx="0.01396" iyy="0.01396" izz="0.00125" ixy="0" ixz="0" iyz="0" />
    </inertial>
  </link>
  <joint name="shoulder" type="revolute">
    <axis xyz="0 1 0" />
    <limit lower="-3.14" upper="3.14" effort="0.5293" velocity="6.159937255" />
    <parent link="torso" />
    <child link="upper_arm" />
    <origin rpy="0 0 0" xyz="0.0 -0.1 0.45" />
  </joint>

  <!--lower_arm-->
  <link name="lower_arm">
    <visual>
      <geometry>
        <cylinder length="0.4" radius="0.05" />
      </geometry>
      <material name="white" />
      <origin rpy="0 0 0" xyz="0 0 0.2" />
    </visual>
    <collision>
      <geometry>
        <cylinder length="0.4" radius="0.05" />
      </geometry>
      <origin rpy="0 0 0" xyz="0 0 0.2" />
    </collision>
    <inertial>
      <mass value="1.0" />
      <origin rpy="0 0 0" xyz="0 0 0.2" />
      <inertia ixx="0.01396" iyy="0.01396" izz="0.00125" ixy="0" ixz="0" iyz="0" />
    </inertial>
  </link>
  <joint name="elbow" type="revolute">
    <axis xyz="0 1 0" />
    <limit lower="-3.14" upper="3.14" effort="0.5293" velocity="6.159937255" />
    <parent link="upper_arm" />
    <child link="lower_arm" />
    <origin rpy="0 0 0" xyz="0.0 0.1 0.35" />
  </joint>

  <!--hand-->
  <link name="hand">
    <visual>
      <geometry>
        <cylinder length="0.15" radius="0.05" />
      </geometry>
      <material name="white" />
      <origin rpy="0 1.5708 0" xyz="0.0 0.0 0.0" />
    </visual>
    <collision>
      <geometry>
        <cylinder length="0.15" radius="0.05" />
      </geometry>
      <origin rpy="0 1.5708 0" xyz="0.0 0.0 0.0" />
    </collision>
    <inertial>
      <mass value="1.0" />
      <inertia ixx="0.00042" iyy="0.00042" izz="0.00042" ixy="0" ixz="0" iyz="0" />
    </inertial>
  </link>
  <joint name="wrist" type="revolute">
    <axis xyz="0 1 0" />
    <limit lower="-1.57" upper="1.57" effort="0.5293" velocity="6.159937255" />
    <parent link="lower_arm" />
    <child link="hand" />
    <origin rpy="0 0 0" xyz="0.0 0.0 0.425" />
  </joint>


  <!--tran0-->
  <transmission name="tran0">
    <type>transmission_interface/SimpleTransmission</type>
    <joint name="hip">
      <hardwareInterface>hardware_interface/PositionJointInterface</hardwareInterface>
    </joint>
    <actuator name="motor0">
      <hardwareInterface>PositionJointInterface</hardwareInterface>
      <mechanicalReduction>1</mechanicalReduction>
    </actuator>
  </transmission>

  <!--tran1-->
  <transmission name="tran1">
    <type>transmission_interface/SimpleTransmission</type>
    <joint name="shoulder">
      <hardwareInterface>hardware_interface/PositionJointInterface</hardwareInterface>
    </joint>
    <actuator name="motor1">
      <hardwareInterface>PositionJointInterface</hardwareInterface>
      <mechanicalReduction>1</mechanicalReduction>
    </actuator>
  </transmission>

  <!--tran2-->
  <transmission name="tran2">
    <type>transmission_interface/SimpleTransmission</type>
    <joint name="elbow">
      <hardwareInterface>hardware_interface/PositionJointInterface</hardwareInterface>
    </joint>
    <actuator name="motor2">
      <hardwareInterface>PositionJointInterface</hardwareInterface>
      <mechanicalReduction>1</mechanicalReduction>
    </actuator>
  </transmission>

  <!--tran3-->
  <transmission name="tran3">
    <type>transmission_interface/SimpleTransmission</type>
    <joint name="wrist">
      <hardwareInterface>hardware_interface/PositionJointInterface</hardwareInterface>
    </joint>
    <actuator name="motor3">
      <hardwareInterface>PositionJointInterface</hardwareInterface>
      <mechanicalReduction>1</mechanicalReduction>
    </actuator>
  </transmission>

  <!--ros_control plugin-->
  <gazebo>
    <plugin name="control" filename="libgazebo_ros_control.so" />
  </gazebo>

  <!--joint_state_publisher plugin-->
  <gazebo>
    <plugin name="joint_state_publisher" filename="libgazebo_ros_joint_state_publisher.so">
      <jointName>hip, shoulder, elbow, wrist</jointName>
    </plugin>
  </gazebo>

</robot>
以下のコマンドで表示確認できます。
$ roslaunch urdf_tutorial display.launch model:=mycobot_style.urdf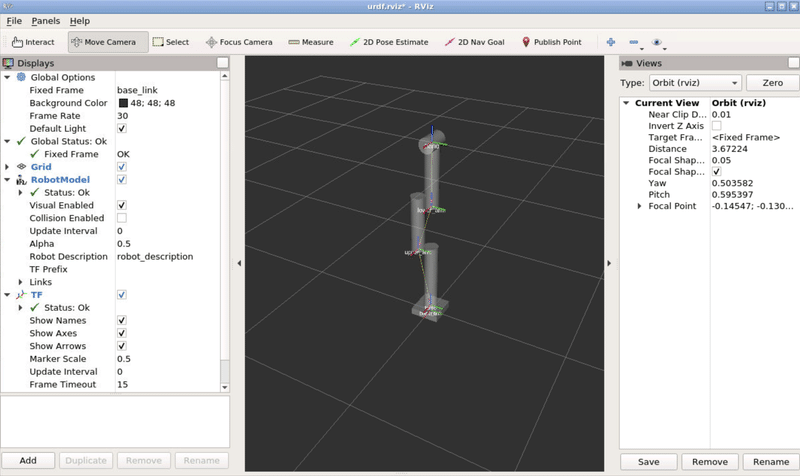
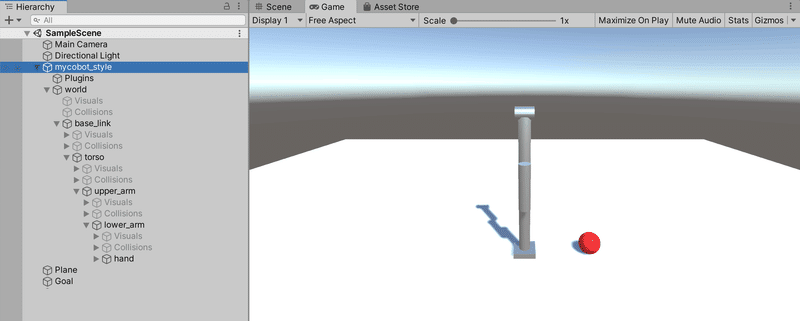
4. URDFのインポート
UnityのシーンにURDFモデルをインポートします。
(1) UnityのAssetsに「mycobot_style.urdf」を配置。
(2) Projectウィンドウで、「mycobot_style.urdf」を右クリックして、「Import Robot Select form URDF file」を選択。
(3) 「Import URDF」を押す。
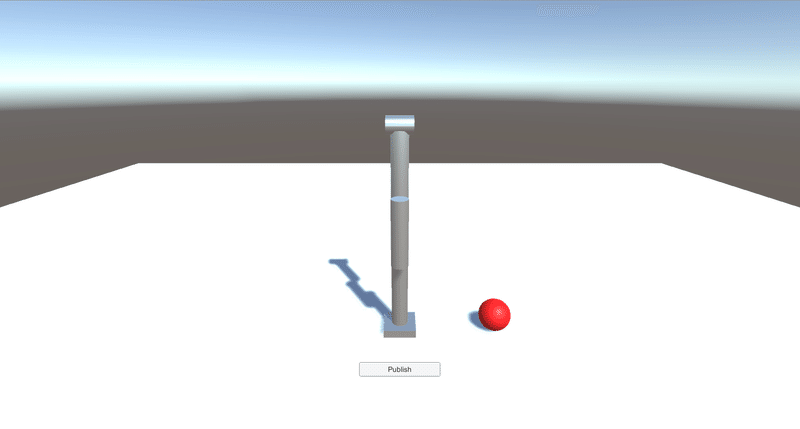
「mycobot_style」のモデルがインポートされます。
(4) Hierarchyウィンドウで「mycobot_style → world → base_link」を選択し、Inspectorウィンドの「ArticulationBody」で「Immovable」をチェック。
土台が固定されます。
(5) HierarchyウィンドウでPlaneで床を作成。
(6) HierarchyウィンドウでSphereを追加し、名前に「Goal」を指定し、赤Materialを指定。
5. キーボードでの操作
動作確認のため、キーボードで操作する手順は、次のとおりです。
(1) 「mycobot_style」を選択し、「Controller」を以下のように設定。
・Control : Position Control
・Stiffness : 10000
・Damping : 100
・Frce Limit : 1000
・Speed : 30
・Acceleration : 10
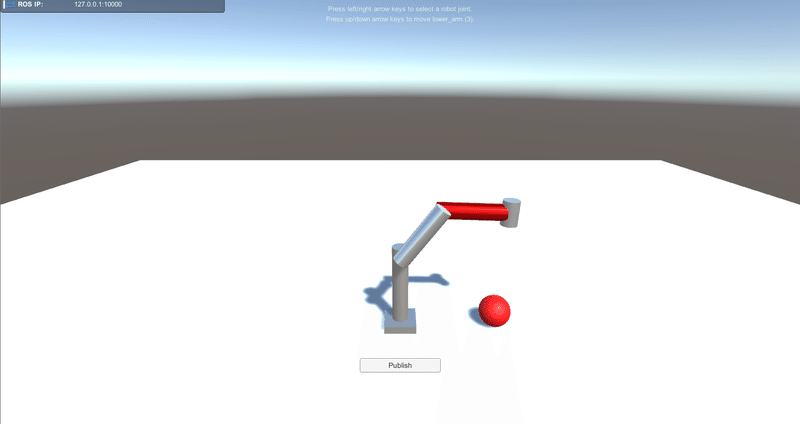
(2) Playボタンで実行。
左右キーで関節を選択し、上下キーで角度を変更できます。

6. ROS側のロボット情報のサブスクライバーの作成
ROS側のロボット情報のサブスクライバーの作成手順は、次のとおりです。
(1) 「robot_arm」パッケージを作成。
「std_msgs」「geometry_msgs」「moveit_msgs」のメッセージの依存関係を追加しています。
$ cd ~/colcon_ws/src
$ catkin_create_pkg robot_arm rospy std_msgs moveit_msgs geometry_msgs message_generation message_runtime
(2) 「CMakeList.txt」を以下のように編集。
・58行目あたり
add_message_files(
  FILES
  RobotArmMoveitJoints.msg
)
・82行目あたり
generate_messages(
  DEPENDENCIES
  geometry_msgs
  moveit_msgs
  std_msgs
)
(3) 「robot_arm」パッケージにmsgフォルダを作成し、以下のファイルを配置。
・RobotArmMoveitJoints.msg
パブリッシュするロボット情報です。
float64[4] joints
geometry_msgs/Pose goal_pose
(4) 「robot_arm」パッケージにsrcフォルダを作成し、以下のファイルを配置し、実行権限を付加(chmod u+x <filename>)。
・trajectory_subscriber.py
#!/usr/bin/env python
# coding: UTF-8
import rospy

from robot_arm.msg import RobotArmMoveitJoints


# サブスクライバーのコールバックの実装
def callback(data):

    # ログ出力
    rospy.loginfo(rospy.get_caller_id() + "I heard:\n%s", data)

# メイン
def main():
    # ノードの初期化
    rospy.init_node('Trajectory_Subscriber', anonymous=True)

    # サブスクライバーのコールバックの登録
    rospy.Subscriber("/robot_arm_joints", RobotArmMoveitJoints, callback)

    # ノード終了まで待機
    rospy.spin()


if __name__ == '__main__':
    main()
(5) 「robot_arm」パッケージにlaunchフォルダを作成し、以下のファイルを配置。
・subscriber.launch
<launch>
  <!--エンドポイントの起動-->
  <param name="ROS_IP" value="0.0.0.0" />
  <param name="ROS_TCP_PORT" value="10000" />
  <node name="server_endpoint" pkg="ros_tcp_endpoint" type="default_server_endpoint.py" args="--wait" output="screen" respawn="true" />

  <!--ロボット情報のサブスクライバーの実行-->
  <node name="trajectory_subscriber" pkg="robot_arm" type="trajectory_subscriber.py" args="--wait" output="screen" />
</launch>
(6) ワークスペースのビルドとセットアップ。
$ catkin build
$ source ~/catkin_ws/devel/setup.bash
7. Unity側のロボット情報のパブリッシャーの作成
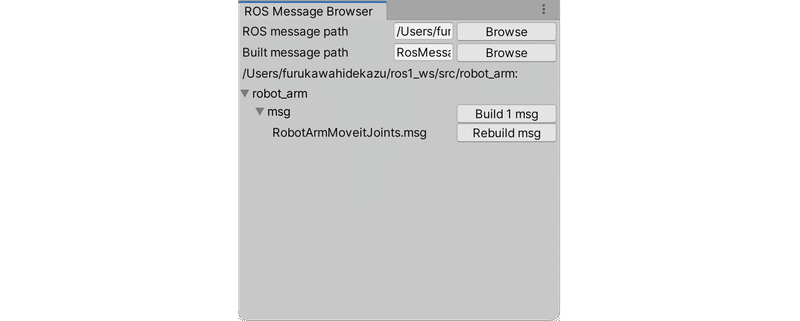
Unity側のロボット情報のパブリッシャーの作成手順は、次のとおりです。
(1) メニュー「Robotics → Generate ROS Messages」を開く。
(2) Browseでrobot_armパッケージを選択し、msg/RobotArmMoveitJoint.msgをBuild。
(3) Hierarchyウィンドウで「mycobot_style」を選択し、新規スクリプト「SourceDestinationPublisher.cs」を追加し、以下のように編集。
・SourceDestinationPublisher.cs
using System;
using RosMessageTypes.Geometry;
using RosMessageTypes.RobotArm;
using Unity.Robotics.ROSTCPConnector;
using Unity.Robotics.ROSTCPConnector.ROSGeometry;
using Unity.Robotics.UrdfImporter;
using UnityEngine;
// パブリッシャー
public class SourceDestinationPublisher : MonoBehaviour
{
// 定数
private static readonly string TopicName = "/robot_arm_joints";
private static readonly Quaternion PickOrientation = Quaternion.Euler(90, 90, 0);
// 変数
public UrdfJointRevolute[] jointArticulationBodies; // 関節
public GameObject goal; // ゴール
private ROSConnection rc; // ROSコネクション
// スタート
void Start()
{
// ROSコネクションの準備
this.rc = ROSConnection.GetOrCreateInstance();
// パブリッシャーの生成
this.rc.RegisterPublisher<RobotArmMoveitJointsMsg>(TopicName);
}
// パブリッシュ
public void Publish()
{
// メッセージの作成
var message = new RobotArmMoveitJointsMsg();
// 関節の角度の指定
for (var i = 0; i < jointArticulationBodies.Length; i++)
{
message.joints[i] = this.jointArticulationBodies[i].GetPosition();
}
// ゴール姿勢の指定
message.goal_pose = new PoseMsg
{
position = this.goal.transform.position.To<FLU>(),
orientation = Quaternion.Euler(90, this.goal.transform.eulerAngles.y, 0).To<FLU>()
};
// パブリッシュ
rc.Publish(TopicName, message);
}
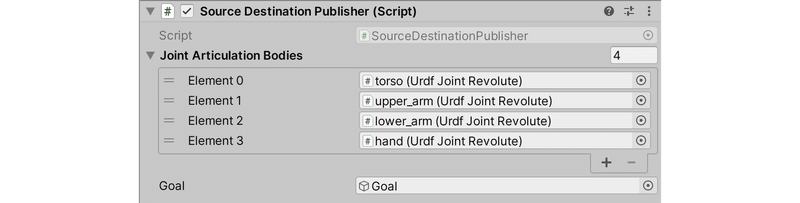
}(6) Hierarchyウィンドウで「mycobot_style」を選択し、Inspectorウィンドウの「SourceDestinationPublisher」を以下のように設定。
Hierarchyウィンドウから各オブジェクトをドラッグ&ドロップします。
・Joint Articulation Bodies :
・torso
・upper_arm
・lower_arm
・hand
・Goal : Goal
(7) HierarchyウィンドウでButtonを配置し、TextにPublishと指定し、ClickをSourceDestinationPublisher.Publish()に関連付ける。
8. 実行
(1) ROS側でlaunchファイルを実行。
$ roslaunch robot_arm subscriber.launch(2) Unity側でPlayボタンを実行し、Publishボタンを押す。
ROS側に、以下のようにサブスクライブしたロボット情報が表示されます。
[INFO] [1640208021.443080]: /trajectory_subscriberI heard:
joints: [3.4351294743828475e-05, 0.6337239146232605, -3.7889835713400544e-10, 7.094592274770051e-12, 0.0, 0.0]
goal_pose:
  position:
    x: 0.0
    y: -0.600000023842
    z: 0.10000000149
  orientation:
    x: 0.0
    y: -0.707106769085
    z: 0.0
    w: -0.707106769085
次回
この記事が気に入ったらサポートをしてみませんか?