
iOSアプリ開発 入門 (15) - HTTP通信

「URLSession」によるHTTP通信の手順をまとめました。
・iOS16
前回
1. HTTP通信
iOSでHTTP通信を行うには、「URLSession」を使います。
2. HTTP通信の有効化
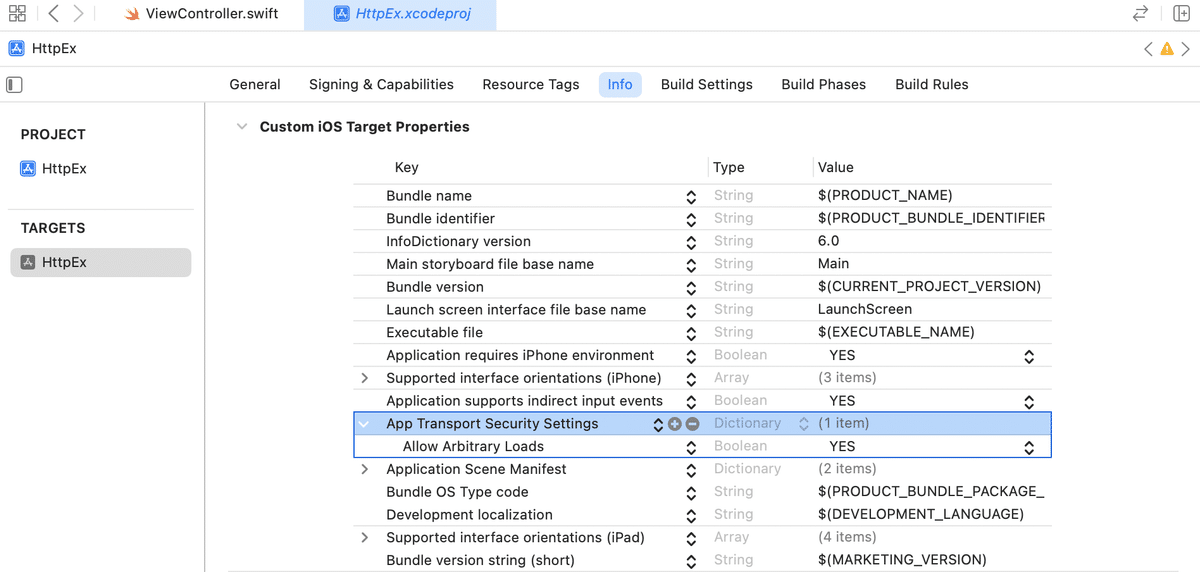
iOSではデフォルトで許可されてるのはhttps通信のみで、http通信は許可されていません。開発中はhttpと通信したいことも多いので、http通信の有効化を行います。
ターゲットのInfo (plist) の設定で、「App Transport Security Settings」(Dictionary)を追加し、その要素として「Allow Arbitary Loads」(BOOL)の「 YES」を追加します。
3. アプリの実装
HTTP通信を行うアプリの実装手順は、次のとおりです。
(1) 「ViewController.swift」を以下のように編集。
<PCのローカルIP>は、サーバを実行しているPCのローカルIPに書き換えてください。
import UIKit

class ViewController: UIViewController {

    // ロード時に呼ばれる
    override func viewDidLoad() {
        super.viewDidLoad()

        self.testGet("http://<PCのローカルIP>:8000/test_get")
        self.testPost("http://<PCのローカルIP>:8000/test_post")
    }

    // GETのテスト
    func testGet(_ url: String) {
        let request = URLRequest(url: URL(string: url)!)
        let task = URLSession.shared.dataTask(with: request) {
            (data, response, error) in
            // エラー時
            if let error = error {
                print("error: \(String(describing: error))")
            }
            // 成功時
            else if let data = data {
                do{
                    let jsonData = try JSONSerialization.jsonObject(with: data, options: JSONSerialization.ReadingOptions.allowFragments)
                    print("data:", jsonData)
                } catch {
                    print(error)
                }
            }
        }
        task.resume()
    }

    // POSTのテスト
    func testPost(_ url: String) {
        var request = URLRequest(url: URL(string: url)!)
        request.httpMethod = "POST"
        let task = URLSession.shared.dataTask(with: request) {
            (data, response, error) in
            // エラー時
            if let error = error {
                print("error: \(String(describing: error))")
            }
            // 成功時
            else if let data = data {
                do{
                    let jsonData = try JSONSerialization.jsonObject(with: data, options: JSONSerialization.ReadingOptions.allowFragments)
                    print("data:", jsonData)
                } catch {
                    print(error)
                }
            }
        }
        task.resume()
    }
}
4. サーバの準備
FastAPIでGETとPOSTを行うサーバーを用意します。
(1) 「main.py」を以下のように編集。
・main.py
from fastapi import FastAPI

app = FastAPI()


@app.get("/")
async def root():
    return {"message": "Hello World!"}


@app.get("/test_get/")
async def test_get():
    return {"message": "get success"}


@app.post("/test_post/")
async def test_post():
    return {"message": "post success"}
(2) 「--host 0.0.0.0」付きでサーバを起動。
ローカルネットワーク内で「http://<PCのローカルIP>:8080/」でアクセスできるようになります。
$ uvicorn main:app --host 0.0.0.0 --reload5. 実行
iOSアプリを実行すると、XcodeのコンソールにHTTP通信の結果が表示されます。
data: {
    message = "get success";
}
data: {
    message = "post success";
}
【おまけ】 ファイルのアップロード
「multipart/form-data」によるファイルのアップロードの手順は、次のとおりです。
(1) アプリの実装。
アセット画像「sample」を以下のパラメータでアップロードしています。
・name=my_file
・filename=sample.png
・contentType=image.png
import UIKit

class ViewController: UIViewController {

    override func viewDidLoad() {
        super.viewDidLoad()
        self.uploadFile("http://<PCのローカルIP>:8000/upload_file",
            image: UIImage(named: "sample")!)
    }

    func uploadFile(_ url: String, image: UIImage) {
        guard let imageData = image.jpegData(compressionQuality: 1) else { return }

        // ファイル情報
        let name = "my_file"
        let filename = "sample.png"
        let contentType = "image/png"

        // バウンダリの準備
        let boundary = "----------" + UUID().uuidString

        // HTTPボディの準備
        var httpBody1 = "--\(boundary)\r\n"
        httpBody1 += "Content-Disposition: form-data; name=\"\(name)\"; filename=\"\(filename)\"\r\n"
        httpBody1 += "Content-Type: \(contentType)\r\n"
        httpBody1 += "\r\n"
        var httpBody = Data()
        httpBody.append(httpBody1.data(using: .utf8)!)
        httpBody.append(imageData)
        var httpBody2 = "\r\n"
        httpBody2 += "--\(boundary)--\r\n"
        httpBody.append(httpBody2.data(using: .utf8)!)

        // リクエストの実行
        var request = URLRequest(url: URL(string: url)!)
        request.httpMethod = "POST"
        request.setValue("multipart/form-data; boundary=\(boundary)", forHTTPHeaderField: "Content-Type")
        request.setValue("\(httpBody.count)", forHTTPHeaderField: "Content-Length")
        request.httpBody = httpBody
        URLSession.shared.dataTask(with: request) {
            (data, response, error) in
            // エラー時
            if let error = error {
                print("error: \(String(describing: error))")
            }
            // 成功時
            else if let data = data {
                do{
                    let jsonData = try JSONSerialization.jsonObject(with: data, options: JSONSerialization.ReadingOptions.allowFragments)
                    print("data:", jsonData)
                } catch {
                    print(error)
                }
            }
        }.resume()
    }
}
(2) サーバの準備
以下の「画像アップロード」で作成したサーバに画像をアップロードできます。