
React Native のコンポーネントの使い方

「React Native」のコンポーネントの使い方をまとめました。
前回
1. 関数コンポーネント
「関数コンポーネント」は、JavaScriptの関数として定義するコンポーネントです。ステートやライフサイクルメソッドを使用するためにはReactのフックを利用します。
親コンポーネントからのパラメータは、propsで受け取ります。
import React from 'react';
import { View, Text } from 'react-native';

// アプリ
function App(): React.JSX.Element {
  return (
    <View>
      <Hello name="World" />
    </View>
  );
}

// Helloのプロパティ
interface HelloProps {
  name: string;
}

// Hello
function Hello(props: HelloProps) {
  return (
    <Text>Hello, {props.name}!</Text>
  );
}

export default App;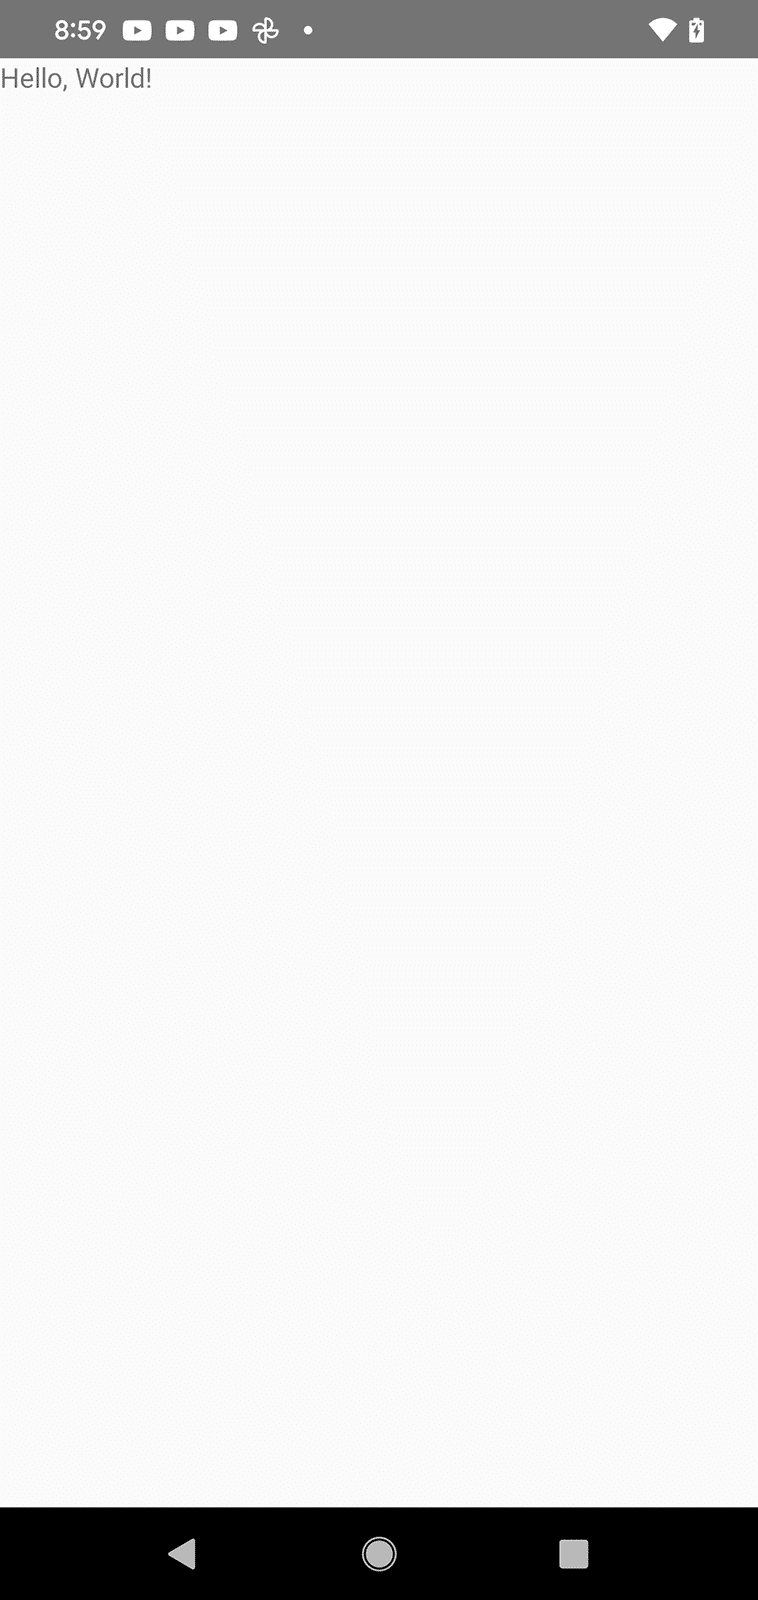
主なフックは、次のとおりです。
◎ 基本のフック
・useState : 状態のフック
・useEffect : ライフサイクルに基づいた副作用のフック
・useContext : コンテキストを利用するためのフック
◎ 追加のフック
・useReducer : より複雑な状態のフック
・useCallback : 関数生成の実行回数を抑えるフック
・useMemo : 値生成の実行回数を抑えるフック
・useRef : Domなどのオブジェクトの参照を保持するフック
・useImperativeHandle : 親コンポーネントに渡す参照を加工するフック
・useLayoutEffect : DOMの変更後に実行される副作用のフック
・useDebugValue : デバッグ情報を提供するフック
・useDeferredValue : 遅延された値を返すフック
・useTransition : 非同期の状態更新をトランジションとしてマークし、パフォーマンスを最適化
・useId : ユニークIDを生成するためのフック
◎ ライブラリのフック
・useSyncExternalStore : 外部のストアと同期するためのフック
・useInsertionEffect : スタイルやその他の副作用をDOMに挿入するためのフック
2. スタイルシート
センタリングとフォント指定を行います。
import React from 'react';
import { View, Text, StyleSheet, Platform } from 'react-native';

// アプリ
function App(): React.JSX.Element {
  return (
    <View style={styles.container}>
      <Hello name="World" />
    </View>
  );
}

// Helloのプロパティ
interface HelloProps {
  name: string;
}

// Hello
function Hello(props: HelloProps) {
  return (
    <Text style={styles.text}>Hello, {props.name}!</Text>
  );
}

// スタイルシート
const styles = StyleSheet.create({
  container: {
    flex: 1,
    backgroundColor: '#fff',
    alignItems: "center",
    justifyContent: "center",
  },
  text: {
    fontFamily: Platform.select({
      ios: "Hiragino Mincho ProN",
      android: "serif"
    }),
    fontSize: 32,
  }
});

export default App;
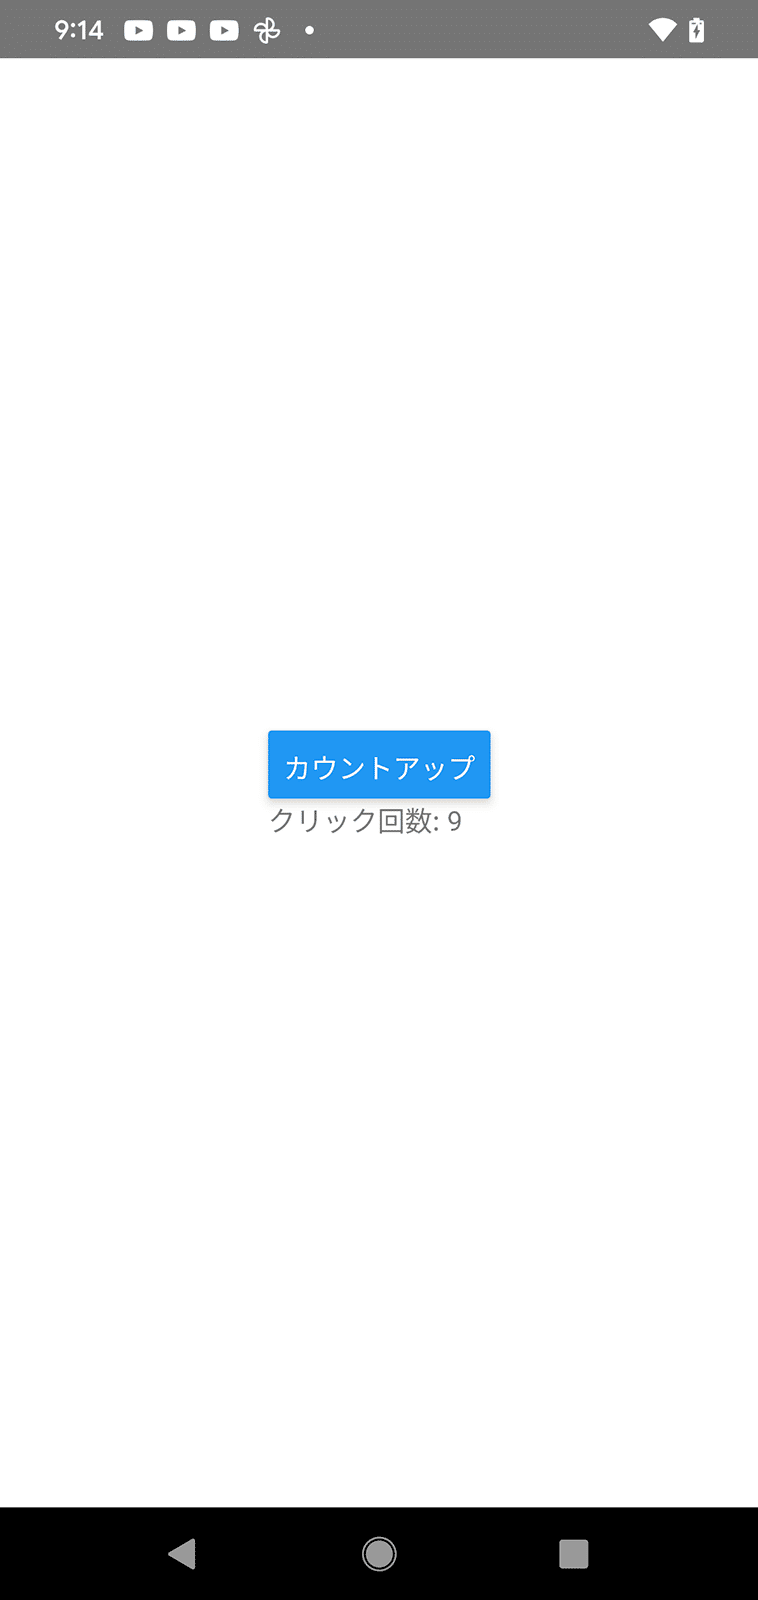
3. 状態管理
stateで状態管理します。
import React, { useState } from 'react';
import { View, Text, StyleSheet, Button } from 'react-native';

// アプリ
function App(): React.JSX.Element {
  return (
    <View style={styles.container}>
      <Counter />
    </View>
  );
}

// カウンター
const Counter = () => {
  const [count, setCount] = useState(0);

  return (
    <View>
      <Button title="カウントアップ" onPress={() => setCount(count + 1)} />
      <Text>クリック回数: {count}</Text>
    </View>
  );
}

// スタイルシート
const styles = StyleSheet.create({
  container: {
    flex: 1,
    backgroundColor: '#fff',
    alignItems: "center",
    justifyContent: "center",
  },
});

export default App;
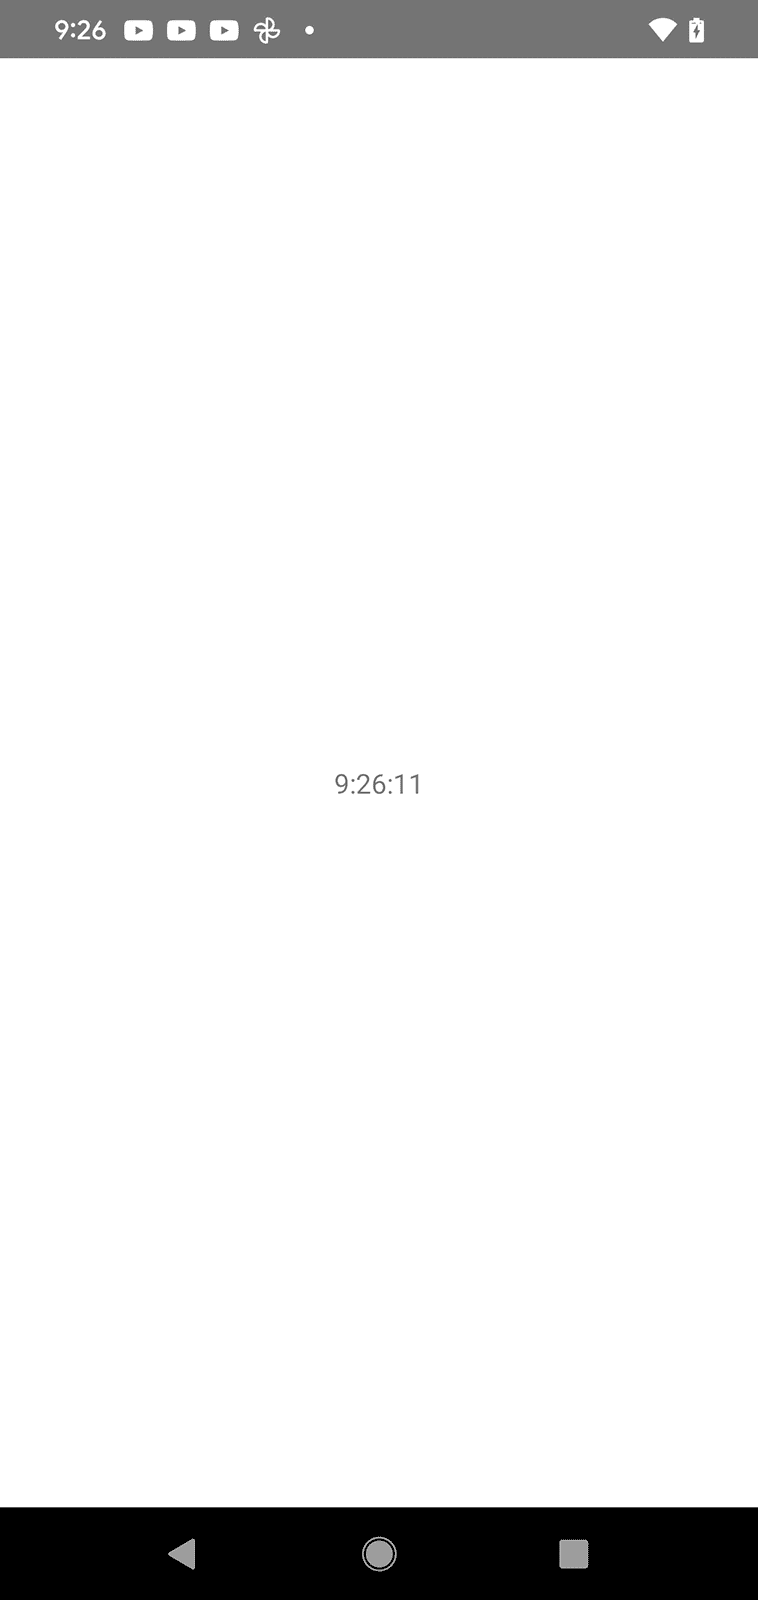
4. クラスコンポーネント
「クラスコンポーネント」は、JavaScriptのクラスとして定義されるコンポーネントです。ステートはthis.stateで管理され、ライフサイクルメソッドを持ちます。
主なライフサイクルは、次のとおりです。
・constructor() : コンポーネントのインスタンス生成時
・componentDidMount() : コンポーネントのマウント時
・componentDidUpdate() : コンポーネントの更新時時
・componentWillUnmount() : コンポーネントのアンマウント時
・render() : レンダリング時
import React, { Component, useState } from 'react';
import { View, Text, StyleSheet, Button } from 'react-native';

// アプリ
function App(): React.JSX.Element {
  return (
    <View style={styles.container}>
      <Clock />
    </View>
  );
}

// Clockのデータ型
interface ClockState {
  currentTime: string;
}

// Clock
class Clock extends Component<{}, ClockState> {
  timerID: NodeJS.Timeout | undefined;

  // インスタンス生成時にstate初期化
  constructor(props: any) {
    super(props);
    this.state = {
      currentTime: new Date().toLocaleTimeString()
    };
  }

  // マウント時にタイマー生成
  componentDidMount() {
    this.timerID = setInterval(
      () => this.tick(),
      1000
    );
  }

  // アンマウント時にタイマー解除
  componentWillUnmount() {
    clearInterval(this.timerID);
  }

  // 定期処理
  tick() {
    this.setState({
      currentTime: new Date().toLocaleTimeString()
    });
  }

  // レンダリング
  render() {
    return (
      <View style={styles.container}>
        <Text>{this.state.currentTime}</Text>
      </View>
    );
  }
}

// スタイルシート
const styles = StyleSheet.create({
  container: {
    flex: 1,
    backgroundColor: '#fff',
    alignItems: "center",
    justifyContent: "center",
  },
});

export default App;
5. スタックによる画面遷移
(1) パッケージのインストール。
・@react-navigation/native : React Navigationのコアパッケージ
・@react-navigation/native-stack : スタックナビゲーション
・react-native-screens : パフォーマンスの最適化
・react-native-safe-area-context : Safe Areaの管理
$ npm install @react-navigation/native @react-navigation/native-stack
$ npm install react-native-screens react-native-safe-area-context
cocoapadの再セットアップ、アプリの再インストールも必要。
(2) コードの編集。
import React from 'react';
import { Text, View, Button} from 'react-native';
import { NavigationContainer, RouteProp } from '@react-navigation/native';
import { createNativeStackNavigator, NativeStackNavigationProp } from '@react-navigation/native-stack';

// スタックのパラメータ
type RootStackParamList = {
  Home: undefined;
  Detail: { name: string };
};

//スタック
const Stack = createNativeStackNavigator<RootStackParamList>();

// アプリ
function App(): React.JSX.Element {
  return (
    <NavigationContainer>
      <Stack.Navigator>
        <Stack.Screen name="Home" component={HomeScreen} />
        <Stack.Screen name="Detail" component={DetailScreen} />
      </Stack.Navigator>
    </NavigationContainer>
  );
}

// ホーム画面のプロパティ
type HomeScreenProps = {
  navigation: NativeStackNavigationProp<RootStackParamList, 'Home'>;
};

// ホーム画面
const HomeScreen: React.FC<HomeScreenProps>  = ({navigation}) => {
  return (
    <View>
      <Text>ホーム画面</Text>
      <Button
        title="画面遷移"
        onPress={() =>
          navigation.navigate('Detail', {name: 'Hello!'})
        }
      />
    </View>
  );
};

// 詳細画面のプロパティ
type DetailScreenProps = {
  route: RouteProp<RootStackParamList, 'Detail'>;
  navigation: NativeStackNavigationProp<RootStackParamList, 'Detail'>;
};

// 詳細画面
const DetailScreen: React.FC<DetailScreenProps> = ({route}) => {
  return (
    <View>
      <Text>詳細画面</Text>
      <Text>{route.params.name}</Text>
    </View>
  );
};

export default App;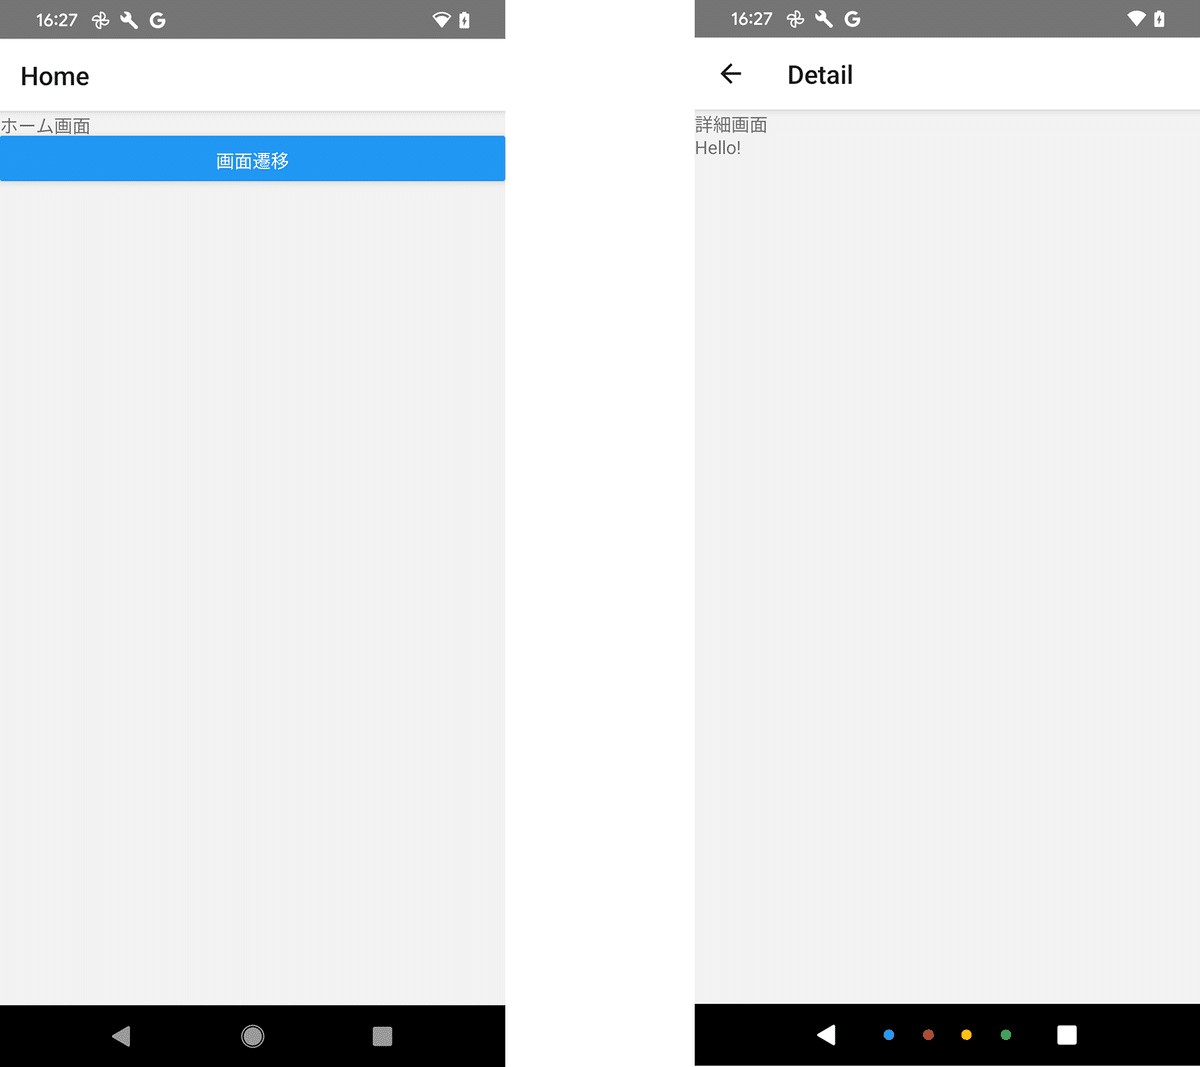
6. タブによる画面遷移
(1) パッケージのインストール。
・@react-navigation/native : React Navigationのコアパッケージ
・@react-navigation/bottom-tabs : タブ
・react-native-screens : パフォーマンスの最適化
・react-native-safe-area-context : Safe Areaの管理
$ npm install @react-navigation/native @react-navigation/bottom-tabs
$ npm install react-native-screens react-native-safe-area-context
cocoapadの再セットアップ、アプリの再インストールも必要。
(2) コードの編集。
import * as React from 'react';
import { View, Text } from 'react-native';
import { NavigationContainer } from '@react-navigation/native';
import { createBottomTabNavigator, BottomTabScreenProps } from '@react-navigation/bottom-tabs';

// タブのパラメータ
type RootTabParamList = {
  Home: undefined;
  Detail: undefined;
};

// タブ
const Tab = createBottomTabNavigator<RootTabParamList>();

// アプリ
const App = (): React.JSX.Element => {
  return (
    <NavigationContainer>
      <Tab.Navigator>
        <Tab.Screen name="Home" component={HomeScreen} />
        <Tab.Screen name="Detail" component={DetailScreen} />
      </Tab.Navigator>
    </NavigationContainer>
  );
};

// ホーム画面のプロパティ
type HomeScreenProps = BottomTabScreenProps<RootTabParamList, 'Home'>;

// ホーム画面
const HomeScreen: React.FC<HomeScreenProps> = ({ navigation }) => {
  return (
    <View>
      <Text>ホーム画面</Text>
    </View>
  );
};

// 詳細画面のプロパティ
type DetailScreenProps = BottomTabScreenProps<RootTabParamList, 'Detail'>;

const DetailScreen: React.FC<DetailScreenProps> = ({ navigation }) => {
  return (
    <View>
      <Text>詳細画面</Text>
    </View>
  );
};

export default App;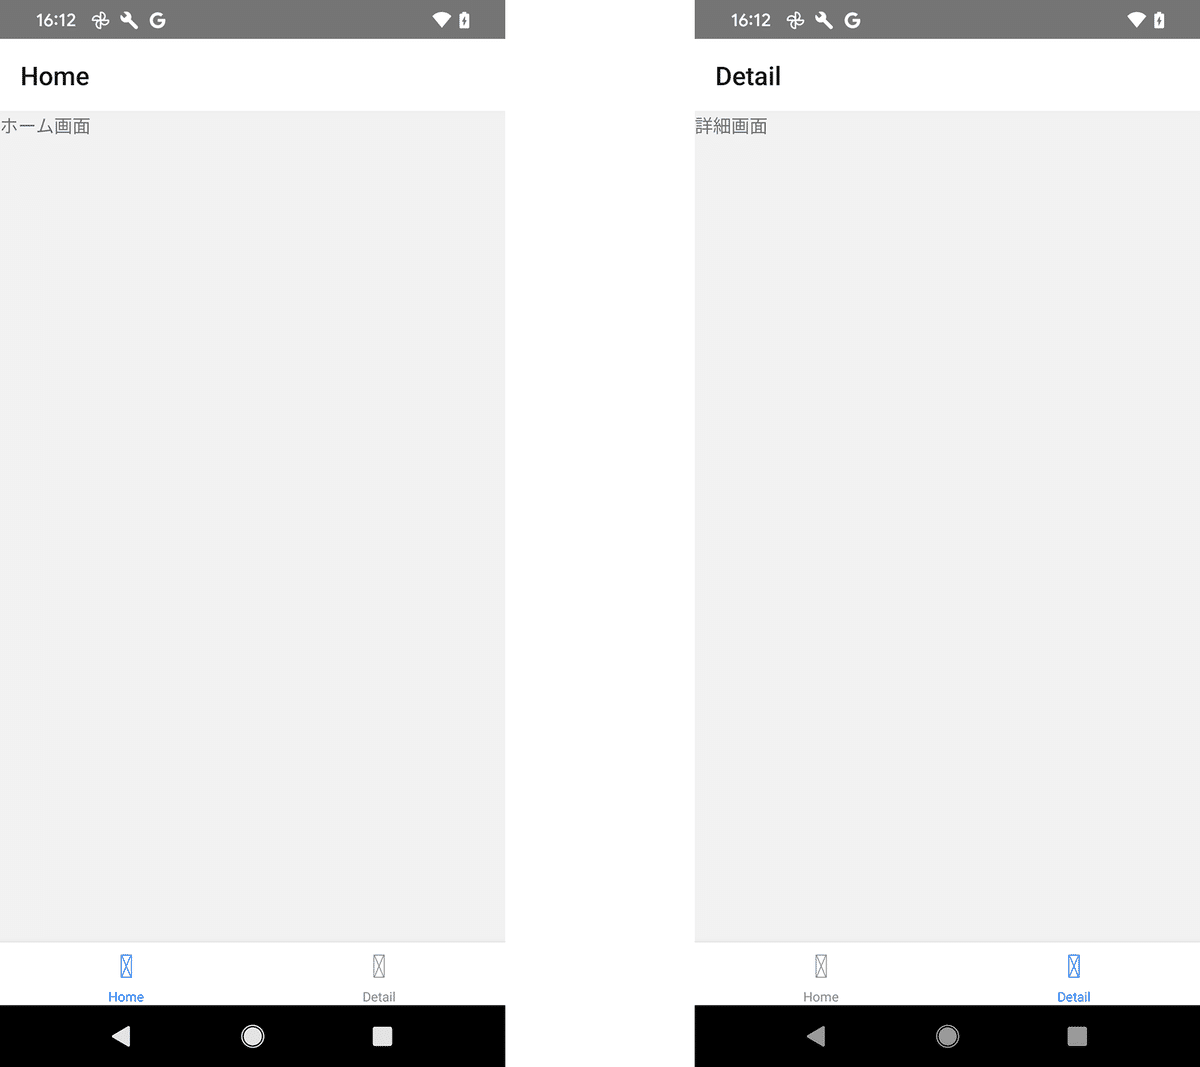
7. ローカルストレージへのデータ保存
(1) パッケージのインストール。
・@react-native-async-storage/async-storage : ローカルストレージへのデータ保存
$ npm install @react-native-async-storage/async-storagecocoapadの再セットアップ、アプリの再インストールも必要。
(2) コードの編集。
import React, { useState, useEffect } from 'react';
import { View, TextInput, Button, StyleSheet } from 'react-native';
import AsyncStorage from '@react-native-async-storage/async-storage';

// アプリ
const App = () => {
  const [text, setText] = useState('');

  // アプリ起動時に呼ばれる
  useEffect(() => {
    // テキスト読み込み関数
    const loadText = async () => {
      try {
        const value = await AsyncStorage.getItem('@saved_text');
        if (value !== null) {
          setText(value);
        }
      } catch (error) {
        console.error('Failed to load text.', error);
      }
    };

    // テキスト読み込み
    loadText();
  }, []);

  // テキスト保存
  const saveText = async () => {
    try {
      await AsyncStorage.setItem('@saved_text', text);
      alert('保存しました。');
    } catch (error) {
      console.error('Failed to save text.', error);
    }
  };

  return (
    <View style={styles.container}>
      <TextInput
        style={styles.textInput}
        placeholder="テキストを入力"
        value={text}
        onChangeText={setText}
      />
      <Button title="保存" onPress={saveText} />
    </View>
  );
};

// スタイルシート
const styles = StyleSheet.create({
  container: {
    flex: 1,
    justifyContent: 'center',
    paddingHorizontal: 20,
  },
  textInput: {
    height: 40,
    borderColor: 'gray',
    borderWidth: 1,
    marginBottom: 20,
    paddingHorizontal: 10,
  },
});

export default App;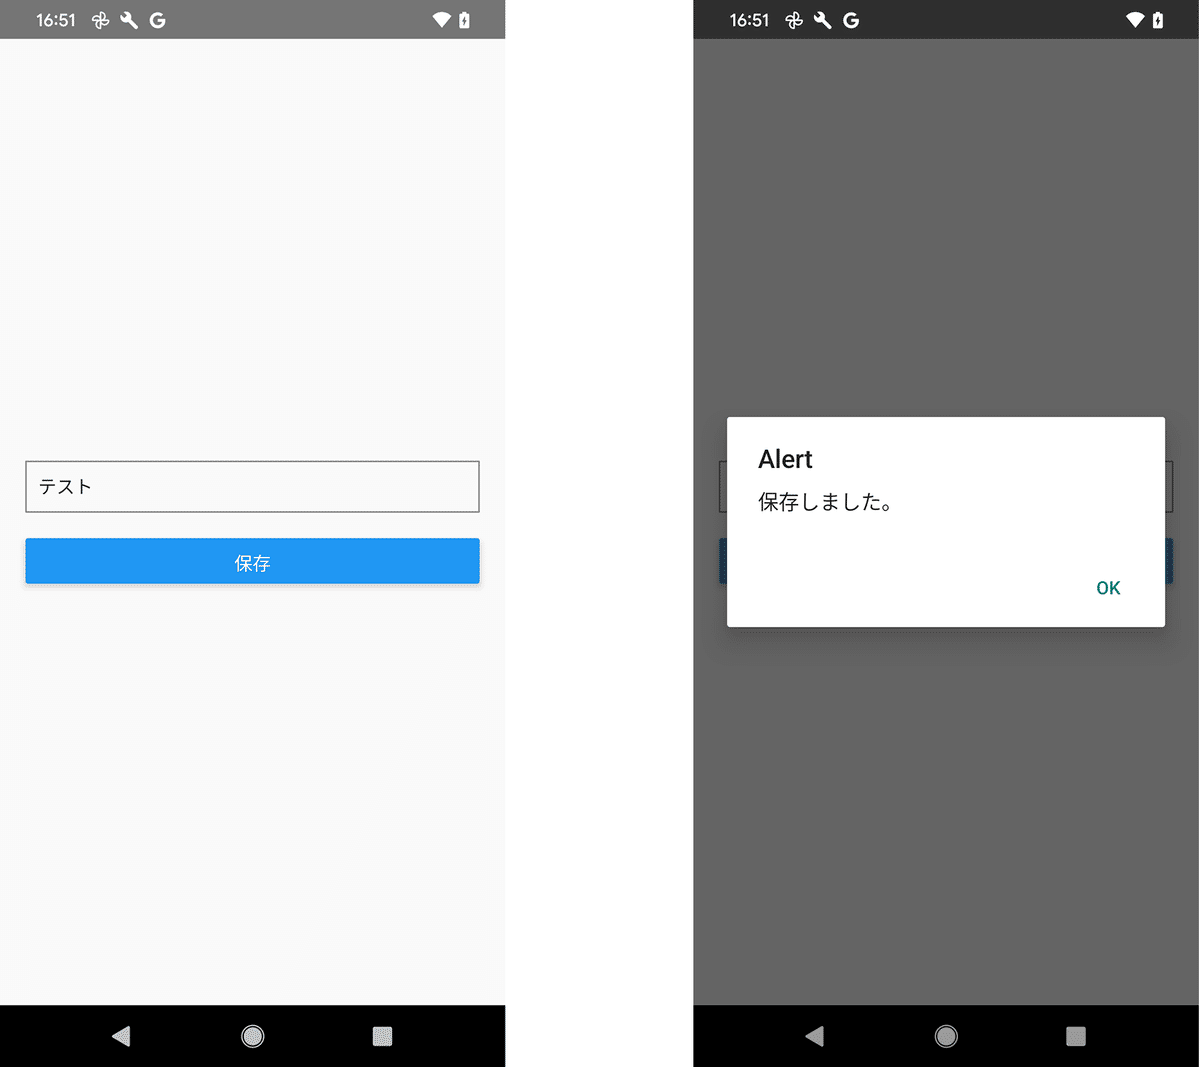
8. ダークモード・ライトモード
useColorSchemeは、Appearance モジュールからのダークモード・ライトモードの更新を提供およびサブスクライブします。
・light : ライトモード
・dark : ダークモード
・null : テーマ指定なし
(1) コードの編集。
import React from 'react';
import {Text, StyleSheet, useColorScheme, View} from 'react-native';

// アプリ
const App = () => {
  const colorScheme = useColorScheme();
  return (
    <View style={styles.container}>
      <Text>useColorScheme(): {colorScheme}</Text>
    </View>
  );
};

// スタイルシート
const styles = StyleSheet.create({
  container: {
    flex: 1,
    alignItems: 'center',
    justifyContent: 'center',
  },
});

export default App;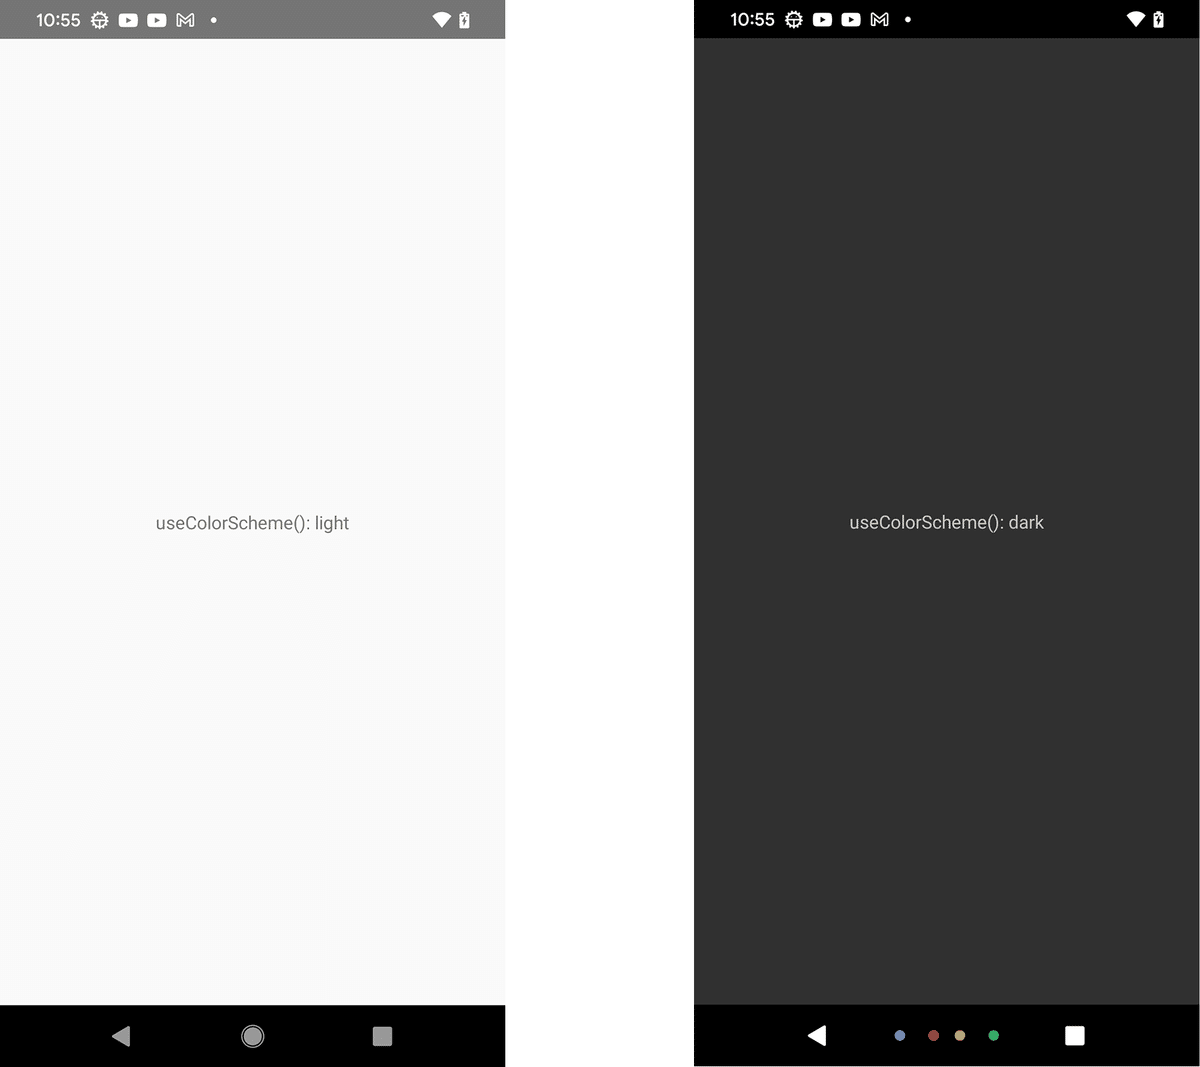
完全な例はAppearanceExample.jsを参照。
9. 多言語対応
(1) パッケージのインストール。
$ npm install react-i18next i18next react-native-localize(2) 翻訳ファイルの準備。
・locales/en.json
{
  "welcome": "Welcome",
  "description": "This is a React Native app"
}
・locales/ja.json
{
  "welcome": "ようこそ",
  "description": "これはReact Nativeアプリです"
}
(3) i18nextの設定の準備
・i18n.ts
import i18n from 'i18next';
import {initReactI18next} from 'react-i18next';
import {getLocales} from 'react-native-localize';

import EN from './locales/en.json';
import JA from './locales/ja.json';

i18n.use(initReactI18next).init({
  resources: {
    en: {translation: EN},
    ja: {translation: JA},
  },
  lng: getLocales()[0].languageCode,
  fallbackLng: ['en', 'ja'],
  interpolation: {
    escapeValue: false,
  },
  compatibilityJSON: 'v3',
});

export default i18n;
(4) コードの編集。
import React from 'react';
import {Text, View} from 'react-native';
import './i18n';
import { useTranslation } from 'react-i18next';

// アプリ
const App = () => {
  const { t } = useTranslation();

  return (
    <View>
      <Text>{t('welcome')}</Text>
      <Text>{t('description')}</Text>
    </View>
  );
};

export default App;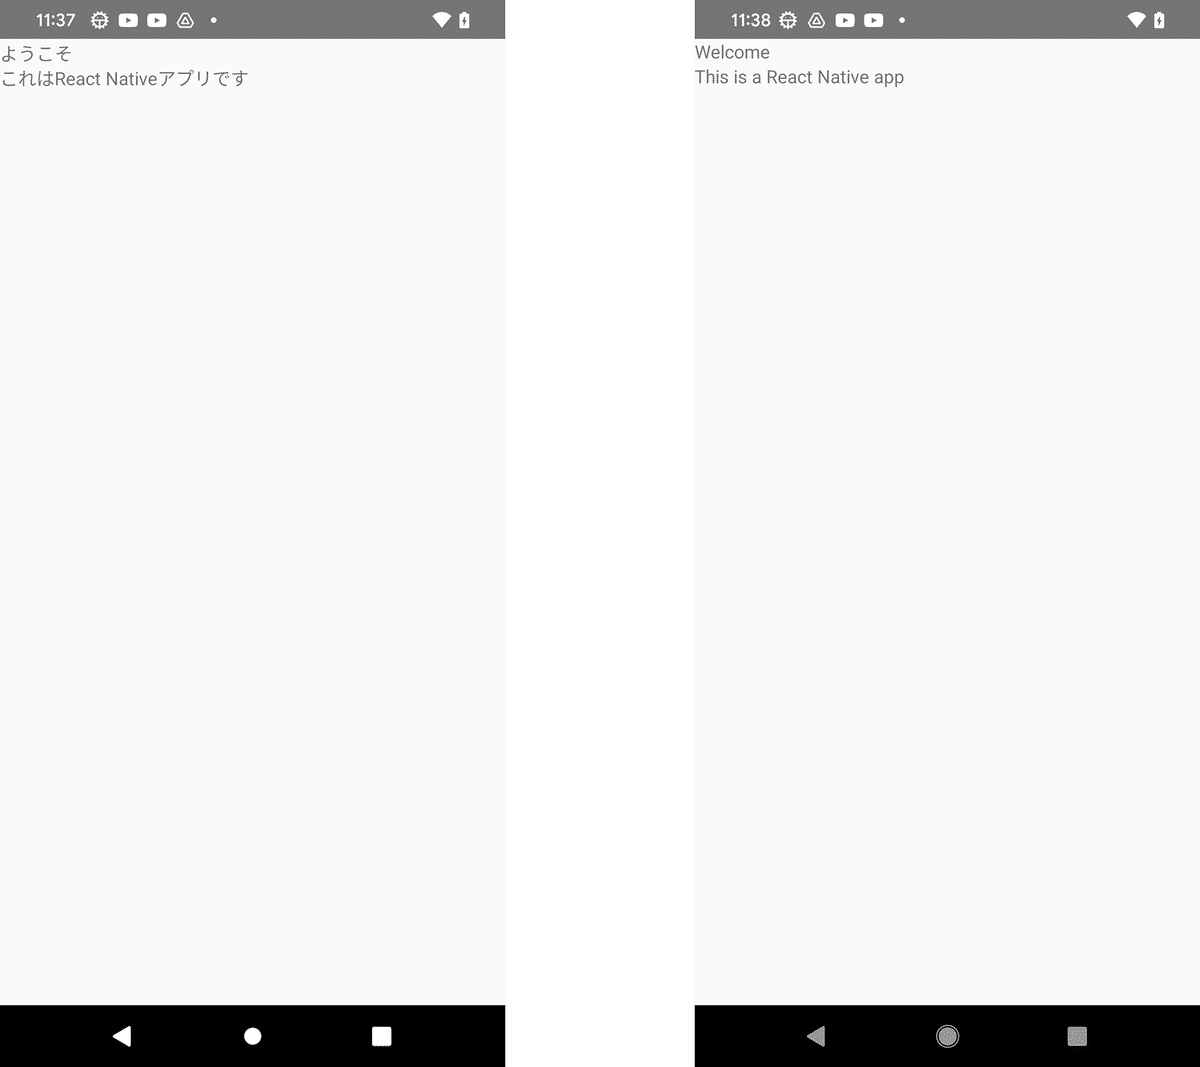
次回
この記事が気に入ったらサポートをしてみませんか?