gRPCとProtocol Buffersによるアプリケーション間通信 / Unity

「gRPC」でアプリケーション間通信を行い、別アプリからテキストと画像を取得するスクリプトを作ります。
1. 開発ツールのインストール
Macで「Protocol Buffers」のコンパイラをインストールするコマンドは、次の通りです。
$ brew install protobuf2. Grpc.Toolsとgrpc_unity_package
「Grpc.Tools」は、protoファイルのコンパイルに利用するファイル群です。
「grpc_unity_package」は、UnityのAssetsに追加するファイル群です。
取得手順は次の通りです。
(1)ブラウザで以下のサイトを開く。
・gRPC Packages
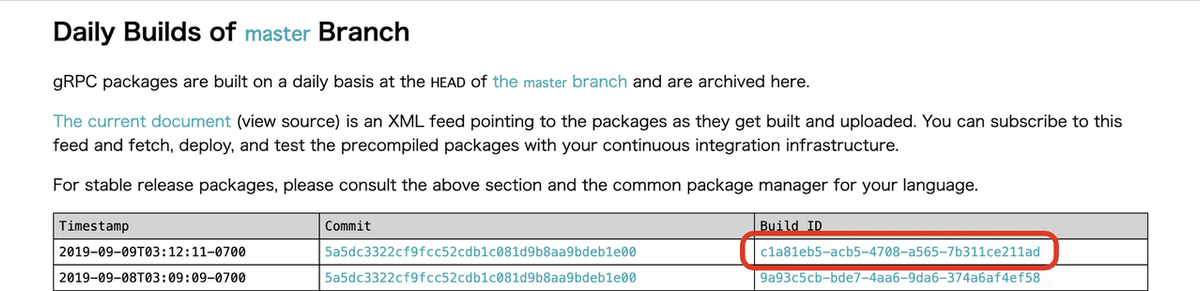
(2)Daily Builds of master Branchの最新のBuild IDのリンクをクリック。
(3)C#の「Grpc.Tools」と「grpc_unity_package」をダウンロード。
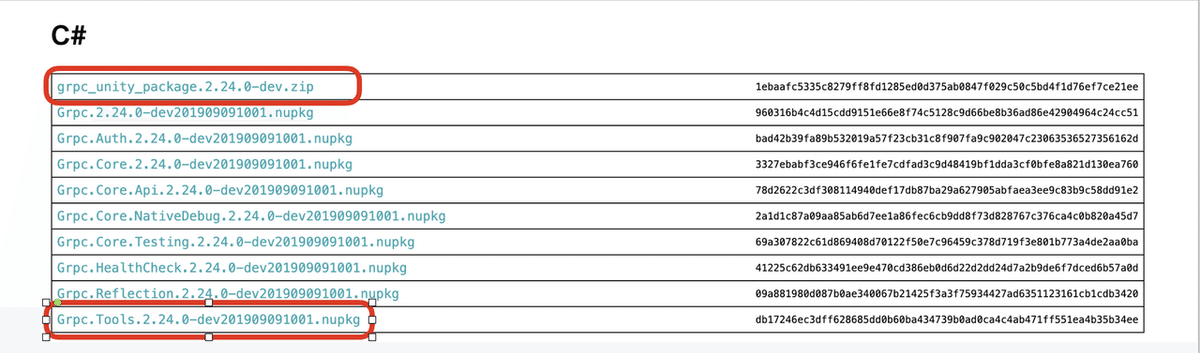
(4)「Grpc.Tools」の拡張子「nupkg」を「zip」に変更して解凍し、親フォルダ名(「Grpc.Tools.2.24.0-dev201909091001」など)をGrop.Toolsに変更。
(5)「grpc_unity_package」を解凍し、「Pluginsフォルダ」をUnityの「Assetsフォルダ」に配置。
(6)Unityのメニュー「File → Build Settings → Player Settings → Other Settings」で「Api Compatibility Level」を「.Net 4.x」に指定。
3. 最新のGoogle.Protobuf.dllの上書き
これで設定完了...といきたいところですが、2019年9月現在「grpc_unity_package」内の「Google.Protobuf.dll」が古いので、C#のビルド時に以下のようなエラーがでます。そこで、新しいもので上書きします。
Assets/Chat.cs(35,17): error CS1729: 'GeneratedClrTypeInfo' does not contain a constructor that takes 7 arguments(1)以下のサイトを開き、Download packageをクリックし、「google.protobuf.3.9.1.nupkg」をダウンロード
・NuGet Gallery | Google.Protobuf 3.9.1
(2)拡張子「nupkg」を「zip」に変更して解凍。
(3)「google.protobuf.3.9.1/lib/net45/Google.Protobuf.dll」を「Plugins/Google.Protobuf/lib/net45/Google.Protobuf.dll」に上書き。
4. protoファイルの生成
構造化データを定義する「protoファイル」を生成します。前回との違いは「csharp_namespace」になります。
【simple.proto】
syntax = "proto3";

option csharp_namespace = "Simple.Grpc";

package simple;

//リクエスト
message SimpleRequest{
}

//レスポンス
message SimpleResponse{
  string text = 1;
  string image = 2;
}

//RPCインタフェースの定義
service SimpleService{
  rpc SimpleSend (SimpleRequest) returns (SimpleResponse) {}
}
5. protoファイルのコンパイル
protoファイルのコンパイルは「protoc」を使います。「--plugin=protoc-gen-grpc=」には、先ほどダウンロードした「Grop.Toolsのフォルダ」のパスを指定します。
$ protoc -I . --csharp_out=. --grpc_out=. simple.proto --plugin=protoc-gen-grpc=Grpc.Tools/tools/macosx_x64/grpc_csharp_plugin以下の2つのファイルが生成されます。UnityのAssetsに配置します。
・Simple.cs : シリアライズのインタフェース
・SimpleGrpc.cs : gRPCのインタフェース
6. サーバーの実装
サーバーを実装します。Assets/StreamingAssetsに「image.jpg」を配置します。
【SimpleServer.cs】
using System.Threading.Tasks;
using UnityEngine;
using Grpc.Core;
using Simple.Grpc;
using System;
using System.Text;

//シンプルサーバー
public class SimpleServer : MonoBehaviour {
    //シンプルサービスサーバーの定義
    class SimpleServiceImpl : SimpleService.SimpleServiceBase {
        //チャット送信の処理
        public override Task<SimpleResponse> SimpleSend(
            SimpleRequest request, ServerCallContext context) {
            var text = "This is TEST!";
            var bytes = System.IO.File.ReadAllBytes(
                Application.streamingAssetsPath + "/" + "image.jpg");
            string b64 = Convert.ToBase64String(bytes);
            return Task.FromResult(new SimpleResponse {Text = text, Image = b64});
        }
    }

    //スタート時に呼ばれる
    void Start() {
        //サーバーの開始
        Server server = new Server {
            Services = {SimpleService.BindService(new SimpleServiceImpl())},
            Ports = {new ServerPort("localhost", 50051, ServerCredentials.Insecure)}
        };
        server.Start();
        print("サーバーの開始");
    }
}
7. クライアントの実装
クライアントを実装します。
【SimpleClient.cs】
using UnityEngine;
using Grpc.Core;
using Simple.Grpc;
using System;
using System.Text;
using System.IO;

//シンプルクライアント
public class SimpleClient : MonoBehaviour {
    //スタート時に呼ばれる
    void Start() {
        //サーバーとの接続
        Channel channel = new Channel("localhost:50051", ChannelCredentials.Insecure);
        SimpleService.SimpleServiceClient client = new SimpleService.SimpleServiceClient(channel);
        var response = client.SimpleSend(new SimpleRequest());
        print("text: " + response.Text);
        byte[] im_bytes = Convert.FromBase64String (response.Image);
        File.WriteAllBytes(Application.dataPath + "/../client.jpg", im_bytes);
    }
}
8. サーバーとクライアントの実行
Unityアプリ同士だけでなく、前回作ったPythonスクリプトとも連携できます。
9. Macのアプリとしてビルドして実行
Macのアプリとしてビルドして実行すると、以下のようなエラーが発生しました。「grpc_csharp_ext」が見つからないようです。
System.DllNotFoundException: grpc_csharp_ext「パッケージの内容を表示」で確認すると、以下にありました。
・Contents
    ・Plugins
        ・x64
            ・grpc_csharp_ext.bundle
        ・x86
            ・grpc_csharp_ext.bundle
試しに、x64の「grpc_csharp_ext.bundle」をPlugins直下に置いたところ、見つけられたようで、正常に動きました。
・Contents
    ・Plugins
        ・grpc_csharp_ext.bundle
この記事が気に入ったらサポートをしてみませんか?