
Qt 6 QML 和訳文書 P115~P144

Advanced Techniques
Performance of QML
QML and Javascript are interpreted languages. This means that they do not have to be processed by a compiler before being executed. Instead, they are being run inside an execution engine. However, as interpretation is a costly operation, various techniques are used to improve performance. The QML engine uses just-in-time (JIT) compilation to improve performance. It also caches the intermediate output to avoid having to recompile. This works seamlessly for you as a developer. The only trace of this is that files ending with qmlc and jsc can be found next to the source files. If you want to avoid the initial start-up penalty induced by the initial parsing you can also pre-compile your QML and Javascript. This requires you to put your code into a Qt resource file, and is described in detail in the Compiling QML Ahead of Time (https://doc.qt.io/qt-6/qtquickdeployment.html#ahead-of-time-compilation) chapter in the Qt documentation.
QMLのパフォーマンス
QMLとJavascriptはインタープリタ言語です。これは実行する前にコンパイルする必要はないということを意味します。その代わり、実行エンジンの中で実行されています。けれども、解釈はコストがかかる作業なので、いろいろなテクニックがパフォーマンス向上のために利用されています。QMLエンジンはjust-in-timeコンパイルをパフォーマンス改善のために利用しています。再度コンパイルすることを避けるために、中間の出力結果をキャッシュします。これは開発者としてのあなたのために間断なくうごきます。この唯一の足跡は、qmlcとjscで終わるファイルがソースファイルの中で見つかる事です。もしあなたが最初の追跡によって引きおこされる最初のスタートアップの痛みを避けたいのであれば、QMLとJavaScriptをプリコンパイルすることもできます。これはあなたにQtのリソースファイルの中へコードを置くことを要求し、詳細はCompiling QML Ahead of Timeで記述されます。(https://doc.qt.io/qt-6/qtquickdeployment.html#ahead-of-time-compilation)
Qtドキュメンテーション内の章です。
Fluid Elements
Until now, we have mostly looked at some simple graphical elements and how to arrange and manipulate them. This chapter is about how to make these changes more interesting by animating them. Animations are one of the key foundations for modern, slick user interfaces, and can be employed in your user interface via states, transitions and animations. Each state defines a set of property changes and can be combined with animations on state changes. These changes are described as a transition from one state to another state. Besides animations being used during transitions, they can also be used as standalone elements triggered by some scripted events.
今まで、私たちはほとんど単純なグラフィカル図形要素をみてきましたし、それらを整理し、操作する方法を見てきました。この章はそれらをアニメ―とをすることによって、より面白く変化させる方法についてのものになります。アニメーションは現代の、なめらかなユーザーインターフェースのための、主要な基盤の一つであり、あなたのユーザーインターフェースに、状態、遷移そしてアニメーションを通して採用できます。それぞれの状態はプロパティの変化のセットで、状態変化でアニメーションと結びつきます。これらの変化はある状態から別の状態への遷移として記述されます。さらに遷移中に利用されているアニメーションのほかに、それらはいくつかの記述されたイベントによって引き起こされるスタンドアロンな要素として利用することもできます。
Animations
Animations are applied to property changes. An animation defines the interpolation curve from one value to another value when a property value changes. These animation curves create smooth transitions from one value to another. An animation is defined by a series of target properties to be animated, an easing curve for the interpolation curve, and a duration. All animations in Qt Quick are controlled by the same timer and are therefore synchronized. This improves the performance and visual quality of animations.
アニメーションはプロパティの変化に応じます。アニメーションはある値から別の値へと、プロパティの値が変化するときの補間曲線を定義します。これらのアニメーションはある値から別の値へ滑らかな遷移を作ります。あるアニメーションはアニメートされる一連のターゲットプロパティ、補間曲線のためにはイージングカーブ(徐行曲線)、そして持続時間により定義されます。Qt Quick内の全てのアニメーションは同じタイマーによって管理され、それゆえ同時進行します。これはアニメーションのパフォーマンスと見た目の質を改善します。
Animations control how properties change using value interpolation
This is a fundamental concept. QML is based on elements, properties, and scripting. Every element provides dozens of properties, each property is waiting to get animated by you. In the book, you will see this is a spectacular playing field. You will catch yourself looking at some animations and just admiring their beauty, and your creative genius, too. Please remember then: animations control property changes and every element has dozens of properties at your disposal.
Unlock the power!
アニメーションはプロパティが補間値を使ってどのように変化するのかを管理する
これは基本的なコンセプトです。QMLは要素、プロパティ、そして記述に基づいています。全ての要素は数十のプロパティを提供し、それぞれのプロパティはあなたにアニメートされるのを待っています。本の中では、これが壮観な競技場であるということがわかります。あなたはいくつかのアニメーションを見て、それらの美しさとあなたの創造的な天才も賞賛していることに気付くでしょう。それから思い出してください。アニメーションはプロパティの変化を管理するものであり、全ての要素には、あなたの自由になる数十のプロパティがあるということを。
力を解放せよ!
// AnimationExample.qml
import QtQuick
Image {
id: root
source: "assets/background.png"
property int padding: 40
property int duration: 4000
property bool running: false
Image {
id: box
x: root.padding;
y: (root.height-height)/2
source: "assets/box_green.png"
NumberAnimation on x {
to: root.width - box.width - root.padding
duration: root.duration
running: root.running
}
RotationAnimation on rotation {
to: 360
duration: root.duration
running: root.running
}
}
MouseArea {
anchors.fill: parent
onClicked: root.running = true
}
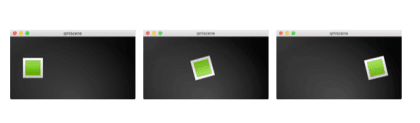
}The example above shows a simple animation applied on the x and rotation properties. Each animation has a duration of 4000 milliseconds (msec). The animation on x moves the x-coordinate from the object gradually over to 240px. The animation on rotation runs from the current angle to 360 degrees. Both animations run in parallel and are started when the MouseArea is clicked. You can play around with the animation by changing the to and duration properties, or you could add another animation (for example, on the opacity or even the scale ). Combining these it could look like the object is disappearing into deep space. Try it out!
上の例はxとrotationプロパティで適用される単純なアニメーションを表示します。それぞれのアニメーションは4000ミリセカンドの存続期間を持ちます。x 上のアニメーションは、x 座標をオブジェクトから 240px まで徐々に移動します。回転時のアニメーションは、現在の角度から 360 度まで実行されます。両方のアニメーションは並行して実行され、MouseArea がクリックされたときに開始されます。
Animation Elements
There are several types of animation elements, each optimized for a specific use case. Here is a list of the most prominent animations:
いくつかのタイプのアニメーション要素があり、それぞれは特別なユースケースのために最適化されます。こちらは最も前途有望なアニメーションのリストです。
PropertyAnimation - Animates changes in property values
プロパティの値で変化をアニメ―トします。
NumberAnimation - Animates changes in qreal-type values
qreal型の値の変化をアニメ―とします。
ColorAnimation - Animates changes in color values
color型の値の変化をアニメ―とします。
RotationAnimation - Animates changes in rotation values
回転の値の変化をアニメ―トします。
Besides these basic and widely used animation elements, Qt Quick also provides more specialized animations for specific use cases:
これらの基礎そして広く利用されたアニメーション要素以外にも、Qt Quickはより多くの特別なアニメーションを、特別なユースケースの場合に提供もします。
PauseAnimation - Provides a pause for an animation
アニメーションのためにポーズを提供します。
SequentialAnimation - Allows animations to be run sequentially
アニメーションをシーケンシャルに実行するようにします。
ParallelAnimation - Allows animations to be run in parallel
アニメーションを並行に実行するようにします。
AnchorAnimation - Animates changes in anchor values
アンカー値で変化をアニメ―トします。
ParentAnimation - Animates changes in parent values
親の値で変化をアニメ―トします。
SmoothedAnimation - Allows a property to smoothly track a value
プロパティが値を滑らかに追跡するようにします。
SpringAnimation - Allows a property to track a value in a spring-like motion
プロパティが噴水のような動きで値を追跡するようにします。
PathAnimation - Animates an item alongside a path
パスを添えてアイテムをアニメ―トします。
Vector3dAnimation - Animates changes in QVector3d values
Later we will learn how to create a sequence of animations.
アニメーションのシーケンスの作り方を学びます。
While working on more complex animations, there is sometimes a need to change a property or to run a script during an ongoing animation. For this Qt Quick offers the action elements, which can be used everywhere where the other animation elements can be used:
PropertyAction - Specifies immediate property changes during animation ScriptAction - Defines scripts to be run during an animation
The major animation types will be discussed in this chapter using small, focused examples.
より複雑なアニメーションで動かすために、時々プロパティを変化させたり、実行中のアニメーションの途中でスクリプトを走らせたりする必要があります。この ためにQt Quickはaction要素を提供し、それは他のアニメーション要素を使うことができる場所であればどこでも利用できます。
プロパティアクション-アニメーション中の即時のプロパティ変化を特定します。
スクリプトアクション-アニメーション中に走らせるスクリプトを定義します。
主なアニメーション型は小さな、焦点を絞った例を使ってこの章で論じられます。
Applying Animations
Animation can be applied in several ways:
Animation on property - runs automatically after the element is fully loaded
Behavior on property - runs automatically when the property value changes Standalone Animation - runs when the animation is explicitly started using start() or running is set to true (e.g. by a property binding)
Later we will also see how animations can be used inside state transitions.
アニメーションはいくつかの方法で適用できます。
プロパティ上のアニメーションー完全に読み込まれた後で自動的に実行
プロパティ上の動作ープロパティが変更するときに自動的に実行
スタンドアロンアニメーションーstart()あるいはrunninigがtrueにセットされて、明示的にアニメーションが始まるときに実行
アニメーションが状態遷移のなかでどのように使うことができるのかも後でわかります。
Clickable Image V2
To demonstrate the usage of animations we reuse our ClickableImage component from an earlier chapter and extended it with a text element.
アニメーションの使用を実際に示すため、最初の方の章からClickableImageコンポーネントを再利用し、text elementでそれを拡張します。
// ClickableImageV2.qml
// Simple image which can be clicked
import QtQuick
Item {
    id: root
    width: container.childrenRect.width
    height: container.childrenRect.height
    property alias text: label.text
    property alias source: image.source
    signal clicked
    Column {
        id: container
        Image {
        id: image
        }
        Text {
         id: label
         width: image.width
         horizontalAlignment: Text.AlignHCenter
         wrapMode: Text.WordWrap
         color: "#ececec"
        }
    }
    MouseArea {
        anchors.fill: parent
        onClicked: root.clicked()
    }
}
To organize the element below the image we used a Column positioner and calculated the width and height based on the column’s childrenRect property. We exposed text and image source properties, and a clicked signal. We also wanted the text to be as wide as the image, and for it to wrap. We achieve the latter by using the Text element's wrapMode property.
イメージの下にある要素を編成するために、Columnポジショナを使いました。そしてカラムのchildrenRectプロパティを元に幅と高さを計算しました。私たちはテキストとイメージのソースプロパティを示し、そしてクリックシグナルを示しました。また、てきすとがイメージと同じくらいの幅であってほしいので、それをラップしました。私たちはText elementのwrapModeプロパティを使うことで後者を達成します。
Parent/child geometry dependency
Due to the inversion of the geometry-dependency (parent geometry depends on child geometry), we can’t set a width / height on the ClickableImageV2, as this will break our width / height binding. You should prefer the child’s geometry to depend on the parent’s geometry if the item is more like a container for other items and should adapt to the parent's geometry.
ジオメトリ逆依存のため(親ジオメトリは子ジオメトリに依存している)私たちは、ClickableImageV2上で幅と高さを設定することができません。これがwidthとheightの連結を壊します。もしアイテムが他のアイテムのためのコンテナのようであり、親のアイテムのジオメトリに適合させるべきであるならば、子のジオメトリを親のジオメトリへ依存させるようにした方がよいです。
The objects ascending

The three objects are all at the same y-position ( y=200 ). They all need to travel to y=40 , each of them using a different method with different sideeffects and features.
First object
The first object travels using the Animation on strategy. The animation starts immediately.
最初のオブジェクトは戦略上アニメーションを使って往復運動をします。アニメーションは即座に始まります。
ClickableImageV2 {
   id: greenBox
   x: 40; y: root.height-height
   source: "assets/box_green.png"
   text: qsTr("animation on property")
   NumberAnimation on y {
       to: 40; duration: 4000
   }
}
When an object is clicked, its y-position is reset to the start position, and this applies to all of the objects. On the first object, the reset does not have any effect as long as the animation is running. This can be visually disturbing, as the y-position is set to a new value for a fraction of a second before the animation starts. Such competing property changes should be avoided.
オブジェクトがクリックされると、yの位置は最初の位置へ再セットされ、そしてこれはそのオブジェクトのすべてに適用されます。最初のオブジェクトでは、その再設定はアニメーションが実行している限り効果を全く持ちません。アニメーションが開始されるほんの一瞬前、y 位置が新しい値に設定されるため、これは視覚的に邪魔になる可能性があります。このような競合するプロパティの変更は避ける必要があります。
Second object
The second object travels using a Behavior on animation. This behavior tells the property it should animate each change in value. The behavior can be disabled by setting enabled: false on the Behavior element.
第2のオブジェクトはアニメーション上でBehaviorを利用して動きます。このbehaviorはプロパティに値でそれぞれの変化をアニメートするべきであると伝えます。behaviorはBehavior要素上で、enabled: falseをセットすることによって無効化できます。
ClickableImageV2 {
    id: blueBox
    x: (root.width-width)/2; y: root.height-height
    source: "assets/box_blue.png"
    text: qsTr("behavior on property")
Behavior on y {
    NumberAnimation { duration: 4000 }
    }
    onClicked: y = 40
// random y on each click
// onClicked: y = 40 + Math.random() * (205-40)
}
The object will start traveling when you click it (its y-position is then set to 40). Another click has no influence, as the position is already set. You could try to use a random value (e.g. 40 + (Math.random() \* (205- 40) ) for the y-position. You will see that the object will always animate to the new position and adapt its speed to match the 4 seconds to the destination defined by the duration of the animation.
オブジェクトはクリックするときにトラベルをスタートします。(そのyの位置が40にセットされています。)別のクリックは影響を持ちません。位置が既にセットされているからです。あなたはy位置のために、ランダム値を使用してみることもできます。(例えば、40+(Math.random()\*(205-40))。
あなたはオブジェクトが常に新しい位置にアニメートし、そのスピードが、アニメーションの持続時間によって定義された目的へ4秒に一致するようになっていることがわかるでしょう。
Third object
The third object uses a standalone animation. The animation is defined as its own element and can be almost anywhere in the document.
3番目のオブジェクトはスタンドアロンアニメーションを使います。アニメーションはそれ自体の要素として定義され、ドキュメント内のほとんどどこにでもいることができます。
ClickableImageV2 {
    id: redBox
    x: root.width-width-40; y: root.height-height
    source: "assets/box_red.png"
    onClicked: anim.start()
// onClicked: anim.restart()
    text: qsTr("standalone animation")
    NumberAnimation {
        id: anim
        target: redBox
        properties: "y"
        to: 40
        duration: 4000
    }
}
The click will start the animation using the animation's start() function. Each animation has start(), stop(), resume(), and restart() functions. The animation itself contains much more information than the other animation types earlier. We need to define the target , which is the element to be animated, along with the names of the properties that we want to animate. We also need to define a to value, and, in this case, a from value, which allows a restart of the animation.
クリックはアニメーションのstart()関数を使ってアニメーションをスタートさせます。それぞれのアニメーションは、start(),stop(),resume()そしてrestart()関数を持ちます。アニメーション自体は、前に見た他のアニメーション型よりもずっと多くの情報を持ちます。私たちがアニメートしたいプロパティの名前にそって、私たちはアニメートされるべき要素である、ターゲットを定義する必要があります。私たちは私たちは一つのto値を定める必要があり、この場合は、一つのfrom値ですが、アニメーションのリスタートをすることができます。

A click on the background will reset all objects to their initial position. The first object cannot be restarted except by re-starting the program which triggers the re-loading of the element.
背景上のクリックが全てのオブジェクトをそれらの初期値へ再設定します。最初のオブジェクトは要素の再読み込みを引き起こすプログラムを再スタートすることによる以外では、再スタートすることができません。
Other ways to control Animations
Another way to start/stop an animation is to bind a property to the running property of an animation. This is especially useful when the user-input is in control of properties:
NumberAnimation {
// [...]
// animation runs when mouse is pressed
running: area.pressed
}
MouseArea {
id: area
}
アニメーションを管理する他の方法
アニメーションをスタートあるいはストップさせる他の方法は、アニメーションの実行プロパティへのプロパティをバインドすることです。これは特にユーザー入力がプロパティの管理にある場合に便利です。
Easing Curves
(徐行曲線?)
The value change of a property can be controlled by an animation. Easing attributes allow influencing the interpolation curve of a property change. All animations we have defined by now use a linear interpolation because the initial easing type of an animation is Easing.Linear . It’s best visualized with a small plot, where the y-axis is the property to be animated and the x-axis is the time (duration). A linear interpolation would draw a straight line from the from value at the start of the animation to the to value at the end of the animation. So the easing type defines the curve of change. Easing types should be carefully chosen to support a natural fit for a moving object. For example, when a page slides out, the page should initially slide out slowly and then gain momentum to finally slide out at high speed, similar to turning the page of a book.
アニメーションによってプロパティの値の変化を管理することができます。徐行アトリビュートはプロパティの補間曲線に影響を与えます。今まで私たちが定義した全てのアニメーションは線形補間を使っています。なぜならば、アニメーションの最初の徐行型が、Easing.Linearだからです。小さなプロットで最も良く表示されていて、y軸はアニメートされるプロパティであり、x軸は持続時間です。線形補間はアニメーションのスタートのfrom値から真っ直ぐな線を描き、アニメーションの終わりであるto値へ描きます。だから徐行型は変化の曲線を定義します。徐行型は動いているオブジェクトに対して自然な一致をさぽーとするために慎重に選ばれるべきです。例えば、本のページをめくることに似ていて、ページがスライドされるとき、ページは最初ゆっくりとスライドし、段々テンポを増していき、最後には素早くスライドします。
Animations should not be overused.
As with other aspects of UI design, animations should be designed carefully to support the UI flow, not dominate it. The eye is very sensitive to moving objects and animations can easily distract the user.
UIデザインの他の側面と同様に、アニメーションはUIフローをサポートするために慎重にデザインされるべきであり、それを支配するようにデザインしないようにしてください。目は動くものをとても敏感にとらえ、アニメーションは簡単にユーザーから注意を逸らすことができます。
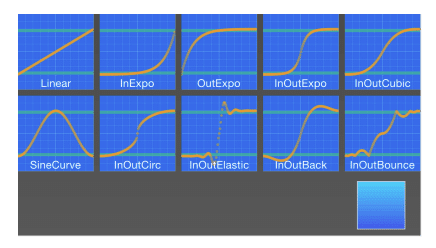
The code for this example was made a little bit more complicated. We first create a grid of EasingTypes and a Box which is controlled by the easing types. An easing type just displays the curve which the box shall use for its animation. When the user clicks on an easing curve the box moves in a direction according to the easing curve. The animation itself is a standalone animation with the target set to the box and configured for xproperty animation with a duration of 2 seconds
この例のためのコードはちょっとだけ今までよりも複雑に作られています。私たちは最初に徐行型のグリッドを作り、徐行型によって管理されるBoxを作ります。徐行型はボックスがそのアニメーションのために使う曲線を表示するだけです。ユーザーがボックスが徐行カーブに従ってある方向に動
TIP
The internals of the EasingType renders the curve in real time, and the interested reader can look it up in the EasingCurves example.
EasingTypeの内部は現実の時間でカーブを表示し、興味のある読者は徐行曲線エグザンプルを見ることができます。
// EasingCurves.qml
import QtQuick
import QtQuick.Layouts
Rectangle {
     id: root
     width: childrenRect.width
     height: childrenRect.height
     color: '#4a4a4a'
     gradient: Gradient {
     GradientStop { position: 0.0; color: root.color }
     GradientStop { position: 1.0; color: Qt.lighter(root.co
     }
     ColumnLayout {
         Grid {
              spacing: 8
              columns: 5
              EasingType {
              easingType: Easing.Linear
              title: 'Linear'
         onClicked: {
              animation.easing.type = easingType
              box.toggle = !box.toggle
         }
     }
     EasingType {
              easingType: Easing.InExpo
              title: "InExpo"
              onClicked: {
                      animation.easing.type = easingType
                      box.toggle = !box.toggle
              }
      }
      EasingType {
               easingType: Easing.OutExpo
               title: "OutExpo"
               onClicked: {
                      animation.easing.type = easingType
                      box.toggle = !box.toggle
               }
      }
      EasingType {
               easingType: Easing.InOutExpo
               title: "InOutExpo"
               onClicked: {
                      animation.easing.type = easingType
                      box.toggle = !box.toggle
                }
      }
      EasingType {
               easingType: Easing.InOutCubic
               title: "InOutCubic"
               onClicked: {
                      animation.easing.type = easingType
                      box.toggle = !box.toggle
                 }
         }
      EasingType {
                easingType: Easing.SineCurve
                title: "SineCurve"
                onClicked: {
                animation.easing.type = easingType
                box.toggle = !box.toggle
                }
         }
       EasingType {
                easingType: Easing.InOutCirc
                title: "InOutCirc"
                onClicked: {
                animation.easing.type = easingType
                box.toggle = !box.toggle
                }
            }
       EasingType {
                 easingType: Easing.InOutElastic
                 title: "InOutElastic"
                 onClicked: {
                      animation.easing.type = easingType
                       box.toggle = !box.toggle
                 }
       }
       EasingType {
                  easingType: Easing.InOutBack
                  title: "InOutBack"
                  onClicked: {
                  animation.easing.type = easingType
                  box.toggle = !box.toggle
                  }
        }
       EasingType {
                  easingType: Easing.InOutBounce
                  title: "InOutBounce"
                  onClicked: {
                      animation.easing.type = easingType
                      box.toggle = !box.toggle
                   }
                   }
       }
       Item {
                height: 80
                Layout.fillWidth: true
             Box {
                  id: box
                  property bool toggle
                  x: toggle ? 20 : root.width - width - 20
                  anchors.verticalCenter: parent.verticalCenter
                  gradient: Gradient {
                  GradientStop { position: 0.0; color: "#2ed5
                  GradientStop { position: 1.0; color: "#2467
                  }
                 Behavior on x {
                 NumberAnimation {
                 id: animation
                 duration: 500
                 }
             }
       }
    }
  }
}
Please play with the example and observe the change of speed during an animation. Some animations feel more natural for the object and some feel irritating.
Besides the duration and easing.type , you are able to fine-tune animations. For example, the general PropertyAnimation type (from which most animations inherit) additionally supports easing.amplitude , easing.overshoot , and easing.period properties, which allow you to fine-tune the behavior of particular easing curves. Not all easing curves support these parameters. Please consult the easing table (http://doc.qt.io/qt-6/qml-qtquick-propertyanimation.html#easingprop) from the PropertyAnimation documentation to check if an easing parameter has an influence on an easing curve.
エグザンプルをやってみてアニメーションの間のスピードの変化を観察してください。いくつかのアニメーションはオブジェクトにとって自然に感じます、そしていくつかはいらいらします。
持続時間と、曲線の型以外に、徐行曲線を調和させることができます。例えば、一般的なPropertyAnimationのタイプ(これからアニメーションが最も継承しています。)は追加的にeasing.amplitude, easing.overshoot, そしてeasing.periodプロパティをさぽーとし、特別な徐行曲線の振る舞いと調和できるようにします。徐行引数が徐行曲線に影響を与えるかどうかをチェックするPropertyAnimationドキュメンテーションから徐行テーブル (http://doc.qt.io/qt-6/qml-qtquick-propertyanimation.html#easingprop)に問い合わせてください。
Choose the right Animation
Choosing the right animation for the element in the user interface context is crucial for the outcome. Remember the animation shall support the UI flow; not irritate the user.
ユーザーインターフェーのコンテキスト内の要素に対する正しいアニメーションを選ぶことは結果に対して決定的です。アニメーションはUIのフローをサポートするもので、ユーザーをいらだたせるものではないことを覚えておいてください。
Grouped Animations
Often animations will be more complex than just animating one property. You might want to run several animations at the same time or one after another or even execute a script between two animations. For this, grouped animations can be used. As the name suggests, it’s possible to group animations. Grouping can be done in two ways: parallel or sequential. You can use the SequentialAnimation or the ParallelAnimation element, which act as animation containers for other animation elements. These grouped animations are animations themselves and can be used exactly as such.
アニメーションはよく一つのプロパティをアニメートするよりもより複雑になるでしょう。あなたは同時にいくつかのアニメーションを動かしたい、あるいは、次々と、もしくは、二つのアニメーション間のスクリプトを実行したい時さえあります。このために、グループ化されたアニメーションを利用できます。名前が示しているように、アニメーションをグループ分けすることが可能です。グループ分けは二つの方法でできます。並行と配列処理です。あなたはSequentialAnimationかParallelAnimation要素を使うことができ、他のアニメーション要素のためにアニメーションのコンテナとして動きます。これらのグループ化されたアニメーションはそれ自体正確にそれらしく使うことができます。

Parallel animations
All direct child animations of a parallel animation run in parallel when started. This allows you to animate different properties at the same time.
並行アニメーション
並行アニメーションの全ての直属の子アニメーションはスタートすると並行に走ります。これは一度に異なるプロパティをアニメートできます。
// ParallelAnimationExample.qml
import QtQuick
BrightSquare {
    id: root
    property int duration: 3000
    property Item ufo: ufo
    width: 600
    height: 400
    Image {
        anchors.fill: parent
        source: "assets/ufo_background.png"
    }
    ClickableImageV3 {
        id: ufo
        x: 20; y: root.height-height
        text: qsTr('ufo')
        source: "assets/ufo.png"
        onClicked: anim.restart()
    }
    ParallelAnimation {
        id: anim
        NumberAnimation {
        target: ufo
        properties: "y"
        to: 20
        duration: root.duration
    }
    NumberAnimation {
        target: ufo
        properties: "x"
        to: 160
        duration: root.duration
        }
    }
}
Sequential animations
A sequential animation runs each child animation in the order in which it is declared: top to bottom.
配列処理アニメーション
配列処理アニメーションは宣言される順番:上から下へ、それぞれの子を走らせます。
// SequentialAnimationExample.qml
import QtQuick
BrightSquare {
    id: root
    property int duration: 3000
    property Item ufo: ufo
    width: 600
    height: 400
    Image {
        anchors.fill: parent
        source: "assets/ufo_background.png"
    }
    ClickableImageV3 {
        id: ufo
        x: 20; y: root.height-height
        text: qsTr('rocket')
        source: "assets/ufo.png"
        onClicked: anim.restart()
    }
    SequentialAnimation {
        id: anim
        NumberAnimation {
        target: ufo
        properties: "y"
        to: 20
// 60% of time to travel up
        duration: root.duration * 0.6
    }
    NumberAnimation {
        target: ufo
        properties: "x"
        to: 400
// 40% of time to travel sideways
        duration: root.duration * 0.4
     }
   }
}
Nested animations
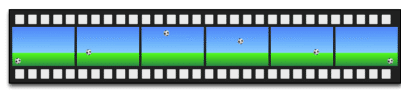
Grouped animations can also be nested. For example, a sequential animation can have two parallel animations as child animations, and so on. We can visualize this with a soccer ball example. The idea is to throw a ball from left to right and animate its behavior.
ネストされたアニメーション
グループ化されたアニメーションもまたネストできます。例えば、配列処理アニメーションは子のアニメーションとして二つの並列したアニメーションを持つことができます。私たちはこれをサッカーボールエグザンプルで表示できます。その考えは左から右へボールを投げそしてその動作をアニメートすることです。

To understand the animation we need to dissect it into the integral transformations of the object. We need to remember that animations animate property changes. Here are the different transformations:
アニメーションを理解するために、私たちはオブジェクトの統合的な変換を分離する必要があります。私たちはアニメーションがプロパティの変化をアニメートしているのだということを思い出す必要があります。こちらが異なる変換です。
An x-translation from left-to-right ( X1 )
(x1)左から右へxの移動
A y-translation from bottom to top ( Y1 ) followed by a translation from up to down ( Y2 ) with some bouncing
下から上へのy移動(Y1)に続いて、上から下への移動(Y2)がバウンスします
A rotation of 360 degrees over the entire duration of the animation ( ROT1 )
全体のアニメーションの持続時間を超えて360度回転する。
The whole duration of the animation should take three seconds.
全体の持続時間は3秒かかります。

We start with an empty item as the root element of the width of 480 and height of 300.
私たちは480の幅、300の高さのルート要素として、空アイテムで始めます。
import QtQuick
Item {
     id: root
     property int duration: 3000
     width: 480
     height: 300
// [...]
}
We have defined our total animation duration as a reference to better synchronize the animation parts. The next step is to add the background, which in our case are 2 rectangles with green and blue gradients.
私たちはアニメーションの部分をよりよく同時進行するための参照として、全体のアニメーションの持続時間を定義しました。次のステップは背景を苦ウェルことで、私たちの場合緑と青のグラディエントで2つの矩形です。
Rectangle {
    id: sky
    width: parent.width
    height: 200
    gradient: Gradient {
    GradientStop { position: 0.0; color: "#0080FF" }
    GradientStop { position: 1.0; color: "#66CCFF" }
    }
}
Rectangle {
    id: ground
    anchors.top: sky.bottom
    anchors.bottom: root.bottom
    width: parent.width
    gradient: Gradient {
    GradientStop { position: 0.0; color: "#00FF00" }
    GradientStop { position: 1.0; color: "#00803F" }
    }
}
The upper blue rectangle takes 200 pixels of the height and the lower one is anchored to the bottom of the sky and to the bottom of the root element.
上の青い矩形は200ピクセルの高さで下の一つは空のそこにアンカーsれており、ルート要素の底にあります。
Let’s bring the soccer ball onto the green. The ball is an image, stored under “assets/soccer_ball.png”. For the beginning, we would like to position it in the lower left corner, near the edge.
サッカーボールをグリーンに持ってきましょう。ボールはイメージで、"assets/soccer_ball.png"のところに格納されています。はじめに、左の下隅、角の近くに、それを置きたいとします。
Image {
     id: ball
     x: 0; y: root.height-height
     source: "assets/soccer_ball.png"
MouseArea {
     anchors.fill: parent
     onClicked: {
         ball.x = 0
         ball.y = root.height-ball.height
         ball.rotation = 0
         anim.restart()
     }
   }
}
The image has a mouse area attached to it. If the ball is clicked, the position of the ball will reset and the animation is restarted. Let’s start with a sequential animation for the two y translations first.
イメージにはマウスエリアを取り付けておきます。もしボールがクリックされると、ボールの位置が再設定し、アニメーションがスタートします。
SequentialAnimation {
    id: anim
    NumberAnimation {
        target: ball
        properties: "y"
        to: 20
        duration: root.duration * 0.4
     }
     NumberAnimation {
        target: ball
        properties: "y"
        to: 240
        duration: root.duration * 0.6
      }
}
This specifies that 40% of the total animation duration is the up animation and 60% the down animation, with each animation running after the other in sequence. The transformations are animated on a linear path but there is no curving currently. Curves will be added later using the easing curves, at the moment we’re concentrating on getting the transformations animated. Next, we need to add the x-translation. The x-translation shall run in parallel with the y-translation, so we need to encapsulate the sequence of ytranslations into a parallel animation together with the x-translation.
これは全体のアニメーション持続時間の40%が上昇のアニメーションで、60%が下降のあにめーしょんです。シーケンスで、各アニメーションが順番に実行されることを指定します。変換は線形パス上でアニメートされますが、全く現在は曲がりません。カーブは徐行曲線を使った後に加えられます。次に、私たちはx軸方向の移動を加える必要があります。x軸方向の移動は、y軸方向に並行して走り、
曲線はイージング曲線を使用して後で追加されますが、現時点では変換のアニメーション化に集中しています。次に、x-翻訳を追加する必要があります。x-trans は y -平行移動と並行して実行されるため、y-translations のシーケンスを x トランスレーションとともに並列アニメーションにカプセル化する必要があります。
ParallelAnimation {
     id: anim
SequentialAnimation {
// ... our Y1, Y2 animation
}
NumberAnimation { // X1 animation
    target: ball
    properties: "x"
    to: 400
    duration: root.duration
    }
}
In the end, we would like the ball to be rotating. For this, we need to add another animation to the parallel animation. We choose RotationAnimation , as it’s specialized for rotation.
最後に、ボールが回転しているようにしてみたい。このためには、パラレルアニメーションにもう一つのアニメーションを加える必要があります。RotationAnimationを、回転のために特化されているので、RotationAnimationを選択します。
ParallelAnimation {
    id: anim
SequentialAnimation {
// ... our Y1, Y2 animation
}
NumberAnimation { // X1 animation
// X1 animation
}
RotationAnimation {
    target: ball
    properties: "rotation"
    to: 720
    duration: root.duration
    }
}
That’s the whole animation sequence. The one thing that's left is to provide the correct easing curves for the movements of the ball. For the Y1 animation, we use a Easing.OutCirc curve, as this should look more like a circular movement. Y2 is enhanced using an Easing.OutBounce to give the ball its bounce, and the bouncing should happen at the end (try with Easing.InBounce and you will see that the bouncing starts right away).
The X1 and ROT1 animation are left as-is, with a linear curve. Here is the final animation code for your reference:
それがアニメーションシーケンス全体です。残っていることの1つは、ボールの動きに正しいイージングカーブを提供することです。Y1 アニメーションでは、円運動のように見えるはずなので、Easing.OutCirc 曲線を使用します。Y2は、ボールにバウンドを与えるためにEasing.OutBounceを使用して強化され、バウンドは最後に発生するはずです(Easing.InBounceで試すと、バウンスがすぐに開始されることがわかります)。X1 と ROT1 のアニメーションはそのまま残され、線形曲線になります。参考までに最終的なアニメーションコードは次のとおりです。
ParallelAnimation {
     id: anim
SequentialAnimation {
     NumberAnimation {
     target: ball
     properties: "y"
     to: 20
     duration: root.duration * 0.4
     easing.type: Easing.OutCirc
     }
     NumberAnimation {
          target: ball
          properties: "y"
          to: root.height-ball.height
          duration: root.duration * 0.6
          easing.type: Easing.OutBounce
     }
     }
     NumberAnimation {
          target: ball
          properties: "x"
          to: root.width-ball.width
          duration: root.duration
     }
     RotationAnimation {
      target: ball
      properties: "rotation"
      to: 720
      duration: root.duration
    }
}
この記事が気に入ったらサポートをしてみませんか?