
【徒然iOS】気ままにUIKit20〜TableView〜

概要
このマガジンは四十を過ぎたおっさんが、
を参考にStoryboardでiOSアプリを完全に趣味で楽しんでいるだけな記事を気ままに上げてます。
今回
をやる〜〜〜
前準備
念の為、バックアップ
新しいクラス
ビューコントローラの追加
イニシャルビューの変更
をいつも通りやってから本題へ💃

本題
⒈ビューにテーブルを配置

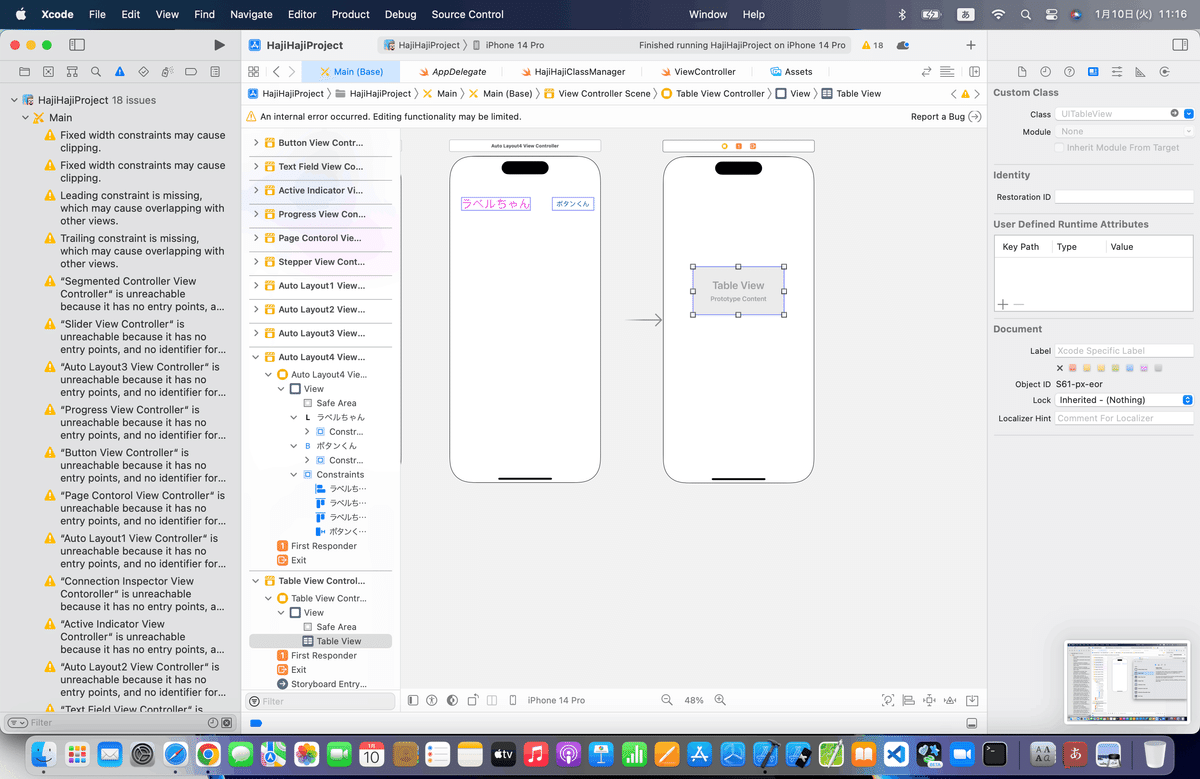
⒉データソースを接続

⒊アトリビュートインスペクタボタン(黄緑枠)を押して設定画面を表示


⒋アシスタントを開いて、UITableViewDataSourceプロトコルを適用


ポイント
stubs警告って何?
なんかを見てもらうとわかるように、
「プロトコルに必要なメソッドを追加していないために発生」
する警告なんだよね〜〜〜!


けども今回は、記事のコードを優先しないとややこしいことになりそうなので、
一旦、追加されたコードは消去して、さっきのFixをクリックする前に戻す。

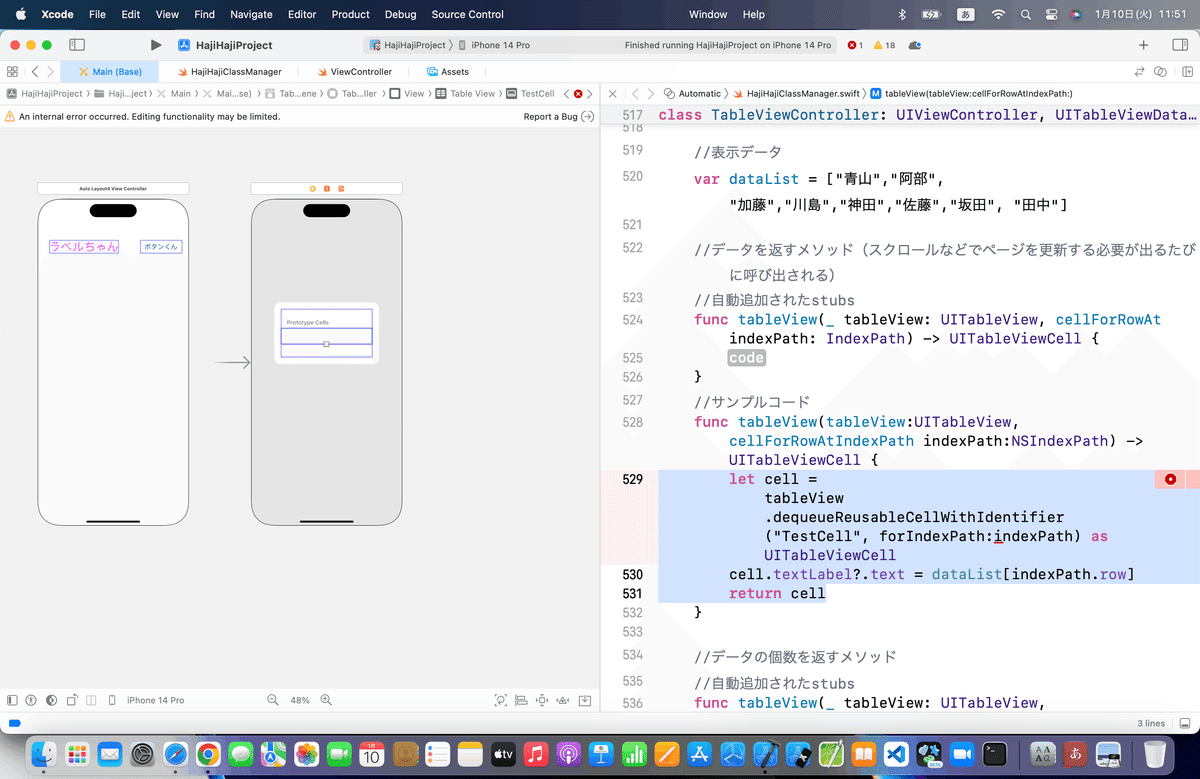
⒌サンプルコードを追加してみよう
追加するコードはこの部分
//表示データ
var dataList = ["青山","阿部", "加藤","川島","神田","佐藤","坂田", "田中"]
//データを返すメソッド(スクロールなどでページを更新する必要が出るたびに呼び出される)
func tableView(tableView:UITableView, cellForRowAtIndexPath indexPath:NSIndexPath) -> UITableViewCell {
let cell = tableView.dequeueReusableCellWithIdentifier("TestCell", forIndexPath:indexPath) as UITableViewCell
cell.textLabel?.text = dataList[indexPath.row]
return cell
}
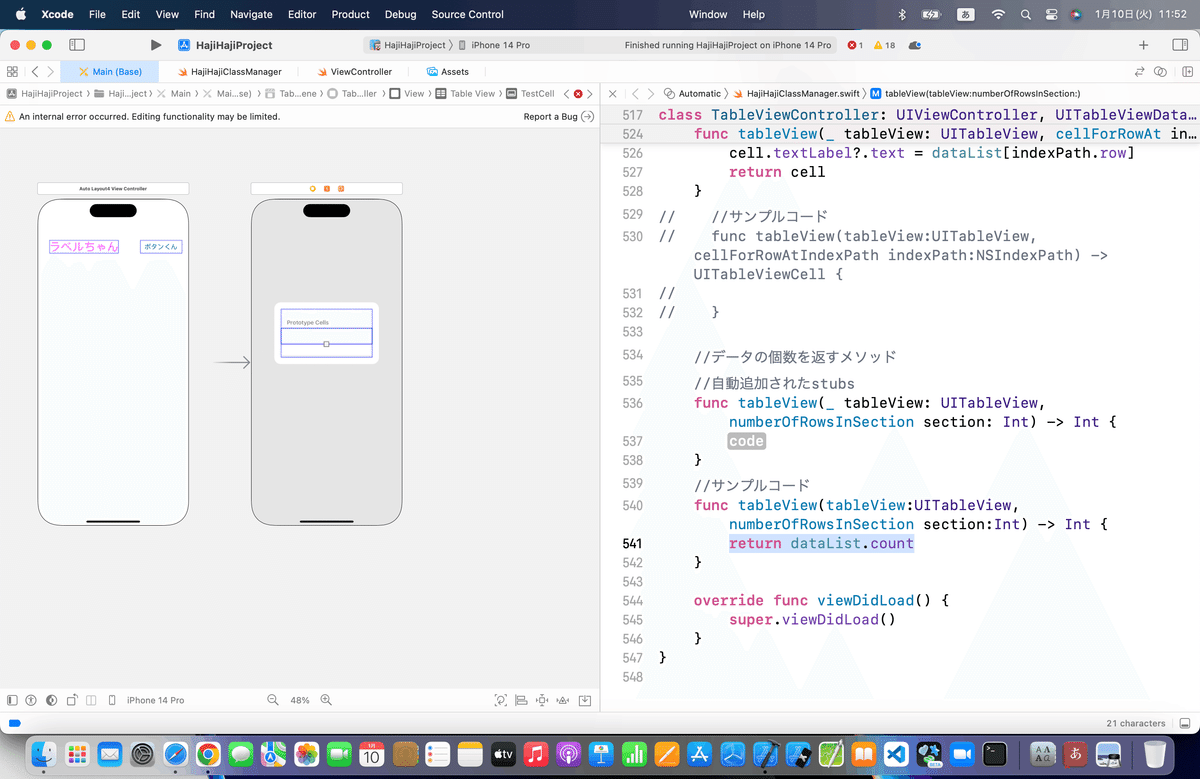
//データの個数を返すメソッド
func tableView(tableView:UITableView, numberOfRowsInSection section:Int) -> Int {
return dataList.count
}
一番上のstubs要求も解消されてないね、、、💦
エラーの内容を見ていくと


ここでさっき、自動で追加したstubsを処理のコードを無視して見比べてみると、、、
    //データを返すメソッド(スクロールなどでページを更新する必要が出るたびに呼び出される)
    //自動追加されたstubs
    func tableView(_ tableView: UITableView, cellForRowAt indexPath: IndexPath) -> UITableViewCell {
    }
    //サンプルコード
    func tableView(tableView:UITableView, cellForRowAtIndexPath indexPath:NSIndexPath) -> UITableViewCell {
    }

    //データの個数を返すメソッド
    //自動追加されたstubs
    func tableView(_ tableView: UITableView, numberOfRowsInSection section: Int) -> Int {
        <#code#>
    }
    //サンプルコード
    func tableView(tableView:UITableView, numberOfRowsInSection section:Int) -> Int {
    }
て感じでそれぞれ上下で書き振りが違うことがわかる
一応、JumptoDifinitionでも確認
@MainActor public protocol UITableViewDataSource : NSObjectProtocol {


    @available(iOS 2.0, *)
    func tableView(_ tableView: UITableView, numberOfRowsInSection section: Int) -> Int


    // Row display. Implementers should *always* try to reuse cells by setting each cell's reuseIdentifier and querying for available reusable cells with dequeueReusableCellWithIdentifier:
    // Cell gets various attributes set automatically based on table (separators) and data source (accessory views, editing controls)

    @available(iOS 2.0, *)
    func tableView(_ tableView: UITableView, cellForRowAt indexPath: IndexPath) -> UITableViewCell


    @available(iOS 2.0, *)
    optional func numberOfSections(in tableView: UITableView) -> Int // Default is 1 if not implemented


    @available(iOS 2.0, *)
    optional func tableView(_ tableView: UITableView, titleForHeaderInSection section: Int) -> String? // fixed font style. use custom view (UILabel) if you want something different

    @available(iOS 2.0, *)
    optional func tableView(_ tableView: UITableView, titleForFooterInSection section: Int) -> String?


    // Editing

    // Individual rows can opt out of having the -editing property set for them. If not implemented, all rows are assumed to be editable.
    @available(iOS 2.0, *)
    optional func tableView(_ tableView: UITableView, canEditRowAt indexPath: IndexPath) -> Bool


    // Moving/reordering

    // Allows the reorder accessory view to optionally be shown for a particular row. By default, the reorder control will be shown only if the datasource implements -tableView:moveRowAtIndexPath:toIndexPath:
    @available(iOS 2.0, *)
    optional func tableView(_ tableView: UITableView, canMoveRowAt indexPath: IndexPath) -> Bool


    // Index

    @available(iOS 2.0, *)
    optional func sectionIndexTitles(for tableView: UITableView) -> [String]? // return list of section titles to display in section index view (e.g. "ABCD...Z#")

    @available(iOS 2.0, *)
    optional func tableView(_ tableView: UITableView, sectionForSectionIndexTitle title: String, at index: Int) -> Int // tell table which section corresponds to section title/index (e.g. "B",1))


    // Data manipulation - insert and delete support

    // After a row has the minus or plus button invoked (based on the UITableViewCellEditingStyle for the cell), the dataSource must commit the change
    // Not called for edit actions using UITableViewRowAction - the action's handler will be invoked instead
    @available(iOS 2.0, *)
    optional func tableView(_ tableView: UITableView, commit editingStyle: UITableViewCell.EditingStyle, forRowAt indexPath: IndexPath)


    // Data manipulation - reorder / moving support

    @available(iOS 2.0, *)
    optional func tableView(_ tableView: UITableView, moveRowAt sourceIndexPath: IndexPath, to destinationIndexPath: IndexPath)
}

// _______________________________________________________________________________________________________________
// this protocol can provide information about cells before they are displayed on screen.
1段目と2段目でやはり書き方が違ってるようだね👀
てことで、サンプルコードの処理コードを、自動追加されたstubsに嵌め込む


サンプルコードは不要なので、コメントアウトか削除
まだ上の段で、赤色警告が出てるので中身を確認すると、、、

'dequeueReusableCellWithIdentifier(_:forIndexPath:)' has been renamed to 'dequeueReusableCell(withIdentifier:for:)'
どうやら
'dequeueReusableCellWithIdentifier(_:forIndexPath:)' は、'dequeueReusableCell(withIdentifier:for:)'に書き方が変わったよ〜〜〜
と言いたいみたい
ではここはFixをクリックして直そう

今回のコード
class TableViewController: UIViewController, UITableViewDataSource {

    //表示データ
    var dataList = ["青山","阿部", "加藤","川島","神田","佐藤","坂田", "田中"]

    //データを返すメソッド(スクロールなどでページを更新する必要が出るたびに呼び出される)
    //自動追加されたstubs
    func tableView(_ tableView: UITableView, cellForRowAt indexPath: IndexPath) -> UITableViewCell {
        let cell = tableView.dequeueReusableCell(withIdentifier: "TestCell", for:indexPath) as UITableViewCell
        cell.textLabel?.text = dataList[indexPath.row]
        return cell
    }

    //データの個数を返すメソッド
    //自動追加されたstubs
    func tableView(_ tableView: UITableView, numberOfRowsInSection section: Int) -> Int {
        return dataList.count
    }

    override func viewDidLoad() {
        super.viewDidLoad()
    }
}
⒍シミュレータで実行バグが出ないか確認👀

⒎テーブルビューの設定を変更
あとは、テーブルビューのアトリビューションなんかの変更みたいだけど、
次回記事で実践例については説明ってことなので、ここでは、一覧にまとめておいた

まとめ
とまあ、こんな感じで、まずはテーブルを表示する方法を学んだけど。
今回はstubsに関して、調べて警告を解消する方法を理解してもらえると十分かな。
4年以上ぶりにやっていて、すっかりここら辺のことは忘れているけど、感覚的にこういう時は何をしたら良いかが身についてるから、すぐに対応できる。
変更点やプロトコルに必要な関数なんかは、丸暗記してコードを打つよりも
Xcodeの機能に8割がた任せて、
不明点をJumptoDefinistionなんかで調べる
(VBAたGoogleAppsScriptの開発なんかでも言えることだけど)
方法が作業効率がいい。
なぜか
記憶力ゲームでコードすら暗記しようとする人をどの現場でも見てきたんだけど、
Swiftも進化し続けてる言語
だから、暗記して覚えても、仕様が変わってることが多い
👉どうせ、覚えても仕様が変わっていて今回みたいに手直しが必要になるから、
💃調べ方と作り方を覚える🕺
なので、
みたいな記事で、解説の後にApple公式ドキュメントのリンク先を貼ってる次第。
考え方は
色々あっていいんだけど、プログラミングも言語だから、
みたいに、
いきなり動かしながら、
機能をある程度感覚で身につけて、
効率の良いやり方を見つける
が良いかなと。
さて、次回は、
をやる〜〜〜!
昨年宣言してたとおり、
他にやりたいこともあるから、
多くても1日1記事 = 週に3〜4記事
くらいのペースでゆっくりやる〜〜〜〜!
業務じゃないし所詮、気ままにやってる趣味だし。
淡々とやっていけば、
みたいに数ヶ月〜1年くらいで終わるからね〜〜〜!
では、また次回🕺
この記事が気に入ったらサポートをしてみませんか?