
#13-16 Layouting

What I learned today (今日の学び)
#13, 14, 15
Floating: Aligns the element and its surrounding elements to the left or right.
例えば左に寄せたければ
htmlで
<p class="float-left" style="background-color: green";>LEFT</p>
cssでは
.float-left{
float: left;
}
と書くと、背景が緑色で中にLEFTと書かれた長方形が左によります。
反対に、floatによる回り込みの解除で使うのはClear。
cssでは
.clear-left{
clear: left;
}
のように書きます。
Positionでelementの動き方を指定します。
positional properties => top, left, bottom, right
static : default positioning. left/right/top/bottom/z-index DOES NOT WORK.
relative : an element's original position remains in the flow of the page. left/right/top/bottom/z-index WORKS.
例えば、html&cssで以下のように書くと
<!--html-->
<div class="position">
<p>relative</p>
<div class="position-relative">
</div>
/* css */
.position div{
background-color: thistle;
margin-bottom: 25px;
height: 100px;
}
.position-relative{
position: relative;
left: -50%;
}
指定した色、大きさのelementが左方向に画面の50%分移動したことになります。
absolute : the element is removed from the flow of the page and other elements will behave as if it's not even there.
parent elementの上に浮いたような感じでchild elementを表示させたい場合など。
こちらのサイトも参考にしました。
fixed : elementを固定したい場合。スクロールされずに表示できます。
cssのsyntaxのみ書いておくと以下の通り。
.position-fixed{
position: fixed;
background-color: darkred !important;
top: 0;
left: 10%;
}
Display(block /inline/ inline-block/ none)
block elements => you CAN set the WIDTH, HEIGHT, MARGIN, on all sides.
inline elements => you CANNOT set the WIDTH, HEIGHT, MARGIN-TOP and MARGIN-BOTTOM
inline-block behave like an inline element but with block properties.
none hides the element.
#16
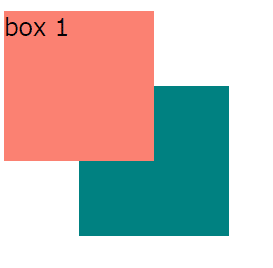
z-index: ; controls the vertical stacking order of elements that overlap. Like, layers in photoshop or in a cake.
elementの配置を指定する。写真などを一部重ね合わせるなど。
とれる値は-999~999まで。
htmlファイルで配置を指定したいelementを作り、cssで指定。
以下のコードだとbox-1がbox-2の上にきて、一部重なります。

上記のコードのアウトプットはこんな感じです。
semantic
web pageのヘッダーは<header></header>に、メインは<main></main>に、フッターは<footer></footer>に書きます。
htmlファイルの中で、これらは全て<body></body>の中に入れます。
<head></head>はhtmlファイルにコードを書く上でのベーシックな設定とブラウザのタブに表示されるタイトルを書く欄。

Activity!
練習問題で作ったwebsiteを記念に貼っておきます。
CSSはお手本のコードがあるのですが、HTMLの部分は自分で書きました。レッスン初回が6/22だったので、機械音痴がちょうど1週間でこれを作れるようになったのは嬉しいです。えらいぞ自分😊
レッスンでは先生の説明を聞きながらsyntaxを真似して書いて、都度アウトプットを確認するので、どういうsyntaxでどういうことができるのかを1つ1つ確かめながら学べるところがよかったです。困ったらいつでも教えてもらえるし、気になったことを聞けば、教材に載っていない情報ももちろん教えてもらえます。教材自体も、各syntaxの役割が分かりやすく書いてあるので復習のお供にもなります。私は授業で扱ったsyntaxと教材を見ながらこのnoteを書いていました。
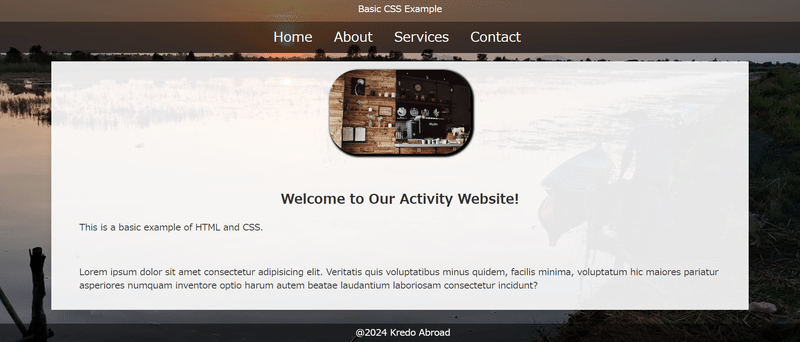
背景写真はお世話になった農家さんの養殖池で撮りました。夕日が水面に映えます
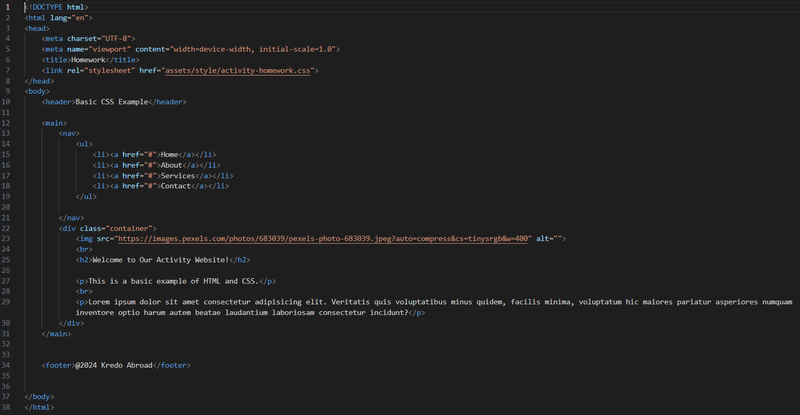
このブラウザのsyntaxは以下です。

未経験からwebエンジニアに転職した卒業生の方の体験記なども載っているので
ぜひ覗いてみてください!
Kredoについて詳しく知りたい方はこちらをご覧ください。
この記事が気に入ったらサポートをしてみませんか?