[Python]標準ライブラリだけで作るお天気予報アプリ
1.お天気予報アプリ
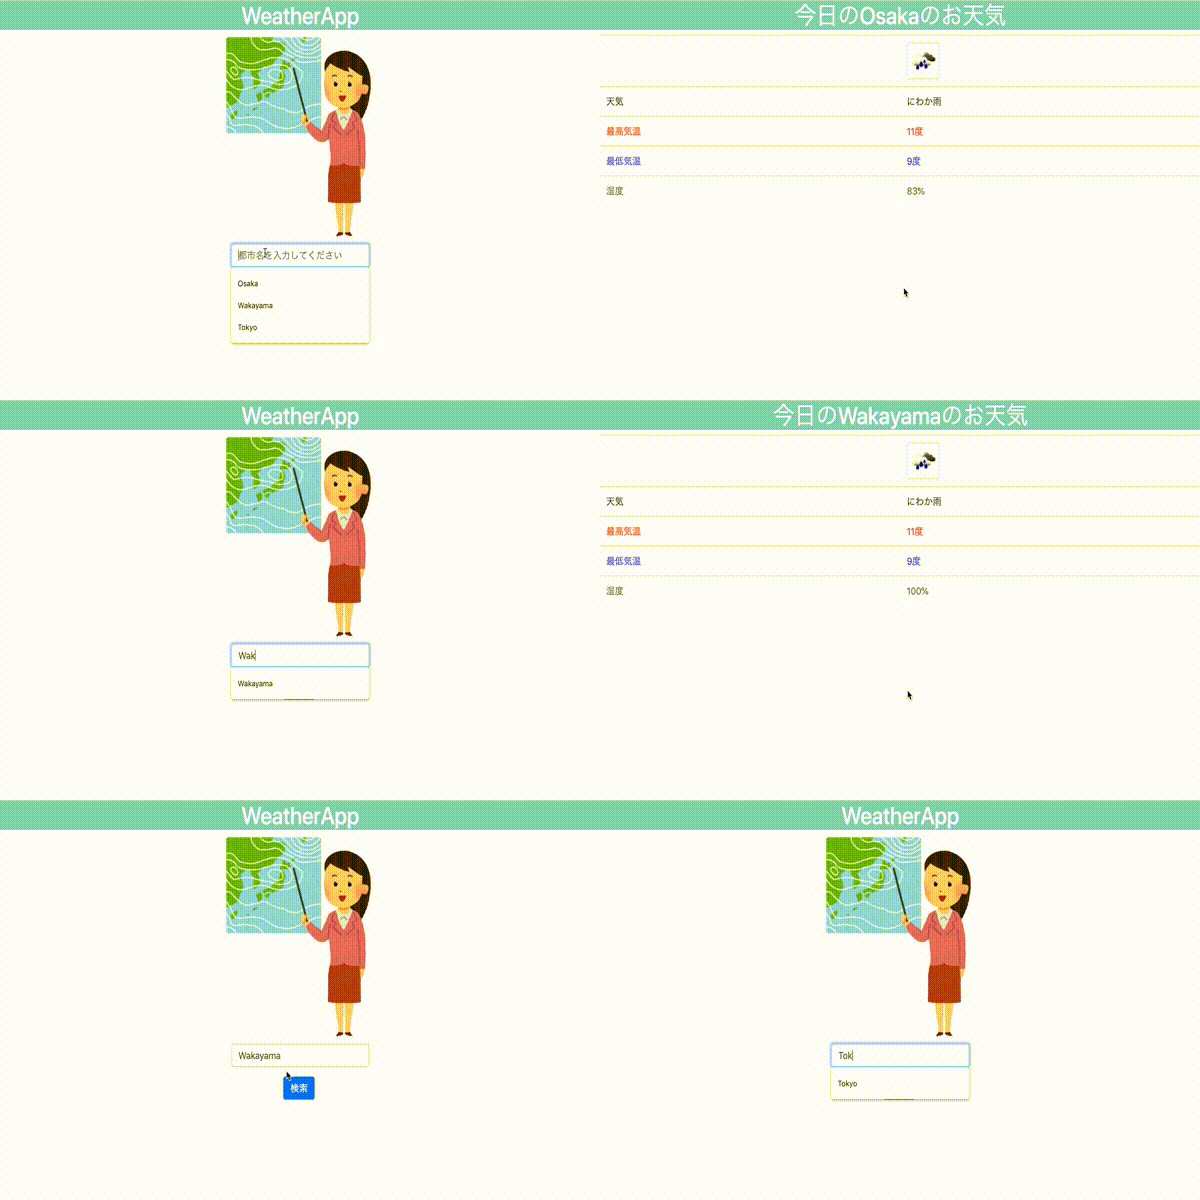
前回フレームワークを用いずに簡単なWebアプリ(HelloWorldの表示)を作成しました。今回はそれをベースに、都市名から今日のお天気情報を表示するアプリを作成します。作成したいアプリの機能は以下の通りとしました。
・都市名を入力し、送信する機能
・都市名から今日のお天気情報を取得する機能
・取得したお天気情報を表示する機能
2.アプリ構成
アプリの全体構成は以下の通りです。
WeatherApp/
├── cgi-bin
│   └── get_weather_info.py
├── index.html
└── run_server.py
WeatherAppディレクトリ配下にcgi-binディレクトリを作成します。これは、CGI(webサーバー上でプログラムを実行させる仕組み)にディレクトリ内のプログラムを実行してもらう為に作成します。そして、そのディレクトリ内にお天気情報を取得するプログラム(get_weather_info.py)を作成します。
次に、サーバー起動の為に必要なプログラム(run_server.py)とサーバー起動時に初めに表示される画面(index.html)を作成します。
最後に、get_weather_info.pyにファイルの実行権限を付与します。以下のコマンドを実行してください。
chmod +x get_weather_info.py3.入力画面を作る
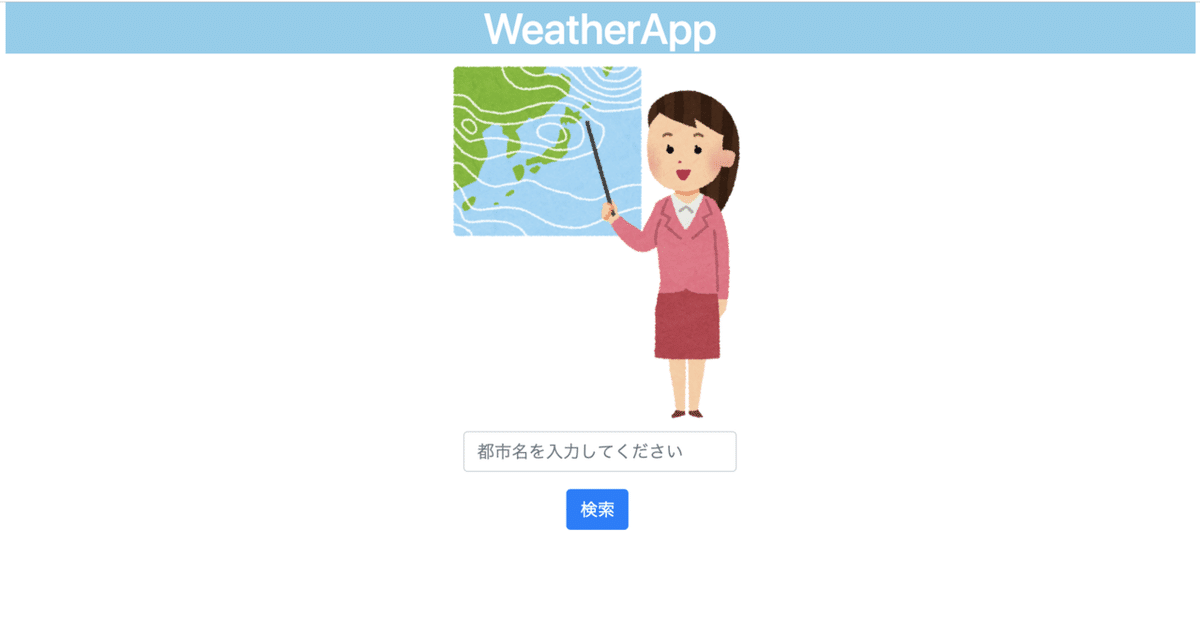
都市名を入力するアプリの画面を作成します。アプリを起動した時の一番初めの画面なのでファイル名はindex.htmlです。
※見栄えをいい感じにする為、BootStrapを使っています。
<!DOCTYPE html>
<html lang="ja">
<head>
    <meta charset="utf-8">
    <link rel="stylesheet" href="https://stackpath.bootstrapcdn.com/bootstrap/4.3.1/css/bootstrap.min.css" integrity="sha384-ggOyR0iXCbMQv3Xipma34MD+dH/1fQ784/j6cY/iJTQUOhcWr7x9JvoRxT2MZw1T" crossorigin="anonymous">
    <title>WeatherApp</title>
</head>
<body>
    <div class="container">
    <h1 class="text-center" style="color:white; background-color:skyblue">WeatherApp</h1>
        <div class="row">
            <img src="https://1.bp.blogspot.com/-liFU57C_IsU/Ur1GFHnxsCI/AAAAAAAAcW8/hTvjknYnVdI/s800/job_otenki_oneesan.png" width="25%" height="25%" class="mx-auto mb-1">
        </div>
        <form action="cgi-bin/get_weather_info.py" method="get">
            <div class="form-group row">
                <div class="col-3 mx-auto">
                 <input type="text" class="form-control" placeholder="都市名を入力してください" name="city_name">
                </div>
            </div>
            <div class="col-1 mx-auto">
                <button type="submit" class="btn btn-primary">検索</button>
            </div>
        </form>
    </div>
    <script src="https://code.jquery.com/jquery-3.3.1.slim.min.js" integrity="sha384-q8i/X+965DzO0rT7abK41JStQIAqVgRVzpbzo5smXKp4YfRvH+8abtTE1Pi6jizo" crossorigin="anonymous"></script>
    <script src="https://cdnjs.cloudflare.com/ajax/libs/popper.js/1.14.7/umd/popper.min.js" integrity="sha384-UO2eT0CpHqdSJQ6hJty5KVphtPhzWj9WO1clHTMGa3JDZwrnQq4sF86dIHNDz0W1" crossorigin="anonymous"></script>
    <script src="https://stackpath.bootstrapcdn.com/bootstrap/4.3.1/js/bootstrap.min.js" integrity="sha384-JjSmVgyd0p3pXB1rRibZUAYoIIy6OrQ6VrjIEaFf/nJGzIxFDsf4x0xIM+B07jRM" crossorigin="anonymous"></script>
</body>
</html>
ブラウザで画面を確認してみます。

4.お天気情報を取得する機能
都市名からお天気情報を取得する機能を作成します。これは外部APIを用いて取得します。取得するのは天気の状態、アイコン画像のパス、(最高・最低)気温、湿度の5項目を呼び出します。以前投稿した記事を参考にして以下の関数を作成します。
def weather_info(city_name):
    app_id = "こちらにはで取得したidを入れてください"
    URL = "https://api.openweathermap.org/data/2.5/weather?q={0},jp&units=metric&lang=ja&appid={1}".format(city_name, app_id)
    IMAGE_URL = "https://openweathermap.org/img/w/"
    response = requests.get(URL)
    data =  response.json()
    #天気情報
    weather = data["weather"][0]["description"]
    #天気アイコン
    weather_icon = data["weather"][0]["icon"]
    #最高気温
    temp_max = data["main"]["temp_max"]
    #最低気温
    temp_min = data["main"]["temp_min"]
    #湿度
    humidity = data["main"]["humidity"]
    #imgタグに埋め込む画像パス
    img_src = IMAGE_URL + weather_icon + ".png"

    context = {"weather": weather,
               "temp_max":str(temp_max) + "度",
               "temp_min": str(temp_min) + "度",
               "humidity": str(humidity) + "%",
               "img_src": img_src}

    return context
5.お天気情報を表示するひな形
こちらの関数で返された情報を用意したHTMLファイルの文字列に埋め込んできいきます。
html_body = """
<!DOCTYPE html>
<html lang="ja">
<head>
    <meta charset="UTF-8">
    <title>{0} Weather Today</title>
    <link rel="stylesheet" href="https://stackpath.bootstrapcdn.com/bootstrap/4.3.1/css/bootstrap.min.css" integrity="sha384-ggOyR0iXCbMQv3Xipma34MD+dH/1fQ784/j6cY/iJTQUOhcWr7x9JvoRxT2MZw1T" crossorigin="anonymous">
</head>
<body>
    <div class="container">
    <h1 class="text-center" style="color:white; background-color:skyblue">今日の{0}のお天気</h1>
    <table class="table">
        <tr><td></td><td><img src="{1}" alt="weather_image" class="img-thumbnail"></td></tr>
        <tr><td>天気</td><td>{2}</td></tr>
        <tr><td style="color:#f33;">最高気温</td><td style="color:#f33;">{3}</td></tr>
        <tr><td style="color:#33f;">最低気温</td><td style="color:#33f;">{4}</td></tr>
        <tr><td style="color:#696969">湿度</td><td style="color:#696969">{5}</td></tr>
    </table>
    </div>
    <script src="https://code.jquery.com/jquery-3.3.1.slim.min.js" integrity="sha384-q8i/X+965DzO0rT7abK41JStQIAqVgRVzpbzo5smXKp4YfRvH+8abtTE1Pi6jizo" crossorigin="anonymous"></script>
    <script src="https://cdnjs.cloudflare.com/ajax/libs/popper.js/1.14.7/umd/popper.min.js" integrity="sha384-UO2eT0CpHqdSJQ6hJty5KVphtPhzWj9WO1clHTMGa3JDZwrnQq4sF86dIHNDz0W1" crossorigin="anonymous"></script>
    <script src="https://stackpath.bootstrapcdn.com/bootstrap/4.3.1/js/bootstrap.min.js" integrity="sha384-JjSmVgyd0p3pXB1rRibZUAYoIIy6OrQ6VrjIEaFf/nJGzIxFDsf4x0xIM+B07jRM" crossorigin="anonymous"></script>
</body>
</html>
""".format(city_name,
           context["img_src"],
           context["weather"],
           context["temp_max"],
           context["temp_min"],
           context["humidity"])
6.お天気情報の取得・表示
4と5をまとめ、get_weather_info.pyを作成します。
先頭の/!usrから始まる一行はWebサーバーにこのプログラムがpython3で動く事を知らせる記述です。
#!/usr/bin/env python3
#-*- coding: utf-8 -*-
import cgi
import requests

#フォームから入力された値を取得する関数(返すデータ型:辞書型)
form = cgi.FieldStorage()
city_name = form["city_name"].value

def weather_info(city_name):
    app_id = "こちらにはで取得したidを入れてください"
    URL = "https://api.openweathermap.org/data/2.5/weather?q={0},jp&units=metric&lang=ja&appid={1}".format(city_name, app_id)
    IMAGE_URL = "https://openweathermap.org/img/w/"
    response = requests.get(URL)
    data =  response.json()
    #天気情報
    weather = data["weather"][0]["description"]
    #天気アイコン
    weather_icon = data["weather"][0]["icon"]
    #最高気温
    temp_max = data["main"]["temp_max"]
    #最低気温
    temp_min = data["main"]["temp_min"]
    #湿度
    humidity = data["main"]["humidity"]
    #imgタグに埋め込む画像パス
    img_src = IMAGE_URL + weather_icon + ".png"

    context = {"weather": weather,
               "temp_max":str(temp_max) + "度",
               "temp_min": str(temp_min) + "度",
               "humidity": str(humidity) + "%",
               "img_src": img_src}

    return context

context = weather_info(city_name)

html_body = """
<!DOCTYPE html>
<html lang="ja">
<head>
    <meta charset="UTF-8">
    <title>{0} Weather Today</title>
    <link rel="stylesheet" href="https://stackpath.bootstrapcdn.com/bootstrap/4.3.1/css/bootstrap.min.css" integrity="sha384-ggOyR0iXCbMQv3Xipma34MD+dH/1fQ784/j6cY/iJTQUOhcWr7x9JvoRxT2MZw1T" crossorigin="anonymous">
</head>
<body>
    <div class="container">
    <h1 class="text-center" style="color:white; background-color:skyblue">今日の{0}のお天気</h1>
    <table class="table">
        <tr><td></td><td><img src="{1}" alt="weather_image" class="img-thumbnail"></td></tr>
        <tr><td>天気</td><td>{2}</td></tr>
        <tr><td style="color:#f33;">最高気温</td><td style="color:#f33;">{3}</td></tr>
        <tr><td style="color:#33f;">最低気温</td><td style="color:#33f;">{4}</td></tr>
        <tr><td style="color:#696969">湿度</td><td style="color:#696969">{5}</td></tr>
    </table>
    </div>
    <script src="https://code.jquery.com/jquery-3.3.1.slim.min.js" integrity="sha384-q8i/X+965DzO0rT7abK41JStQIAqVgRVzpbzo5smXKp4YfRvH+8abtTE1Pi6jizo" crossorigin="anonymous"></script>
    <script src="https://cdnjs.cloudflare.com/ajax/libs/popper.js/1.14.7/umd/popper.min.js" integrity="sha384-UO2eT0CpHqdSJQ6hJty5KVphtPhzWj9WO1clHTMGa3JDZwrnQq4sF86dIHNDz0W1" crossorigin="anonymous"></script>
    <script src="https://stackpath.bootstrapcdn.com/bootstrap/4.3.1/js/bootstrap.min.js" integrity="sha384-JjSmVgyd0p3pXB1rRibZUAYoIIy6OrQ6VrjIEaFf/nJGzIxFDsf4x0xIM+B07jRM" crossorigin="anonymous"></script>
</body>
</html>
""".format(city_name,
           context["img_src"],
           context["weather"],
           context["temp_max"],
           context["temp_min"],
           context["humidity"])

#HTMLファイルを出力する旨を伝える
print("Content-type: text/html")
#HTMLファイルの出力
print(html_body)
最後に、以下のプログラムを実行してアプリを起動します。
python3 run_server.py
7.実行結果

