新台の『パチスロ這いよれ!ニャル子さん』を打ったら結構面白かった話と叩きどころの話とか

書いた経緯
なんか新台で取れたので、ニューギンかーーーー、あんま良い印象ねーんだよなあー、とか思いながら打ってみたらめっちゃ面白かったので、特に食わず嫌いしてる人向けにちょっと書いてみようと思った。
あと、『パチスロXXX天井期待値』とかの記事はイヤってほど見るけど、「この台は何待ちなん?」とか「どうやったら出るの?」とか、面白さを伝える記事って全然なくて、無いなら自分で作ろうと。オタクは供給が無いなら自分で供給するのです。
宣伝
このnoteは『Noteでやる予定のこと』(https://note.com/mk_nagakita/n/n175dd7368231)の通り、日本語+英語で書く予定だけど、英語の分だけ有料になります。気に入ったら英語の勉強がてらに買ってくれよな!⇒あまりの分量に有料にしてたけど、冷静になってみると、もっと多くの人に読んでもらった方が期待値が高いより良いなと思い、無料にしました。(あと思ったより売れてて引いた)(購入済の方々へは返金済です)
本題
当たり前だけども、この記事執筆時点で、本機の解析はほとんど出てません。設定差についてもAT確率とボナ確率くらいしか出てないので、内容的には打った感想と、どんな感じのゲームフローなのかを説明する感じになります。大いに主観です。信じるも八卦信じぬも八卦。
注意点
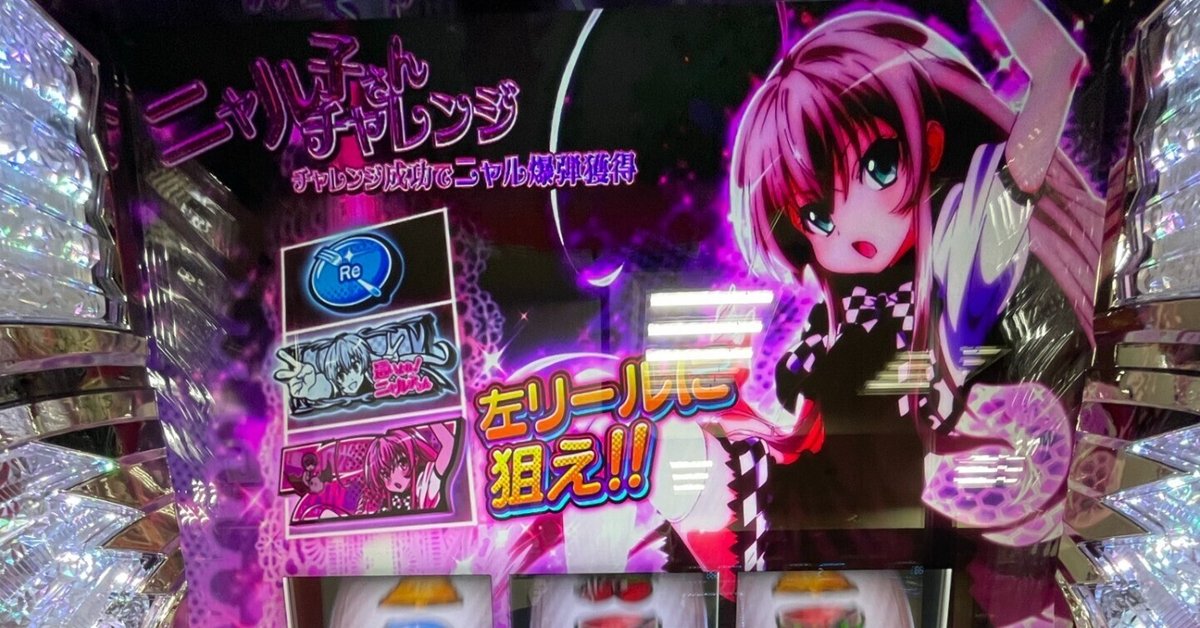
一番大事なことなので、最初に書きます。ボーナス中とAT中、時々カットインが入り『リプ白7を狙え!』と煽られますが、絶対に左リールから停止して、確実に狙うように!!!ボーナス中はともかく、AT中にミスすると悲惨な事になります。
概要
●番長Zeroの通常時
Zero図柄の代わりに3.8分の1で落ちるブランク図柄(ニャル目)をそろえましょう。20、40等の20刻みの回数がチャンスで、160回が天井(ゲーム数で600ちょっと)。20は半分くらいチャンスゾーンにつながって、60と120で直撃を何回か見たよ。
●特訓の代わりにCZ、ボナ中7揃いの代わりにチャンスゾーン
直撃ボナはあんまりなくて、大体はチャンスゾーンから。
●モンハン月下雷鳴のAT
・複数ストックはない(つまり復活はない)
・30ゲーム+EXゲーム数で敵を倒せ(バイオハザードリベレーションズみたいなもんと思いねぇ)
・ベル連ではなくリプレイを引け(後述)
通常時いろいろ
基本的には:
通常時⇒(CZのCZ)⇒CZ⇒ボーナス⇒ボナ後CZ⇒AT⇒ボナ後CZという流れ。
●ニャル目=4連(1/208)でCZ抽選、5連(1/792)するとCZ確定。間に引いたレア役では連続が途切れない安心仕様(ニューギンがまともな事やってる!!)なので、実際にはもうちょっと確率は高い。
●弱チェリー=CZのCZが出てきたりする(結構でてくる。40%くらいあんのかな?)
●スイカ=空気。三枚役ありがとう。
●強チェリー、チャンス目=CZ抽選、ときどき直撃。
●中段チェリー=おめでとう(AT確定)(フリーズ契機なので普通に止まってる時点で残念賞です)
いつものニューギンみたいに赤文字連打したり前兆ステップアップ赤まで行ってスルー連発!みたいなクソ煽りわんぱくさは無いので、そこは安心してくれていい。携帯でも弄りながら適当にお楽しみください。演出担当シャブでもやってんのか?って思いかけたけど、そもそも原作がそんなテンションだったので、悪いのは原作者。
特殊モードだのゾーンだのはチュートリアルに大体書いてあるからそれ見るといいよ!
基本的にはブランク20回のゾーンでCZが出てきて、突破できなけりゃ60のゾーンで直撃、またはニャル目5連、それができなきゃ天井だ。どんまい。
チャンスゾーンいろいろ
①ニャル子に迫られたいむ
チャンスゾーンのチャンスゾーン。10ゲーム間滞在中のニャル目はすべて連続扱い。レア役引いたら延長(弱役で3ゲーム、強役で5ゲームが基本)。
なんやかやチャンスゾーンに絡む。ゾーン終了直後に引いたブランクでもカウントされるのはちょっとうれしい。クソゾーンじゃねぇか!と思ってたけど、なんやかや3-40%くらいでニャル目5連に絡んでる気がする。
②ニャル目高確
通常時、突然7を狙え!って言われるので「お、なんか凄いモン引いたか?
」となりがち。中身は単なるニャル目高確です。7がズレ目でそろう増えないボーナスで、10ゲームくらいニャル目が揃いやすい。迫られたいむで引けると嬉しいけど、1/2048の割にはあんま強くない感。
③ニャル子クエスト
チャンスゾーン。リプレイに祈れ、リプレイを思え。
6マスのマップをぐるぐる回る形式で、アタリのマスでリプレイ又はレア役を引きましょう!ステージが4つあって4つ目以降時点でボーナス確定というゲーム性。ハズレのマスでリプレイを引いたら残念。ニャル子とのほのぼの生活にお戻りください。ニャル目を引いたら右のゲージが上がって、上がり切ったらマス目強化。宝箱マスでボーナス直撃とかもあるので、見た目よりはキツくない
ちなみに突破した分は次のクエストに持ち越されます。火山とかでヤメんなよ!
ここをスムーズに突破できる日はヤレる日。ヤレない時は早めに帰りましょう。
④でんぶゾーン
原作ってそんな臀部にフォーカスしてましたっけ。でんぶの極み!っていいたかっただけでしょこれ?ボーナス後はこれ。基本15ゲームだけどボーナス中のニャル目とかでちょっと増える。置いといて、ニャル目2連、弱役はたぶん8%とか10%とかでAT。強役はあんま引けてないからわからんけど、多分50%とか75%くらいじゃね?モードとかあるかもだけど、今んところガチっぽい。モード/設定差がなきゃなんとなーーく1/70くらいで突破だと思う。
ボーナス中
BB(40ゲーム)もRB(20ゲーム)もそんな変わらん。でんぶゾーンのゲーム数を集める仕事。BBで20ゲーム、RBで10ゲーム追加くらいが目標。ニャル目の確率は落ちてて、恐らく1/10くらいになってる模様。レア役は弱チェリー<スイカ<チャンス目=強チェリーくらいの感覚。
AT中
概要
30ゲーム+α内に相手のライフをゼロにしたら次セット。対戦相手の強さによって継続率が50%~80%くらいまで変動。ゲーム数が無くなったらEXゲームを使って耐える。たまに報酬としてボーナスが貰えるが、その際は20or40ゲームのEXゲーム上乗せ特化ゾーンを貰えた上で、当然30ゲームの通常ATも貰えるので、まぁまぁ破壊力がある。
超?でんぶの極み?期待するなそんなモン。
ダメージ契機
リプレイ<ベル<ニャル目<弱レア役<<<<<強レア役<<<<<<<<リプレイ(カットインあり)
●リプレイ(カットインなし)=基本なんもしない。なんでリプレイが引けてカットイン抽選が取れてないんだよ俺はもう!!ザコ!!バァカ!!ってさせる枠。
●ベル=基本なんもしない。特に感想は無いが、引きどころで出てくると舌打ち。たまに強攻撃持ってくるので憎めない。
●ニャル目=弱パンチ。20%くらい?で武器持ってきたり、3-5%くらい?で悩殺ゾーン持ってくるので侮れない。あと特殊攻撃中はダメージ増加(1.3倍くらいになってると思う)なので、なんやかや嬉しい。
●レア役の皆さん=大した事しない。ちょっといいニャル目って感じなので、コレを引くのが目標ではないという事を覚えておいてください。
●リプレイ(カットインあり)=常にこれを願っている。攻撃した上に爆弾カマして、さらに1/2で特殊攻撃のチャンスを2回も頂ける。ちなみにそれら特殊攻撃のチャンスは「当該ゲームでベル以外を引けば成功」になるので、やっぱりリプレイを祈りましょう。
攻撃の格付け
各キャラの通常攻撃=ペチン!って音しそう。
石ころ=鼻くそ投げてんのかお前?
シャンタッ君=毒。雀の涙。石ころのが1ゲーム貰える分マシかも。
チェーンソー=ニャル目引けてればまぁまぁのダメージかも。
連撃=ニャル子以外ならちょっとだけ期待。ニャル子だとチェーンソーに毛が生えたようなもん(1/4ゲージ~1/2ゲージが精いっぱい)。この辺りまではなんも期待しない方がいい。
連=赤までいけばドカっと減らせるけど、大体緑とかで「ああ、、うん。まぁどうも」みたいな感覚になる
爆弾=大タル爆弾。ニャル目引けてれば1ゲージいけるかも?
ギャルゲ無双=コメントに困るライン。1ゲージくらいを期待したい。
フォーク=1ゲージは持っていきたい
重撃=この辺から期待し始める。爆弾並みのダメージ与えつつシャンたっ君の倍くらいの継続ダメージを入れてくれるので、まぁまぁ幸福感がある
カオスリール超=継続次第で悩殺ゾーンばりの大ダメージになるけど、ゲーム数が貰えてないから若干損した気持ちになる
悩殺ゾーン=基本コレ待ち。色んな契機で来るので、リプレイが引けない日はほぼコレ頼り
一撃=お前を神にしてくれることもあれば、絶望の淵から救ってくれることもある。抱かれたい日もあれば絞め殺したい日もあると思いますが、引けなかったらお前のせいです。失敗してもチェーンソー分くらい削ってくれる。
重撃以上はほぼカットインリプレイか強役からしかいかない(悩殺ゾーンを除く)。つまりこの台のダメージ契機は殆どがカットインリプレイから来る。
↑に「+α」とあるように、時々攻撃+特殊攻撃ゲームを貰える。武器だと1ゲーム、その他は複数ゲームが基本。シャンタッ君は卵を置いてどっかいくといい。
長くなったけどつまり、モンハン月下亜種と思いねぇ。他の台の例にもれず、ここをどう打つかがキモ。オーソドックスに右手で叩くか、奇をてらって左を混ぜるか、あえての左連打か、今日のヒキは全部ここで使うように。
ベル連ではなく、願うのはリプレイ、のうち、技術介入カットインが出るやつ(1/16らしいので、リプレイの1/2位なもんだと思う。つまりヒキ依存の台って言われて座ってるお前のようなスロッターにとっては実質1/7)リプレイを制する者は世界を制する。引けないお前はクソ野郎。通常時はあれほど恋い焦がれたニャル目もここでは空気、だいたい弱パンチして終わる。
敵の種類
敵が4種類+特殊なやつ1種類いて、星が少ないほどキツい上に特に報酬が優遇されたりはしないのでこの辺は祈ろう。敵選択画面のレア役はEXゲーム数の上乗せに回るので、敵が昇格とかはない模様。
AT中の演出面
仕様的に『アイテムマスでベル以外を引け!!』のウエイトがめちゃくちゃ重いこともあり、その辺りの演出はガッツリ作りこまれてる印象。
・中右左ナビ出しといて中段リプ停止して悶絶
・右ナビ出てきてニャル目揃いほぼ確定につき悶絶
・演出ナシ(リプorハズレ)でぐぬぬ
・213ナビ出てるのになんか今チャンスボタン光らなかった?
・321ナビでガッカリしてたら右下段ニャル子(ニャル目確定)
・『リプレイを狙え!』カットイン(リプレイを狙えって生まれて初めて言われたかもしれん)
などなど、ニューギンが作ったとは思えない作りこみを見せてくれるため、昨今のスロットに足りない栄養分を補ってくれる。こういうのでいいんだよこういうので。
ちなみに武器演出中のー1-、ーー1ナビはニャル目揃い確定につきちょっと嬉しい。恐らく通常AT時は1ーーナビで潰してるであろうニャル目も、ここでは全部出てきます。
ごほうびタイム
ごほうびタイム中はニャル目の確率がガッツリ下げられてるので、20ゲームある!!これはかつる!!!などと幻想を追い求めないこと。大体ハス太(黄色)止まりです。クー子(赤)まで行ったら50%でボーナスらしいし、この辺はしかたないね。弱チェ以外の子役を願いましょう。超邪神中は赤スタートらしいけど、そんなもん引けるか!!
打ち方(毎ゲーム黒バーなんぞ狙ってんじゃねぇ!)
なんでこれを後ろに持ってきたかというと、↑の仕様面を理解してないと伝わらない事があるから。『どうせ黒バー狙いでしょ?攻略サイトに書いてあるよ?』そうだな。奴らはエアプだからそんなもん忘れろ。
すなわち
毎ゲーム脳死左黒バー狙いとかいうクソみたいな真似はするな
ということ。ここ、来週のテストに出ます。
注:左でスイカが零れる位置があるかも(1ライン機だから役構成全部把握しないと検証できんのだ。。怪しいとこでビタしてみた感じ多分無い)
オススメは左フリー打ち、又は赤7狙い
ボーナス中のカットインで分かる通り、リプ白7が止まった時点でリプレイor強弱チェリー。すなわちチャンスゾーンないしAT中演出マスで汁が出る打ち方ができるという事である。男の子ならイチカク目好きでしょ?ちなみに左は白バーが代用図柄になってくれるため、チェリーのこぼしは無いです。個人的にはDangerマスなんかでも左赤狙いして、やるならやれ!!畜生め!!という気持ちで挑むことにより突破率を高めています。こういうのは勢いと思い込みです。
いいところ
上記読んでもらったらなんとなくイメージできたかもだけど、ヒキ台です。昨今のヴヴヴのデキレ感とか、チャンスゾーンでレア役引いたのに空気じゃねーかよお前!!なスロットにウンザリした貴方のための台です。なんせリプレイの突破率は100%!ちなみに致死率も100%です!
あと、上位ATとかボーナス引けなくても出るときゃ出る(個人マックスは1800枚⇒CZで貫きスペックキメて追加1800枚が最高)(その後2000枚呑まれてトントンで終わりました)のが好印象。なのでそろそろ上位なんちゃらも引かせてください。
悪いところ
●ニャル子クエストV移行時の『御開帳~!』のタイミングはもうちょっとなんとかなんなかったんすか?なんか凄いモン引いたかと思ったわ!
●ボーナス中の曲のつなぎはもうちょっとどうにかならんかったんでしょうか。。この台で2番目にどうでもいい箇所だし(一番はごほうびタイム)、あんまり気にしてないけども。どうせ君もツイッターとか見ながら消化してんでしょ?
叩きどころ
通常時:
ニャル目ニャル目ニャル目ニャル目ニャル目….って祈りつつ、ニャル目ニャル目ニャル目リプレイあああなんで俺はこういう時にヒケる選ばれた人間に産まれなかったんだなぜ右手で行ってしまったんだここは左ってわかっていたはずなのにさっきの流れで明らかだっただろここは左だよって思いながら消化しましょう。左赤7狙いをすることによりリプレイが体感的に減るため、ニャル目率を高めることができます。こういうのは気持ちの問題です。
ニャル子クエスト:
個人的にはリプレイを引くべき時は左、Dangerは右です。左だとリプレイが寄ってくるでしょ?こういうのは気持ちの問題です。ちなみに分岐マスでリプレイが成立してる場合、結構な確率で(半分くらい?)カットインが出るので、祈るべきはリプレイではなく、カットインです。正しく念じましょう。こうズバーっと出す感じで。
AT中:
ピキュウウウン!って脳内にイメージしながら叩くといい。あんまり興奮して赤7が枠外まですっ飛んでいかないように注意(1敗)見事カットインが出たら武器マスでニャル目orリプレイを引くだけです。非常にシンプル。武器マス成功率は約1/2ぐらいだと思う。ここと特殊攻撃時はニャル目隠してないので、ベルじゃなきゃまぁ安心。セグパターンとかは見ない方が面白いとおもうので割愛。
おわりに
あまりにも久しぶりに時間を忘れてスロットに熱中してしまったことにより、勢い余って謎に5000文字以上書いてしまった。書くとこまではともかく、どうして俺はこれを英訳しようと考えてしまったのだろう。しかし男に二言は無いので、日本語部分は全部無料公開という形にしました。俺はこういうので人間強度を高めようと思うんだ。『よくやった、もう休め』とか『この記事のお陰でリプレイが引けました!』という人はコインをひとつかみして投げてくれる感覚とかで買ってくれてもいいと思うし、『お前マジでコレ訳したの??』という気持ちで見てってくれてもいいと思う。世の中には君の想像を超えたアホがいるのだ。
Before Reading
As a matter of course, at the time of writing this article, there is almost no analysis of this machine. The only information available on setting differences is AT probability and bonus probability, so I will describe my impression of the machine and how the game flow is like. It is very subjective. Believe it or not, it's all up to you.
Important Note
I will write it first as this is the most important thing you need to know about this machine:
Sometimes a cut-in will come up and say, "Aim for the 7!" during the Bonus and AT, make sure to stop from the left reel and aim for it! It will be disastrous if you miss during AT, let alone during the bonus(but it is also necessary to aim).
Outline
Similar to Banchou Zero:
Instead of Banchou Zero's blank pattern, "Nyarume" falls at 1 in 3.8 during normal stages. 20, 40, etc. in increments of 20 are the chances zone, and the ceiling is 160 times of Nyarume (a little over 600 games in calculated average). 20 leads to the chance zone about half the time and I have seen a few direct hits for bonus at 60 and 120th Nyarume. I've seen a few direct hits at 60 and 120.
Monster Hunter Gekka Raimei - like - AT:
No multiple stocks (i.e., no resurrection), 30 games + EX game count to defeat the enemy (also similar to Biohazard Revelations), replay instead of bell sequence (will be explained later).
To Do During Normal Modes:
Basic flow:
Normal Mode ⇒ (CZ of CZ) ⇒ CZ ⇒ Bonus ⇒ CZ after Bonus ⇒ AT ⇒ CZ after Bonus.
Rare Liners:
Nyarume: CZ draws for 4 in a row (1/208), and 5 in a row (1/792) determines CZ. As the rare liner drawn in between does not break the sequence (Newgin is surprisingly doing the right thing!!!), the actual probability is a little bit higher. The CZ is a CZ that is drawn by the player, somewhat directly(a little additional context here: some of CZ is not drawing the result directly but mostly decided machine internally).
Cherry = Chance to have CZ of CZ to comes out after drawing those(Around 40% of chance from my experience).
Watermelon= Does nothing. Thanks for 3 medals.
Chance Cherry, Chance Blank = Some chance to draw CZ, sometimes direct hit for bonus.
Middle cherry = Congratulations (AT confirmed) (It is a freeze trigger, so when it stops normally, it is a disappointment prize).
There's no kind of shit actions like Newgin's usual "I'll go through it again and again! Enjoy it while playing with your cell phone.
I almost thought that the action director was on some kind of drug, but author of comic itself was on, so it`s not Newgin`s fault.
The special modes and zones are generally described in the tutorial, so you can take a look at them!
Basically, the CZ comes up in the zone with 20 Nyarumes, and if you can't break through, you have some chance to get a direct hit in the zone with 60 blanks, or 5 Nyarume in a row, and if you can't do that, it's the ceiling. Feel bad.
Variation of Chance Zones
①ニャル子に迫られたいむ(Nyaruko ni Semarare Time)
Chance zone of chance zone. Every Nyaru-me during the 10-game stay is treated as a sequence. When a rare liner is drawn, the zone will extended (3 games for a weak liners, 5 games for a strong liner). Has some good chance to directed to Chance Zone so do not look it over. Nice thing is that blanks drawn right after the zone ends are counted. I thought this zone was sucks, but it has somehow it's related to 5 consecutive Nyarume 3-40% of the time(again, it is from my experience).
②ニャル目高確(High Chance Games for Nyarume)
It comes out while on games with "Aim for the seven!", and you might think like "Oh did I get some big one?" , but in fact it`s just high zone for Nyarume. Technically it is real bonus but does not get you additional medals(I mean it is bonus but only increases probability on Nyarume). I`d say lucky if I got thins while Semarare Time but basically it is no much if you consider it`s probability(1/2048)
③ニャル子クエスト(Nyaruko Quest)
Chance Zone. Pray and wish for replays.
The game is played by going around a 6-square map and drawing a replay or a rare role on the correct square. There are four stages, and the bonus is determined after the fourth stage. If you hit a replay in the "Danger" square, you will get back to normal mode. Kindly return to your heartwarming life with Nyaruko. The gauge on the right goes up when you draw a Nyarume, and when the gauge is fully up, the squares are reinforced.
By the way, it is not as hard as it looks, because there are squares where gets you direct hit of bonus at the treasure chest square, etc. The amount of the breakthrough is carried over to the next quest. Don't give up at the volcano stage or V stage(3rd or 4th stages)! The day you can get through here smoothly is the day you get laid. If you can't get laid, leave early.
④でんぶゾーン(Denbu Zone/Buttocks Zone)
I don't remember the original focusing on the buttocks like that. I'm sure you just wanted to say that, didn't you director? You go there after the bonus. It's basically 15 games, but it increases a little when you get a "Nyarume" during the bonus. 2 set of Nyarume or rare liner to have some chance to get AT. I`m guessing you have around 10% chance to win with 2nd Nyarume or Cherry/Melon, and guessing 50% on Chance blank or Chance Cherry. Without mode/setting differences, I'd say it breaks through at 1/70 or so.
While on Bonus
No huge difference between BB(40 games) or RB(20 games). Basically games to collect some medals and get additional game on Denbu Zone. I`m personally targeting to get 20 extra games on BB or 10 on RB. Seems like probability on Nyarume had dropped to 1/10 from 1/3.8. Rare liner strength are Cherry < Watermelon < Chance Blank = Chance Cherry from what I`ve been seen.
While on AT
General:
If the opponent's life is reduced to zero within 30 games +α, the next set is played. The continuation rate varies from 50% to 80% depending on the strength of the opponent. When the number of games runs out, use EX game to endure. Sometimes you will get a bonus as a reward, but in that case, you will get 20 or 40 games of EX game multiplier zone, and of course you will get 30 games of normal AT, so it is quite effective. Super? Denbu no Kiwami? Don't get your hopes up.
Damage Trigger
Replay < Bell < Nyarume < Rare Liner <<<<< Strong Rare Liner <<<<<<<< Replay (with cut-in)
● Replay (no cut-in) = basically nothing. Why can't I draw a replay and get the cut-in draw, the frame that makes the player say, "I'm a fool! why couldn`t I just win 1/2 even won 1/7.4!!"
● Bell = Basically nothing. I don't have any particular opinion about him, but when it comes out at the point where I want to pull it out, I click my tongue or even word a curse. But don't hate him because he sometimes brings a strong attack and at least getting you some medals.
●Nyarume = Nyaruko Punch! Has around 20% chance to bring a weapon, or a 悩殺ゾーン(Tempting Zone) at about 3-5%. The damage is increased during the special attack (about 1.3 times I think), so it is not a thing to be underestimated
● All the Rare Liners = No big deal. Remember, it's a bit like a good Nyarume, so the goal is not to pull this one.
● Replay (with cut-in) = Always hope for this. You can get a Bomb attack, and two chances for a special attack in 1/2 of the games. By the way, those special attack chances will be "success if you draw anything other than bell in the relevant game", so you should still pray for a replay.
Kind of Opponents
4 different opponents and one special, less stars are harder to defeat but harder does not mean you will get better praise. Rare liner on the game choosing opponent would get you games on EX games and wouldn`t replace your opponent to better one.
Actions in AT
As this machine has high weight on "draw a non-bell liner at item square!", actions here are well-created.
Replay stops on center(=Replay confirmed) when the navigation says 213(bell navigation)
See ・-・-1 navigation (Nyarume confirmed)
No action (=Replay or No liners)
Navigation shows 213 but I guess chance button blinked?
Navigation shows 321 but Nyaruko stopped bottom right(=Nyarume confirmed)
"Aim for Replay!"(my very first time that machine asked me to aim for replay)
etc
So I would say it is completely differ from a machines made by Newgin.
Those are great action gets you vitamins you are missing(or recent pachislot is missing.
Btw, navigation"ー1 ー" ーー 1" while on attacking, has no chance on "fake Nyarume" and all those Nyarume hidden while regular AT would be appear properly.
Attack Ratings
Each character's normal attack = Sounds like a "Pétch!
Stone = Are you throwing snot?
Each character's normal attack = Petching! Sounds like a "Pétch! Stone = Are you throwing snot?
Shantakkun= Poison attack or sparrow tears. As stone get you one additional game it could be even worse than a stone.
Chain Saw= Maybe 1/4 of a gauge if you could get Nyarume.
連撃(Streak Attack)=It would be some amount of damage if the attacker is not Nyaruko. Nyaruko is like a little bit more from Chain Saw(1/4-1/2 of a gauge). You shouldn`t expect a lot from this or attacks above.
連(Charge Attack)=You can hope somewhat if it goes to red(Blue<Green<Red is basis of pachislot), but mostly stops at green and you would be like "Well okay, thanks".
爆弾(Bomb)=Large Barrel Bomb (comes from Monsterhunter Gekka Raimei) Might hope to get one gauge if you are drawing Nyarume at attacking game.
ギャルゲ無双(Gyaruge Musou)=No much to comment but probably expect for one gauge.
フォーク=Most strong weapon(excepting special attacks) so I might expect for one gauge +.
重撃(Heavy Blow)=I will be start hoping something or get through the match. It`s like Bomb + Double poison damage so it is something to start satisfying me.
カオスリール超(Chaos Wheel Super)=
Depending on the continuation of the game, you can do a lot of damage just like in the Tempting Zone, but you don't get the game count, so you might feel a little a bit of lost(still satisfying attack).
悩殺ゾーン(Nousatsu Zone/Tempting Zone)=
We are basically awaiting of this. It comes from several of triggers so if you are having day that you don`t get drawing replay, basically it is your only hope.
一撃(One Shot)=
50% chance to one shot the opponent. Icon that makes you the mission of the God, or rescue you from abyss of despair. You will desired him to hug you or you might want to hug him down, but it`s all up to you if you could make it or what. It gives you some mercy with a little damage similar to Chain Saw when you failed.
The only way to get a heavy blow or more is almost always from a cut-in replay or a strong liners (except for the Tempting Zone). In other words, most of the damage triggers on this platform come from cut-in replays. As "+α" is shown in abeve, sometimes you will get attack + special attack game. Weapons get one game, and others get multiple games. Shantakkun can leave the egg and go away.
It was a long story, but in short, I think it's a variant of Monster Hunter Gekka Raimei. As is the case with other machines, the key is how to play here. Whether you hit it orthodoxly with your right hand, or mix it up with your left, or dare to hit it with your left, use all of today's skills(or way of pray) here. I wish for a replay, not a series of bells, of which a technical intervention cut-in appears (As it is 1/16, so I think it is about 1/2 of a replay). So for a slotter like you, who sits there and is told it's a pray-dependent machine, it should be considered1/7.) He who controls the replay controls the world. You are an asshole if you can't pull it off. The "Nyarume" that you have been longing for so much in normal times is also a bit of a nuisance here, and it usually ends with a weak punch.
ごほうびタイム(Gohoubi Time):
Games to upgrade your prize after beating opponent. As probability of Nyarume had dropped, so in most of case it only goes to yellow. I know it is silly but as if the color goes up to red you have 50% chance to get bonus, it should be this hard. Do not expect too much even if 20 or 25 games of Time, and pray for rare liners except for cherry(he does not do his work sometimes). I heard it would start Red when you are in Super AT but don`t even think of it.
★Where to Aim and How to Play(Stop Aiming Black Bar Every Single Game!)
Reason why I have put this section here is, you must need to understood of basis of this machine to figure what I am trying to mention. "Yea I know we supposed to aim black bar as usual"? "I have read XXXX and I know how already"? Shut up they don`t know a shit.
TAKE NOTE: You must NOT aim black bar every single game without think. (You might have a little chance to miss watermelon if you hit some place, as this machine is one line I need to investigate a little more but mostly not)
My Recommendation is to Hit Random Place on Left, or Aim for Seven.
As you could see from cut in while on AT or Bonus, it would be Replay or Cherry whenever [Replay-White-Seven] stopped on the left. It means you can get additional ecstasy while on chance zone or AT. I know every boys love those "one shot" thing. By the way as white bar would be replacement of cherry there is no chance to get payouts for cherry.
Personally I do aim for seven at danger square to let machine to know "I AM READY" and control their decision. This is all about how do you think and take.
Pros on Machine
As you might already figured by reading above, it is a machine all about timing and lucks. Literary 100% of result goes by your luck for today. If you are fatigued of the machine like "it`s all decided before I play(see Valvrave or Re:Zero)", or machine like "it requires rare liner but still fails even I got one", this is the machine you would go. Success rate of replay on CZ is 100%!(fatal rate also is 100% :p)
Also, you don`t need to have special mode to get a lot of medal, this is a best thing you just need some replays(my max amount of medal from one AT was 1,800+1,800 right after previous AT)(by the way I Lost 2,000 right after that and day ended even on that day)
Cons on Machine
●The timing on sound "Gokaicho--!!" when you get to final stage of Nyaruko Quest should be considered a little more, I was thinking I got some rare thing when I first time saw it..
●Repeating of sound at bonus…(Yea I know the bonus and Gohoubi Time on this machine is like the part you are feeling nothing)(I am sure you will be playing around with Twitter as well)
宜しければサポートお願いします!頂いた費用は「外国人にパチンコ、パチスロを布教する活動」の活動費にします!