Unity Modern UI Pack 公式Documentation - v4.3.1 勝手に和訳版

これはUnity Asset Storeで販売されているアセット「Modern UI Pack」の公式ページからリンクされている、公式のドキュメントを勝手に和訳したものです。(※問題があればすぐ削除します If this Japanese-transrated document has any problem, I'll delete it soon.)
英語もプログラミングも初心者ですので、誤訳があればご指摘いただければ修正いたします。
1. Frequently Asked Questions (FAQ)
よくある質問
• Does MUIP support URP/HDRP rendering?
MUIPはURP/HDRPをサポートしていますか?
Yes. There’s no difference when it comes to rendering pipelines.
はい。レンダリングパイプラインよる違いはありません。
• I’m stuck and need help, what can I do?
使っていて分からないところがあり行き詰まってしまいました。どうしたらいいでしょうか。
If you can’t find a solution for your problem in this doc, contact me! I’d gladly help to solve your issue.
このドキュメントを読んでも解決法が見つからないときは、私(作者)にご連絡ください。あなたの問題を解決できるよう喜んでお手伝いいたします。
• I can’t modify the element, all of the values are staying the same. Why?
要素を変更できません。全ての値が同じになったままです。なぜでしょうか?
Almost all of the elements are managed by UI Manager. Values in the manager are universal, which means it’ll affect any object that has a ‘UI Manager’ component. If you don’t want that, you can delete the component from specific elements. It’ll take its own unique values as soon as deleting the manager component.
ほとんどの要素はUI Managerというコンポーネントによって管理されています。UI Managerの値はユニバーサルなものです。つまりUI Managerを持つ全てのオブジェクトに影響を与えます。このような挙動を望まない場合は、特定の要素からこのコンポーネントを削除することが出来ます。UI Managerコンポーネントを削除すればすぐに、その固有の値が反映されます。
• What platforms can I build for?
どのプラットフォームに対応していますか?
MUIP works in builds for all platforms that are listed in Unity build window.
Unityのビルドウインドウに出てくる全てのプラットフォームに対応しています。
• I’m getting errors, why and how can I fix it?
エラーが出ます。なぜでしょうか。どのように直せますか。
It could be about anything. Make sure to import TextMesh Pro from package manager and its essentials from Window > TextMesh Pro. If you’re still having the issue, contact me with some details.
様々な理由が有り得ます。TextMesh ProがPackage managerからインポートされているか確認してください。インポートされていたら、UnityのメニューのWindow > TextMesh Proから、TextMesh Pro essentialsがインポートされているかも確認してください。それでもまだエラーがある場合は、その詳細を作者まで送って下さい。
• Are you going to support and add new stuff to the package?
パッケージに新しい素材を追加したり、サポートしたりする予定はありますか?
Of course! I always reply and help to support requests, and update the package frequently.
もちろんです! サポートのリクエストにはいつでも返信していますし、頻繁にパッケージをアップデートしています。
• How do I get rid of the UI Manager?
UI Managerはどうやって削除できますか?
You can basically delete the ‘UI Manager [element name]’ component from the object, and that’s it!
基本的には‘UI Manager [要素名]’のコンポーネントをオブジェクトから削除するだけで終わりです!
2. Quick Start
First of all, thanks for purchasing the package! If you need some help to get
started, this is the right place.
まずは、パッケージをご購入いただきありがとうございます もし、何かお困りのことがありましたら、この2章をまず参照して下さい。
2.1. How To Use
MUIP is using the native Unity UI, so you can use the package just like the default Unity UI.
MUIPはネイティブのUnity UIを使用しているので、デフォルトのUnity UIと同じようにこのパッケージを使用することができます。
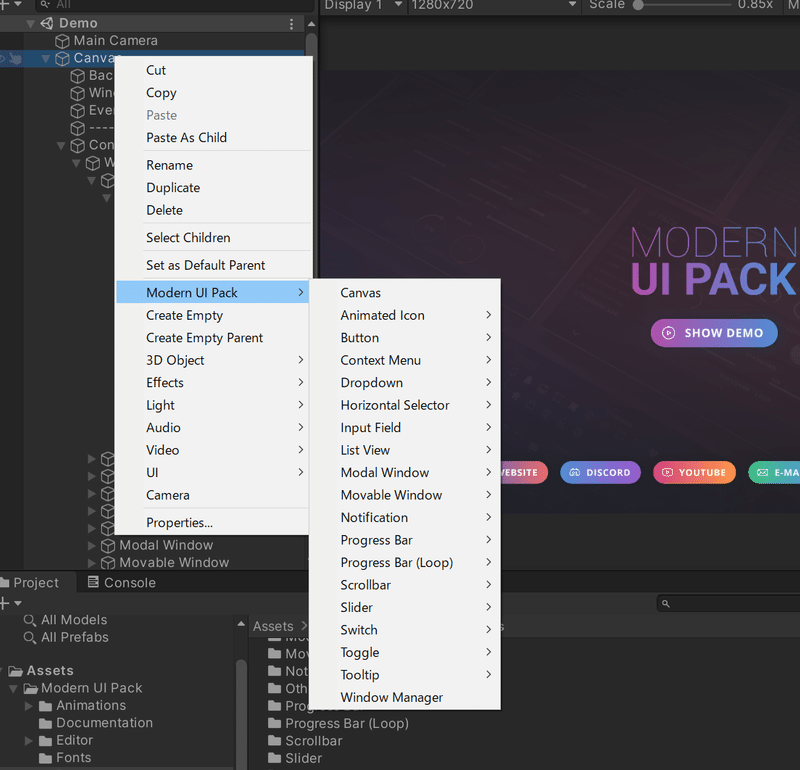
To create an element, you can click on Create and go to Modern UI Pack section. You can also right click to an object in hierarchy and spawn an element.
UI要素を作成するには、ヒエラルキーでCreateをクリックまたいは右クリックして Modern UI Pack セクションにから選択します。
Some windows / elements are using Canvas Group component. You’ll have to set their alpha value to 1 in order to see them, and set 0 to make them invisible. So, basically, you have to maximize the alpha value while changing the content of a specific panel (or just to see, up to you).
ウィンドウや要素には、Canvas Groupコンポーネントを使用しているものがあります。アルファ値を1に設定すると完全に不透明になり、0に設定すると完全にと埋めになって見えなくなります。基本的には、パネルの内容を変更している間はそのパネルのアルファ値を最大にしておいてください。
If you want to see a live example of how elements / systems work, you can check out the demo scene.
各要素やシステムがどのように動作するかの例を見たい場合は、デモシーンを読み込んで再生してみて下さい。
2.2. UI Manager
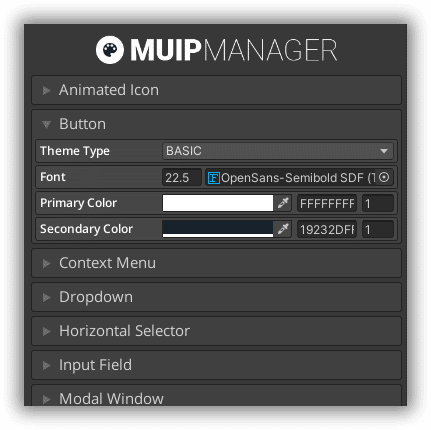
Do you want to change the appearance of the entire UI at the same time? Well, we got you covered. UI Manager basically will change every single element, meaning that you won’t have to change stuff one by one.
UI 全体の見た目を同時に変更したい?もちろんできます。UI Managerは基本的には全ての要素を同時に変更しますので、要素の一つ一つを変更していく必要はありません。
You can open the window by clicking Tools > Modern UI Pack > Show UI Manager or just press Ctrl + Shift + M. And you’re all set! You can now expand the categories and start to change values.
Unityのメニューから Tools > Modern UI Pack > Show UI Manager をクリックするか、Ctrl+Shift+Mを押してUI Managerウィンドウを開くことができます。これでカテゴリを広げたり値の変更をしたりできます。

Update Values
While this option is checked, UI Manager will be updating UI elements dynamically. If not, you won't be able to see any changes until you hit play (runtime). You can turn this off to gain more performance on the editor, just don’t forget to enable it while changing stuff. This feature is disabled in build mode, so it won’t have any effect on builds.
このオプションがONの間、UI Manager は UI 要素を動的に更新します。OFFの場合は、再生ボタンを押すまで変更結果が反映されません。エディタのパフォーマンスを向上させるためにこのオプションをオフにすることもできますが、値の変更中は忘れずに有効にしてください。この機能はビルドモードでは無効になっているので、ビルドには何の影響もありません。
Extended Color Picker
If you want to see a more detailed color picker, enable this. This will be adding a hex code and an alpha slider right next to the color picker.
より詳細なカラーピッカーを表示したい場合は、ここをONにしてください。カラーピッカーのすぐ横に16進コードとアルファスライダーが追加されます。
UI Manager Hints
If you want to see some tips about the manager, then you can enable this.
UI Managerに関するヒントを見たい場合は、ここをONにします。
Note that UI Manager values are universal and will affect any object that contains a UI Manager component. If you want to edit objects seperately, you can delete the component from the object that you’ve created.
注意:UI Managerの値はユニバーサルで、UI Managerのコンポーネントを持つすべてのオブジェクトに影響します。オブジェクトを個別に編集したい場合は、編集対象のオブジェクトからUI Managerコンポーネントを削除してください。
3. UI Elements
There are lots of UI elements in MUIP. While some of them are custom made, the others are developed through the default Unity UI elements. In this section, you’ll learn more about the custom ones. If you wish, you can learn more about the default ones from the official Unity tutorials / documentation.
MUIPにはたくさんのUI要素があります。その中にはカスタムメイドのものもありますが、その他はデフォルトのUnity UI要素を使って開発されています。この節ではカスタムメイドの要素について説明します。デフォルトのUnity UI要素については、公式のUnityチュートリアルやドキュメントを参照して下さい。
3.1. Changing Content
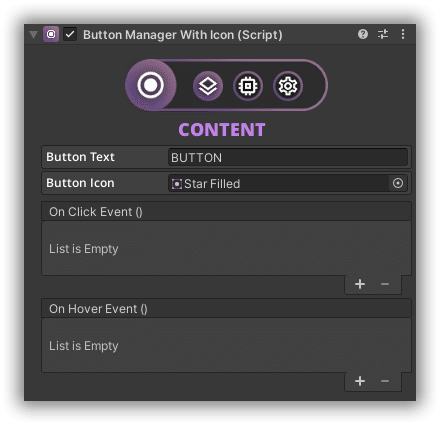
In most cases, you can change the content from the inspector. For example, instead of trying to find the text object, you can simply change it on the inspector. This will save some time while changing complex elements. Here’s an example:
ほとんどの場合、インスペクタから内容を変更することができます。例えば、ボタンのテキストオブジェクトを探さなくても、MUIPのコンポーネントからインスペクタ上でボタンのテキストが変更が可能です。これにより、複雑な要素を変更するのが楽になります。以下が例です。
3.2. Editing UI elements
Every UI object was made with native Unity UI, so you can customize or change them as much as you want. All of the objects are properly categorized, so, if you want to change a specific thing, just search for it via inspector. Do not forget about the UI Manager.
すべてのUIオブジェクトはネイティブのUnity UIで作られているので、好きなだけカスタマイズしたり変更したりできます。すべてのオブジェクトは適切に分類されているので、特定のものを変更したい場合はインスペクタで検索するだけです。UI Managerの存在も忘れずに!
3.3 UI Elements
There are some custom elements that are not included in the default Unity UI. In this section, you can learn more things about them.
MUIPにはデフォルトのUnity UIには含まれていないカスタムメイドの要素がいくつかあります。この3.3節では、これらを説明します。
3.3.1. Animated Icon
Add some vitality to your icons! Well, at least for some of them. You can play their animations by clicking or hovering. Just select the one you prefer via inspector.
アイコンが動きます。少なくとも一部のアイコンは。クリックやホバーでアニメーションします。インスペクタでお好みのものを選択してください。
3.3.2. Button
There’s no usage difference, you can use MUIP Buttons just like the native one. There are 14 types of buttons, select the one you like and start tweaking! You can also use the native UI Button API with it.
使い方はデフォルトのUnity UIのボタンと違いはなく、同じようにMUIPボタンを使うことができます。14 種類のボタンがありますので、お好きなものを選んで調整してみてください。また、以下に例示したソースのように、ネイティブのUIボタンのAPIを使用することもできます。
using Michsky.UI.ModernUIPack; // MUIP namespace required
public ButtonManager myButton; // Your button variable
void YourFunction()
{
  myButton.buttonTitle = “New Title”; // Changing the title
  myButton.buttonIcon = spriteVariable; // Changing the icon
  myButton.UpdateUI(); // Apply the changes
}
3.3.3. Context Menu
After creating the Context Menu System from Modern UI Pack menu, you can add the Context Menu Content component to the objects you want to use with. Add new items, change its icon or text, and you’re good to go!
Modern UI PackメニューからContext Menu Systemを作成した後、使用したいオブジェクトにContext Menu Contentコンポーネントを追加することができます。新しいアイテムを追加したり、アイコンやテキストを変更したりすればOKです。
You can also change context menu bounds, but I’d suggest you keep them. It’s basically changing the direction of the context menu, so it’s always visible even if it's on the corner. If you want to change the look of the element, you can select the Context Menu system in your scene and make changes.
コンテキストメニューの枠を変更することもできますが、そのままにしておくことをお勧めします。基本的にはコンテキストメニューの向きを変えることになるので、たとえ角にあっても表示されるようになってしまうからです。要素の見た目を変えたい場合は、シーン内のContext Menu systemを選択して変更することができます。
3.3.4. Dropdown
There are 2 types of dropdown with 3 animation styles. It’s pretty advanced compared to the native dropdown, but don’t worry, it’s easy to use!
ドロップダウンには2種類あり、それぞれが3つのアニメーションスタイルを持ちます。デフォルトのUnity UIのドロップダウンと比べると複雑に見えますが、使いやすいのでご安心を!
Items
You can add dropdown items to this list. If you wish, you can add functions to each item as well.
このリストにドロップダウンの項目(item)を追加することができます。必要に応じて、各項目からメソッドを呼ぶこともできます。
Saving
You can save the last selected value by checking this box. Note that every selector should has its own unique Dropdown Tag value.
このボックスをチェックすることで、最後に選択した値を保持することができます。すべてのセレクタは、ユニークなDropdown Tagの値を持つ必要があることに注意してください。
API / Usage
You can either use item event or dynamic event. Dynamic Event works just like the native dropdown (int32). You can add events/items via your own script like this:
item eventまたはdynamic eventのどちらかを使用することができます。dynamic eventはデフォルトのUnity UIのドロップダウン(int32)と同じように動作します。以下ように、独自のスクリプトを使ってイベントやアイテムを追加することができます。
using Michsky.UI.ModernUIPack; // MUIP namespace required
public CustomDropdown myDropdown; // Your dropdown variable
void YourFunction()
{
  // Creating the item. ‘null’ can be used if you don’t want to include an icon
  myDropdown.CreateNewItem(“Item Title”, spriteIcon);

  // Use this if you are creating items using a loop (e.g. for)
  myDropdown.CreateNewItemFast(“Item Title”, spriteIcon);
  myDropdown.SetupDropdown();
  // Adding int32 (dynamic) events
  myDropdown.dropdownEvent.AddListener(YourEventHere);
}
3.3.5. Horizontal Selector
Basically, think of this thing as a dropdown, but the navigation is managed by only with next and previous controls. In my opinion, it fits better than dropdown in most cases.
Horizontal Selectorは基本的にドロップダウンのようなものだと思ってOKですが、選択された箇所の一つ前と後を基準にナビゲーションされます。私(作者)の意見としては、ドロップダウンよりもこちらの方が良い場合が多いと思います。
Items
You can add horizontal selector items to this list. If you wish, you can add functions to each item as well.
このリストにHorizontal Selectorの項目(item)を追加することができます。必要に応じて、各項目からメソッドを呼ぶこともできます。
Saving
You can save the last selected value by checking this box. Note that every selector should has its own unique Selector Tag value.
このボックスをチェックすることで、最後に選択した値を保持することができます。すべてのセレクタは、ユニークな Selector Tagの値を持つ必要があることに注意してください。
API / Usage
It can be used with OnClick or you can call it from your script. HorizontalSelector.ForwardClick(); or HorizontalSelector.PreviousClick(); is what you’re looking for.
OnClickと一緒に使うこともできますし、スクリプトから呼び出すこともできます。HorizontalSelector.ForwardClick(); または HorizontalSelector.PreviousClick(); というメソッドを利用して下さい。
using Michsky.UI.ModernUIPack; // MUIP namespace required

public HorizontalSelector mySelector; // Your selector variable

void YourFunction()
{
  // Creating new items
  mySelector.CreateNewItem("Item Title");
  mySelector.index = 3; // Changing the current index
  mySelector.SetupSelector();
  // Adding int32 (dynamic) events
  mySelector.selectorEvent.AddListener(YourEventHere);
}
3.3.6. Input Field
Input fields in MUIP are basically the same as the default TMP Input Field. The only difference is animation. Other than that, you can use them just like the default one.
MUIPの入力フィールドは基本的にデフォルトのTMP(TextMesh Pro)の入力フィールドと同じです。唯一の違いはアニメーションです。それ以外はデフォルトのものと同じように使用できます。
3.3.7 Modal Window
In order to change Modal Window content, you just need to change some values from Modal Window Manager (which is attached to the modal object).
Modal Windowの内容を変更するには、(モーダルオブジェクトに添付されている)Modal Window Managerからいくつかの値を変更するだけです。
using Michsky.UI.ModernUIPack; // MUIP namespace required

public ModalWindowManager myModalWindow; // Your mw variable

void YourFunction()
{
  myModalWindow.icon = spriteVariable; // Change icon
  myModalWindow.titleText = “New Title”; // Change title
  myModalWindow.descriptionText = “New Description”; // Change desc
  myModalWindow.UpdateUI(); // Update UI
  myModalWindow.OpenWindow(); // Open window
  myModalWindow.CloseWindow(); // Close window
  myModalWindow.AnimateWindow(); // Close/Open window automatically
}
In runtime, your window will be changing depending on the values. If you want to change those values manually, you can enable ‘Use Custom Content’. You can call the window via OnClick or your script.
ランタイムでは、値によってウィンドウが変化します。手動で値を変更したい場合は、‘Use Custom Content’を有効にしてください。OnClick またはスクリプトでウィンドウを呼び出すことができます。
3.3.8 Movable Window
Want to create a movable/draggable window? Well, you can create a ready to use preset from Modern UI Pack menu, or add a ‘Window Dragger’ component to your object.
ドラッグして移動可能なウィンドウを作成したいですか?Modern UI Pack メニューからすぐに使えるプリセットを作成するか、オブジェクトに 'Window Dragger' コンポーネントを追加することで作成できます。
Drag Area
If you want to limit the area, you can assign an object to this field. If this field is null, it’ll automatically get the canvas as a reference.
ドラッグできる領域を制限したい場合は、このフィールドにオブジェクトを割り当てることができます。このフィールドがNULLの場合は、自動的にキャンバスを参照先として取得します。
Drag Object
This will be the object that you want to drag on.
これがドラッグしたいオブジェクトになります。
3.3.9 Notification
Deliver a message to your users! Just add a notification object and change some settings depending on your needs. API, you ask? Here you go:
ユーザーにメッセージを通知しよう! notificationオブジェクトを追加して、必要に応じて設定を変更するだけです。APIは以下の様なものがあります。
using Michsky.UI.ModernUIPack; // MUIP namespace required

public NotificationManager myNotification; // Your ntf variable

void YourFunction()
{
  myNotification.icon = spriteVariable; // Change icon
  myNotification.title = “New Title”; // Change title
  myNotification.description = “New Description”; // Change desc
  myNotification.UpdateUI(); // Update UI
  myNotification.OpenNotification(); // Open notification
  myNotification.CloseWindow(); // Close notification
}
3.3.10 Progress Bar
You can use progress bars as a health bar, mana bar, loading bar and so on. You can tweak the settings via inspector, but you can also change current percent or speed from your script.
progress barは、HPバー、MPバー、ローディングバーなどとして使用することができます。インスペクタを介して設定を調整することができるだけでなく、スクリプトから現在のパーセントや速度を変更することもできます。
using Michsky.UI.ModernUIPack; // MUIP namespace required

public ProgressBar myBar; // Your pb variable

void YourFunction()
{
  myBar.currentPercent = 50f; // set current percent
  myBar.speed = 2; // set speed
  myBar.invert = true; // 100 to 0
  myBar.restart = true; // restart when it's 100
  myBar.isOn = false; // enable or disable counting
}
3.3.11. Slider
MUIP is using the native slider that comes with Unity UI, but we’ve added some new cool features into it.
MUIP は デフォルトUnity UI に付属のスライダーを使用していますが、いくつかのクールな新機能が追加されています。
You can find these new features from Slider Manager, which is attached to the slider object. You can also save the last selected value by checking the Save Value box. Note that every slider should has its own unique Slider Tag value in order to save correctly.
これらの新機能はスライダーオブジェクトにアタッチされたSlider Managerから確認できます。また、Save Valueボックスにチェックを入れることで、最後に選択した値を保持することもできます。正しく保持するためには、すべてのスライダーにユニークなSlider Tagの値が必要です。
3.3.12. Switch
Basically, a ‘modernized’ toggle. Looks better imo.
基本的には「近代化」されたトグルです。(※imoって何…????)
Events
You can add On / Off events and invoke them at the start from Switch Manager.
Switch Managerからオン/オフイベントを追加し、呼び出すことができます。
Saving
You can save the last selected value by checking the Save Value box. Note that every switch should has its own unique Switch Tag value in order to save correctly.
Save Valueボックスにチェックを入れると、最後に選択した値を保持できます。正しく保持するためには、すべてのスイッチにユニークなSwitch Tagの値が必要です。
3.3.13. Toggle
Toggles in MUIP are basically the same as the native toggle. The only difference is animation. Other than that, you can use them just like the default one.
MUIP のトグルは基本的にデフォルトのUnity UIののトグルと同じです。唯一の違いはアニメーションです。それ以外はデフォルトのものと同じように使えます。
3.3.14. Tooltip
After creating the Tooltip System from Modern UI Pack menu, you can add ‘Tooltip Content’ component to the objects you want to use with. Just type your description and you’re good to go!
Modern UI PackのメニューからTooltip Systemを作成したら、使いたいオブジェクトに‘Tooltip Content’コンポーネントを追加します。説明文を入力するだけでOKです。
You can also change tooltip bounds, but I’d suggest you keep them. It’s basically changing the tooltip direction, so it’s always visible even if it's on the corner.
また、ツールチップの枠を変更することもできますが、そのままにしておくことをお勧めします。基本的にはツールチップの向きを変えることになるので、たとえ角にあっても表示されるようになってしまうからです。
Works with Screen Space Camera, Screen Space Overlay and World Space (with some limitations) canvas modes.
Screen Space Camera, Screen Space Overlay, World Space(一部制限あり)のキャンバスモードで動作します。
3.3.15. Window Manager
To add your own content to an existing panel, just drag your stuff under [Window Name] > Content object. As long as your stuff is a child of Content, it’ll be automatically animated.
既存のパネルに独自のコンテンツを追加するには、 追加しようとする要素を[Window名] > Content objectの下にドラッグするだけです。追加しようとする要素が[Window名] > Content objectの子である限り、自動的にアニメーション化されます。
Adding a new window
Duplicate an existing panel to create a new one. You'll also need a button to open the panel, so duplicate one of the existing buttons on the list and set the panel index. After duplicating the objects, you can now assign the new one into Window Manager.
既存のパネルを複製して新しいパネルを作成します。パネルを開くためのボタンも必要になるので、リスト上の既存のボタンを複製して、パネルのインデックスをセットします。オブジェクトを複製したら、新しいものをWindow Managerに割り当てられるようになります。
OnClick example:
Window Manager > WindowManager.OpenPanel() > Your Window Name
Window Manager > WindowManager.PrevPage()
Window Manager > WindowManager.NextPage()
Script example:
WindowManager.OpenPanel("Your Window Name");4. Animations
MUIP is using the default Animator system, which can be customized easily.
You can change or tweak the animations by using animation or animator window. Due to optimization, I’d suggest you to keep animator disabled as long as you don’t use them, as it’s working in the background.
MUIP はデフォルトのアニメーターシステムを使用しているので、簡単にカスタマイズできます。アニメーションやアニメーターウィンドウを使ってアニメーションを変更したり、微調整したりすることができます。最適化にあたっては、使っていないアニメーターはバックグラウンドで動作しているので無効にしておくことをお勧めします。
4.1. Editing Animations
You can manage the animations from the ‘Animator’ tab (Window > Animation > Animator). Click an object that has an animator component and you’ll see the animation states. Now, you can select an animation and change or edit them as you want. You can learn more info about the animator on official Unity docs.
アニメーションは ‘Animator’ タブ((Window > Animation > Animator)から管理することができます。アニメーターコンポーネントを持つオブジェクトをクリックすると、アニメーションの状態が表示されます。これで、アニメーションを選択して、好きなように変更したり、編集したりすることができます。アニメーターについてはUnityの公式ドキュメントを参照してください。
5. Contact & Licence
You can contact me or get the latest updates via:
以下から私(作者)に連絡したり、最新情報を入手できます。
Discord
E-mail
Website
YouTube
If you have any problems, questions, suggestions or feedback, please feel free to
contact me.
なにか問題や質問や提案やフィードバックがありましたら、お気軽にご連絡ください。
Licence
This package uses the default asset store licence & terms of use.
For more information: https://unity3d.com/legal/as_terms
このパッケージはデフォルトのアセットストアライセンスと利用規約に則っています。詳しい情報はこちら
この記事が気に入ったらサポートをしてみませんか?