
【簡単】GitHub Desktop 初期設定と項目を日本語化して確認してみた【Windows】

なんか色々するより、GitHub Desktopにした方が作業簡単だよ???
って聞いたので、設定してみることにした
GitHub Desktop ダウンロード
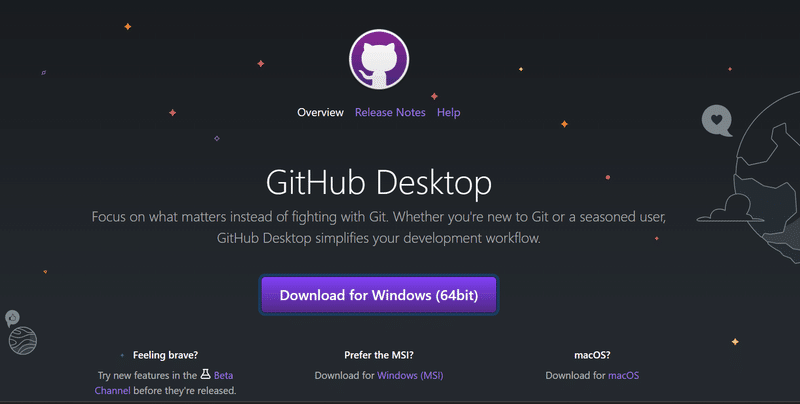
まずはダウンロードページから「GitHub Desktop」をダウンロード。
Mac or Windows を選択すると書かれているサイトが多かったけど、ページに飛んだら自分のPC環境が自動で判別されるのか?
【Download for Windows (64bit)】
と表示されたのでそのままクリックしてダウンロード!
▼GitHub Desktopのダウンロードページ
GitHub Desktop インストール
GitHub のチョット困ったところは「日本語表示」が無いこと。
一度試したけど、途中の英語での選択がわからず、時間のある時に…と断念したので再!
ダウンロードしたGitHubのデータは、ダウンロード先の設定等を変えたり、他の場所に保存などをして無ければ、「ダウンロード」のフォルダに保存されています。
※PC環境によって違う場合があります。

exe ファイルをクリック
exe ファイルをクリックするとインストールが開始します
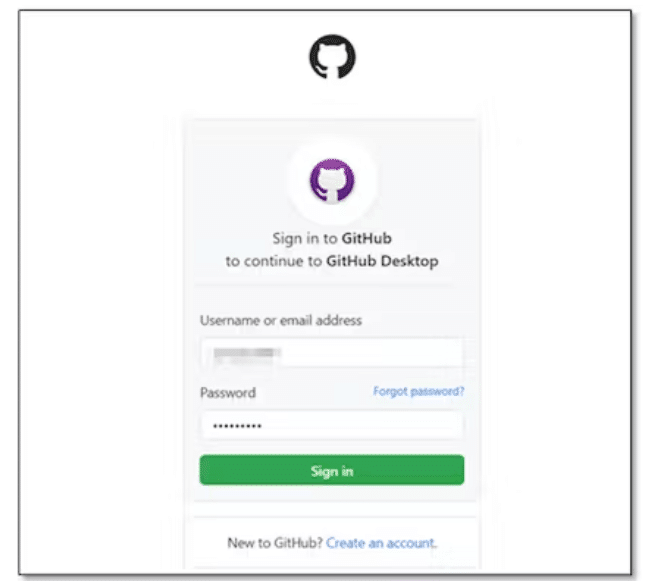
ダウンロードとインストールが済むと、次の画面でGitHubアカウントの有無を尋ねられます。アカウントがない方は①「Create your free account」をクリックし、アカウント登録を済ませます。GitHubアカウントを既に持っている方は②「Sign in to GitHub.com」をクリックしてログイン。

「Sign in to GitHub.com」をクリックするとGitHubアカウントとパスワードの入力を求められますので、それぞれ入力。
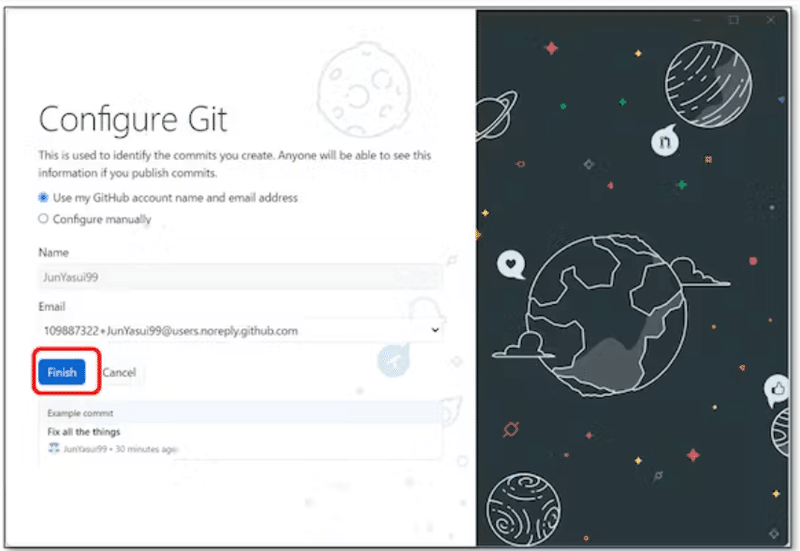
GitHubへのサインインが成功すると、登録済みの名前とEメールの確認を求められ、間違いがなければ「Finish」をクリックします。これでGitHub Desktopのダウンロードとインストールが完了。
GitHub Desktop 項目を日本語に翻訳
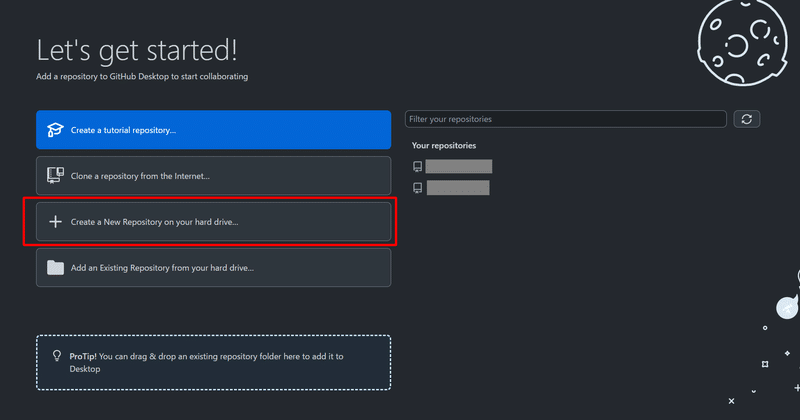
Let's get started ! - さあ、始めよう!
Add a Repository to GitHub Desktop to start collaborating
GitHub Desktopにリポジトリを追加して共同作業を開始する

Create a tutorial repository
チュートリアル・リポジトリを作成するClone a repository from the Internet
インターネットからリポジトリをクローンするCreate a New Repository on your hard drive
ハードドライブに新しいリポジトリを作成するAdd an Existing Repository from your hard drive
ハードドライブから既存のリポジトリを追加する
項目内容
■ヘッダー
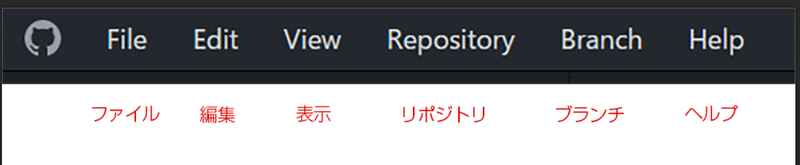
【File】 ファイル
【Edit】 編集
【View 】 表示
【Repository】 リポジトリ
【Branch】 ブランチ
【Help】 ヘルプ
File ‐ ファイル
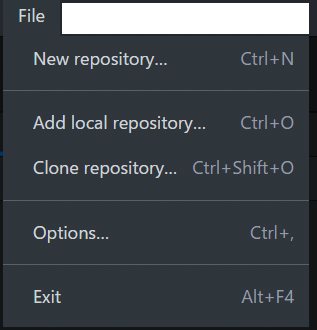
【New Repository】 新リポジトリ
【Add local Repository】 ローカルリポジトリ追加
【Clone Repository】 クローンリポジトリ
【Options】 オプション
【Exit】出口
Edit - 編集
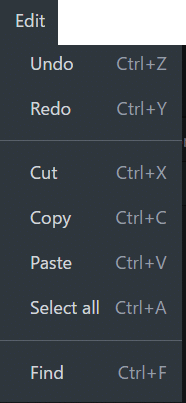
【Undo】元に戻す
【Redo】やり直し
【Cut】カット
【Copy】コピー
【Paste】ペースト
【Select all】全てを選択
【Find】検索
View - 表示
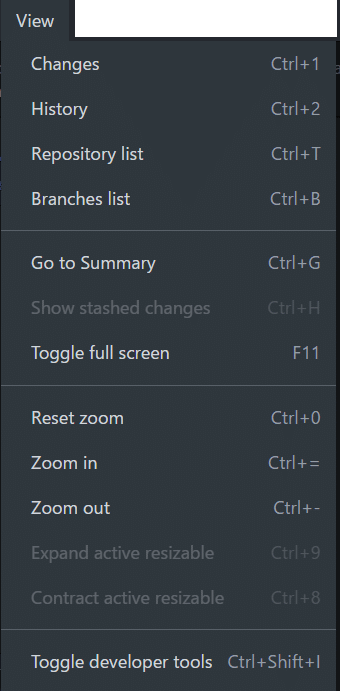
【Changes】変更点
【History】更新履歴
【Repository list】リポジトリ一覧
【Branches list】ブランチ一覧
【Go To Summary】まとめへ移動
【Show stashed changes】保存された変更の表示
【Toggle full screen】全画面表示
【Reset zoom】ズームをリセット
【Zoom in】拡大
【Zoom out】縮小
【Expand active resizable】
【Contract active resizeble】
【Toggle developer tools】
Repository - リポジトリ
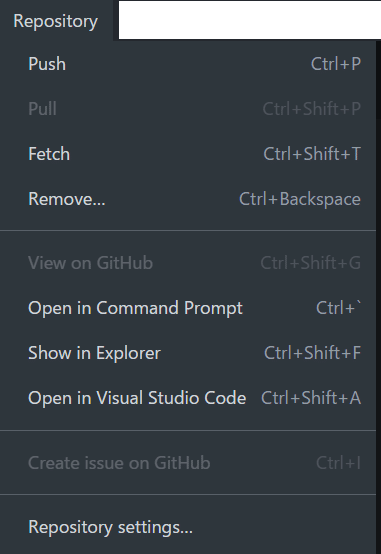
【Push】プッシュ
【Pull】プル
【Fetch】フェッチ
【Remove】削除
【view on GitHub】GitHubで見る
【Open in Command Prompt】コマンドプロンプトで開く
【Show in Explorer】エクスプローラーで表示
【Open in Visual Studio Code】Visual Studio Codeで開く
【Create issue on GitHub】GitHubに問題を作成する
【Repository Settings】リポジトリ設定
Branch - ブランチ
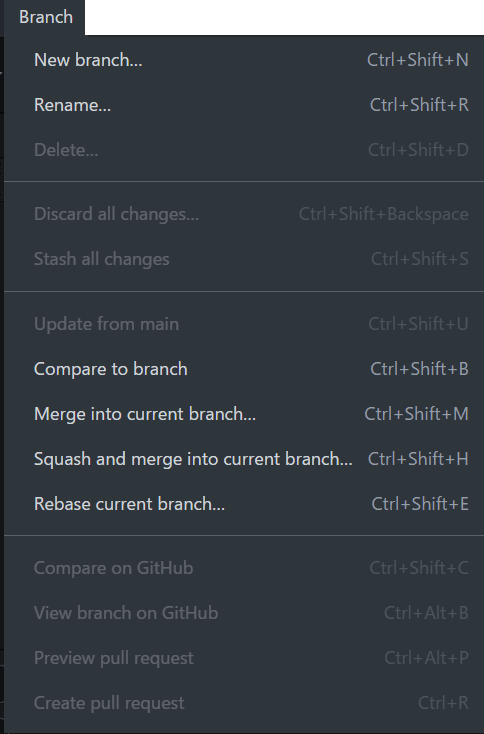
【New Branch】新しいブランチ
【Rename Branch】ブランチ名変更
【Delete】削除
【Discard all Changes】すべての変更を破棄
【Stash all Changes】すべての変更を保存
【Update frome main】メインのブランチを更新
【Compare on GitHub】GitHub上で比較する
【View branch on GitHub】GitHubでブランチを見る
【Preview pull request】プルリクエストのプレビュー
【Create pull request】プルリクエストの作成
Help - ヘルプ
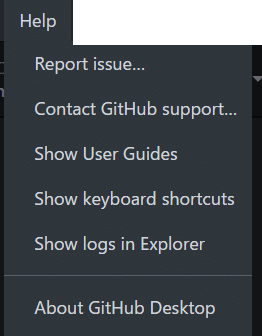
【Report issues】問題を報告する
【Contact GitHub Support】GitHubサポートへのお問い合わせ
【Show User Guides】ユーザーガイドを表示する
【Show keyboard shortcuts】キーボードショートカットを表示する
【Show logs in Explorer】エクスプローラーにログを表示する
【About GitHub DeskTop】GitHub DeskTopについて
Current Repository を選択して右クリック
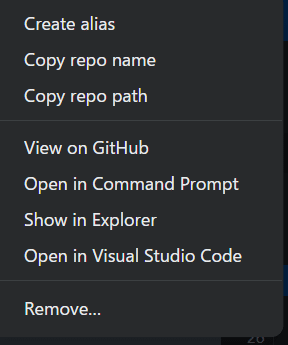
【Create alias】エイリアス作成
【Copy repo name】レポ名をコピー
【Copy repo path】レポパスのコピー
【View on GitHub】GitHubで見る
【Open in Command Prompt】コマンドプロンプトで開く
【Show in Explorer】エクスプローラーで開く
【Open in Visual Studio Code】VScode で開く
【Remove…】削除
GitHub Desktop の日本語化
日本語化パッチが今の所無さそう? ですが、GitHub Desktopのファイルにcss を足す事で、一部メニューは日本語に出来ましたら。

メニューバーの「File」を「ファイル」に置き換えるためのコードのファイル
\AppData\Local\GitHubDesktop\app-2.6.3\resources\app\renderer.css
上記のファイルに下記のコードをコピペ
/*日本語化*/
 #app -menu-bar>div:nth-child(1)>div>button {
  font-size: 0;
}
 #app -menu-bar>div:nth-child(1)>div>button:last-child:after {
  font-size: 12px;
  content: "ファイル";
}
 #app -menu-bar>div:nth-child(2)>div>button {
  font-size: 0;
}
 #app -menu-bar>div:nth-child(2)>div>button:last-child:after {
  font-size: 12px;
  content: "編集";
}
 #app -menu-bar>div:nth-child(3)>div>button {
  font-size: 0;
}
 #app -menu-bar>div:nth-child(3)>div>button:last-child:after {
  font-size: 12px;
  content: "表示";
}
 #app -menu-bar>div:nth-child(4)>div>button {
  font-size: 0;
}
 #app -menu-bar>div:nth-child(4)>div>button:last-child:after {
  font-size: 12px;
  content: "リポジトリ";
}

 #app -menu-bar>div:nth-child(5)>div>button {
  font-size: 0;
}
 #app -menu-bar>div:nth-child(5)>div>button:last-child:after {
  font-size: 12px;
  content: "ブランチ";
}
 #app -menu-bar>div:nth-child(6)>div>button {
  font-size: 0;
}
 #app -menu-bar>div:nth-child(6)>div>button:last-child:after {
  font-size: 12px;
  content: "ヘルプ";
}
GitHub Desktop の使い方
NEW リポジトリ作成
Create New Repository on your hard drive をクリック
記入内容
Name: リポジトリ名
Description: 説明(任意)
Local Path: (フォルダを作成するディレクトリのパス)
※このパスの下にリポジトリ名でフォルダが作成されます。Git Ignore: わからなかったらそのままでOK
Licence: わからなかったら「MIT License」(免責事項と著作権表示義務)を選択しておく
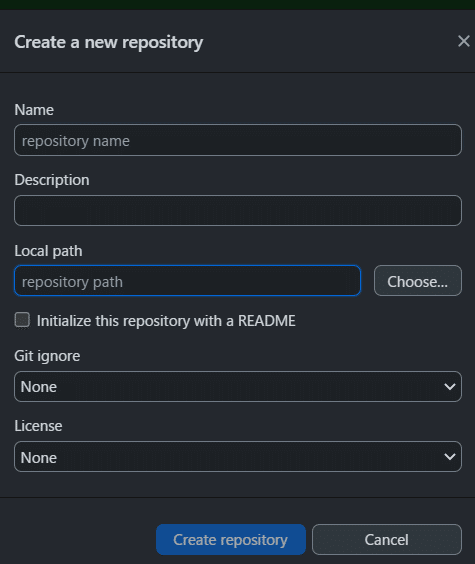
記入が出来たら Create repository をクリック。
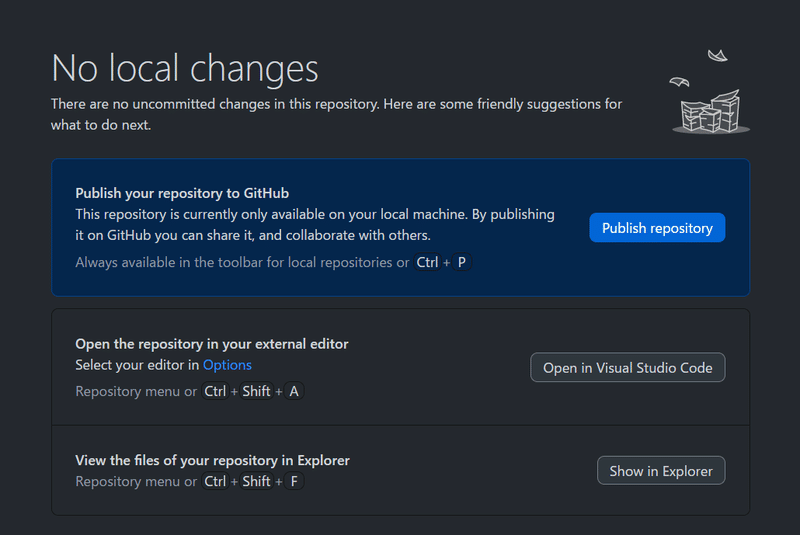
リポジトリを公開
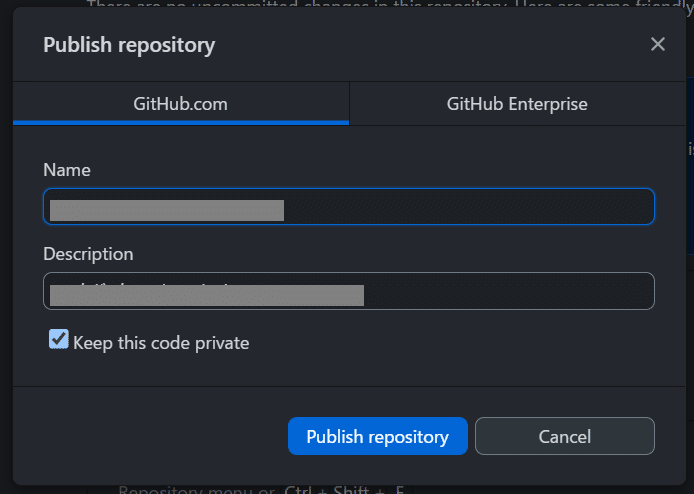
publish repository をクリック。
NameとDescriptionを確認して「publish Repository」を押す。
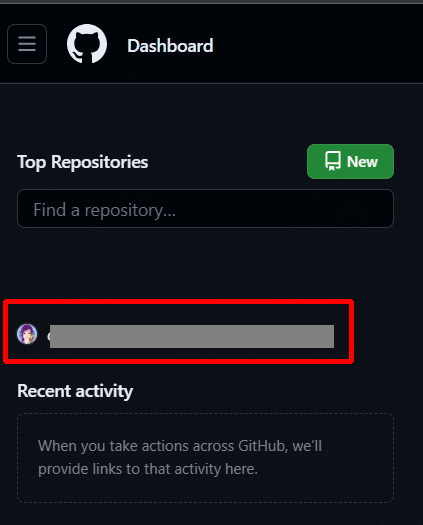
GitHub のサイトを確認すると、新しいリポジトリが作成されています。
おわりに
Twitterであそんでます!
気軽に声かけてみてね!
私に焼肉食べさせてください🤤