
【バックエンドとフロントエンドの結合】React, Axios - Springboot3 第10回

1. はじめに
こんにちは、今日はSpringbootとReactを連動して、バックエンドとフロントエンドの統合してみます!私は「フルスタックエンジニア」を目指して勉強しているので、まさに、クライアントサイドとサーバーサイド、両方の知識を勉強しないといけないのですね!
2.実装過程

どのようにReactをバックエンドマイのクロサービスと統合させるか?React には、HTTP 要求を行う機能がありません。React アプリケーションで HTTPリクエストを送るためには、サードパーティ製の HTTP ライブラリを使用する必要があります。これが、まさに「Axios」 ライブラリです。
2.1 Reactアプリの生成
「https://create-react-app.dev/」にアクセスします。

npxを再度インストールする必要はない。
まず、node JSをインストールします。
https://nodejs.org/ja/download

次に、Reactプロジェクトを開発するためにテキストエディタが必要です。インストールが終わったら、下記のように進めます。

springboot-microservicesフォルダを開きます。


「npx create react app react frontend」

変わったディレクトリで「npm start」でアプリを起動します。


1つのHTMLファイルしか見ることができないです。
ここで一体「SPA」ってなんですか、という疑問ができるかもしれないですね。
「SPA」は「Single Page Application」の略で、Webアプリケーションの一種を指します。SPAは、従来のマルチページのWebアプリケーションとは異なり、一つのHTMLページをロードし、動的にコンテンツを更新する方式を採用しています。これにより、ユーザーエクスペリエンスが向上し、Webアプリケーションのパフォーマンスが向上します。代表的なSPAフレームワーク・ライブラリにはAngular、React、Vue.jsなどがあります。
(結構流行ってるらしい…(*´Д`))
(1) 単一ページのロード
初期に必要なすべてのリソース(HTML、JavaScript、CSSなど)をロードした後、その後はページ全体を更新することなく、必要なデータだけを動的にロードします。
(2) ルーティング
SPAは、クライアント側のルーティングを通じてブラウザのアドレスバーを更新し、ユーザーがページを更新しなくても様々なビューを表示することができます。
(3) AJAX(Asynchronous JavaScript and XML)
SPAは非同期的にサーバーからデータを取得してページを更新することができます。これはユーザーエクスペリエンスを向上させ、パフォーマンスを最適化します。
(4) データバインディング
SPAではデータとUI要素を同期させるデータバインディングが一般的に使用されます。データが変更されると自動的に画面が更新されます。
SPAは、モバイルアプリケーションと同様のユーザー体験を提供し、より良い性能と速い応答時間を持ちます。


Reactアプリケーションの画面に綺麗に表示されます。
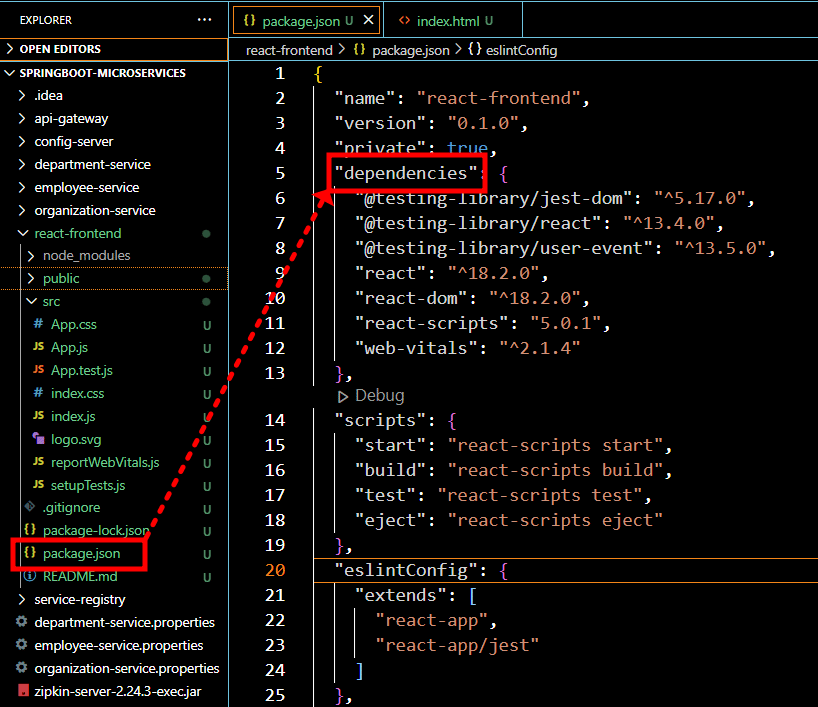
2.2 NPMでBootstrap追加

「--save」は、「bootstrap」ライブラリのエントリを依存性に追加します。


2.3 ReactとAPI-Gatewaの連結
まず、AxiosHTTP ライブラリをインストールします。
Axios(アクシオス)とは?
JavaScriptのライブラリで、主にブラウザやNode.js上でHTTPリクエストを行うために使用されます。これは、PromiseベースのAPIを提供し、非同期通信を行う際に便利です。Axiosは、様々なHTTPメソッド(GET、POST、PUT、DELETEなど)やリクエストの設定(ヘッダー、パラメータ、認証など)を提供します。

axios HTTP ライブラリパッケージのインストールに成功した!

import axios from 'axios'

const EMPLOYEE_SERVICE_BASE_URL = "http://localhost:9191/api/employees";

const EMPLOYEE_ID = 2;

class EmployeeService{

    getEmployee(){
        axios.get(EMPLOYEE_SERVICE_BASE_URL + "/" + EMPLOYEE_ID)
    }
}

export default new EmployeeService
まず、employee serviceのベースURLを保持する変数を定義します。
続いて、EmployeeServiceクラスを作成します。。
「axios.get(EMPLOYEE_SERVICE_BASE_URL + "/" + EMPLOYEE_ID)」がHTTPリクエストを送る役割をします。
最後には、他のReactコンポーネントがこの EmployeeService オブジェクトを使用できるように、この EmployeeService オブジェクトのインスタンスをエクスポートします。
2.4 Reactコンポーネント実装

「React」には2種類のコンポーネントがあります。
1つ目は「クラスコンポーネント」、2つ目は「関数コンポーネント」です。
React アプリケーションでは、「クラスコンポーネント」を使用しますが、「関数コンポーネント」も使用できます。


props は、異なるコンポーネント間で渡される単純な JavaScript オブジェクトです。
propsとstateの違いは?
propsとstateは両方のプレーンJavaScript オブジェクトです。
だが、これらは一つの重要な点で異なります。 propsはコンポーネントに渡されますが、stateはコンポーネント内で管理されます。 states オブジェクトはコンポーネント自体で使用されます。
コンポーネントのライフサイクルメソッドを呼び出して、データを取得します。

このコンポーネントメソッドは、マウントされるたびに呼び出されます。

下記のようにEmployeeComponentを作成します。
import React, { Component } from 'react';

class EmployeeComponent extends Component {

    constructor(props) {
        super(props);

        this.state = {
            employee: {},
            department: {},
            organization: {}
        }

    }

    componentDidMount(){
        EmployeeService.getEmployee().then((response) => {
            this.setState({employee : response.employee})
            this.setState({department : response.department})
            this.setState({organization : response.organization})

            console.log(this.state.employee)
            console.log(this.state.department)
            console.log(this.state.organization)
        })

    }

    render() {
        return (
            <div>

            </div>
        );
    }
}

export default EmployeeComponent;
全体的に構造を見ましょう。
コンポーネントの初期化(Constructor)
コンポーネントの初期化メソッドで、state オブジェクトを初期化しています。employee、department、organization の各項目は空のオブジェクトです。
データの取得(componentDidMount)
componentDidMount メソッドは、コンポーネントがマウントされた後に実行されるライフサイクルメソッドです。
EmployeeService.getEmployee() を呼び出して、従業員、部門、組織のデータを非同期で取得しています。
データの取得が成功したら、各データをコンポーネントの state にセットしています。

import logo from './logo.svg';
import './App.css';
import EmployeeComponent from './component/EmployeeComponent';

function App() {
  return (
    <div className="App">
      <header className="App-header">
        <EmployeeComponent />
      </header>
    </div>
  );
}

export default App;

「src/component/EmployeeConponent.js」が
「src/App.js」に挟まれる。

これらのプロジェクトが異なるサーバの異なるポートで実行されているため、CORS ポリシーの問題が発生しています。
CORS(Cross-Origin Resource Sharing)ポリシーは、Webブラウザのセキュリティ機能の一環として導入された仕組みです。これは、異なるオリジン(異なるドメイン、プロトコル、ポート番号)からのリソースへのアクセスをブラウザが制御するための規約です。同一オリジンからのリクエストには通常制限がないのに対し、異なるオリジンからのリクエストには制限がかかります。
CORSポリシーは、以下のような原則に基づいています。
同一オリジンポリシー (Same-Origin Policy)
ブラウザは、デフォルトで同一オリジンポリシーを採用しています。これは、異なるオリジンからのJavaScriptコードやリクエストへのアクセスを制限するものです。
CORSヘッダーの使用
異なるオリジンからのリクエストが許可される場合、サーバーはCORSヘッダーを返す必要があります。これには、Access-Control-Allow-Originヘッダーが含まれます。このヘッダーは、アクセスを許可するオリジンを指定します。
簡単に言えば、CORSポリシーは、異なるオリジンからのWebリクエストを制限し、サーバーが明示的にアクセスを許可した場合にのみ許可するというメカニズムです。これにより、悪意のあるWebページからの攻撃を防ぎ、ユーザーのセキュリティを向上させます。
それでは、異なるサーバー、異なるポートで動作するアプリケーションのリクエストをどのように許可すべきでしょうか?
ここではAPI Gatewayを通じて許可しようと思います。
ここにアクセスしましょう。
https://cloud.spring.io/spring-cloud-gateway/multi/multi__cors_configuration.html

下記のサイドで「yml」を 「properties」形式で変換します。
https://mageddo.com/tools/yaml-converter
spring.cloud.gateway.globalcors.corsConfigurations.[/**].allowedOrigins=*
spring.cloud.gateway.globalcors.corsConfigurations.[/**].allowedMethods=GET, PUT, POST, DELETE
「allowedMethods」にPUT、POST、DELETEも追加します。

api-gatewayを再起動します。

CORSの問題が解消されることがわかる。
でも、何のデータが入っていない。

    componentDidMount(){
        EmployeeService.getEmployee().then((response) => {
            this.setState({employee : response.data.employee})
            this.setState({department : response.data.department})
            this.setState({organization : response.data.organization})

            console.log(this.state.employee)
            console.log(this.state.department)
            console.log(this.state.organization)
        })

    }
2.5 User,Department,Organizationの詳細表示

実際のHTMLのレンダリングコードはEmployeeComponentで作成します。
import React, { Component } from 'react';
import EmployeeService from '../service/EmployeeService';

class EmployeeComponent extends Component {

    constructor(props) {
        super(props);

        this.state = {
            employee: {},
            department: {},
            organization: {}
        }
    }

    componentDidMount(){
        EmployeeService.getEmployee().then((response) => {
            this.setState({employee : response.data.employee})
            this.setState({department : response.data.department})
            this.setState({ organization : response.data.organization})

            console.log(this.state.employee)
            console.log(this.state.department)
            console.log(this.state.organization)
        })
    }


    render() {
        return (
            <div> <br /><br />
                <div className='card col-md-6 offset-md-3'>
                    <h3 className='text-center card-header'> View Employee Details</h3>
                    <div className='card-body'>
                        <div className='row'>
                            <p><strong>Employee First Name: </strong> {this.state.employee.firstName}</p>
                        </div>
                        <div className='row'>
                            <p><strong>Employee Last Name: </strong> {this.state.employee.lastName}</p>
                        </div>
                        <div className='row'>
                            <p><strong>Employee Email: </strong> {this.state.employee.email}</p>
                        </div>
                    </div>
                    <h3 className='text-center card-header'> View Department Details</h3>
                    <div className='card-body'>
                        <div className='row'>
                            <p><strong>Department Name: </strong> {this.state.department.departmentName }</p>
                        </div>
                        <div className='row'>
                            <p><strong>Department Description: </strong> {this.state.department.departmentDescription }</p>
                        </div>
                        <div className='row'>
                            <p><strong>Department code: </strong> {this.state.department.departmentCode }</p>
                        </div>
                    </div>
                    <h3 className='text-center card-header'> View Organization Details</h3>
                    <div className='card-body'>
                        <div className='row'>
                            <p><strong> Organization Name: </strong> {this.state.organization.organizationName } </p>
                        </div>
                        <div className='row'>
                            <p><strong> Organization Description: </strong> {this.state.organization.organizationDescription } </p>
                        </div>
                        <div className='row'>
                            <p><strong> Organization Code: </strong> {this.state.organization.organizationCode } </p>
                        </div>
                    </div>
                </div>
            </div>
        );
    }
}

export default EmployeeComponent;
render メソッドは、コンポーネントを描画します。
各セクション(Employee、Department、Organization)ごとに、詳細を表示するためのコードが記述されています。
{this.state.employee.firstName} のようにして、state から取得したデータを表示しています。
このコンポーネントは、従業員、部門、組織の詳細データを非同期で取得して、レンダリングします。
import logo from './logo.svg';
import './App.css';
import EmployeeComponent from './component/EmployeeComponent';

function App() {
  return (
    <div className="container">
      <EmployeeComponent />
    </div>
  );
}

export default App;
「<EmployeeComponent />」このコンポーネントに上記のコードが全部含まれている。


やりがいありますね~
まるで、筋トレみたいです。
3. 終わりに
Spring BootとReactを連動させ、バックエンドとフロントエンドを統合するプロジェクトを進めました。フルスタックエンジニアを目指す旅路で、クライアントサイドとサーバーサイドの知識を同時に深めることの重要性を実感しました。これからもエンジニアとしてのスキル向上を目指し、学びと実践を続けていきます。
これまで相対的にスプリングブーツだけに集中して勉強してきましたが、フロントエンド領域での勉強をもう少し補うのもいいと思いますね。 フロントエンドの技術スタックを見ると、何かおしゃれな感じがして華やかに見えるのは私だけそう思うのでしょうか?(ww)
エンジニアファーストの会社 株式会社CRE-CO
ソンさん
【参考】
[Udemy] Building Microservices with Spring Boot & Spring Cloud
この記事が気に入ったらサポートをしてみませんか?