
ユーザー間のフォロー機能を実装する(Ruby on Rails)

今回はRailsアプリケーションで、アプリの利用ユーザー同士でフォローをする(フォロワーになる)、解除する(フォローを外す)、と言ったSNSアプリならではの機能の実装を紹介します。TwitterやInstagramなどでお馴染みの機能ですが、いざ個人制作でSNSアプリのフォロー機能を実装するとなると難しい部分があります。その中で参考になる解説記事やYoutubeの動画での機能実装の解説がありましたのでそれらを参考にしながら実装を進めていきましょう。
前提とポイント
・Userモデル、usersテーブルが存在すること。
(deviseというユーザー管理のgemを使用しています)
・中間テーブルの理解とアソシエーションの組み方。
・データベースは使い慣れているものを使用していただければ大丈夫です。(私自身はmysqlを使用しています)
・モデルやコントローラーなどの各ファイルのコマンド入力、作成方法については割愛しています。
・機能面のみの説明となります。見た目の部分には触れていません。
参考
フォロー機能を実装 - railsでinstagramを作るpart5
(実装についてはこの動画の方法をメインにしています)
https://www.youtube.com/watch?v=nEQ3Bg2uSh0
Railsでフォロー機能を作る方法
(フォロー機能におけるアソシエーションの考え方はこちらを参考に)
https://qiita.com/mitsumitsu1128/items/e41e2ff37f143db81897
アプリの挙動
https://gyazo.com/a23f719a15dcfc0c8b758eede28f01a5
実装
まず初めに中間テーブルとなるFollowモデルを作成します。ユーザー同士のフォロー、フォロワーの関係は、一人ひとりのユーザーに対してどのようなフォロー、フォロワーが存在するのかという「多対多」の関係性となります。まずはFollowモデル作成時に生成されたマイグレーションファイルを以下のように編集します。
db/migrate/〇〇_create_follows.rb

class CreateFollows < ActiveRecord::Migration[6.0]
 def change
   create_table :follows do |t|
     t.belongs_to :user, null: false, foreign_key: true
     t.belongs_to :target_user, null: false, foreign_key: false
     t.timestamps
   end
 end
end
followsテーブルのtarget_userというカラムが、フォロー対象となるユーザーのIDを格納しています。カラムの型がbelongs_toとなっていますが、references型の別名です。可読性を高めるためのものなので記述はどちらでも良いかと思います。参考) https://cloud6.net/so/ruby-on-rails/29380
foreign_key: falseと記述している部分については、これがtrueであるとマイグレーションファイルの実行が出来ないからです。
それではrails db:migrateを行ってください。
そしてFollowモデル、Userモデルにアソシエーションを記述します。
app/models/follow.rb

class Follow < ApplicationRecord
 belongs_to :user
 belongs_to :target_user, class_name: 'User', foreign_key: 'target_user_id'
end
app/models/user.rb
class User < ApplicationRecord
# Include default devise modules. Others available are:
# :confirmable, :lockable, :timeoutable, :trackable and :omniauthable
devise :database_authenticatable, :registerable,
:recoverable, :rememberable, :validatable
// 以下を追加する
has_many :active_relationships, class_name: 'Follow', foreign_key: 'user_id'
has_many :passive_relationships, class_name: 'Follow', foreign_key: 'target_user_id'
has_many :followings, through: :active_relationships, source: :target_user
has_many :followers, through: :passive_relationships, source: :user
endこのフォロー機能を実装する上で一番難しいのが各モデルへの以上のアソシエーションの記述です。各モデルに共通して「class_name: 'User'」、「class_name: 'Follow'」という記述があります。それぞれ「target_user」と「active_relationships」、「passive_relationships」というモデルが定義されていますがこれらは実際には架空のモデルです。この場合のclass_nameというのは実際に存在するUserモデルやFollowモデルを定義することでそれを参照するようにしています。要するにUserモデルにbelongs_to(所属する)、Followモデルをhas_many(所持する)という関係性を明示しています。
次にこれらの記述ですが、
has_many :followings, through: :active_relationships, source: :target_user
has_many :followers, through: :passive_relationships, source: :userthroughオプションを使用し、先ほど定義した架空のモデルのテーブルを中間テーブルとして定義しています。これが実際の経由点(中間テーブル)であるFollowモデルのテーブルを参照していることになります。そして「followings」、「followers」という架空のモデルを定義していますが、フォロー機能のメソッドを記述する際のモデルのメソッドとなります。後述しますがコントローラーに「User.find(params[:user_id]).followings」とすることでUserモデルが中間テーブルである、active_relationshipsテーブル(実際の中身はfollowsテーブル)にアクセスし、あとに続く「source: :target_user」という記述でactive_relationshipsテーブル(Followsテーブル)にあるtarget_user_idカラムを参照してfollowingモデルにアクセスし、フォローしているユーザーを取得するという流れになります。フォロワーについてはその逆のことをすることになります。流れはそのままで参照先がpassive_relationshipsテーブル(中身は同様にFollowsテーブル)のuser_idということになります。それぞれに異なる名前を指定しているため、整理が難しいかと思いますが、以上の流れをイメージ出来れば理解しやすいかと思います。
アソシエーションの記述が完了したら、フォロー機能のルーティング設定、コントローラーを作成します。
config/routes.rb

Rails.application.routes.draw do
 root "home#index"
 devise_for :users
 resources :users do
   resource :follow
 end
end
usersのルーティングとの入れ子構造にして、「resource :follow」と記述します。

rails routesでルーティングを確認すると、ルーティングを入れ子構造にしたことにより、users/user_id/followというようなパスの表示となっています。また「resource」と記述していることについては、あるユーザーをフォローしたり、外したりということは一回のリソースということになります。そのため「follow」という単数形の記述となっておりindexアクションも存在しません。参考) https://rails-study.net/resources-resource/
次にfollowsコントローラーを作成しapp/controllers/follows_controller.rbにて以下のように編集します。
app/controllers/follows_controller.rb

class FollowsController < ApplicationController
 before_action :authenticate_user!

 def create
   current_user.active_relationships.create(target_user_id: params[:user_id])
   redirect_to [:user, { id: params[:user_id] }]
 end

 def destroy
   current_user.active_relationships.find_by(target_user_id: params[:user_id]).destroy
   redirect_to [:user, { id: params[:user_id] }]
 end
end
「before_action :authenticate_user!」によりログインユーザーのみがフォロー機能を使用できるようにしています。フォローが成功した時にredirect_toにてフォローをしたユーザーの詳細ページへと遷移するようになっています。destroyアクションについても同様です。またモデルに「find_by」メソッドを使用することでフォローを解除の対象となるユーザーのデータを取得しています。それではユーザーの詳細ページを作成していきます。
show.html.erbファイルを作成して以下のように編集してください。
app/views/users/show.html.erb

<h3><%= @user.email %></h3>

<% if current_user.active_relationships.exists?(target_user_id: @user.id) %>
  <%= link_to 'フォロー解除', [@user, :follow], method: :delete %>
<% else %>
  <%= link_to 'フォローする', [@user, :follow], method: :post %>
<% end %>現在ログインしているユーザーのactive_relationshipsテーブルにデータが存在していれば、フォローを解除するリンクを表示させて、そうではない場合はフォローするリンクを表示させます。以上で一旦のフォロー機能の実装が出来ました。ただし、現状では自分自身をフォローすることが出来ること、ログアウトした状態でユーザー詳細ページへとアクセスしようとすると、エラーが発生するためこれを修正します。以下のように編集します。
app/views/users/show.html.erb

<h3><%= @user.email %></h3>

<% if user_signed_in? && current_user != @user %> // 追加
 <% if current_user.active_relationships.exists?(target_user_id: @user.id) %>
   <%= link_to 'フォロー解除', [@user, :follow], method: :delete %>
 <% else %>
   <%= link_to 'フォローする', [@user, :follow], method: :post %>
 <% end %>
<% end %> // 追加
「user_signed_in?」でユーザーがログインしているか、その上で現在のログインユーザーがそのユーザー詳細ページのユーザーと異なる場合にのみフォローする、フォローを解除するリンクを表示させます。ここまで来ればあとはラストスパートです。フォロー、フォロワーの一覧を表示させるようにします。まずルーティングを追記して、followingsコントローラーと、followersコントローラーを作成します。ルーティングを以下のように編集します。
config/routes.rb

Rails.application.routes.draw do
 root "home#index"
 devise_for :users
 resources :users do
   resource :follow
   resources :followings // 追加
   resources :followers // 追加
 end
end
そして、作成したfollowingsコントローラーと、followersコントローラーを以下のように編集します。
app/controllers/followings_controller.rb

class FollowingsController < ApplicationController
 def index
   @followings = User.find(params[:user_id]).followings
 end
end
app/controllers/followers_controller.rb
class FollowersController < ApplicationController
def index
@followers = User.find(params[:user_id]).followers
end
end以上のコードについてはアソシエーションの部分で上述した通りで、それぞれフォローしているユーザーとフォロワーとなっているユーザーを取得して、ビューファイルで使用するためのインスタンス変数に代入しています。そしてそれぞれのコントローラーのindexアクションに対応したビューファイルを作成します。作成したビューファイルを以下のように編集してください。
app/views/followings/index.html.erb

<% @followings.each do |user| %>
 <div>
   <%= link_to user.email, [user] %>
 </div>
<% end %>
app/views/followers/index.html.erb
<% @followers.each do |user| %>
<div>
<%= link_to user.email, [user] %>
</div>
<% end %>そして最後に先ほど作成したユーザー詳細ページに各ユーザーのフォロー、フォロワーを一覧することが出来るビューファイルのリンクを配置します。
app/views/users/show.html.erb

<h3><%= @user.email %></h3>
<% if user_signed_in? && current_user != @user %>
 <% if current_user.active_relationships.exists?(target_user_id: @user.id) %>
   <%= link_to 'フォロー解除', [@user, :follow], method: :delete %>
 <% else %>
   <%= link_to 'フォローする', [@user, :follow], method: :post %>
 <% end %>
<% end %>

// 以下を追加する
<div>
 <%= link_to 'フォロー',  [@user, :followings] %>
</div>
<div>
 <%= link_to 'フォロワー',  [@user, :followers] %>
</div>
以上でRailsアプリケーションにおけるフォロー機能の実装が完了しました。実際のデータベースのレコードを確認してみます。
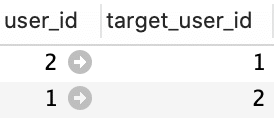
user_idの1と2が相互フォローになっている場合のレコードです。フォロー対象(target_user_id)とフォロワー(user_id)の関係性を見て取ることができます。以上で解説を終了します。個人制作(ポートフォリオ)の参考になれば幸いです。
この記事が気に入ったらサポートをしてみませんか?