DMX制御のLED電球を使ってみたこと / How I struggled with cheap DMX LED lamps

今回、イベントにインスタレーションを出品することとなり、中国、深圳にあるShenzhen LED Colour Light Technology Co., Ltdというメーカー製のDMXでコントロールできるLED内蔵電球型ライト(LCL-RGB-P80)を多数購入し演出に使用した。安価だったがあまり情報がなく制御できるまで苦労したのでその辺りを記録しておく。他に使う方のご参考になれば。
So I had opportunity to build an installation for an event took place in Tokyo this autumn. We purchased DMX-controlled LED bulbs (LCL-RGB-P80) (well, technically it’s not a bulb, but I’ll call it bulb because it looks like a bulb) from Shenzhen LED Colour Light Technology Co., Ltd in Shenzen, China. It was very cheap, but took some efforts to set up since there wasn’t enough info available, so I hope this article might help you guys one day. Good luck and happy building!
ランプモジュールの購入 / Buying the lamp module
インスタレーションに多数ランプを使用することになり、同僚が以前展示会でもらってきていた中国のLED演出機器のメーカーのカタログで見つけた電球型でDXM制御出来るLEDランプを使ってみる方向になった。DMXで色制御できるため容易にシステムが構築できるし、ディジーチェーンで電球を多数接続出来る構成になっており、今回のような多数の電球を使う用途に適しているようだ。ただ、カタログ、ウェブサイトは少し怪し感じがするし、実際に見たときの明るさが分からないまま多数購入するのは大変リスキーだったため、まず1個だけ購入することとした。今回は中国語ができるメンバーにメーカーとのやり取りをしてもらったが、出来ない場合はコミュニケーションがかなりの障害になるかもしれない。ハードウェアやってる人は中国語と友達にならないとね。送金は多少コストが掛かるが即時に送金できるためPaypalにて行った。他にも銀行口座間送金も使え、数%安かったのだが、日本の銀行ではオンラインで送金出来ないことが多く、送金に時間もかかるため急ぎの注文の時はあまり有効ではない。あ、でも例えばtransfer wiseを使えばいいかもしれない。次回やってみます。
We decided to use a lot of bulbs for the installation, so I picked up the DMX-controlled LED bulb which my colleague found on a catalogue he got from a chinese light equipment manufacturer at a trade fair. By using DMX, it’s much easier to build a control system, furthermore their wiring system allow us to daisy-chain a lot of lamps, seemed to adequate for the installation like this one. However it was very risky to purchase large quantity without knowing it’s real quality and specs, especially their not-so-well-made website and catalogue made us quite uncertain about their quality control. So we’ve decided to buy a sample (it was good that we planned well ahead and still had time to do this). This time we had a Chinese speaking member in our team, but normally the communication would have been much difficult I guess. Well, but if you are a hardware-guy, you supposed to be familiar with Chinese, right? I’m doing my best anyway.
We transferred cash over Paypal since we couldn’t wait wire transfer which was actually much cheaper, but I think the service like Transfer Wise would be a good alternative. I might try it next time. (Japanese banks’ wire transfer service is dead slow, but that’s another story)
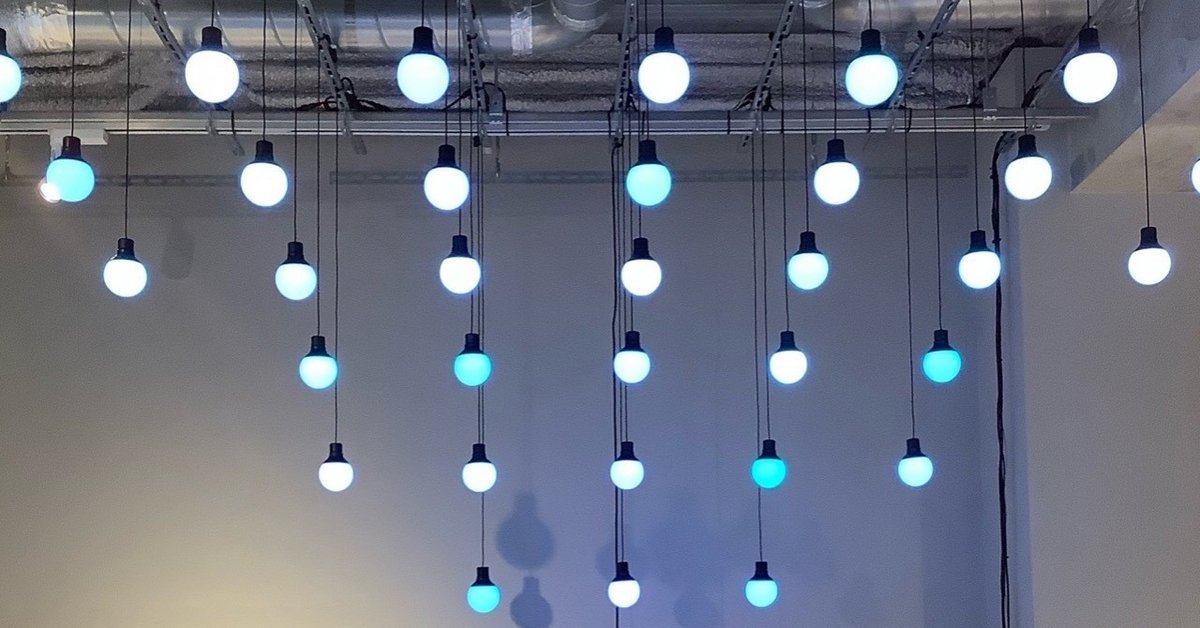
ウェブサイト上では1.2Wとなっているが、問い合わせたところ実際には1.5Wのものがありそれを1個サンプルで購入する事とした。発送は大変早く、注文してから3日ほどでDHLで届いた。サンプルの電球が1個7ドル前後だったのに対して送料が30ドル程度。あとは最低限接続するためのDMX変換コネクタ、電源コネクタも購入した。到着したサンプルが下のもの。周囲が明るく照らせるわけではないが、演出としては使えそうだ。RGBのLEDではよくあることだが本物の電球色っぽく光らせようとしても汚い黄色にしかならないので注意!
On their website it state the bulb’s output as 1.2 Watt, but the manufacturer said they have 1.5 Watt version, so we decided to get that version. The shipping was quite fast, within 3 or 4 days we got the sample over DHL. The sample costed just 7$ and shipping took around 30$. Additionally we got DMX adapter and power adapter as well. The picture below is the sample we got, it wasn’t super bright but better than we‘ve expected. Good enough to use it for the installation!
As normal for the RGB LEDs, it’s not a good idea to make it shine like real bulb. Their yellow colour is just so much darker and uglier than your expectation!

しかし外装が汚い。安価だったためそもそもクオリティは期待していなかったがケーブルが出ているキャップの部分はゲート(射出成型した時の樹脂の注入口)跡がのこっているし、電球のソケットに該当する部分はマットなのにキャップはツヤあり。色も微妙に違う。なんでやねん。そしてDMX+電源24Vが乗っているケーブルが太く、大きなコネクタが直上につくこともあってかなり不格好に見える。ケーブルの太さに対して電球部分が軽量なため、吊り下げてもまっすぐに垂れ下がってくれない。ソケット部分には数個、成型不良がみられ、樹脂が末端まで届いてないものもあった。今回は天井から多数吊架し、ケーブルの存在感は消したかったため、手間が掛かったが配線を柔らかく細いロボットケーブルに付け替え、また仕上がりクオリティの良くない電球のソケット部分を黒マットで塗装することとした。また、その加工のため、電球は基板を接着せず、球も組み付けせずに発送してもらうことが出来た。これがうまく行き、当初予想していたより苦労せずに配線付け替えと塗装作業ができた。
Well, the quality of the bulb’s outer shell wasn’t good at all. Actually I didn’t have any expectation at all due to the cheap unit price, but the cap had visible trace of the gate (the channel in which moulding resin flow through by the injection moulding method), and while cap’s surface texture was shiny, the bracket/base’s texture was matt. Also the shade of white was different. What the f***. The cable to the bulb was so thick and bulky cable connector just above the bulb made it quite ugly. Because the cable was also stiff, the light weight bulb never hangs straight. Furthermore a few of the brackets had moulding failure, that the resin did not reached to the end.
This time we wanted to hang them from ceiling, so we decided to replace the original cable with thin robot-cable, and to paint cap and bracket to black matt paint, although it took extra time. Fortunately for this extra process we could let the manufacturer to ship the bulb without glueing the PCB to the bracket and without completely assembled. This saved our work for disassembly and masking, made painting faster than we thought.


↑手作りの塗装ブース。ぜんぶこれでやったわけではなく途中からちゃんとしたのが来ました。吸気を掃除機でやったのは秘密
This is how I painted stuff, well, I did not use this primitive set up infinitely, proper paint booth arrived later. It is a secret that I used a vacuum cleaner I found in our workshop for ventilation of paint mist.
実際に中に入っている基盤はこのようなもの。ハンダ付けが汚いのはおおめに見ましょう。まあさ、安かったんだから!
Actual PCB looks like this. We should not complain for the low quality soldering, it was cheap after all!


DMXアドレスのアサイン / Assigning DMX address
DMX制御なので電球に個別にアドレスを割り振らないといけない。そのために電球の本発注と共にアドレスライタも電球と一緒に注文した。これを買ったはずが。。。
We needed to assign DMX address to each bulbs, so we’ve purchased the address writer as well. We thought we ordered this one...

これが来た。 But came this guy.

もちろん取扱説明書は中国語版すらついていない。ネット上で 型番XIEMA_V6.0を調べるとAlibaba Japanで売っているものが見つかったのだが、商品説明上にちょっとした情報はあるものの、画面、筐体に書いてあるバージョンが微妙に違う。。。入手したものはB版、Alibaba上にあるものはC版で複数のチップに対応しているようだった。
Off course there was no document even in Chinese. I searched on Internet for the product number XIEMA_V6.0 and found the product on Alibaba Japan. There was some information on product description, but displayed content and version on the body look different... We got Ver. B, but Alibaba’s one is Ver. C. It can program several type of chips.
この記事上ではDMX−LEDストリップのアドレスをアサインしており、三つあるコネクタの一番右、GND/ DB/DAは使用不可となっていたが、入手したライタでは右側のコネクタにXLR3(3芯DMX)コネクタがつながっていた。どうなってんねん。購入した電球タイプの接続図は見つからなかったためAlibaba記事を信じて中央のコネクタに付属DMXコネクタを挿しなおし(これが間違いだった)、購入したDMX変換コネクタを介して電球につないでみる。(そしていま気づいたがピン配置上で中央と右では端子ABの位置が逆になっている…)
Alibaba’s article was about assigning address for DMX-LED strip. There are tree ports on the writer and the article says the right one is not in use. Hä, there is XLR3 connector attached on the right port of our writer? What’s this? I could not find wiring diagram for the bulb type like we bought, so I just followed the article and moved the XLR3 connector to the centre port (it turned out that it was wrong). And connected the bulb over DMX adapter we also bought with the bulb. (Now I’ve also noticed that the order of terminal A and B are switched on centre and right...)
中央のポート / Centre port : ADD / B / A / GND
右のポート / Right port:A / B / GND
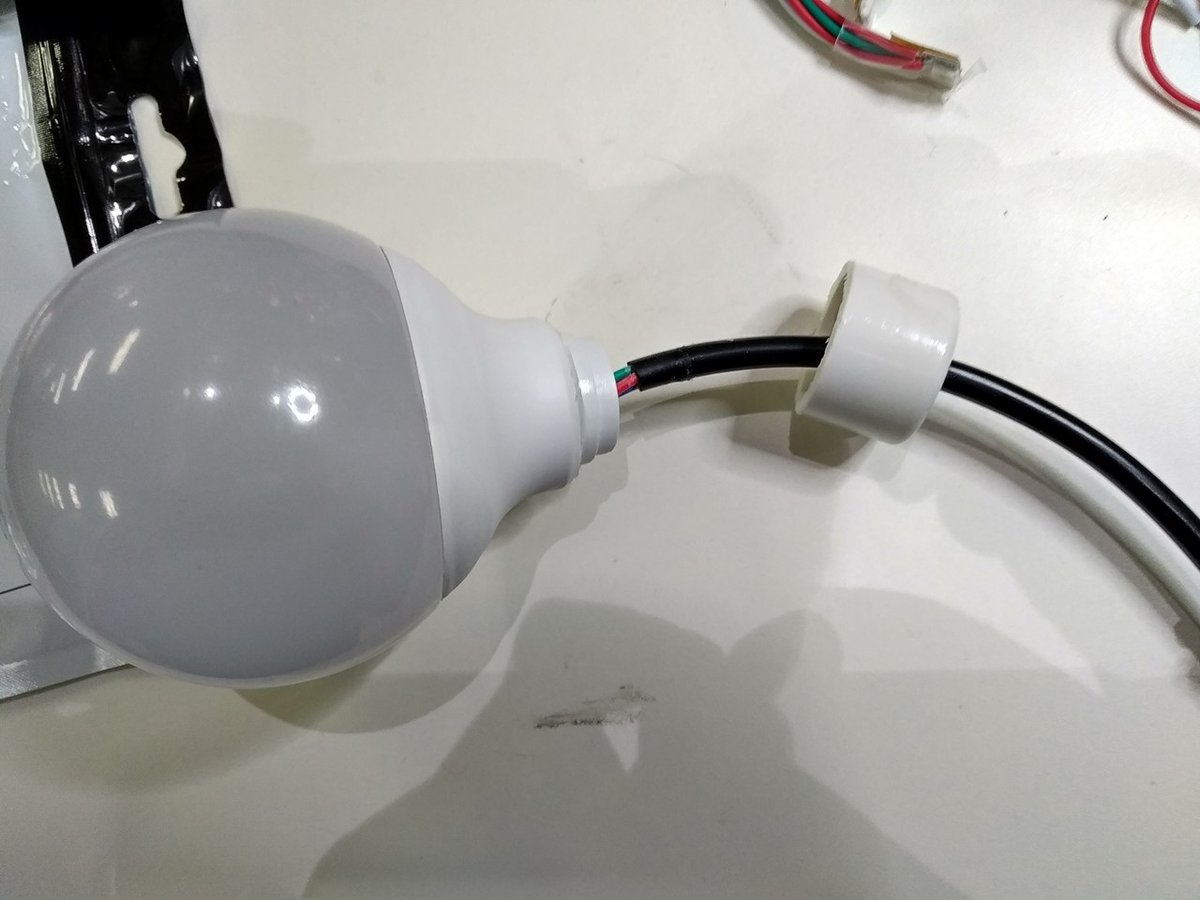
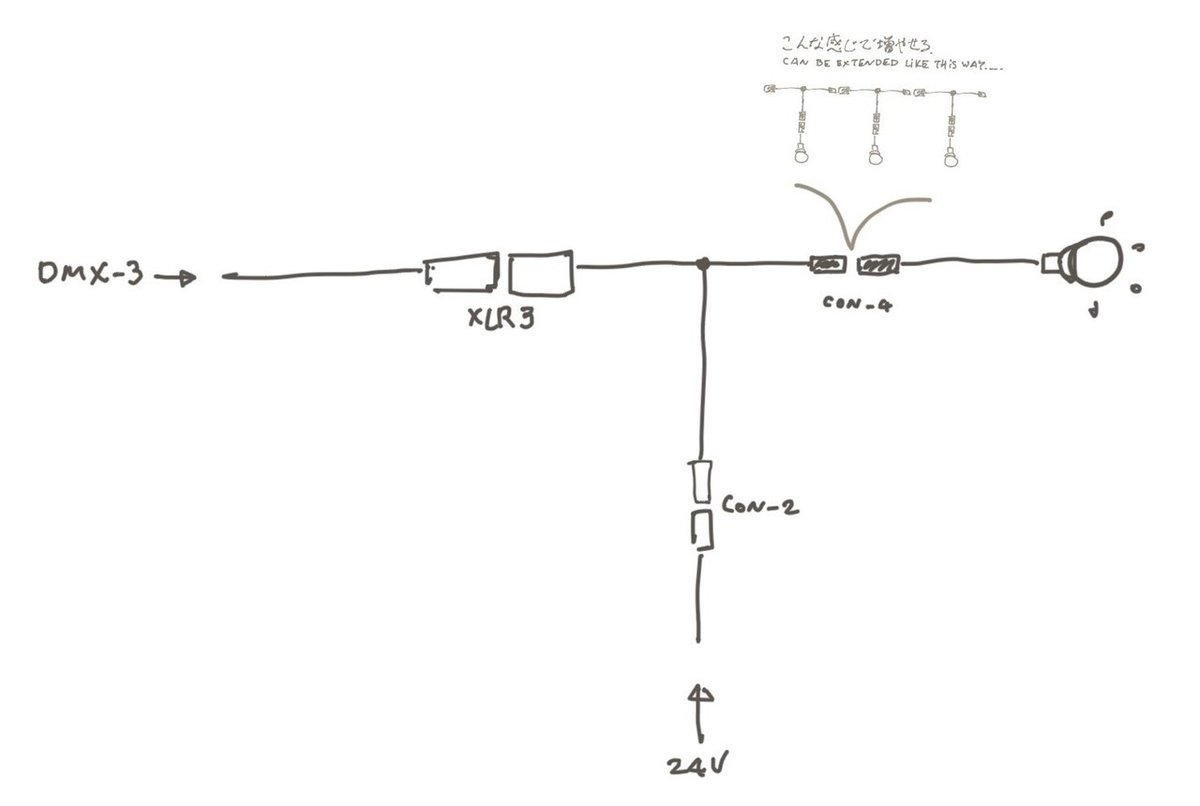
電源はDMX変換コネクタから分岐している2ピンのコネクタに24Vを供給すればよい。電源供給したところで電球は点灯したためとりあえず故障していないことが確認できた。
接続はこんな感じである。
24V is supplied to the wire came from DMX adapter. The bulb turn on when I supplied the power. Oh goodness. It’s not broken. Wiring is like this:
アドレスライタのメニューは以下のようになっており分かりにくいこと極まりない。
The menu on the writer was like this. Confusing as hell.
- Start Ch: 開始チャンネル番号 / Beginning channel number
- Ch Mode: 1チップあたりのチャンネル数、RGBなら3 / Channels per 1 LED chip, so if you got RGB LED, it should be 3
- Number: チップ数(LEDストリップ上のチップ数?今回は標準の512のままにしておいた)/ This must be the number of chips per daisy-chained line. I left the default value 512.
- IC: チップ型番 / Model number of the LED chip
開始チャンネルが指定できれば、チャンネルモードとチップ数はそのままで良いはずなのだが、チップ型番が分からない。幸い完全に組立てせずに送ってもらったため容易に基盤上で確認できたが(UCS-512-C4)、分からなかったら闇雲に試すか、分解して確認するしかない。また、同じ電球タイプでも、いちばん最初に送ってもらったサンプルには別のICが入っており、このライタでは対応しておらずチャンネルのアサインができなかった。出荷時はチャンネル1−3がRGBにそれぞれ設定されているため、開始チャンネルを4にセットしてSETボタンを押すとアドレスが書き込まれるはず…なのだが完了表示が出てもチャンネルが変わった様子がない。いろいろ試すうちに接続していなくてもOK表示が出ることが分かった。オイ!
中央のポートに挿しなおしていたDMXコネクタを出荷時の右側のポートに付け替えたところようやくアドレスの切り替えに成功した。なんだ、このポート生きてるじゃないですか。
Well, so each time we need to specify only start channel number and leave channel mode and chip number. But chip model number? Fortunately we got half-assembled products this time, so it was easy to check up the chip type (it was USC-512-C4), but normally you would have to disassemble the product or try out all patterns. Even with same type bulb product, the first sample we got from the manufacturer actually had different type of control chip which is not listed on this writer’s menu. On shipping they are all programmed from 1-3 channel for each R, G, B, so I have tried to change the start channel to 4. Pressed the SET button and device’s display showed “OK”... Yet the channel seemed to have never changed. I have tried several thing, then realised that the “OK” message appeared even the wire is not connected. Man!
I finally managed to rewrite the channel after I moved back the DMX connector to the right position where the connector is initially plugged. So this port is alive actually!

このように+-ボタンを同時押しでテストモードに入れるのだが、こっちのメニューもまた分かりにくい。
You can enter to the Test Mode by pressing + and - button at the same time. Yet this menu was equally confusing.
- Mode: RGB/ RGBWなどLEDチップのモード指定 / Specify LED chip’s mode. e.g. RGB / RGBW
- Ch. Num: チャンネル番号 / Channel number
- Scan: 指定したチップを白で表示 / You can specify a chip to light up white
- Change R: 色が変わるモード / Color changing mode
- Step-W: 白色でステップアップ/ダウンするモード / Step-up and -down in white
- Ch Value: 指定値を送るモード / Send specific value in white
Modeは間違えることがないが、2番目のチャンネル番号とは、色信号を送る最大チャンネルを指している。つまりRGBのLEDに対して設定モードでCh 4と設定した場合
Ch4: R, Ch 5: G, Ch 6: B
なのでここでは6と設定するとCh:1 からCh:6まで255の信号が送られて白色で点灯してくれる。なぜこういう分かりにくいインターフェースなのか、僕には聞かないでください。
Scanは別に設定したアドレスをスキャンしてくれるわけではなく、チップ(ここではDMX電球)を順番に点灯させる機能なため、上記のように設定モードでCh 4を設定した場合、Scanモードで2と指定するとチップ/電球が白色に点灯する。うーん、最高に分かりにくい!それ以下は各種色の変化パターンなので特に説明は不要と思う。
You won’t confuse Mode setting, but second item, Channel Number is actually the highest channel number to send color signal. So if you set channel to 4 in the setting mode, channels are programmed like this: Ch4: R, Ch 5: G, Ch 6: B. In this case you have to specify “6”, then color signal are sent from Ch: 1 to Ch:6, so you will the bulb to be lit white. Please don’t ask me why they made such confusing way!
“Scan” does not scan the address of the lighting device, but made to lit the chip / device one after another so you can ensure you haven’t programmed same channel twice. So when you set channel to 4, you have to specify “2” in Scan Mode to see the light bulb to be lit white. What a great UI design! Other modes are more or less self-explaining I guess.
そして、最終的にはこのようになりました。
And it became like this.


教訓 / Learning
- 中国からの発送は時間が掛からないが納期に注意
- The shipping from china won’t take much time, but make sure you have enogh lead time for the production
- 製造のクオリティが低くてもカバーできる対策があること(自前で塗装する、ユーザーが近くで観察できない位置に配置する、など)
- Prepare measurement even the production quality was not good enough (e.g. painting by your self, use the product where user can’t come closer)
- 中国語ですら情報がない場合がある
- There are cases you can’t even find information in Chinese
- サンプル発注には結構対応してくれた。逆にその辺の対応でメーカーの良し悪しを見極める必要がある。
- This time the manufacturer shipped us for sample purchase and they respond very quickly. It is necessary to estimate their quality from the communication.
- アドレスライタの電源は5Vだが、電球の電源は24V、同じコネクタにしておいたまま間違って差したりすると派手な音を立ててライタが壊れるので注意(壊した人)
- The power supply of the address writer is 5V, while bulbs’ power is 24VDC. Clever enough I used same DC barrel jack and eventually sticked 24V to the writer. It can make large CRACK and break. (Yes, I did)
- 中国語できる、またはできる人がいると便利!
- Learn Chinese, or find someone who speak Chinese, they are so helpful!
この記事が気に入ったらサポートをしてみませんか?