
OBSに表示するDiscordオーバーレイのを横並びで四角形で表示するCSS

はじめに
Among Usの配信だったりAPEXだったりコラボ配信に役立つCSSです。

とりあえず完成品のCSSが欲しい方は下から
body {
	background-color: rgba(0, 0, 0, 0);
	margin: 0;
	padding: 0;
	overflow: hidden;
}

.voice-container .voice-states {
	display: flex;
	flex-wrap: wrap;
}

.voice-container .voice-states .voice-state {
	width: 150px;
	display: inline-block;
	height: auto;
	text-align: center;
	margin-bottom: 38px;
	padding: 10px;
}

.voice-container .voice-states .voice-state .avatar {
	width: 150px;
	height: 150px;
	border-radius: 10px;
	border: none;
	filter: brightness(50%);
	float: none;
	display: block;
	margin-left: auto;
	margin-right: auto;
}

.voice-container .voice-states .voice-state .avatar.speaking {
	border-radius: 10px;
	border-color: rgba(0, 0, 0, 0) !important;
	position: relative;
	animation-name: speak;
	animation-duration: 5000ms;
	animation-fill-mode: forwards;
	filter: brightness(100%);
	filter: drop-shadow(0 0 5px rgba(255, 102, 255, 1));
}

.voice-container .voice-states .voice-state .user {
	text-align: center;
	padding-top: 0px;
}

.voice-container .voice-states .voice-state .user .name {
	font-size: 21px !important;
	line-height: 2.1;
}

@keyframes speak {
	0% {
		bottom: 0px;
	}
	5% {
		bottom: 10px;
	}
	10% {
		bottom: 0px;
	}
	15% {
		bottom: 10px;
	}
	20% {
		bottom: 0px;
	}
	25% {
		bottom: 10px;
	}
	30% {
		bottom: 0px;
	}
	35% {
		bottom: 10px;
	}
	40% {
		bottom: 0px;
	}
	45% {
		bottom: 10px;
	}
	50% {
		bottom: 0px;
	}
	55% {
		bottom: 10px;
	}
	60% {
		bottom: 0px;
	}
	65% {
		bottom: 10px;
	}
	70% {
		bottom: 0px;
	}
	75% {
		bottom: 10px;
	}
	80% {
		bottom: 0px;
	}
	85% {
		bottom: 10px;
	}
	90% {
		bottom: 0px;
	}
	95% {
		bottom: 10px;
	}
	100% {
		bottom: 0px;
	}
}
導入方法
①Discord StreamKit Overlayを開く
②Install for OBSをクリック

③VOICE WIDGETをクリック

④OBSに表示したいDiscordのサーバ、ボイスチャンネルを選択する

⑤画面右にあるURLをコピー

⑥OBS Studioを開く
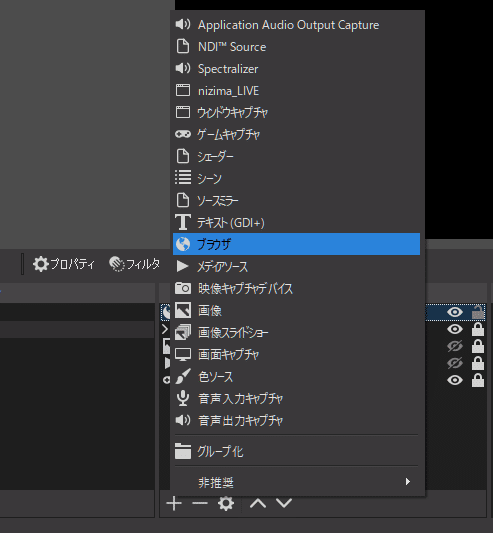
⑦ソースからブラウザを追加
⑧URL欄に先ほどコピーしたURLをペースト

⑨カスタムCSS欄に序盤に記載していたCSSをコピー&ペースト
元々入っているカスタムCSSは消して大丈夫です。


⑩OK
あとは好きな位置に動かして完成です。
カスタムについて
・周りの枠の色を変えたい
以下部分の
.voice-container .voice-states .voice-state .avatar.speaking {
	border-radius: 10px;
	border-color: rgba(0, 0, 0, 0) !important;
	position: relative;
	animation-name: speak;
	animation-duration: 5000ms;
	animation-fill-mode: forwards;
	filter: brightness(100%);
	filter: drop-shadow(0 0 5px rgba(255, 102, 255, 1));
}
ここのrgbaを変えてください
カラーコードがあればrgbaに変換できるサイトなどがあります。
WEBクリエイターの部屋様:カラーコードからrgbaへ変換するツール【css】
filter: drop-shadow(0 0 5px rgba(255, 102, 255, 1));・名前の大きさを変えたい
この箇所のfont-sizeの数値を上げたり下げたりしてみてください。
文字の位置がズレてるなぁぁぁって方はline-heightの数値も変えてみてください
.voice-container .voice-states .voice-state .user .name {
	font-size: 21px !important;
	line-height: 2.1;
}
以上です。最後まで読んでいただき、ありがとうございました。
この記事が気に入ったらサポートをしてみませんか?