BOCCO emoがおすすめ料理を紹介~Rakuten Web Service連携〜

こんにちは。
ユカイ工学エンジニアの宮﨑です。
本記事では、BOCCO emoとRakuten Web Service(楽天グループ株式会社が提供しているAPI)を連携した作例の紹介と、設定方法についてご説明します。
はじめに
献立が思いつかなくて無駄に時間を消費してしまう。そんなことよくありますよね。
そこで、おすすめの料理を紹介してくれるBOCCO emoを作ってみました。
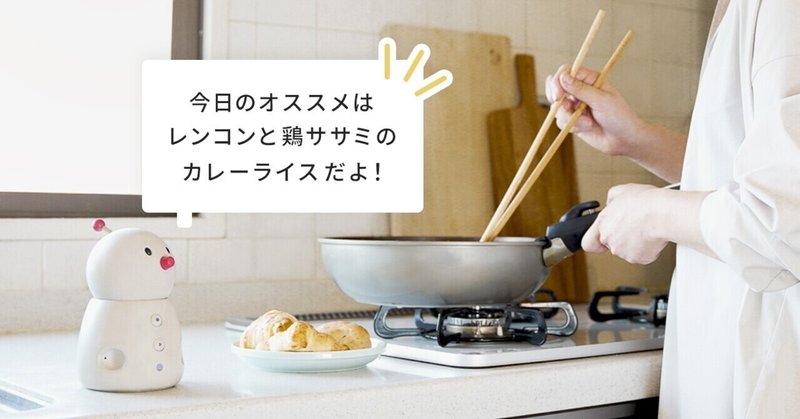
BOCCO emoに「お腹すいた」と吹き込むと、おすすめの料理を紹介してくれます。
必要なもの(開発環境)
システム構成
システム構成図は下記の通りです。

BOCCO emoがVUIコマンドを認識すると、BOCCO emo Platform APIを経由し、Apps Scriptに通知されます。Apps ScriptはRakuten Web ServiceのAPIを利用し、楽天レシピの情報を取得します。
最後に、レシピの料理名と概要をBOCCO emoに発話させます。
設定方法
Rakuten Web Serviceの設定
Rakuten Web Serviceにアクセスし、楽天会員でログインします。
次に、新規アプリの作成を行います。
アプリケーションの一覧画面にアクセスし、Application IDを控えておきます。

BOCCO emo platform APIの設定
BOCCO emo Platform APIの管理画面にログインし、APIを実行するための、認証情報を取得します。
ダッシュボードの画面から、リフレッシュトークンを控えておきます。

Apps Scriptの設定
Apps Scriptを新規作成します。
以下のコードを入力し、ウェブアプリとしてデプロイします。
class Emo {

    constructor() {
        this.refleshToken = PropertiesService.getScriptProperties().getProperty('refreshToken')
        this.baseURL = 'https://platform-api.bocco.me'
        this.accesToken = this.getAccesToken(this.refleshToken)
    }

    getAccesToken(refleshToken){// アクセストークンの取得
        try {
            const requestUrl = this.baseURL + '/oauth/token/refresh'
            const response = UrlFetchApp.fetch(requestUrl, {
                'method' : 'post',
                'payload' : JSON.stringify({'refresh_token': refleshToken}),
                'headers' : {'Content-Type': 'application/json'}
            })
            return JSON.parse(response.getContentText()).access_token
          } catch (e) {
            Logger.log(e.message)
            return ''
          }
    }

    message(text, room_uuid){// 発話要求(メッセージ投稿)
        try {
            const requestUrl = this.baseURL + '/v1/rooms/'+ room_uuid +'/messages/text'
            const response = UrlFetchApp.fetch(requestUrl, {
                'method' : 'post',
                'payload' : JSON.stringify({'text': text}),
                'headers' : {
                    'Content-Type': 'application/json',
                    'Authorization': 'Bearer '+ this.accesToken
                }
            })
            Logger.log(response)
            return true
          } catch (e) {
            Logger.log(e.message)
            return false
          }
    }

    setWebhookUrl(){// Webhook URLの設定
        const payload = {
          "description": "my webhook",
          "url": PropertiesService.getScriptProperties().getProperty('webhookUrl')
        }
        try {
            const requestUrl = this.baseURL + '/v1/webhook'
            const response = UrlFetchApp.fetch(requestUrl, {
                'method' : 'post',
                'payload' : JSON.stringify(payload),
                'headers' : {
                    'Content-Type': 'application/json',
                    'Authorization': 'Bearer '+ this.accesToken
                }
            })
            Logger.log(response)
            return true
          } catch (e) {
            Logger.log(e.message)
            return false
          }
    }

    setWebhookEvents(){// Webhookイベント種別の設定
        const payload = {
          "events": [
            "vui_command.detected"
          ]
        }
        try {
            const requestUrl = this.baseURL + '/v1/webhook/events'
            const response = UrlFetchApp.fetch(requestUrl, {
                'method' : 'put',
                'payload' : JSON.stringify(payload),
                'headers' : {
                    'Content-Type': 'application/json',
                    'Authorization': 'Bearer '+ this.accesToken
                }
            })
            Logger.log(response)
            return true
          } catch (e) {
            Logger.log(e.message)
            return false
          }
    }
}
var emo = new Emo()

function setting(){// 初期設定(Webhookの設定)
  emo.setWebhookUrl()
  emo.setWebhookEvents()
}

function doPost(e) {// Webhookが通知された時の処理
  const jsonContents = JSON.parse(e.postData.contents)
  if(jsonContents.event != "vui_command.detected"){
    return
  }
  if(jsonContents.data.vui_command.kind !='interjection.hungry'){
    return
  }
  const text = getRecipe()
  emo.message(text, jsonContents.uuid)
}

function getRecipe(){// レシピ情報の取得

  const applicationId = PropertiesService.getScriptProperties().getProperty('applicationId')
  const url = 'https://app.rakuten.co.jp/services/api/Recipe/CategoryRanking/20170426?applicationId=' + applicationId
  var options = {
    'method' : 'get',
    'contentType': 'application/json'
  };

  const response = UrlFetchApp.fetch(url, options)
  const recipe = JSON.parse(response.getContentText()).result
  const recipeBest = recipe[0]// ランキングの1位を取得
  const text = "今日のおすすめは、" + recipeBest.recipeTitle + "。" + recipeBest.recipeDescription + "。😀"
  Logger.log(recipe)
  return text
}
デプロイ後に表示される、ウェブアプリのURLを控えておきます。

今まで控えたものを、Apps Scriptのスクリプトプロパティに追加します。
applicationId: Rakuten Web Serviceで取得したApplication ID
refreshToken: BOCCO emo Platform APIで取得したリフレッシュトークン
webhookUrl: Apps Scriptで取得した、ウェブアプリのURL

最後に、コードの編集画面からsetting関数を実行します。
setting関数を実行すると、BOCCO emo Platform APIからApps ScripにWebhookが通知されるようになります。

以上で設定は完了です。
実際の様子
おわりに
Rakuten Web Serviceと連携し、BOCCO emoに料理を紹介してもらう機能を追加してみました。
BOCCO emo Platform APIを利用することで、外部システムと容易に連携することができます。
なお、今回は使用しませんでしたが、Python、node.js用のライブラリも公開されています。
Python:https://github.com/YUKAI/emo-platform-api-python
node.js:https://github.com/YUKAI/emo-platform-api-nodejs
BOCCO emo APIsの活用について、サポートしますので、ご興味ある方はお気軽に問い合わせください!

この記事が気に入ったらサポートをしてみませんか?