
[laravel8] Model Factory

Laravelで開発を行っていて、新たにテーブルにカラムを追加することになりマイグレーションを編集し
php artisan migrate:fresh
上のコマンドを実行するということはよくあることです。
しかしこのコマンドを実行すると今までデータベースに入っていたテスト用のデータはすべて消えてしまい、もう一度データベースにデータを挿入しなくてはなりません。
そんなときにLaravelではテスト用のデータを生成してくれるModel Factoryという機能があります。
UserFactory
LaravelではデフォルトでUserFactoryが存在しているので、Model Factoryを理解するためにもUserFactoryを見ていきましょう。
database/factories/UserFactory.php
<?php

namespace Database\Factories;

use App\Models\User;
use Illuminate\Database\Eloquent\Factories\Factory;
use Illuminate\Support\Str;

class UserFactory extends Factory
{
   /**
    * The name of the factory's corresponding model.
    *
    * @var string
    */
   protected $model = User::class;

   /**
    * Define the model's default state.
    *
    * @return array
    */
   public function definition()
   {
       return [
           'name' => $this->faker->name(),
           'email' => $this->faker->unique()->safeEmail(),
           'email_verified_at' => now(),
           'password' => '$2y$10$92IXUNpkjO0rOQ5byMi.Ye4oKoEa3Ro9llC/.og/at2.uheWG/igi', // password
           'remember_token' => Str::random(10),
       ];
   }

   /**
    * Indicate that the model's email address should be unverified.
    *
    * @return \Illuminate\Database\Eloquent\Factories\Factory
    */
   public function unverified()
   {
       return $this->state(function (array $attributes) {
           return [
               'email_verified_at' => null,
           ];
       });
   }
}
このクラスで注目する点はdefinitionメソッドです。
   public function definition()
   {
       return [
           'name' => $this->faker->name(),
           'email' => $this->faker->unique()->safeEmail(),
           'email_verified_at' => now(),
           'password' => '$2y$10$92IXUNpkjO0rOQ5byMi.Ye4oKoEa3Ro9llC/.og/at2.uheWG/igi', // password
           'remember_token' => Str::random(10),
       ];
   }
このFactoryはmodelプロパティからもわかるようにUserクラスのデータを生成するFactoryで、
protected $model = User::class;そのUserモデルの生成したいデータをこのdefinitionメソッドの中で生成するデータを定義しています。
カラムによってはデフォルトの値が設定されていることもあるので、全てのカラムを定義する必要はありません。
この場合はname,email,email_verified_at,password,remember_tokenを生成するようになっています。
またfakerとありますが、これは文字列を生成してくれるライブラリです。
$this->faker->name()
は名前を自動で生成してくれます。他にも色々ありますが、使いながら紹介していきます。
UserModel
では、Factoryを設定するModel側はどのような設定が必要でしょうか?
app/Models/User.php
<?php

namespace App\Models;

use Illuminate\Contracts\Auth\MustVerifyEmail;
use Illuminate\Database\Eloquent\Factories\HasFactory;
use Illuminate\Foundation\Auth\User as Authenticatable;
use Illuminate\Notifications\Notifiable;

class User extends Authenticatable
{
   use HasFactory, Notifiable;

・・・・・・ModelFactoryを使用するにはモデルでHasFactory traitをuseする必要があります。
use Illuminate\Database\Eloquent\Factories\HasFactory;
use HasFactory
HasFactory traitについて詳しく知る必要はありませんが、これをuseすることでModelのfactoryメソッドを使用することができるようになります。
factoryメソッド
$php artisan db:seed
コマンドを使ってデータベースにデータを挿入するときに実行される、(デフォルトで存在している)DatabaseSeeder.phpを見てると、
database/seeders/DatabaseSeeder.php
\App\Models\User::factory(10)->create();ここで確認できるようにfactoryメソッドを使いデータを生成し、そのデータをデータベースへ挿入できます。
つまりfactoryメソッドが使えれば、テストデータを生成してそのデータをデータベースに挿入することができるようになるということです。
Userデータを作成
tinkerを使ってデフォルトのUserFactoryを使ってみます。
$php artisan tinker
Psy Shell v0.10.8 (PHP 8.0.3 — cli) by Justin Hileman
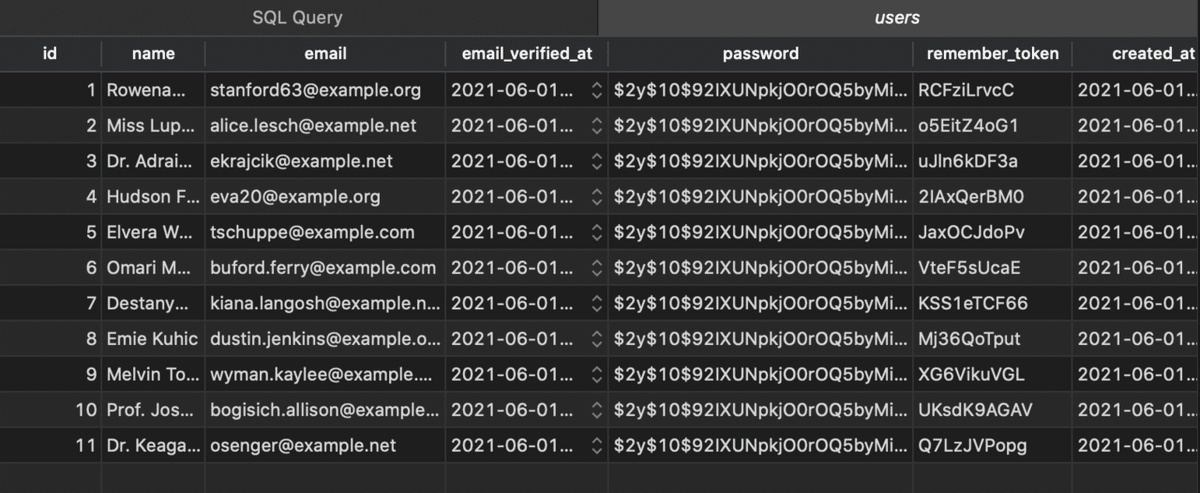
>>> User::factory()->create();
[!] Aliasing 'User' to 'App\Models\User' for this Tinker session.
=> App\Models\User {#3421
name: "Rowena Cummerata",
email: "stanford63@example.org",
email_verified_at: "2021-06-01 13:11:42",
#password: "$2y$10$92IXUNpkjO0rOQ5byMi.Ye4oKoEa3Ro9llC/.og/at2.uheWG/igi",
#remember_token: "RCFziLrvcC",
updated_at: "2021-06-01 13:11:42",
created_at: "2021-06-01 13:11:42",
id: 1,
}User::factory()->create();
を実行してみると、自動生成されたデータが返ってきます。
もちろんデータベースにも入ってきています。

User::factory(10)->create();
と10ユーザーと指定してみるとさらに10ユーザーが挿入されます。
PostモデルのFactoryを作ってみる
Postモデルはコマンドで作ったのでHasFactoryはuseされています。
app/Models/Post.php
<?php

namespace App\Models;

use Illuminate\Database\Eloquent\Factories\HasFactory;
use Illuminate\Database\Eloquent\Model;

class Post extends Model
{
   use HasFactory;

   protected $guarded = [];

   public function category()
   {
       return $this->belongsTo(Category::class);
   }
}
この状態ではfactoryメソッドは使えるようになりますが、LaravelはPostFactoryに定義があるのかを探しにいってしまうので、エラーになってしまいます。
なので、PostFactoryを作成します。
$php artisan make:factory PostFactory
database/factories/PostFactory.php に雛形のファイルが生成されるのでdefinitionメソッドに定義をしていきます。
    public function definition()
   {
       return [
           'user_id' => User::factory,
           'category_id' => Category::factory,
           'title' => $this->faker->sentence,
           'slug' => $this->faker->slug,
           'excerpt' => $this->faker->sentence,
           'body' => $this->faker->paragraph
       ];
   }
比較的短いtitleとexcerptは $this->faker->sentence 、slugも用意されているのでslugには $this->faker->slug 、またブログ記事の内容になるbodyには$this->faker->paragraphでデータを生成するように定義します。
user_idとcategory_idに関してはそれぞれのモデルのfactoryを使い、それぞれ生成されたデータを代入するように設定しています。
CategoryFactoryはまだ作っていないので、ここで一緒に作っておきます。
$php artisan make:factory CategoryFactory
database/factories/CategoryFactory.php
nameとslugを生成するように設定します。
<?php

namespace Database\Factories;

use App\Models\Category;
use Illuminate\Database\Eloquent\Factories\Factory;

class CategoryFactory extends Factory
{
   /**
    * The name of the factory's corresponding model.
    *
    * @var string
    */
   protected $model = Category::class;

   /**
    * Define the model's default state.
    *
    * @return array
    */
   public function definition()
   {
       return [
           'name' => $this->faker->word,
           'slug' => $this->faker->slug
       ];
   }
}
TinkerでPostモデルのFactoryが動くか見てみます。
$php artisan tinker
Psy Shell v0.10.8 (PHP 8.0.3 — cli) by Justin Hileman
>>> App\Models\Post::factory()->create();
=> App\Models\Post {#3447
    user_id: 1,
    category_id: 1,
    title: "Consequatur quam id id nesciunt.",
    slug: "ducimus-dolor-quas-et-nihil-aut-adipisci-error",
    excerpt: "Ducimus dolorem nihil maiores eaque.",
    body: "Consequuntur amet aliquam ducimus et quam sit hic. Aspernatur et et accusantium dolorem aspernatur natus ut. Rerum laudantium ducimus maxime sit dicta quos.",
    updated_at: "2021-06-01 13:42:01",
    created_at: "2021-06-01 13:42:01",
    id: 1,
  }
問題なく新しい記事が生成されているようです。
データベースを見ても
Postsテーブル

Usersテーブル

Categoriesテーブル

すべて生成されています。
Tinkerで
App\Models\Post::factory(3)->create();
などと生成したいデータの数も指定できるので、適当に生成したあとにトップページを確認してみると
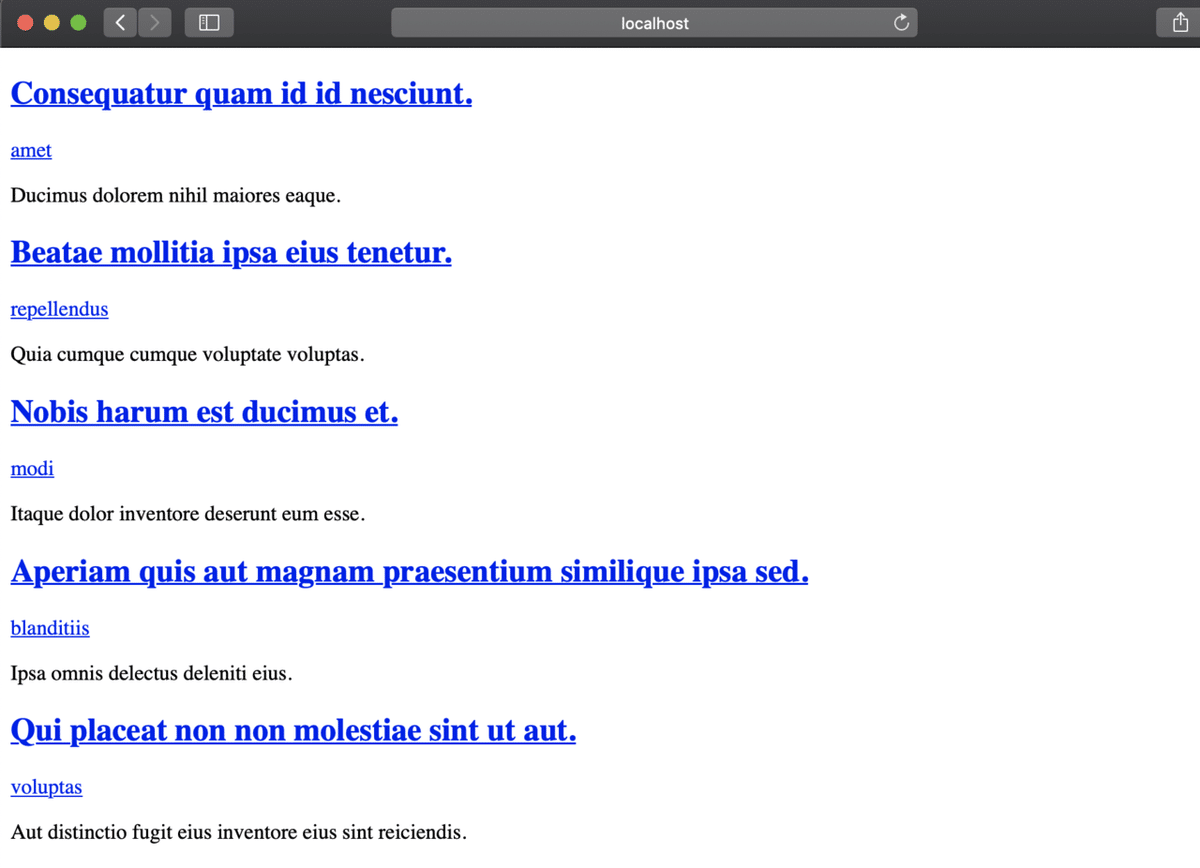
生成されたデータでブログができていますね。
最後に
Laravelのmodelのfactoryを使うことで、データベースをリフレッシュした後に毎回テストデータを挿入する必要がなくなりました。
次の記事ではこのFactoryを使用するSeederと呼ばれるコマンドを説明していきます。
今回のソースコードは
この記事が気に入ったらサポートをしてみませんか?