【技術解説】 Niantic Lightship VPS新機能 『Remote Authoring』を試してみた

1. Article summary - 記事概要
Hello, this is Matt from the Designium.
Through this article, I will explain the Remote Authoring, one of the new features of Niantic's Lightship VPS, which was announced in 2022.
こんにちは、デザイニウムのMattです。この記事では、2022年に発表されたNiantic社のLightship VPSの新機能のひとつである『Remote Authoring』について解説していきます。
Previously, when creating AR content, you had to actually go to the location to do so, but with 'Remote Authoring' you can search the Geospatial Browser map for the location and place content without having to go to a real location.
これまでARコンテンツを作成する場合、実際にその場所に行かなければなりませんでしたが、「Remote Authoring」をつかうことで、実際の場所に行かなくても、Geospatial Browser の地図からその場所を検索してコンテンツを配置することが可能です。
Niantic has posted a guide to using their remote authoring on their private beta forums:
https://community.lightship.dev/t/getting-started-with-vps-remote-authoring/2671
Here we will summarise the important points of that thread and add our own notes on the process.
Remote Authoring is an important tool for improving the efficiency of Augmented Reality development. Remote authoring allows us to place content accurately at a location without having to physically visit the site.
Niantic has developed a convenient workflow that combines the ability to find locations where we can build AR experiences and download a 3D mesh of the area that we can use to remotely author content.
Nianticがリモートオーサリングについてのガイドをフォーラムに共有しているので、このNoteではその中でも特に重要なポイントを紹介したいと思います。
リモートオーサリングはAR開発をより効率的に行うために大変重要なツールになります。現地に行くことなく、ARのオブジェクトをそこに配置できるようになるためです。
Nianticは、どこでAR体験をできるのかを把握して、そのスポットの3Dデータをダウンロードし、リモートでオーサリングできるようなワークフローを既に開発していますので、そのフローに沿って説明をしていきます。
2. Getting the Map Data - マップデータの取得
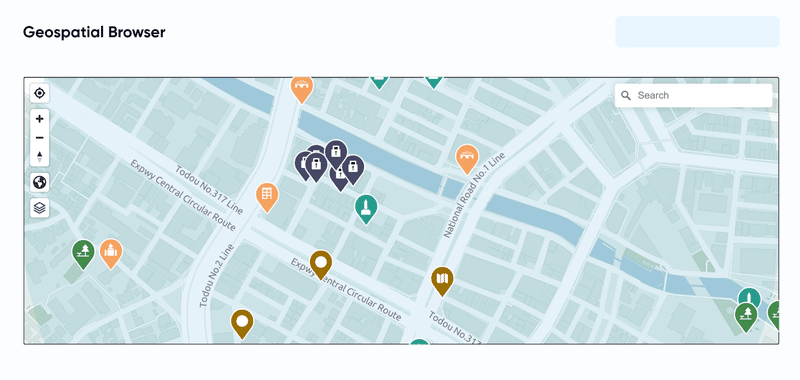
The Geospatial Browser is much like the VPS Coverage Map that can be accessed via the Lightship developer dashboard. It shows the available VPS Wayspot locations but also allows users to see the 3D meshes associated with that location.
Geospatial BrowserはLightship Developer Dashboardで確認できるVPS Coverage mapに非常に似ています。Geospatial Browserでは利用可能なVPS Wayspotの位置を確認でき、且つ各Wayspotの3Dメッシュデータも見ることができます。
By clicking on a Wayspot marker we can see the various 3D meshes. For example below is a Wayspot I created outside of our office building in Gotanda.
各WayspotのマーカーをクリックしてそのWayspotの3Dメッシュデータを確認できます。例えば、下記は私が作成した五反田にある弊社のビルのエントランスの3Dメッシュデータです。
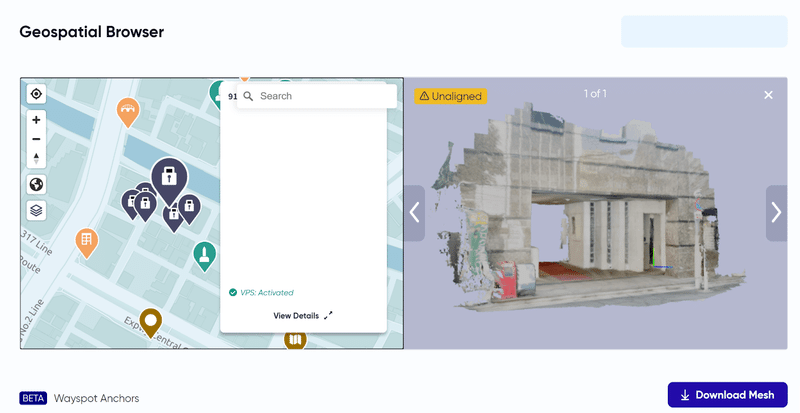
Once we have found the 3D mesh we think will be most helpful placing our content we can hit the Download Mesh button to download the data in a zip file.
3Dメッシュデータを確認後は、ダウンロードボタンをクリックするだけでzipファイルでダウンロードすることができます。
3. Authoring the Content - コンテンツのオーサリング
To start remote authoring first install the remote authoring SDK unity package to Unity.
I suggest creating a new scene to do the remote authoring to keep things tidy.
次に、remote authoring SDKのunity packageをUnityプロジェクトにインストールする必要があります。新しいシーンを作った上で、進めるのが望ましいです。
Once you have a new scene open the remote authoring scene by selecting the menu Lightship > ARDK > Remote Authoring Assistant > Open.
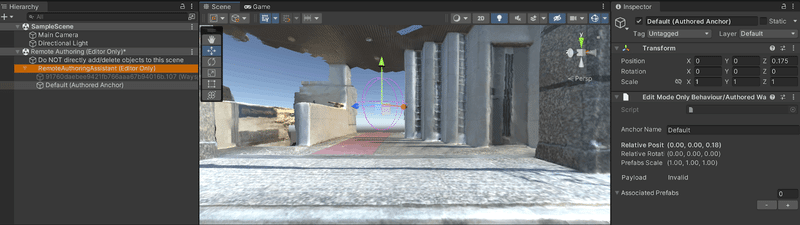
You will be presented with a mostly empty Unity scene with a hierarchy that looks like this:
そのシーンを作ったら、あとはメニューからLightship > ARDK > Remote Authoring Assistant > Open を選択するだけです。
そうすると、下記のような殆ど空のUnityシーンが現れます。

Once the scene is open simply drag the map data zip file mentioned previously into the Unity project and it should automatically import the map into the scene.
シーンを開いて先ほどの地図データのZIPファイルをUnityプロジェクトにドラッグすると、自動的にマップがシーンにインポートされます。

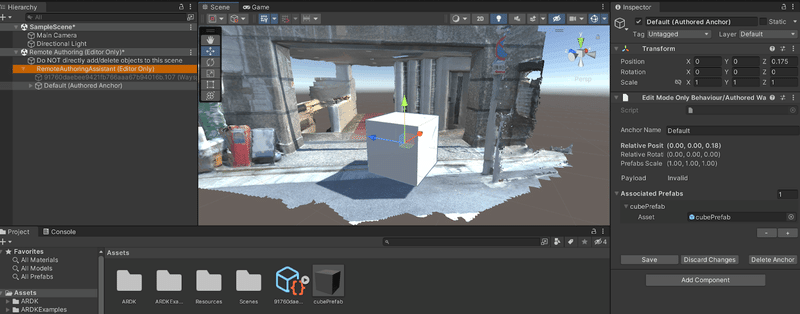
The scene contains 1 anchor that can be placed wherever you want to anchor a piece of content.
シーンには1つのアンカーが含まれており、コンテンツを好きな場所に配置することができます。
After changing the position or rotation of an anchor be sure to hit the Save button found in the inspector when the anchor is selected.
アンカーの位置や回転を変更したときは、アンカーを選択した状態でインスペクタにある「Save」ボタンを押すのを忘れないようにしてください。
One convenient feature of the Lightship remote authoring tool is that anchors can have prefabs assigned to them. Adding a prefab to the Associated Prefabs list in the anchor object inspector will automatically load the prefab into the scene and will automatically load the prefab in the built application when the Wayspot is successfully relocalized.
Lightship リモートオーサリングツールの便利な機能のひとつに、アンカーにプレハブを割り当てることができる機能があります。アンカーオブジェクトインスペクタの Associated Prefabs リストにプレハブを追加すると、プレハブが自動的にシーンに読み込まれ、Wayspotが正常に再ローカライズされると、ビルドしたアプリケーションにプレハブが自動的に読み込まれます。
More anchors can be created using the script attached to the RemoteAuthoringAssistant gameObject.
RemoteAuthoringAssistant gameObjectにスクリプトをアタッチすることで、さらにアンカーを作成することができます。
It is important to give each anchor a unique name or it can result in errors/conflicts when trying to reload content.
各アンカーにはそれぞれ異なった名前を付けるようにしてください。そうしないと、コンテンツをリロードする際にエラーやコンフリクトが発生する可能性があります。

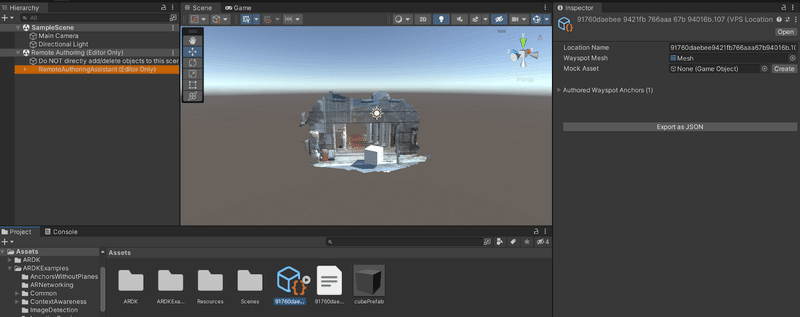
After placing all the anchors you require, select the RemoteAuthoringAssistant gameObject and hit the Save All Anchors button. The last step is to export the anchors as a JSON. To do this tap the Inspect Location Manifest button or select the imported map data directly.
必要なアンカーをすべて配置したら、RemoteAuthoringAssistant gameObjectを選択し、「Save All Anchors」ボタンをクリックします。最後に、アンカーをJSONとしてエクスポートします。そのためには「Inspect Location Manifest」ボタンをクリックするか、インポートしたマップデータを直接選択してください。
Once selected the manifest inspector will show an Export as JSON button. Press this and save the file in the Unity project assets folder. This map data JSON will be needed for recalling the anchors.
マニフェストを選択すると、インスペクタに「Export as JSON」ボタンが表示されます。これを押して、ファイルを Unity プロジェクトの assets フォルダに保存します。このマップデータJSONは、アンカーを呼び出すのに必要になります。
4. Creating the App -
Lightship provides an example scene to get started with reloading the remotely authored content.
Lightshipは、リモートオーサリングコンテンツのリロードを始めるためのサンプルシーンを提供しています。
This scene is found in the Remote Authoring Examples Unity package and once this is installed it can be found in /Assets/ARDKExamples/RemoteAuthoring/
The important script in this scene is the LocationManifestManager script found on the ManifestLoader GameObject. The inspector should look like this:
このシーンは、Remote Authoring Examples Unityパッケージに含まれており、これをインストールすると、/Assets/ARDKExamples/RemoteAuthoring/で確認できます。
このシーンで重要なスクリプトは、ManifestLoader gameObjectにあるLocationManifestManagerスクリプトです。インスペクタはこのように表示されます。
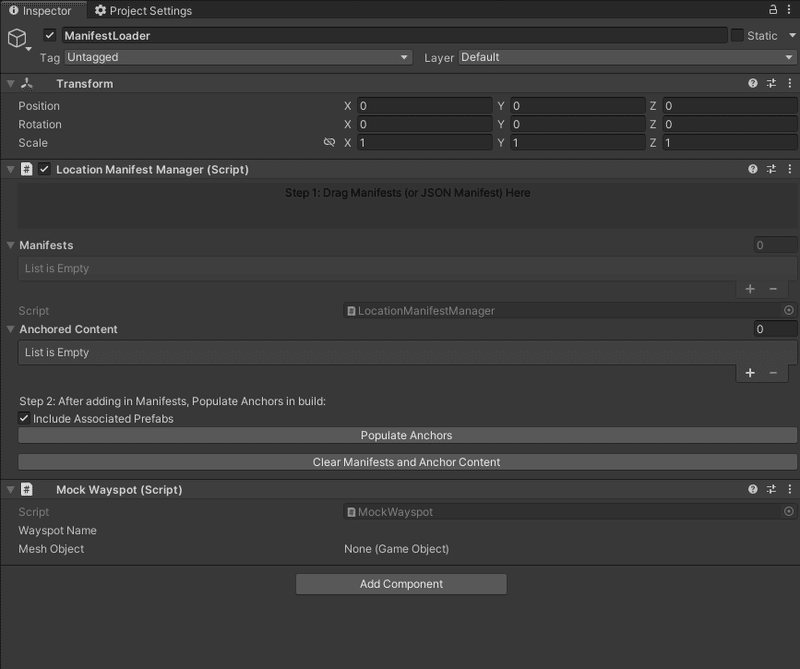
If there are any manifests or anchored content shown here you can remove them by hitting the Clear Manifests and Anchor Content button.
Once clear, drag the map data JSON mentioned previously onto the LocationManifestManager script in the inspector. This should add a manifest to the manifest list.
ここにマニフェストやアンカーコンテンツが表示されている場合は、「Clear Manifests and Anchor Content」ボタンを押すことで削除できます。
何もない状態になったら、前述のマップデータJSON をインスペクタの LocationManifestManager スクリプトにドラッグします。これで、マニフェスト一覧にマニフェストが追加されるはずです。

Once you have added the manifest click the Populate Anchors button to make sure the anchor prefabs appear when the Wayspot is localised. The prefabs will not show up in the editor scene.
マニフェストを追加したら、「Populate Anchors」ボタンをクリックして、Wayspotがローカライズされたときにアンカープレハブが表示されるようにします。プレハブはエディタシーンには表示されません。

Once the anchors have been populated the content should be loaded when the device successfully localises at the Way spot.
アンカーが追加されたら、Wayspotでデバイスのローカライズが成功したときにコンテンツが読み込まれます。
5. Important Notes - 注意することメモ
When choosing the Wayspot to download choose the highest quality, most recognisable mesh of the area.
When creating anchors in the remote authoring scene DO NOT USE Unity’s built-in “Duplicate” function or “CTRL C, CTRL V” on anchor game objects. Use RemoteAuthoringAssistant inspector buttons to add/remove anchors.
Anchors for each location must have unique names.
For Android, the apps must target Android 12 (API level 31) or higher.
For Android, the app requires grade 6.7.1 or better to build. The default version of gradle that comes with Unity 2021 is 6.1.1, so you need to install gradle 6.7.1 or better and set that as the gradle Unity will use. Set the gradle in the Unity editor in the Edit>Preferences>External Tools menu.
1. ダウンロードするWayspotを選択する際は、その地域の中にあるハイクオリティで認識しやすいメッシュを選択してください。
2. リモートオーサリングシーンでアンカーを作成する場合、アンカーゲームオブジェクトにUnity組み込みの「複製」機能または「CTRL C」「CTRL V」を使用しないようにしてください。アンカーの追加・削除には、「RemoteAuthoringAssistant」のインスペクタボタンを使ってください。
3. 各ロケーションのアンカーはそれぞれ異なる名前にする必要があります。
4. Androidの場合は、Android 12(APIレベル31)以上を対象にする必要があります。
5. Androidの場合、アプリのビルドにはgradle 6.7.1以降が必要です。Unity2021に付属するgradleのデフォルトバージョンは6.1.1なので、gradle6.7.1以上をインストールし、それをUnityが使用するgradleとして設定する必要があります。Unityエディタ内のEdit>Preferences>External Toolsからgradleを設定します。
4. Editorial Note - 編集後記
こんにちは!デザイニウム広報のマリコです。Niantic社のLightshipがローンチされてから1年が経ち、様々な新機能が追加されてきましたね❗8thwall の参画からはじまり、今回紹介した「Remote Authoring」機能をはじめとした開発者向けの機能強化は開発者に優しい機能も増えていて嬉しいですよね✨今後もARエンジニア向けの記事をたくさん公開していく予定です🎶 またMattをはじめとする弊社ARエンジニアのR&D動画をMattのTwitterや弊社Twitter でもシェアしていますので、よければフォローしてくださいね😊
The Designium
Official website
Twitter (フォローお待ちしてます✨)
Facebook
Youtube
この記事が気に入ったらサポートをしてみませんか?