【Niantic Lightship VPS for Webをつかってみよう!#3】 VPSをつかって簡単なアプリをつくってみよう!

こんにちは、デザイニウムの桐井です。
前回の記事では、8th WallのWayspotやWayspotの追加方法、既存のExampleについて解説してきました。
今回は、実際にVPSを利用して簡単なアプリを作成してみましょう。
前回紹介した8th Wallの公式のExampleは、A-Frameを利用したものとなっています。私が使い慣れているという理由から、今回はThree.jsを利用して実装していきたいと思います。
アプリ作成の準備
はじめに、以下のプロジェクトをクローンします。
8th WallでTheree.jsを使った開発をする際に一番シンプルなプロジェクトとなっているので、こちらをベースに作成していきたいと思います。
次に、app.jsを見てみます。こちらが起点となるプログラムとなっています。8th Wallには、AR開発がしやすいように様々なモジュールが用意されています。
モジュールの例
・Threejsで開発を始めやすいように、カメラの設定やレンダラーの設定、その他を用意してくれているモジュール
XR8.Threejs.pipelineModule
・vps用のコーチングUIを表示してくれるためのモジュール
VpsCoachingOverlay.pipelineModule
・カメラの起動時、カメラ処理イベント、およびその他の状態変化時にコールバックの受け取り、また、カメラの位置を計算するために使用されるモジュール
XR8.XrController.pipelineModule
これらをXR8.addCameraPipelineModulesに追加することで使用できます。
...
XR8.addCameraPipelineModules([  // Add camera pipeline modules.
    // Existing pipeline modules.
    XR8.GlTextureRenderer.pipelineModule(),      // Draws the camera feed.
    XR8.Threejs.pipelineModule(),                // Creates a ThreeJS AR Scene.
    XR8.XrController.pipelineModule(),           // Enables SLAM tracking.
    LandingPage.pipelineModule(),
    VpsCoachingOverlay.pipelineModule(),
    XRExtras.FullWindowCanvas.pipelineModule(),  // Modifies the canvas to fill the window.
    XRExtras.Loading.pipelineModule(),           // Manages the loading screen on startup.
    XRExtras.RuntimeError.pipelineModule(),      // Shows an error image on runtime error.
    // Custom pipeline modules.
    initScenePipelineModule(),  // Sets up the threejs camera and scene content.
])
...
クローンしてきたプロジェクトにも、すでに色々と書いてあるのが見て取れるかと思います。
カメラパイプラインモジュールにはライフサイクルメソッドが用意されており、ランタイム中は各カメラパイプラインモジュールは定義されたライフサイクルで実行されていきます。詳細は下記に記載されているのですが、
onStart、onUpdate、ononVideoSizeChangeなど8th Wallのライフサイクル内で呼び出されるものが定義されています。
VPSの有効化
8th WallでVPSを有効にするには、XR8.XrControllerで定義されているconfigure関数を叩くだけです。
...
const onxrloaded = () => {
  XR8.XrController.configure({ enableVps : true })
...
これでVPSの利用が可能になりました。
VPSイベントの設定
VPSを有効にしたあとは、XR8.XrController.pipelineModuleから発行されるVPS用のイベントに対して処理を追加し、アプリケーションを実装していきます。
VPSに関係するイベントとして、下記が用意されています。
meshfound: meshが最初に見つかった場合に発生
meshupdated: 見つかったメッシュの位置または回転が変更されたときに発生
meshlost: recenter が呼び出されたときに発生
projectwayspotscanning: プロジェクトに登録されたWayspot がスキャン用に読み込まれたときに発生
projectwayspotfound: Project Wayspot が最初に見つかったときに発生
projectwayspotupdated: Project Wayspot の位置または回転が変更されたときに発生
projectwayspotlost: Project Wayspot が追跡されなくなったときに発生
detect-meshアプリの作成
まずはWayspotのmeshデータを取得し、配置するアプリケーションを実装してみます。このような動作になります。
動作としては、下記のExampleとほぼ一緒なものとなります。
step1: 実装
シンプルなものなので細かい説明は省きますが、気をつける点としては、
reality.meshfoundで返ってくるデータのgeometryは、meshの頂点index,頂点カラー,頂点座標が入っているオブジェクトになるので、自分でTHREE.BufferGeometryを作成する必要があります。
下記が実装したコードです。
"detect-mesh.js"

export const detectMeshPipelineModule = () => {
  let mesh = null

  const loader = new THREE.GLTFLoader()

  const handleMeshUpdate = ({detail}) => {
    const {id, position, rotation} = detail
    mesh.position.set(position.x, position.y, position.z)
    mesh.quaternion.copy(rotation)
  }

  const handleMeshFound = ({detail}) => {
    const {id, position, rotation, geometry} = detail
    const {scene} = XR8.Threejs.xrScene()
    const texture = null

    const ma = new THREE.MeshBasicMaterial({vertexColors: true, transparent: true, opacity: 0.7});
    const ge = new THREE.BufferGeometry();
    ge.setIndex( new THREE.BufferAttribute( geometry.index.array, 1 ) );
    ge.setAttribute('position',new THREE.BufferAttribute(geometry.attributes[0].array,3));
    ge.setAttribute('color',new THREE.BufferAttribute(geometry.attributes[1].array,3));
    mesh = new THREE.Mesh(ge, ma)
    mesh.name = 'vps-mesh'
    scene.add(mesh)

    handleMeshUpdate({detail})
  }

  return {
    name: 'detect-mesh',

    listeners: [
      {event: 'reality.meshfound', process: handleMeshFound},
      {event: 'reality.meshupdated', process: handleMeshUpdate},
    ],
  }
}
"app.js"
import './index.css'
import {initScenePipelineModule} from './threejs-scene-init'
import {detectMeshPipelineModule} from './detect-mesh.js'
import * as camerafeedHtml from './camerafeed.html'
const onxrloaded = () => {
XR8.XrController.configure({ enableVps : true })
VpsCoachingOverlay.configure({
textColor: '#0000FF',
promptPrefix: 'Go look for',
})
XR8.addCameraPipelineModules([
XR8.GlTextureRenderer.pipelineModule(),
XR8.Threejs.pipelineModule(),
XR8.XrController.pipelineModule(),
LandingPage.pipelineModule(),
VpsCoachingOverlay.pipelineModule(),
XRExtras.FullWindowCanvas.pipelineModule(),
XRExtras.Loading.pipelineModule(),
XRExtras.RuntimeError.pipelineModule(),
// Custom pipeline modules.
initScenePipelineModule(),
detectMeshPipelineModule()
])
document.body.insertAdjacentHTML('beforeend', camerafeedHtml)
const canvas = document.getElementById('camerafeed')
XR8.run({canvas})
}
window.XR8 ? onxrloaded() : window.addEventListener('xrloaded', onxrloaded)detect-Wayspotアプリの作成
次に、projectwayspot~イベントを利用したアプリケーションを作成してみましょう。このようなアプリケーションを目指します。
ソファー周りをprivateなWayspotとして登録しています。そして任意の座標上にboxのオブジェクトを配置しています。オクルージョンやreceive shadowsも追加してみました。
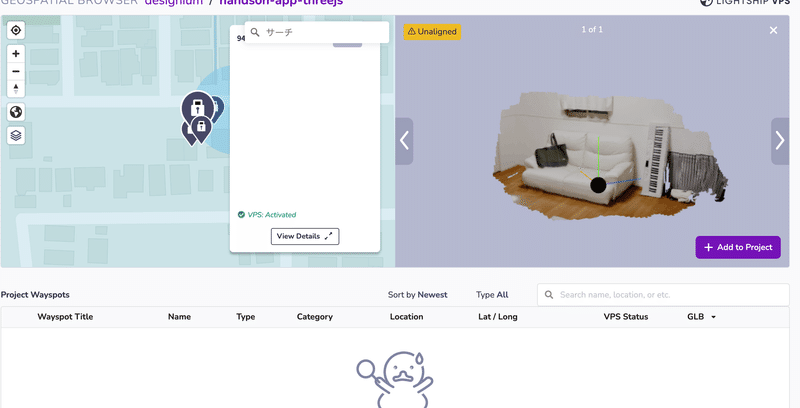
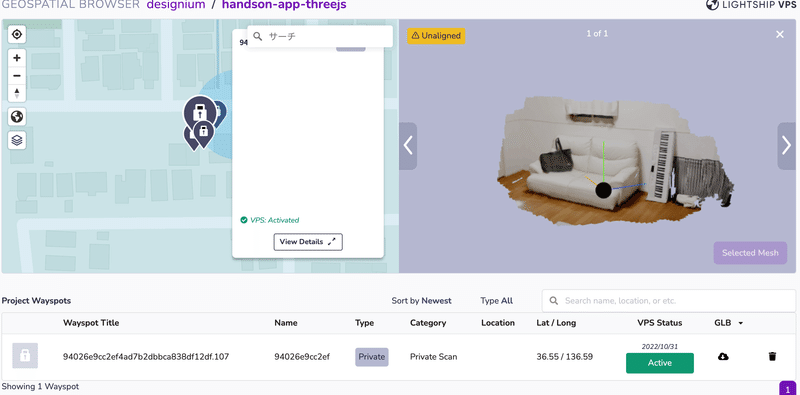
step1: 使用するWayspotを登録
detect-meshアプリは、どこのWayspotでも動くものでしたが、今回は特定のWayspotのみに動作させたいので、使用するWayspotを登録します。
geospatial-browserから任意のWayspotをクリックして"Add To project"からプロジェクトに登録します。projectwayspot~のイベントでは、こちらに登録したWayspotに対して実行されます。
step2: オブジェクトの座標を登録
8th WallのVPSでは、Wayspotのmeshデータ、idしか取得することはできません。例えば上記のアプリを作成したい場合、オブジェクトを配置する座標を決めないといけないのですが、8th Wallではそういったビューワー等はありません。素直にやろうと思うとテスト&調整を繰り返すことになります。辛いところがあるので、ここではBlenderを使った設定をご紹介します。
尚、これは私が考えたやり方なので、もっといいやり方があるかもしれません。
配置したいWayspotのglbデータをダウンロードする。
Add to Projectoすることでダウンロードが可能になります。

2. ダウンロードしたglbデータをBlenderにimportし、任意の場所にobjectを配置する。
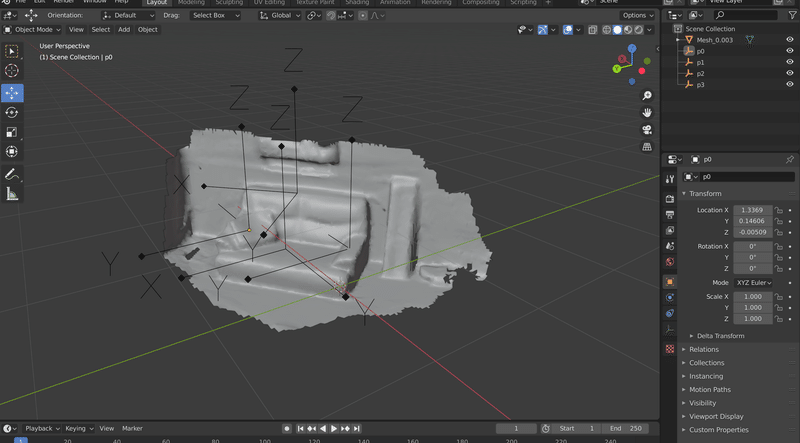
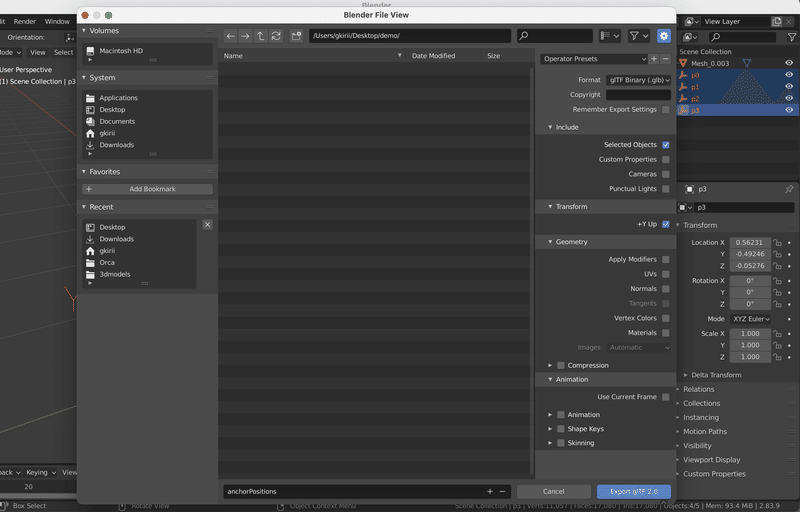
3. セットし終わったらglbでExportし、以下の画像のように設定する。
重要なのは、Transformの+Y Upにチェックを入れることです。
Blenderは上方向がZ軸という少し変わった座標系になっているので、ここにチェックを入れることで上方向がY軸となり、8th Wall内での座標系と同じ右手座標系になります。
4. 書き出し終わったものを8th Wallにimportする。
step3: 実装
下記が実装したコードです。
こちらはdetect-meshアプリとは違ってWayspotのモデルデータをimportしてあるので、Wayspotを認識したタイミングで読み込んでいます。それをオクルージョン用、receive shadows用でシーンに追加しています。
"detect-wayspot.js"

export const detectWayspotPipelineModule = () => {
  let roomMeshForShadow = null
  let roomMeshForOcclusion = null

  const loader = new THREE.GLTFLoader()
  const anchorPositionFile = require('./assets/anchorPositions.glb')
  const roomFile = require('./assets/room.glb')

  const handleWayspotUpdate = ({detail}) => {
    const {id, position, rotation} = detail
    roomMeshForShadow.position.copy(position)
    roomMeshForShadow.quaternion.copy(rotation)

    roomMeshForOcclusion.position.copy(position)
    roomMeshForOcclusion.quaternion.copy(rotation)
  }

  const handleWayspotFound = ({detail}) => {
    const {name, position, rotation} = detail
    const {scene} = XR8.Threejs.xrScene()

    // wayspotのglbを読み込み
    loader.load(
      roomFile,
      (gltf) => {
        roomMeshForShadow = gltf.scene
        roomMeshForOcclusion = roomMeshForShadow.clone()

        const shadowMat = new THREE.ShadowMaterial({opacity: 0.5, color: 0x0a0a0a})
        const occlusionMat = new THREE.MeshPhongMaterial({colorWrite: false})

        roomMeshForShadow.traverse((object) => {
          if (object.isMesh) {
            object.material = shadowMat
            object.receiveShadow = true
          }
        })

        roomMeshForOcclusion.traverse((object) => {
          if (object.isMesh) {
            object.material = occlusionMat
          }
        })

        scene.add(roomMeshForShadow)
        scene.add(roomMeshForOcclusion)

        // blenderで作った配置用のglbを読み込み
        loader.load(
          anchorPositionFile,
          (p) => {
            for (let i = 0; i < p.scene.children.length; i++) {
              const ge = new THREE.BoxGeometry(0.2, 0.2, 0.2)
              const ma = new THREE.MeshStandardMaterial({color: 0x00ff00})
              const obj = new THREE.Mesh(ge, ma)
              const pos = p.scene.children[i].position
              obj.position.copy(p.scene.children[i].position)
              obj.quaternion.copy(p.scene.children[i].quaternion)
              obj.castShadow = true
              roomMeshForOcclusion.attach(obj)
            }
          }
        )
      }
    )
  }

  return {
    name: 'detect-wayspot',

    listeners: [
      {event: 'reality.projectwayspotfound', process: handleWayspotFound},
      {event: 'reality.projectwayspotupdated', process: handleWayspotUpdate},
    ],
  }
}
"app.js"
import './index.css'
import {initScenePipelineModule} from './threejs-scene-init'
import {detectWayspotPipelineModule} from './detect-wayspot.js'
import * as camerafeedHtml from './camerafeed.html'
const onxrloaded = () => {
XR8.XrController.configure({ enableVps : true })
VpsCoachingOverlay.configure({
textColor: '#0000FF',
promptPrefix: 'Go look for',
})
XR8.addCameraPipelineModules([
XR8.GlTextureRenderer.pipelineModule(),
XR8.Threejs.pipelineModule(),
XR8.XrController.pipelineModule(),
LandingPage.pipelineModule(),
VpsCoachingOverlay.pipelineModule(),
XRExtras.FullWindowCanvas.pipelineModule(),
XRExtras.Loading.pipelineModule(),
XRExtras.RuntimeError.pipelineModule(),
// Custom pipeline modules.
initScenePipelineModule(),
detectWayspotPipelineModule(),
])
document.body.insertAdjacentHTML('beforeend', camerafeedHtml)
const canvas = document.getElementById('camerafeed')
XR8.run({canvas})
}
window.XR8 ? onxrloaded() : window.addEventListener('xrloaded', onxrloaded)最後に
全3回に渡り、Lightship VPS for Webについて解説してきました。
WebからVPSが使えるようになったことで、アプリをインストールしなくても体験ができるようになり、VPSがより身近になったなと感じています。
これからいろいろなコンテンツや表現が出てくることがとても楽しみです。
イベントのお知らせ
Niantic Lightship VPS for Web Hands-on workshop #2
2022年11月25日にARDK User Group が東京のLIFORK原宿でハンズオンイベントを開催します。講師は、記事の執筆者でもある桐井です。この連載をベースに、UnityやJSを触ったことのある方を対象のなっていますので、興味のある方はぜひ下記のリンクから詳細をご確認ください。みなさまのご参加をお待ちしております😊
Designium
Official website
Interactive website
Twitter
Instagram
Facebook
この記事が気に入ったらサポートをしてみませんか?