python:WEBアプリを作ろう(djangoでスクレイピング)
今回は、pythonのWebフレームワークのdjangoを使って、YahooNewsのURLを入力すれば、そのURLに記載されているタイトルとURLを抽出し、違うページに簡単にタイトルとURLを表示するような無意味なWebアプリを作ってみましょう。


projectの作成
django-admin startproject newsproject .アプリの作成
python3 manage.py startapp newsapp
templatesフォルダの作成

※manage.pyが存在するフォルダに作成。後ほど、このフォルダにURLオブジェクトを作るためのページと情報を表示するためのページ。bootstapを使うためのhtmlを作成し、入れ込みます。
newsprojectのsetting.pyの編集
INSTALLED_APPS = [
   'django.contrib.admin',
   'django.contrib.auth',
   'django.contrib.contenttypes',
   'django.contrib.sessions',
   'django.contrib.messages',
   'django.contrib.staticfiles',
   'newsapp', #追記
]
作ったアプリ名を追記します。
TEMPLATES = [
   {
       'BACKEND': 'django.template.backends.django.DjangoTemplates',
       'DIRS': [BASE_DIR, 'templates'], #追記
       'APP_DIRS': True,
       'OPTIONS': {
           'context_processors': [
               'django.template.context_processors.debug',
               'django.template.context_processors.request',
               'django.contrib.auth.context_processors.auth',
               'django.contrib.messages.context_processors.messages',
           ],
       },
   },
]
BASE_DIRは、manage.pyがあるフォルダを示し、その中のtemplatesフォルダをTEMPLATESとみなすような設定です。
newsprojectのurls.pyの編集
from django.contrib import admin
from django.urls import path, include#追記
urlpatterns = [
   path('admin/', admin.site.urls),
   path('', include('newsapp.urls')), #追記
]
localhost:8000にアクセスするとnewsapp.urlsを見に行くような設定です。
アプリフォルダにurls.pyを作成し、編集
from django.urls import path
from .views import Create, listfunc

urlpatterns = [
   path('', Create.as_view(), name='home'),
   path('list/', listfunc, name='list'),
]
localhost:8000にアクセスされた場合、Createクラスが実行され、localhost:8000/list/にアクセスすると listfuncが実行されるような設定です。
Createクラスとlistfuncは後で作成します。
アプリフォルダのviews.pyを編集
from django.shortcuts import render
from .models import News
from django.views.generic import CreateView
from django.urls import reverse_lazy
import urllib.request
import requests
from bs4 import BeautifulSoup


class Create(CreateView):
   template_name = 'home.html'
   model = News
   fields = ('url',)
   success_url = reverse_lazy('list')


def listfunc(request):
   for post in News.objects.all():
       url = post.url
   list = []
   response = requests.get(url)
   bs = BeautifulSoup(response.text, "html.parser")
   ul_tag = bs.find_all(class_="topicsList_main")
   for tag in ul_tag[0]:
      title = tag.a.getText()
      url2 = tag.a.get("href")
      list.append([title, url2])
   context = {'list': list,}
   return render(request, 'list.html', context)
Createクラスでフォームから受け取ったurlオブジェクトを作成し、lisufuncで
そのurlオブジェクトを使ってスクレイピングしています。もっと簡単な方法があると思いますが、今回は、上記のような感じで作成しました。
アプリフォルダのmodels.pyを編集
from django.db import models

class News(models.Model):
   url = models.CharField(max_length=100)
マイグレーションを行う
python3 manage.py makemigrationspython3 manage.py migratebase.htmlを作成
<!doctype html>
<html lang="en">
 <head>
   <!-- Required meta tags -->
   <meta charset="utf-8">
   <meta name="viewport" content="width=device-width, initial-scale=1, shrink-to-fit=no">
   <!-- Bootstrap CSS -->
   <link rel="stylesheet" href="https://stackpath.bootstrapcdn.com/bootstrap/4.4.1/css/bootstrap.min.css" integrity="sha384-Vkoo8x4CGsO3+Hhxv8T/Q5PaXtkKtu6ug5TOeNV6gBiFeWPGFN9MuhOf23Q9Ifjh" crossorigin="anonymous">
   <title>Pachi Data</title>
 </head>
 <body>
   {% block header %}
   {% endblock header %}
   {% block content %}
   {% endblock content %}
   <!-- Optional JavaScript -->
   <!-- jQuery first, then Popper.js, then Bootstrap JS -->
   <script src="https://code.jquery.com/jquery-3.4.1.slim.min.js" integrity="sha384-J6qa4849blE2+poT4WnyKhv5vZF5SrPo0iEjwBvKU7imGFAV0wwj1yYfoRSJoZ+n" crossorigin="anonymous"></script>
   <script src="https://cdn.jsdelivr.net/npm/popper.js@1.16.0/dist/umd/popper.min.js" integrity="sha384-Q6E9RHvbIyZFJoft+2mJbHaEWldlvI9IOYy5n3zV9zzTtmI3UksdQRVvoxMfooAo" crossorigin="anonymous"></script>
   <script src="https://stackpath.bootstrapcdn.com/bootstrap/4.4.1/js/bootstrap.min.js" integrity="sha384-wfSDF2E50Y2D1uUdj0O3uMBJnjuUD4Ih7YwaYd1iqfktj0Uod8GCExl3Og8ifwB6" crossorigin="anonymous"></script>
 </body>
</html>
※boostrapのStarterTemplateを貼り付け、bodyの中にblock headerとblock contentを追記しています。
home.htmlを作成
{% extends 'base.html' %}

{% block header %}
<div class="jumbotron">
   <div class="container">
     <h1 class="display-4">News</h1>
     <p class="lead">Enter the URL</p>
   </div>
 </div>
{% endblock header %}

{% block content %}
<div class="container">
<form action='' method='POST'>{% csrf_token %}
<p>URL: <input type="text" name='url'></p>
<input type="submit" value="取得する">
</form>
</div>
{% endblock content %}
URLオブジェクトを作成するためのトップページです。
list.htmlを作成
{% extends 'base.html' %}

{% block header %}
<div class="jumbotron">
   <div class="container">
     <h1 class="display-4">News</h1>
   </div>
 </div>
{% endblock header %}

{% block content %}
<div class="container">
<ul class="list-group list-group-flush">
 <table border="2">
   <tr>
     <th>タイトル</th>
     <th>URL</th>
   </tr>
   {% for post, post2 in list %}
   <tr>
     <td>{{ post }}</td>
     <td><a href="{{ post2 }}">{{ post2 }}</a></td>
   </tr>
   {% endfor %}
 </table>
</ul>
</div>
{% endblock content %}
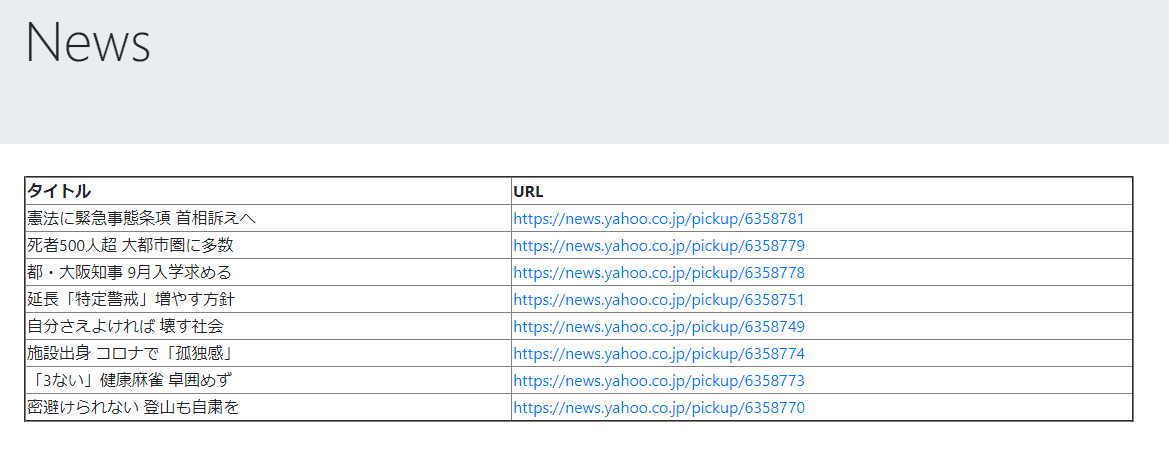
データを表示させるためのページです。
以上で完成となります。以下のコードでサーバーを起動して、確認してみてください。
python3 manage.py runserver最終的な構成は以下のような感じです。

