SkyWayとAWS Transcribeを使ってリアルタイムに書き起こしと分析を行う

こんにちは。SkyWay WebRTC Researchチームのucchyです。
皆さんは、ビデオ会議をやっている最中に「聞いている人がどんな反応なのか分からない」「良い会議が出来ているかわからない」と感じたことはないでしょうか。
昨今、ビデオ会議の映像や音声から商談や会議の品質を可視化するサービスが流行ってきています。
特に商談や教育系のサービスを提供している場合、「良い商談」「良い授業」をすることで、商談や授業の成功率を向上出来るため、非常に重要です。
「良い商談」「良い授業」には色々な定義があると思いますが、以下のような指標を可視化することで改善のきっかけにすることができます。
会話のスピード(捲し立てるように喋っていないか等)
会話のバランス(一方的に喋っていないか等)
声から読み取れる感情(聞き手がポジティブな感情になっているか等)
NGワードを使っていないか・キラーワードを使えているか(聞き手に刺さるような単語を支えているか等)
声の大きさが適切か
本記事では、「良い商談」「良い授業」を目指すために、文章の書き起こしと分析を行う方法をご紹介します。
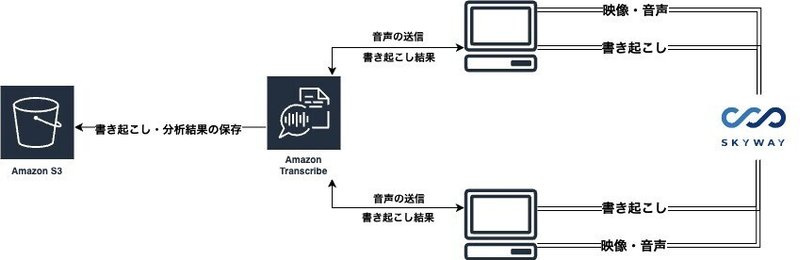
アーキテクチャ
本記事のサンプルでは、Amazon Transcribeを利用して文章を書き起こし、映像・音声・書き起こした文章をSkyWayを通してやりとりするような形になります。
また、書き起こし結果や、会話の分析結果はS3に保存します。
本記事で利用する重要なサービス
SkyWayとは
SkyWayは、弊社が提供する、通話機能を簡単に組み込むことが出来るサービスです。無料枠もあるため、検証や開発であればコストを掛けずに利用することが出来ます。
AWS Transcribe / Call Analyticsとは
AWS Transcribeは、音声をテキストに変換できるサービスです。AWS Transcribeには、Call Analyticsという機能があり、音声を解析することで「会話のスピード」や「会話のバランス」などを計算することができます。
こちらのサービスも無料枠があるため、コストを掛けずに試すことができます。(無料枠を超えて利用してしまうと料金が発生するためご注意下さい)
AWS Transcribeは英語・日本語などの様々な言語に対応しています。
Call Analyticsによるリアルタイム感情分析は、2024/04時点では英語にのみ対応していますが、通話後の分析は日本語も対応しています。
リアルタイム版Call Analyticsを試す上での注意点
本記事では、リアルタイム版Call Analyticsを英語で利用する前提で記載しており、日本語の場合は適切に感情分析ができない可能性があるのでご注意ください。分析結果は日本語の場合と変わらないため、日本語で利用したい場合は、通話後分析(post-call analytics)を利用してください。
また、リアルタイム版Call Analyticsは以下の通り、本来は2チャネルある音声(1チャネル自身の音声・2チャネルが相手の音声)を前提としていますが、本記事では自身の音声のみが含まれている音声をCall Analyticsに送信しています。
通話後分析を利用する場合は、録音ファイルを指定のS3バケットに保存するほか、AWS ConsoleでTranscribeサービスを開くことで、デモを行うことができます。
事前準備
SkyWayのアカウントの作成・プロジェクト/アプリケーションの作成
まずは、SkyWayの公式サイトから、アカウントの作成をしてください。
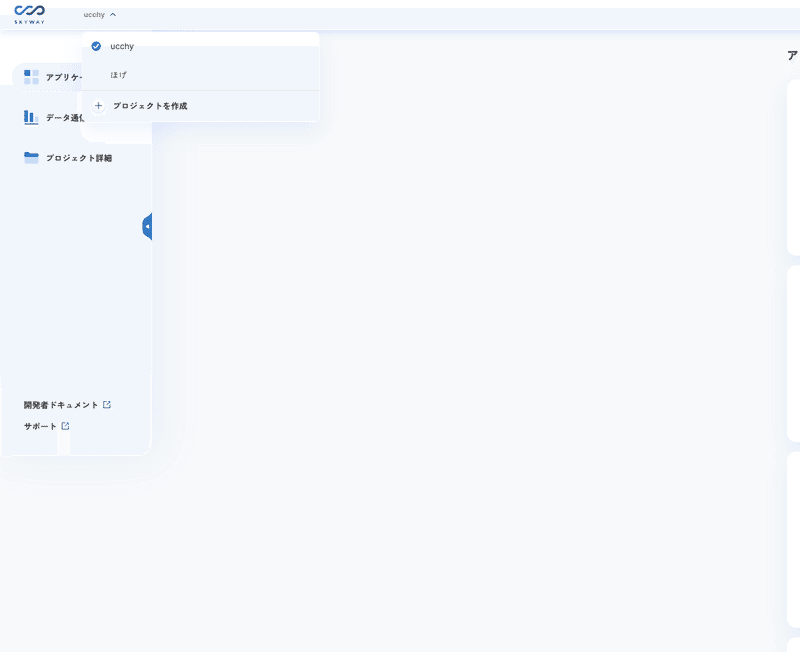
その後、新たなプロジェクトを作成します。
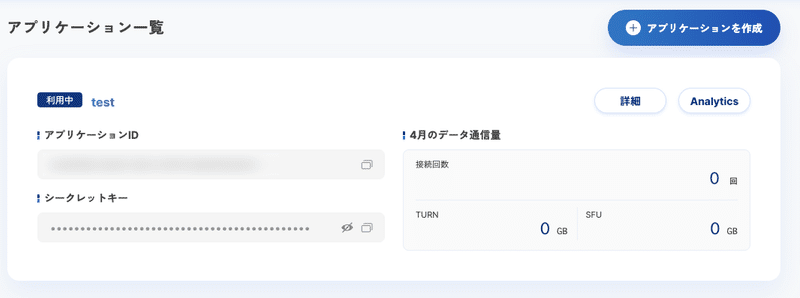
プロジェクトの作成が成功したら、アプリケーションの作成ボタンをクリックし、アプリケーションの作成をします。

アプリケーションが作成したら、「アプリケーションID」と「シークレットキー」を控えておいてください(後からでも確認できます)。
この「アプリケーションID」「シークレットキー」を用いてアプリケーションからSkyWayの機能を呼び出します。
AWS アカウントの作成とTranscribe/S3の権限を設定
AWSのアカウント作成手順については、多くの記事が紹介しているため、本記事では省略します。
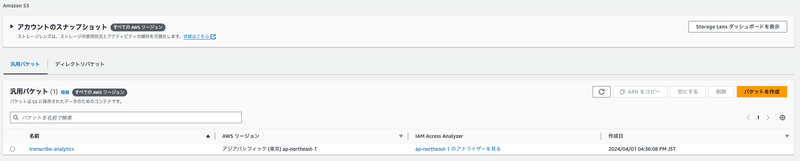
次に、文章の書き起こし結果や会話の解析結果を保存するために、S3にバケットを作成します。
下図のように、「transcribe-analytics」のような分かりやすいバケット名を設定しましょう。このバケット名を指定して、AWS Transcribeは書き起こし結果を保存するため、後ほど必要になります。
その後、AWS Transcribe / Call Analyticsを利用するために、IAMページを開き、ユーザーとロールを設定します。
このユーザーは、AWSのSDKを通して、音声をAWS Transcribeに送信し、書き起こしの指示を行うために必要なものです。 アクセスキーを作成して、 アクセスキー と シークレットキー を控えておいてください。
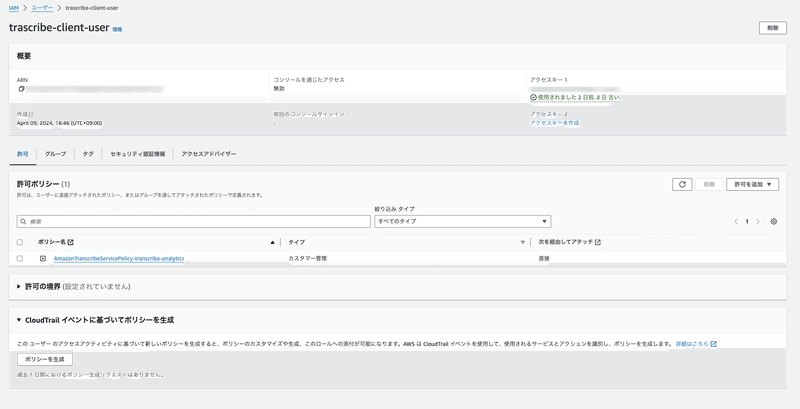
こちらで設定したユーザーのポリシーには、 iam:PassRole transcribe:* sts:AssumeRole の許可が必要です。今回はサンプルアプリなので、Resourceは * としています。
{
    "Version": "2012-10-17",
    "Statement": [
        {
            "Resource": "*",
            "Action": [
                "iam:PassRole"
            ],
            "Effect": "Allow"
        },
        {
            "Action": [
                "transcribe:*"
            ],
            "Resource": "*",
            "Effect": "Allow"
        },
        {
            "Sid": "Statement1",
            "Effect": "Allow",
            "Action": [
                "sts:AssumeRole"
            ],
            "Resource": "*"
        }
    ]
}
次に、AWS Transcribeが適切な権限を持って書き起こしや、書き起こし結果のS3への保存を行うためのロールを作成します。
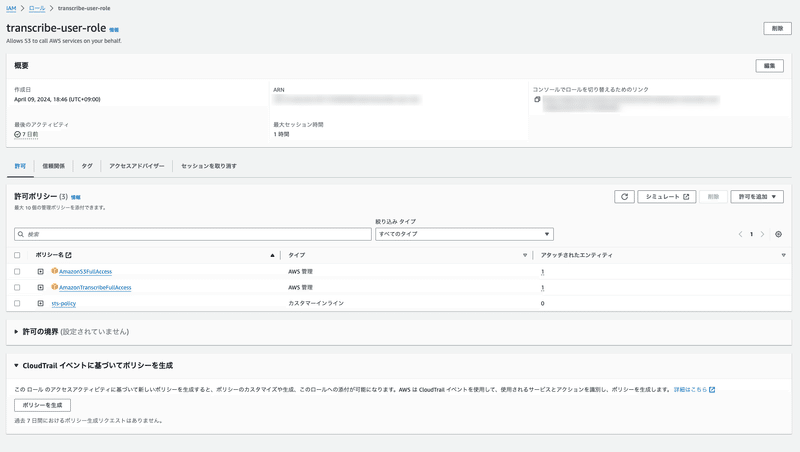
こちらのロールには、「S3の権限」 「Transcribeの権限」「set:Assumeを行う権限」 が必要です。今回はサンプルアプリなので、FullAccess権限を与えていますが、適宜修正しましょう。
「set:Assumeを行う権限」 については、 sts-policy として、以下の設定を行なっています。
{
    "Version": "2012-10-17",
    "Statement": [
        {
            "Sid": "VisualEditor0",
            "Effect": "Allow",
            "Action": "sts:AssumeRole",
            "Resource": "*"
        }
    ]
}
また、このロールの信頼関係には、 transcribe.amazonaws.com transcribe.streaming.amazonaws.com に設定する必要があります。
{
    "Version": "2012-10-17",
    "Statement": [
        {
            "Effect": "Allow",
            "Principal": {
                "Service": [
                    "transcribe.amazonaws.com",
                    "transcribe.streaming.amazonaws.com"
                ],
                "AWS": "arn:aws:iam::<PROJECT_ID>:user/<IAM_USER>"
            },
            "Action": "sts:AssumeRole"
        }
    ]
}
このロールの ARN を指定して、クライアントから書き起こしリクエストを送るため、ARNを控えておいてください。
事前準備で作成した情報をアプリケーションで利用する
事前準備が長くなってしまったので、このタイミングで、必要な情報が揃っているか確認しましょう。ここまでで、以下の情報が必要になります。
// SkyWayで作成したアプリケーションIDとシークレットキー
SKYWAY_APP_KEY="<APPLICATION_ID>"
SKYWAY_SECRET_KEY="<SECRET_KEY>"

// AWSのユーザーの情報
AWS_ACCESS_KEY_ID="<AWS_ACCESS_KEY>"
AWS_SECRET_ACCESS_KEY="<AWS_SECRET_ACCESS_KEY>"

// 書き起こし結果を保存するためのS3バケット
AWS_TRANSCRIBE_S3_LOCATION="s3://<BUCKET_NAMW>"

// AWS Transcribeが利用するロール
AWS_DATA_ACCESS_ROLE_ARN="arn:aws:iam::<PROJECT_ID>:role/<ROLE_NAME>"
Next.jsで通話アプリケーションを構築する
サンプルコード
本記事で紹介するサンプルコードは以下のリポジトリに置いています。適宜参照してください。
https://github.com/yuki-uchida/skyway-aws-transcribe
Next.jsで通話ページを作成する
今回のサンプルアプリケーションは、Next.jsを利用して構築しています。
ディレクトリ構成は大まかに以下のようになっています。
.
├── src
│   ├── app
│       ├── page.tsx // TOPページ
│       ├── api
│       │   └── room
│       │       └── route.tsx // SkyWayのCredentialを作成するAPI
│       └── room
│           ├── page.tsx // 通話画面
│           ├── transcribe.tsx // Transcribeを利用した書き起こし機能
│           ├── callAnalytics.tsx // CallAnalyticsを利用した感情分析機能
│           └── pcmEncode.tsx // Transcribe/CallAnalyticsに音声を送信するために分割して圧縮する機能
├── package.json
├── package-lock.json
└── .env.local
まずは 通話ルームIDとメンバー名を指定して通話ページに遷移する page.tsx を実装します。
"use client";
import React, {useState} from "react";
import Link from "next/link";

export default function Home() {
  const [roomId, setRoomId] = useState("");
  const [memberName, setMemberName] = useState("");
  return (
    <div className="mt-8">
      <form className="flex flex-col gap-4">
        <input
          type="text"
          placeholder="Room ID"
          value={roomId}
          onChange={(e) => setRoomId(e.target.value)}
          className="border-2 border-gray-300 p-2"
        />
        <input
          type="text"
          placeholder="Member Name"
          value={memberName}
          onChange={(e) => setMemberName(e.target.value)}
          className="border-2 border-gray-300 p-2"
        />
        <Link
          href={{
            pathname: `/room`,
            query: {roomId: `${roomId}`, memberName: `${memberName}`},
          }}
        >
          <button className="bg-blue-500 text-white p-2">Enter Room</button>
        </Link>
      </form>
    </div>
  );
}
以下のように、シンプルなTOPページになります。

次に、SkyWayを利用して通話を開始する機能(src/app/room/page.tsx)と、SkyWayのシークレットキーを使って認証情報を払い出すAPI (src/app/api/room/route.tsx)を実装します。
認証情報を払い出すAPIは、以下のような実装にしています。通話ページから、このAPIにリクエストを送ることで、SkyWayの認証情報を取得することができます。
import {NextRequest, NextResponse} from "next/server";
import jwt from "jsonwebtoken";
import {webcrypto as crypto} from "crypto";

const id = process.env.SKYWAY_APP_KEY as string;
const secret = process.env.SKYWAY_SECRET_KEY as string;
interface SkyWayCredential {
  channelName: string;
  memberName: string;
  iat: number;
  exp: number;
  authToken: string;
}
async function getSkyWayCredential(channelName: string, memberName: string) {
  const iat = Math.floor(Date.now() / 1000);
  const exp = Math.floor(Date.now() / 1000) + 36000; // 10h=60*60*10
  const token = jwt.sign(
    {
      jti: crypto.randomUUID(),
      iat: iat,
      exp: exp,
      scope: {
        app: {
          id: id,
          turn: true,
          actions: ["read"],
          channels: [
            {
              id: "*",
              name: "*",
              actions: ["write"],
              members: [
                {
                  id: "*",
                  name: "*",
                  actions: ["write"],
                  publication: {
                    actions: ["write"],
                  },
                  subscription: {
                    actions: ["write"],
                  },
                },
              ],
              sfuBots: [
                {
                  actions: ["write"],
                  forwardings: [
                    {
                      actions: ["write"],
                    },
                  ],
                },
              ],
            },
          ],
        },
      },
    },
    secret
  );
  const credential: SkyWayCredential = {
    channelName: channelName,
    memberName: memberName,
    iat: iat,
    exp: exp,
    authToken: token,
  };
  return credential;
}

const GET = async (request: NextRequest) => {
  const credential = await getSkyWayCredential(
    request.nextUrl.searchParams.get("roomId") ?? "",
    request.nextUrl.searchParams.get("memberName") ?? ""
  );

  return NextResponse.json(credential);
};

export {GET};
通話ページは以下のような実装になります。SkyWayのSDKの使い方については、公式サイトのクイックスタートをご覧ください。
"use client";
import {
  SkyWayRoom,
  SkyWayContext,
  LocalP2PRoomMember,
  SkyWayStreamFactory,
  P2PRoom,
  RoomPublication,
  LocalDataStream,
} from "@skyway-sdk/room";
import {useSearchParams} from "next/navigation";
import {useEffect, useRef, useState} from "react";
import {FontAwesomeIcon} from "@fortawesome/react-fontawesome";
import {
  faFaceAngry,
  faFaceMeh,
  faFaceSmile,
} from "@fortawesome/free-solid-svg-icons";
interface SkyWayCredential {
  channelName: string;
  memberName: string;
  iat: number;
  exp: number;
  authToken: string;
}

export default function Room() {
  const roomId = useSearchParams().get("roomId") ?? "";
  const memberName = useSearchParams().get("memberName") ?? "";
  const localVideoRef = useRef<HTMLVideoElement>(null);

  const [token, setToken] = useState<string>("");
  const [room, setRoom] = useState<P2PRoom>();
  const [me, setMe] = useState<LocalP2PRoomMember>();


  useEffect(
    () => {
      const getToken = async () => {
        const res = await fetch(
          `http://localhost:3000/api/room?roomId=${roomId}&memberName=${memberName}`
        );
        const credential: SkyWayCredential = await res.json();
        const authToken: string = credential.authToken;
        setToken(authToken);
      };
      getToken();
    },
    // eslint-disable-next-line react-hooks/exhaustive-deps
    []
  );
  useEffect(
    () => {
      if (token === "") {
        return;
      }
      const roomJoinAndPublish = async () => {
        const context = await SkyWayContext.Create(token);
        const room: P2PRoom = await SkyWayRoom.FindOrCreate(context, {
          type: "p2p",
          name: roomId,
        });
        setRoom(room);
        const me: LocalP2PRoomMember = await room.join();
        setMe(me);
        const {audio, video} =
          await SkyWayStreamFactory.createMicrophoneAudioAndCameraStream(); // 2

        if (localVideoRef.current) {
          video.attach(localVideoRef.current); // 3
        }

        const dataStream = await SkyWayStreamFactory.createDataStream();
        setDataStream(dataStream);
        await me.publish(dataStream);
        await me.publish(audio);
        await me.publish(video, {
          codecCapabilities: [
            {mimeType: "video/h264"},
          ],
        });
        const subscribeAndAttach = async (publication: RoomPublication) => {
          if (publication.publisher.id === me.id) {
            return;
          }
          const {stream} = await me.subscribe(publication.id);
          const remoteMediaArea = document.getElementById("remoteMediaArea");
          switch (stream.contentType) {
            case "video":
              const videoMedia: HTMLVideoElement =
                document.createElement("video");
              videoMedia.playsInline = true;
              videoMedia.autoplay = true;
              stream.attach(videoMedia);
              if (remoteMediaArea != null) {
                remoteMediaArea.appendChild(videoMedia);
              }
              break;
            case "audio":
              const audioMedia: HTMLAudioElement =
                document.createElement("audio");
              audioMedia.controls = true;
              audioMedia.autoplay = true;
              stream.attach(audioMedia);
              if (remoteMediaArea != null) {
                remoteMediaArea.appendChild(audioMedia);
              }
              break;
            case "data":
              stream.onData.add((data) => {
                setRemoteTranscript((prevTranscripts) => [
                  ...prevTranscripts,
                  data as string,
                ]);
              });
              break;
          }
        };
        room.publications.forEach(subscribeAndAttach);
        room.onStreamPublished.add((e) => subscribeAndAttach(e.publication));
      };

      roomJoinAndPublish();
      const leaveRoom = async () => {
        if (me === undefined) {
          return;
        }
        for (const pub of me.publications) {
          await me.unpublish(pub.id);
        }

        await me.leave();
      };
      return () => {
        leaveRoom();
      };
    },
    // eslint-disable-next-line react-hooks/exhaustive-deps
    [token]
  );


  return (
    <div>
      <h1>RoomId: {roomId}</h1>
      <h1>MemberName: {memberName}</h1>
      <div className="videoBox grid grid-cols-2">
        <video
          controls
          className="localVideo"
          playsInline
          ref={localVideoRef}
          muted
          autoPlay
        />
        <div id="remoteMediaArea"></div>
      </div>
    </div>
  );
}
ここまでで、SkyWayを利用した通話アプリケーションを構築することができました。

AWS Transcribe / Call Analyticsを使ってリアルタイム書き起こしと感情分析を実装する
AWS Transcribeには、複数の機能があります。今回は、リアルタイムに日本語の書き起こしをするTranscribe(Streaming)と、リアルタイムに英語の感情分析をするCall Analytics、通話後の会話分析を行うpost-call Analyticsを利用します。
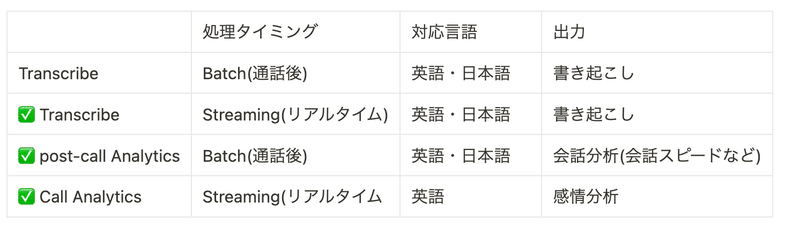
Call Analyticsは2024/4時点では日本語に対応していないため、サービスに採用するのは難しいかも知れませんが、どのような出力結果になるか参考になればと思います。
まずは、Transcribe共通で利用する、「マイクから音声を取得してPCMコーデックにエンコードする」処理を実装します。(AWS Transcribeでは、PCMが推奨されています)
PCMエンコードの処理はAWS SDKのsampleを参照しました。
https://github.com/awsdocs/aws-doc-sdk-examples/blob/main/javascriptv3/example_code/cross-services/transcribe-streaming-app/src/libs/transcribeClient.js#L102
import MicrophoneStream from "microphone-stream";

export const pcmEncodeChunk = (chunk: Buffer) => {
  const input = MicrophoneStream.toRaw(chunk);
  let offset = 0;
  const buffer = new ArrayBuffer(input.length * 2);
  const view = new DataView(buffer);
  for (let i = 0; i < input.length; i++, offset += 2) {
    const s = Math.max(-1, Math.min(1, input[i]));
    view.setInt16(offset, s < 0 ? s * 0x8000 : s * 0x7fff, true);
  }
  return Buffer.from(buffer);
};
次に、transcribeとcall analyticsの機能を実装します。
transcribe.tsx を以下の通り実装することで、リアルタイムに日本語や英語の書き起こしをすることが可能です。
import {
  AudioStream,
  StartStreamTranscriptionCommand,
  TranscribeStreamingClient,
} from "@aws-sdk/client-transcribe-streaming";
import update from "immutability-helper";
import {Buffer} from "buffer";
import MicrophoneStream from "microphone-stream";
import {useState} from "react";
import {pcmEncodeChunk} from "./pcmEncode";

export const useTranscribe = () => {
  const [transcripts, setTranscripts] = useState<
    {
      isPartial: boolean;
      transcript: string;
    }[]
  >([]);
  const client = new TranscribeStreamingClient({
    region: "ap-northeast-1",
    credentials: {
      accessKeyId: process.env.NEXT_PUBLIC_AWS_ACCESS_KEY_ID as string,
      secretAccessKey: process.env.NEXT_PUBLIC_AWS_SECRET_ACCESS_KEY as string,
    },
  });
  const startStream = async (mic: MicrophoneStream) => {
    const audioStream = async function* () {
      for await (const chunk of mic as unknown as Buffer[]) {
        const audioEvent: AudioStream.AudioEventMember = {
          AudioEvent: {
            AudioChunk: pcmEncodeChunk(chunk),
          },
        };
        yield audioEvent;
      }
    };
    const command = new StartStreamTranscriptionCommand({
      LanguageCode: "ja-JP",
      MediaEncoding: "pcm",
      MediaSampleRateHertz: 48000,
      AudioStream: audioStream(),
    });
    const response = await client.send(command);
    if (response.TranscriptResultStream) {
      for await (const event of response.TranscriptResultStream) {
        if (
          event.TranscriptEvent?.Transcript?.Results &&
          event.TranscriptEvent.Transcript?.Results.length > 0
        ) {
          const result = event.TranscriptEvent.Transcript?.Results[0];
          setTranscripts((prev) => {
            const transcript = (
              result.Alternatives?.map(
                (alternative) => alternative.Transcript ?? ""
              ) ?? []
            ).join("");

            const index = prev.length - 1;
            if (prev.length === 0 || !prev[prev.length - 1].isPartial) {
              const tmp = update(prev, {
                $push: [
                  {
                    isPartial: result.IsPartial ?? false,
                    transcript,
                  },
                ],
              });
              return tmp;
            } else {
              const tmp = update(prev, {
                $splice: [
                  [
                    index,
                    1,
                    {
                      isPartial: result.IsPartial ?? false,
                      transcript,
                    },
                  ],
                ],
              });
              return tmp;
            }
          });
        }
      }
    }
  };
  const startTranscriptionStream = async () => {
    const mic = new MicrophoneStream();
    const audioStream = await window.navigator.mediaDevices.getUserMedia({
      video: false,
      audio: true,
    });
    mic.setStream(audioStream);

    await startStream(mic);
  };
  return {
    startTranscriptionStream,
    transcripts,
  };
};
callAnalytics.tsx を以下の通り実装することで、リアルタイムに英語の感情分析を行なった上で、通話終了後に「会話のスピード」「会話のバランス」を計算して、S3のバケットに保存できます
import update from "immutability-helper";
import {Buffer} from "buffer";
import MicrophoneStream from "microphone-stream";
import {useState} from "react";
import {
  AudioStream,
  StartCallAnalyticsStreamTranscriptionCommand,
  TranscribeStreamingClient,
} from "@aws-sdk/client-transcribe-streaming";
import {pcmEncodeChunk} from "./pcmEncode";

export const useCallAnalytics = () => {
  const [agentAnalytics, setAgentAnalytics] = useState<
    {
      isPartial: boolean;
      transcript: string;
      sentiment?: string;
    }[]
  >([]);
  const client = new TranscribeStreamingClient({
    region: "ap-northeast-1",
    credentials: {
      accessKeyId: process.env.NEXT_PUBLIC_AWS_ACCESS_KEY_ID as string,
      secretAccessKey: process.env.NEXT_PUBLIC_AWS_SECRET_ACCESS_KEY as string,
    },
  });
  const startStream = async (mic: MicrophoneStream) => {
    const audioStream = async function* () {
      const config: AudioStream.ConfigurationEventMember = {
        ConfigurationEvent: {
          ChannelDefinitions: [
            {
              ChannelId: 0,
              ParticipantRole: "AGENT",
            },
            {
              ChannelId: 1,
              ParticipantRole: "CUSTOMER",
            },
          ],
          PostCallAnalyticsSettings: {
            OutputLocation: process.env
              .NEXT_PUBLIC_AWS_TRANSCRIBE_S3_LOCATION as string,
            DataAccessRoleArn: process.env
              .NEXT_PUBLIC_AWS_DATA_ACCESS_ROLE_ARN as string,
          },
        },
      };
      yield config;

      for await (const chunk of mic as unknown as Buffer[]) {
        const audioEvent: AudioStream.AudioEventMember = {
          AudioEvent: {
            AudioChunk: pcmEncodeChunk(chunk),
          },
        };
        yield audioEvent;
      }
    };
    const command = new StartCallAnalyticsStreamTranscriptionCommand({
      LanguageCode: "en-US",
      MediaEncoding: "pcm",
      MediaSampleRateHertz: 48000,
      AudioStream: audioStream(),
    });

    const response = await client.send(command);
    if (response.CallAnalyticsTranscriptResultStream) {
      const resultStream = response.CallAnalyticsTranscriptResultStream;
      for await (const event of resultStream) {
        const utteranceEvent = event.UtteranceEvent;
        if (utteranceEvent === undefined) {
          return;
        }
        if (utteranceEvent.ParticipantRole === "AGENT") {
          if (utteranceEvent.Transcript === undefined) {
            return;
          }
          setAgentAnalytics((prev) => {
            const index = prev.length - 1;
            const transcript = utteranceEvent.Transcript ?? "";
            if (prev.length === 0 || !prev[prev.length - 1].isPartial) {
              // segment is complete
              const tmp = update(prev, {
                $push: [
                  {
                    isPartial: utteranceEvent.IsPartial ?? false,
                    transcript,
                    sentiment: utteranceEvent.Sentiment,
                  },
                ],
              });
              return tmp;
            } else {
              // segment is NOT complete(overrides the previous segment's transcript)
              const tmp = update(prev, {
                $splice: [
                  [
                    index,
                    1,
                    {
                      isPartial: utteranceEvent.IsPartial ?? false,
                      transcript,
                      sentiment: utteranceEvent.Sentiment,
                    },
                  ],
                ],
              });
              return tmp;
            }
          });
        } else {
          // console.log("CUSTOMER TRANSCRIPT occurred");
        }
      }
    }
  };
  const startCallAnalyticsStream = async () => {
    const mic = new MicrophoneStream();
    const audioStream = await window.navigator.mediaDevices.getUserMedia({
      video: false,
      audio: true,
    });
    mic.setStream(audioStream);

    await startStream(mic);
  };
  return {
    startCallAnalyticsStream,
    agentAnalytics,
  };
};
最後に、 transcribe.tsx callAnalytics.tsx の機能を page.tsx から呼び出して、書き起こしと感情分析を行えるようにし、書き起こし結果をSkyWayのDataStreamを用いて対向に送信します。
以下のコードを page.tsx に追加してください。
// ......
import {useTranscribe} from "./transcribe";
import {useCallAnalytics} from "./callAnalytics";
// ......

export default function Room() {
  // ......
  const [dataStream, setDataStream] = useState<LocalDataStream>();
  const {startCallAnalyticsStream, agentAnalytics} = useCallAnalytics();
  const {startTranscriptionStream, transcripts} = useTranscribe();
  const [remoteTranscript, setRemoteTranscript] = useState<string[]>([]);
  // ......
  useEffect(() => {
    if (dataStream === undefined || transcripts.length === 0) {
      return;
    }
    if (transcripts.slice(-1)[0].isPartial === false) {
      dataStream.write(transcripts.slice(-1)[0].transcript);
    }
    // eslint-disable-next-line react-hooks/exhaustive-deps
  }, [transcripts]);

  return (
    <div>
      // ......
      <button
        className="bg-blue-500 hover:bg-blue-700 text-white font-bold py-2 px-4 mt-2 rounded"
        onClick={startTranscriptionStream}
      >
        Start Recording
      </button>
      <button
        className="bg-blue-500 hover:bg-blue-700 text-white font-bold py-2 px-4 mt-2 rounded"
        onClick={startCallAnalyticsStream}
      >
        Start Call Analytics
      </button>
      <div className="transcriptBox grid grid-cols-2">
        <div className="localTranscript">
          {transcripts.length > 0 && (
            <>
              <div className="col-span-1 bg-gray-100">
                Transcription without sentiment analysis
                <ul>
                  {transcripts.map((t, i) => (
                    <li key={i}>{t.transcript}</li>
                  ))}
                </ul>
              </div>
            </>
          )}
        </div>
        <div className="remoteTranscript">
          {remoteTranscript.length > 0 && (
            <>
              <div className="col-span-1 bg-gray-50">
                Transcription without sentiment analysis
                <ul>
                  {remoteTranscript.map((t, i) => (
                    <li key={i}>{t}</li>
                  ))}
                </ul>
              </div>
            </>
          )}
        </div>
      </div>

      {agentAnalytics.length > 0 && (
        <>
          <div className="col-span-1 bg-gray-100">
            Agent Call
            <ul>
              {agentAnalytics.map((t, i) => (
                <>
                  <li key={i}>
                    {
                      <>
                        {t.sentiment === "NEGATIVE" && (
                          <FontAwesomeIcon
                            icon={faFaceAngry}
                            className="h-[20px] pr-1"
                            color="#ff7f50"
                          />
                        )}
                        {t.sentiment === "POSITIVE" && (
                          <FontAwesomeIcon
                            icon={faFaceSmile}
                            className="h-[20px] pr-1"
                            color="#008000"
                          />
                        )}
                        {t.sentiment === "NEUTRAL" && (
                          <FontAwesomeIcon
                            icon={faFaceMeh}
                            className="h-[20px] pr-1"
                            color="#808080"
                          />
                        )}
                      </>
                    }
                    {t.transcript}
                  </li>
                </>
              ))}
            </ul>
          </div>
        </>
      )}
    </div>
  );
}
完成アプリケーション
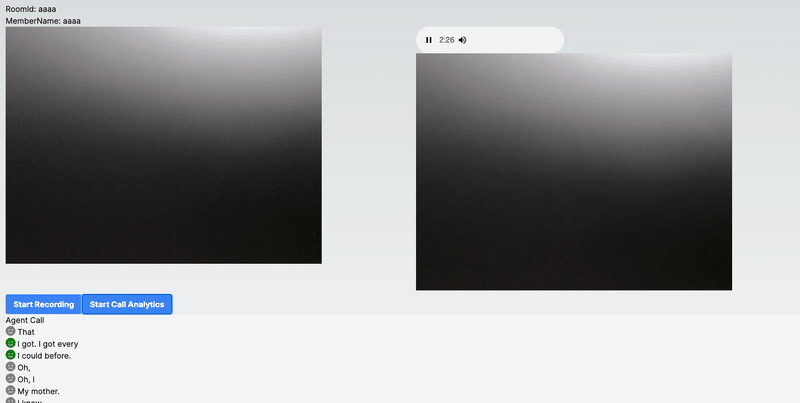
以下のように、複数のタブでアプリケーションを開き、 Start Recording ボタンを押すと、書きおこしが実行され、対向のユーザーに書き起こし結果が送信されています。
書き起こしの品質に関しては、デバイスや、環境によって大きく精度が異なりますが、静かな環境では、多少ミスは見られるものの、会話の内容を掴むことはできそうです。

また、 Start CallAnalytics ボタンを押すと、以下のように、音声の感情が分析され、ポジティブ・ニュートラル・ネガティブが顔文字で表示されるようになっています。
リアルタイム感情分析の結果に関しては、AWSの要求である「自身の音声を1チャネルに、対向の音声を2チャネルに設定された2チャネルの音声ファイル」ではなく「自身の音声のみが含まれた音声ファイル」を送信している都合もあるためか、そこまで精度が高くないように感じます
書き起こしも感情分析も、リアルタイム版はバッチ版に比べて品質が落ちることが多いため、精度を求める場合には、通話後の録音を書き起こし・感情分析する方が良いでしょう。
通話後分析の結果
CallAnalyticsを行う際に、以下の通話後分析の設定も併せて行なっています。
const config: AudioStream.ConfigurationEventMember = {
  ConfigurationEvent: {
    ChannelDefinitions: [
      {
        ChannelId: 0,
        ParticipantRole: "AGENT",
      },
      {
        ChannelId: 1,
        ParticipantRole: "CUSTOMER",
      },
    ],
    PostCallAnalyticsSettings: {
      OutputLocation: process.env
        .NEXT_PUBLIC_AWS_TRANSCRIBE_S3_LOCATION as string,
      DataAccessRoleArn: process.env
        .NEXT_PUBLIC_AWS_DATA_ACCESS_ROLE_ARN as string,
    },
  },
};
この設定を行うと、リアルタイム感情分析の他に、通話後の分析も行われるようになります。
通話後の分析は、録音ファイル(wavファイル)と分析結果(jsonファイル)がS3に保存されます。

通話分析の結果は、以下のようなフォーマットで吐き出されます。
書き起こし単位での分析結果
LoudnessScores: 声の大きさ
Sentiment: 感情
会話全体の分析結果
NonTalkTime: 会話のない時間
Interruptions: 会話が遮られた数・時間・遮った人の情報
TalkSpeed: 発話速度
{
  "JobStatus": "COMPLETED",
  "LanguageCode": "en-US",
  "Transcript": [
    {
      "LoudnessScores": [82.13, 83.85],
      "Content": "That was",
      "Id": "1d9f86e2-130e-40d0-a0c8-a7b2494e13ed",
      "BeginOffsetMillis": 3735,
      "EndOffsetMillis": 4345,
      "Sentiment": "NEUTRAL",
      "ParticipantRole": "AGENT"
    },
    .....
  ],
  "AccountId": "181181909946",
  "Categories": {"MatchedDetails": {}, "MatchedCategories": []},
  "Channel": "VOICE",
  "Participants": [
    {"ParticipantRole": "AGENT"},
    {"ParticipantRole": "CUSTOMER"}
  ],
  "ConversationCharacteristics": {
	  "NonTalkTime": {
      "Instances": [
        {
          "BeginOffsetMillis": 48985,
          "DurationMillis": 3550,
          "EndOffsetMillis": 52535
        }
      ],
      "TotalTimeMillis": 3550
    },
    "Interruptions": {
      "TotalCount": 4,
      "TotalTimeMillis": 131020,
      "InterruptionsByInterrupter": {
        "AGENT": [
          {
            "BeginOffsetMillis": 9665,
            "DurationMillis": 14600,
            "EndOffsetMillis": 24265
          },
        ]
      }
    },
    "TotalConversationDurationMillis": 155705,
    "Sentiment": {
      "OverallSentiment": {"AGENT": 0.3, "CUSTOMER": 0.3},
    },
    "TalkSpeed": {
      "DetailsByParticipant": {
        "AGENT": {"AverageWordsPerMinute": 144},
        "CUSTOMER": {"AverageWordsPerMinute": 145}
      }
   }
これらの分析結果以外にも、辞書を追加してNGワードを検知したりすることも可能です。
まとめ
本記事では、SkyWayとAWS Transcribeを用いて、リアルタイム書き起こし・リアルタイム感情分析・通話後分析の3つの機能を実現する方法を紹介しました。
リアルタイム感情分析に関してはポジティブ・ニュートラル・ネガティブの情報しか得られないため、活用するのが難しそうですが、リアルタイム書き起こしと通話後分析は使えるケースが多くありそうです。
これらの機能を使って、サービス品質を向上させられることも可能だと考えられるので、是非本記事を参考に実装して頂ければ幸いです。
この記事が気に入ったらサポートをしてみませんか?