

初めてのReactでログイン画面を作ってみた

はじめに
こんにちは、株式会社SHIFT ITソリューション部の渡部です。
ReactとTypeScriptを使ったフロントエンドの開発、Jestによる自動テストを行ったのですが、どちらも初めてで難しく感じたため、同じように初めてReactやTypeScriptで開発を行う方の参考になればと思います。
対象者
Reactを初めて触る方
ReactとTypeScriptでフロントエンド開発を行いたい方
JestでReactの単体テストを行いたい方
環境
Node.js:16.17.0
React:18.2.0
TypeScript:4.9.4
Jest:27.5.1
React TestingLibrary:13.4.0
React-router-dom:6.4.5
React-hook-form:7.40.0
環境構築
早速Reactプロジェクトを作成します。
Node.jsがインストールされていない場合は最初にこちらからインストールを行ってください。
今回はReact標準の環境構築ツールであるcreate-react-appコマンドで環境構築を行います。
--template typescriptオプションを付けることでTypeScript用のプロジェクトが作成されます。
作業ディレクトリに移動後、以下のコマンドを実行してください。
$ npx create-react-app --template typescript myapp次に、今回必要なライブラリのインストールを行います。
フォーム作成にReact-hook-form、ルーティング設定にReact-router-domを使用します。
$ cd myapp
$ npm install react-hook-form
$ npm install react-router-dom
$ npm install @hookform/error-message
実装
それではログイン画面の実装を行っていきます。
ディレクトリ構成は以下のようになっています。
(create-react-appで作成した雛形から更新・新規作成したソースのみ記載)
─── src
    ├── App.tsx (ルーティング設定)
    ├── views
    │   ├── Signin.tsx (ログイン画面)
    │   ├── Signin.css
    │   └── Top.tsx (ログイン成功時の遷移ページ)
    └── __test__
        └── Signin.test.tsx (Signin.tsxのテストを行うテストファイル)
App.tsx
各ページを呼び出し、react-router-domでルーティングを行います。
//App.tsx
import { BrowserRouter, Routes, Route } from "react-router-dom";
import Signin from "./views/Signin";
import Top from "./views/Top"

function App() {
  return (
    <BrowserRouter>
      <Routes>
        <Route path={`/`} element={<Signin />} />
        <Route path={`/Top`} element={<Top />} />
      </Routes>
    </BrowserRouter>
  );
};
export default App;
Signin.tsx
ログインフォームの作成、ログイン処理を行っています。
react-hook-formでバリデーションチェックを行い、エラーメッセージも指定しました。
ID・パスワードが間違っている場合のエラーメッセージはuseState を使用して管理しています。
//Signin.tsx
import { useState } from "react";
import { useForm, SubmitHandler } from 'react-hook-form';
import { ErrorMessage } from '@hookform/error-message';
import { useNavigate } from "react-router-dom";
import './Signin.css';

//型宣言
type Inputs = {
    username: string;
    password: string;
}

export default function Signin() {
    const navigate = useNavigate();
    //errorMsg という名前のstate関数を宣言、初期値 null をセット
    const [errorMsg, setErrorMsg] = useState("")

    const {
        register,
        handleSubmit,
        reset,
        formState: { errors }
    } = useForm<Inputs>({
        mode: 'onChange',
    });

    //ログインボタンを押した際の処理
    const onSubmit: SubmitHandler<Inputs> = (data) =>{
        console.log(data);
        if (data.username === "user" && data.password === "password"){  //仮ID・パスワード
            loginSuccess();
        }else{
            loginErrorMsg();
        }
        reset();
    };

    //ログインに成功した場合、次のページへ遷移
    const loginSuccess = () => {
        navigate("/Top");
    }

    //ログインに失敗した場合のエラーメッセージをセット
    const loginErrorMsg = () => {
        //setErrorMsg()でerrorMsgの値を更新
        setErrorMsg("ユーザーIDもしくはパスワードが間違っています。");
    }

    //入力内容をクリア
    const clearForm = () => {
        reset();
    }

    return (
        <div className="formContainer">
        <form onSubmit={handleSubmit(onSubmit)}>
            <h1>ログイン</h1>
            <hr />
            <div className='uiForm'>
            <p className="errorMsg">{errorMsg}</p>
                <div className='formField'>
                    <label htmlFor="userID">ユーザーID</label>
                    <input
                        id = "userID"
                        type="text"
                        placeholder='userID'
                        {...register('username', {
                            required: 'ユーザーIDを入力してください。',
                            maxLength: {
                                value: 20,
                                message: '20文字以内で入力してください。'
                            },
                            pattern: {
                                value:
                                    /^[A-Za-z0-9-]+$/i,
                            message: 'ユーザーIDの形式が不正です。',
                            },
                        })}
                    />
                </div>
                <ErrorMessage errors={errors} name="username" render={({message}) => <span>{message}</span>} />
                <div className='formField'>
                    <label htmlFor="password">パスワード</label>
                    <input
                        id = "password"
                        type="password"
                        placeholder='password'
                        role = 'password'
                        {...register('password', {
                            required: 'パスワードを入力してください。',
                            maxLength: {
                                value: 20,
                                message: '20文字以内で入力してください',
                            },
                            pattern: {
                                value:
                                    /^[A-Za-z0-9]+$/i,
                            message: 'パスワードの形式が不正です。',
                            },
                        })}
                    />
                </div>
                <ErrorMessage errors={errors} name="password" render={({message}) => <span>{message}</span>} />
                <div className="loginButton">
                    <button
                        type = "submit"
                        className="submitButton"
                        >ログイン
                    </button>
                    <button
                        type = "button"
                        className="clearButton"
                        onClick={clearForm}
                        >クリア
                    </button>
                </div>
            </div>
        </form>
        </div>
  );
}React-hook-form : https://react-hook-form.com/get-started
React-router-dom : https://reactrouter.com/en/main
Signin.css
実装する際は以下を参考にしてみてください。
css
h1{
    text-align: center;
  }

  .formContainer{
    height: 100vh;
    width: 100%;
    display: flex;
    align-items: center;
    justify-content: center;
  }

  .formContainer form{
    background-color: rgb(255, 255, 255);
    border: 2px solid rgb(59, 152, 214);
    width: 70%;
    max-width: 400px;
    padding: 30px;
    border-radius: 10px;
    box-shadow: 6px 6px 10px 0px rgba(83, 84, 85, 0.4);
  }

  .uiForm{
    display: flex;
    flex-direction: column;
    align-items: center;
    justify-content: space-evenly;
    height:400px;
  }

  .formField{
    display: flex;
    flex-direction: column;
    width: 100%;
  }

  .formField input{
    background-color: aliceblue;
    border: 1px solid rgb(127, 127, 131);
    padding: 20px;
    border-radius: 4px;
  }

  .formField input:focus{
    outline: none;
  }

  .formField label{
    font-size: 17px;
    font-weight: 600;
    margin-bottom: 3px;
  }

  .loginButton{
    display: flex;
    align-items: center;
    justify-content: center;
    width: 100%;
    margin-bottom: 0px;
  }

  button{
    background-color: rgb(59, 152, 214);
    width: 100%;
    margin: 5px;
    border: none;
    border-radius: 5px;
    padding: 10px 30px;
    color: aliceblue;
    font-size: 18px;
    cursor: pointer;
    transition: all 0.2s;
  }

  button:hover{
    background-color: rgb(43, 123, 177);
  }

  .errorMsg {
    color: red;
    margin: 0;
    align-self: flex-start;
  }
Top.tsx
ログイン成功時に遷移するトップページです。
ログアウトボタンを押すとログイン画面に戻ります。
//Top.tsx
import { useNavigate } from "react-router-dom";

export default function Top() {
    const navigate = useNavigate();

    return (
        <div className="container">
        <h1>Top Page</h1>
        <button
            onClick={() => navigate('/')}
            >ログアウト
        </button>
        </div>
    );
}
ここまで出来たら動作確認を行っていきます。
以下のコマンドを実行し、アプリを起動させます。
$ npm startログインフォームが表示されました。
設定したバリデーションチェックが正しく行われていることや、クリアボタンで入力フォームがリセットされること、仮ID・パスワードでログインが可能なことが確認できました。
これでログインページの完成となります。
テスト自動化
さて、ログインページはできあがりましたが、せっかくなのでテスト自動化もしてみましょう。
create-react-app でプロジェクトを作成すると、標準でJestもインストールされているので、JestとReact TestingLibraryを使用してテスト自動化を行います。
まず、テストコードの基本的な書き方は以下のようになります。
describe('Signin test', () => {
    test('renders Signin component', () => {
        render()
        expect(screen.getByText('ログイン')).toBeInTheDocument()
    });
...
}
render関数でSigninコンポーネントをレンダリングすることで、コンポーネント内にアクセスできるようになり、getByTextでテキストを取得します。
expect().toBeInTheDocument()が真であればテスト成功となります。
しかし今回のコードでは、useNavigateの部分をmockにしなければエラーが出てテストができません。
以下のように、まずmock処理を書いておくことで解決しました。
//useNavigateをmock
const mockedNavigator = jest.fn();
    jest.mock('react-router-dom', () => ({
        ...jest.requireActual('react-router-dom'),
        useNavigate: () => mockedNavigator,
    }
));
実際にuseNavigateが正しく動作しているかテストをするときは、以下のように書くことで期待するページに遷移しているかをテストすることができます。
expect(mockedNavigator).toHaveBeenCalledWith('/Top')また、以下のようなログインボタンクリック後に出るエラーメッセージをテストしたい場合は、ログインボタンの処理に使用しているhandleSubmitが非同期処理なので、処理が終わってからメッセージが出るまで待つ必要があります。
このような非同期処理の場合は、async、await waitForを使用することでテストが実行できます。
test('ID・パスワード未入力でログインボタンをクリック', async () => {
        render()
        userEvent.click(screen.getByRole('button', {name: 'ログイン'}))
        await waitFor(() => expect(screen.getByText('ユーザーIDを入力してください。')).toBeInTheDocument())
        await waitFor(() => expect(screen.getByText('パスワードを入力してください。')).toBeInTheDocument())
    });
Signin.test.tsx
以上のことを踏まえたテストコードです。
ファイル名はテストしたいファイルの名前(今回だとSignin.tsx)に.testを付け加えた名前にします。
テストコードはまとめて__test__ディレクトリに格納しています。
前章では手動で確認していた
設定したバリデーションチェックが正しく行われていること
クリアボタンで入力フォームがリセットされること
仮ID・パスワードでログインが可能なこと
の確認を自動で行えるようにします。
//Signin.test.tsx
import userEvent from '@testing-library/user-event';
import { render, waitFor, screen } from '@testing-library/react';
import Signin from '../views/Signin'

//useNavigateをモック
const mockedNavigator = jest.fn();
    jest.mock('react-router-dom', () => ({
        ...jest.requireActual('react-router-dom'),
        useNavigate: () => mockedNavigator,
    }
));

describe('Signin test', () => {
    test('未入力でログインボタン クリック', async () => {
        render()
        userEvent.click(screen.getByRole('button', {name: 'ログイン'}))
        await waitFor(() => expect(screen.getByText('ユーザーIDを入力してください。')).toBeInTheDocument())
        await waitFor(() => expect(screen.getByText('パスワードを入力してください。')).toBeInTheDocument())
    });

    test('ユーザーID:ひらがな入力', async () => {
      render()
      userEvent.type(screen.getByRole('textbox', { name: 'ユーザーID' }),'あいうえお')
      userEvent.click(screen.getByRole('button', {name: 'ログイン'}))
      await waitFor(() => expect(screen.getByText('ユーザーIDの形式が不正です。')).toBeInTheDocument())
    });

    test('不正なID/パス', async () => {
      render()
      userEvent.type(screen.getByRole('textbox', { name: 'ユーザーID' }),'watanabe')
      userEvent.type(screen.getByRole('password', { name: 'パスワード' }),'aaaa')
      userEvent.click(screen.getByRole('button', {name: 'ログイン'}))
      await waitFor(() => expect(screen.getByText('ユーザーIDもしくはパスワードが間違っています。')).toBeInTheDocument())
    });

    test('クリアボタン', async () => {
      render()
      userEvent.type(screen.getByRole('textbox', { name: 'ユーザーID' }),'user')
      userEvent.type(screen.getByRole('password', { name: 'パスワード' }),'password')
      userEvent.click(screen.getByRole('button', {name: 'クリア'}))
      userEvent.click(screen.getByRole('button', {name: 'ログイン'}))
      await waitFor(() => expect(screen.getByText('ユーザーIDを入力してください。')).toBeInTheDocument())
    });

    test('正しいID/パス', async () => {
      render()
      userEvent.type(screen.getByRole('textbox', { name: 'ユーザーID' }),'user')
      userEvent.type(screen.getByRole('password', { name: 'パスワード' }),'password')
      userEvent.click(screen.getByRole('button', {name: 'ログイン'}))
      await waitFor(() => expect(mockedNavigator).toHaveBeenCalledWith('/Top'))
    });
});
では実際にテストを実行してみましょう。
以下のコマンドを実行するとテストが開始されます。
$ npm test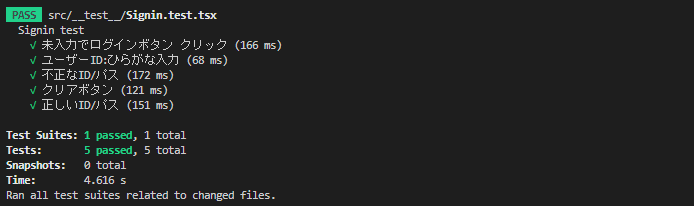
このように今回作った5つのテスト項目すべてがPASSしました。テスト成功です!
さらに-- --coverageというオプションを追加すると、、
$ npm test -- --coverage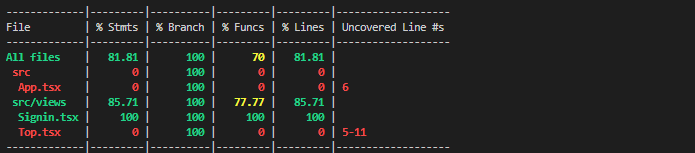
テストカバレッジも表示されます。
今回はSignin.tsxのみテストしたので、その部分だけ100%となりました。
このオプションを付けることにより、coverageディレクトリが作成されます。
その中にあるindex.htmlを見るとさらに詳しく見ることもできます。ぜひ活用してみてください。
終わりに
ログインページの開発と自動テストまでを行いました。
同期処理、非同期処理がわからなかったり、mockがうまくできなかったり、と最初は苦労しました。。
状態管理についても現在勉強中なので、今後もっといい書き方を探していきたいです!
執筆者プロフィール:渡部 瑠菜
2022年4月に新卒入社後、ITソリューション部に所属。 AWSやReactを勉強中。 趣味は絵を描くことや2D/3Dモデリングなど。
お問合せはお気軽に
https://service.shiftinc.jp/contact/
SHIFTについて(コーポレートサイト)
https://www.shiftinc.jp/
SHIFTのサービスについて(サービスサイト)
https://service.shiftinc.jp/
SHIFTの導入事例
https://service.shiftinc.jp/case/
お役立ち資料はこちら
https://service.shiftinc.jp/resources/
SHIFTの採用情報はこちら
https://recruit.shiftinc.jp/career/