
コピペで慣れる生WebGL#03ビデオと3D

前回、#02パーティクルについて紹介しました。複数のプログラム(three.jsではMaterial)を使い、パーティクルのレンダリングを行うサンプルでした。前回までは行列をほとんど使いませんでした。今回から行列を使い3Dをレンダリングする手法を紹介します。
ビデオと3D
ビデオの背景にシンクロさせて立方体をレンダリングする手法を紹介します。ビデオをWebGLのテクスチャとして使用する際、ビデオのフレームが更新するたびにテクスチャーを更新しないといけません。テクスチャーを更新はパフォーマンス的に重く、ビデオサイズやデバイスでパフォーマンスが落ちないかを確認する必要があります。
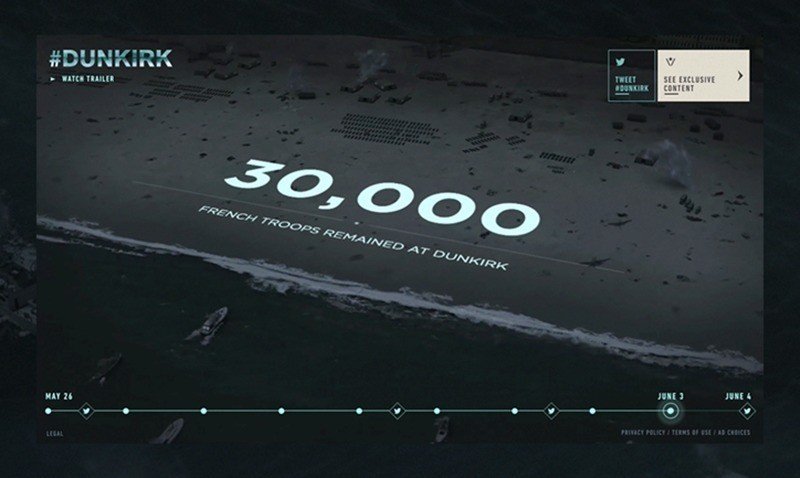
この手法を使ったサイトはそんなに多くないですが、1つだけ紹介しておきます。
今回作成したサンプルです。

生WebGLバージョン+コード
thee.jsバージョン+コード
サンプルで使用したmp4はcoverr.coから使用しています。
WebGLコードを作成する前に使用するmp4のカメラデータを取得します。
mp4からカメラのパスを取得する
After EffectのtrackerというツールでWebGLでレンダリングするためのカメラのパスを自動的に取得します。
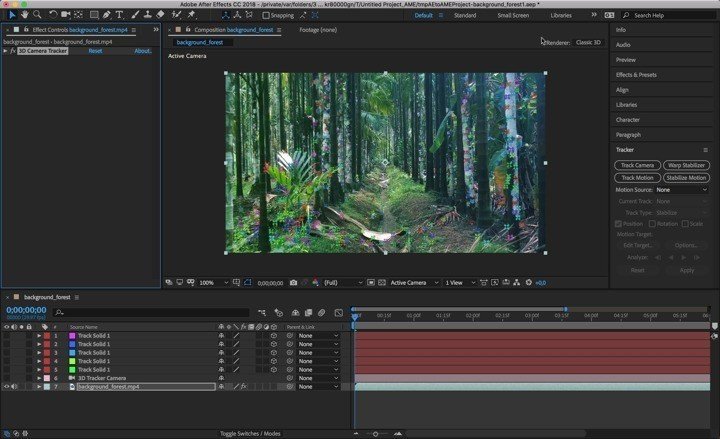
カメラのパスの取得はボタン1つでできますが、このあたりのチュートリアルが参考になりました。
AEのアニメーションデータを抽出するafter-effectsというnode.jsのライブラリがあるのでそれを利用してカメラ部分のアニメーションデータをjsonとして書き出します。
こちらがそのために作成したnode.jsのファイルです。
WebGL作成
背景ビデオの作成
#01ディストーションエフェクトと同じ要領で作成していきます。ウィンドウサイズの比率に合わせてビデオ部分が拡大縮小するようにfragmentシェーダを作成しました。
// fragmentシェーダ
precision mediump float;

uniform float uWindowRate;
uniform float uVideoSizeRate;
uniform sampler2D uTexture;

varying vec2 vUv;

void main(){
    vec2 customUv;

    // ビデオサイズとウィンドウサイズの比率を比較してuvを拡大・縮小させてcustomUvを決定する
    if(uVideoSizeRate < uWindowRate){
        float winWSize = 1.0/uWindowRate;
        float imgWSize = 1.0/uVideoSizeRate;
        customUv.x = (imgWSize-winWSize)/imgWSize/2.0 + mix( 0.0, winWSize/imgWSize, vUv.x);
        customUv.y = vUv.y;
    }else{
        customUv.x = vUv.x;
        customUv.y = (uVideoSizeRate-uWindowRate)/uVideoSizeRate/2.0 + mix( 0.0, uWindowRate/uVideoSizeRate, vUv.y);
    }
    vec4 color = texture2D(uTexture, customUv);
    gl_FragColor = color;
}
ビデオの更新に合わせて毎フレームテクスチャを更新します。
gl.bindTexture(gl.TEXTURE_2D, videoTexture);

if (video.readyState !== 0) {
    gl.texImage2D(gl.TEXTURE_2D, 0, gl.RGBA, gl.RGBA, gl.UNSIGNED_BYTE, video);
    if (prevVideoState == 0) {
        gl.texParameteri(gl.TEXTURE_2D, gl.TEXTURE_WRAP_S, gl.CLAMP_TO_EDGE);
        gl.texParameteri(gl.TEXTURE_2D, gl.TEXTURE_WRAP_T, gl.CLAMP_TO_EDGE);
        gl.texParameteri(gl.TEXTURE_2D, gl.TEXTURE_MIN_FILTER, gl.LINEAR);
    }
}
three.jsではTHREE.VideoTextureがあり、勝手に更新してくれるので、そちらを利用しました。
テクスチャの更新は画像サイズによって更新する速さは違いますが、重い処理なのでなるべく小さいサイズにするようにしておきます。小さいとクオリティが下がるので、いかにバランスをとるかが重要です。
カメラの設定
これまでのチュートリアルではカメラの要素を使わない実装を行ってきました。(three.jsではカメラを設定しないとレンダリングできないできません。しかし、形だけでカメラを設定し、カメラから自動的に取得できる行列は使用していませんでした。)
今回から生WebGLの中にthree.jsのようにカメラを設定します。カメラから行列を取得し、レンダリングに使用します。
カメラから行列を2つ取得します。
1.view matrix カメラを中心とした相対座標に変換する行列
2.projection matrix 3D空間をクリップスペース("clip space")に変換する行列
カメラとの距離(深度)によってスケールを増減させるPerspectiveカメラと増減させないOrthographicカメラがあります。
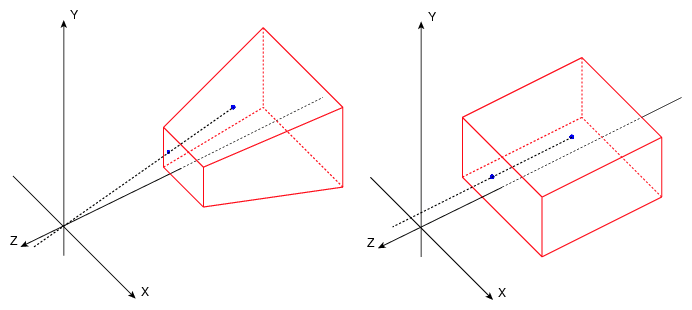
今回のデモでは遠近感のあるようにスケールを変化させたいのでPerspectiveカメラを使用します。
glMatrix.jsという行列・ベクトルを扱うライブラリではPerspectiveカメラとOrthographicカメラのprojection matrixを提供するメソッドがあります。今回はそちらを使用しています。
カメラでの行列計算についてもっと知りたい方はこちらのサイトを参考にしてください。
three.jsのようにCameraクラスを作成します。
class Camera {
	constructor(options) {
		this.viewMatrix = mat4.create();
		this.projectionMatrix = mat4.create();

		this.rotationY = Math.PI;

		this.timelineData = options.timelineData;

		this._positionKeyframeAnimation = new KeyframeAnimation({
			frames: this.timelineData.animations.position
		});

		mat4.perspective(
			this.projectionMatrix,
			(60 / 180) * Math.PI,
			windowWid / windowHig,
			1,
			100000
		);
	}
	update(currentTime) {
		let position = this._positionKeyframeAnimation.getCurrentValue(currentTime);

		mat4.fromTranslation(this.viewMatrix, position);
		mat4.rotateY(this.viewMatrix, this.viewMatrix, this.rotationY);
		mat4.invert(this.viewMatrix, this.viewMatrix);
	}
	resize() {
		mat4.perspective(
			this.projectionMatrix,
			(60 / 180) * Math.PI,
			windowWid / windowHig,
			1,
			100000
		);
	}
}
先ほど作成したAfter Effectから取得したデータをもとにカメラアニメーションのタイムラインを作成します。ビデオの現在の時間からカメラのポジションを決定します。
class KeyframeAnimation {
constructor(options) {
this._frames = options.frames;
}
getCurrentValue(time) {
let prev = -1;
for (let i = this._frames.length - 1; i >= 0; i--) {
if (time >= this._frames[i][0]) {
prev = i;
break;
}
}
if (prev == -1) {
if (prev < 0) prev = 0;
return this._frames[prev][1];
} else if (prev === this._frames.length - 1) {
return this._frames[this._frames.length - 1][1]; // vec3(temp, prev, prev, 0)
} else {
let startFrame = this._frames[prev];
let endFrame = this._frames[prev + 1];
time = clamp(time, startFrame[0], endFrame[0]);
let rangeVal = range(startFrame[0], endFrame[0], time); // 0 - 1
let outValue0 = lerp(startFrame[1][0], endFrame[1][0], rangeVal);
let outValue1 = lerp(startFrame[1][1], endFrame[1][1], rangeVal);
let outValue2 = lerp(startFrame[1][2], endFrame[1][2], rangeVal);
return [outValue0, outValue1, outValue2];
}
}
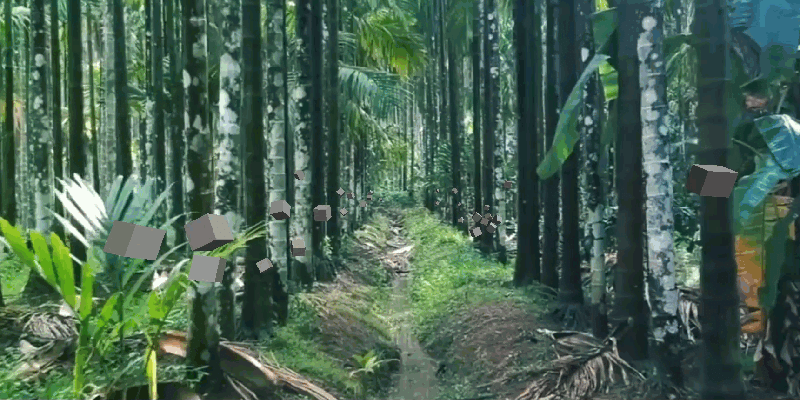
}立方体(プログラム、バッファーなど)を作成
今回は立方体の頂点、法線をそれぞれバッファーとして作成します。
コードが長いのでgistにアップしておきます。
生WebGLで立方体を作成する関数は以下のようになります。
// 立方体を作成
function createBox() {
	let { positions, normals } = createBoxArrary(1, 1, 1);

	boxProgram = createProgram(boxVertexShaderSrc, boxFragmentShaderSrc);

	// 立方体の頂点バッファーを作成
	boxPositionBuffer = gl.createBuffer();
	gl.bindBuffer(gl.ARRAY_BUFFER, boxPositionBuffer);
	gl.bufferData(gl.ARRAY_BUFFER, positions, gl.STATIC_DRAW);
	boxPositionBufferLocation = gl.getAttribLocation(boxProgram, 'position');

	// 立方体の法線バッファーを作成
	boxNormalBuffer = gl.createBuffer();
	gl.bindBuffer(gl.ARRAY_BUFFER, boxNormalBuffer);
	gl.bufferData(gl.ARRAY_BUFFER, normals, gl.STATIC_DRAW);
	boxNormalBufferLocation = gl.getAttribLocation(boxProgram, 'normal');

	// レンダリングする際にパスする頂点の数
	boxVertexNum = positions.length / 3;

	// uniformのロケーションをキャッシュする
	boxUniforms = {
		modelViewMatrix: gl.getUniformLocation(boxProgram, 'modelViewMatrix'),
		projectionMatrix: gl.getUniformLocation(boxProgram, 'projectionMatrix'),
		normalMatrix: gl.getUniformLocation(boxProgram, 'normalMatrix')
	};

	let posX, posY, posZ, rotationX, rotationY, rotationZ, size;
	// ランダムに配置する立方体の位置・回転・スケールをmodelMatrixとして取得する
	for (let ii = 0; ii < 30; ii++) {
		size = 30 + 30 * Math.random();
		if (Math.random() < 0.5) posX = 800 + 400 * Math.random();
		else posX = -400 * Math.random() + 200;

		posY = 300 + 200 - 400 * Math.random();
		posZ = -500 + 5000 * Math.random();

		rotationX = 2 * Math.PI * Math.random();
		rotationY = 2 * Math.PI * Math.random();
		rotationZ = 2 * Math.PI * Math.random();

		let modelMat = mat4.create();
		mat4.fromTranslation(modelMat, [posX, posY, posZ]);
		mat4.rotateX(modelMat, modelMat, rotationX);
		mat4.rotateY(modelMat, modelMat, rotationY);
		mat4.rotateZ(modelMat, modelMat, rotationZ);
		mat4.scale(modelMat, modelMat, [size, size, size]);

		boxes.push({ modelMatrix: modelMat });
	}
}
modelMatrixはランダムに配置する立方体の位置・回転・スケールを表す行列です。最小単位の立方体(1x1x1)の立方体の頂点にmodelMatrixをかけることにより3D空間上の頂点を定義します。
カメラで取得できるprojectionMatrixとviewMatrixを利用し、クリップスペース上の座標に変換していきます。ここでの行列計算はvertexシェーダーで実行します。
const boxVertexShaderSrc = `
precision mediump float;

attribute vec4 position;
attribute vec3 normal;

uniform mat4 modelViewMatrix;
uniform mat4 projectionMatrix;
uniform mat3 normalMatrix;

varying vec3 vNormal;

void main(){
    gl_Position = projectionMatrix * modelViewMatrix * position;
    vNormal =   normalize(normalMatrix * normal);
}
`;
法線の情報はライティングで立体的に見せるために必要となります。
今回はディレクショナルライトを使用しています。法線ベクトルと光の方向ベクトルの内積で色の加減の設定をします。fragmentシェーダー上で実行します。
const boxFragmentShaderSrc = `
precision mediump float;

// Passed in from the vertex shader.
varying vec3 vNormal;

void main() {
  vec3 normal = vNormal;
  float light = max(dot(normal, normalize(vec3(1.0, 1.0, 1.0))), 0.0);

  gl_FragColor.rgb = vec3(0.5);
  gl_FragColor.a = 1.0;
  gl_FragColor.rgb *= light;
  gl_FragColor.rgb += vec3(0.2);
}
`;
ディレクショナルライトについてもっと知りたい方はこちらのサイトを参考にしてください。
three.js
function createBox() {
	let mat = new THREE.RawShaderMaterial({
		vertexShader: boxVertexShaderSrc,
		fragmentShader: boxFragmentShaderSrc
	});

	for (let ii = 0; ii < 30; ii++) {
		let size = 30 + 30 * Math.random();
		let box = new THREE.Mesh(new THREE.BoxGeometry(1, 1, 1), mat);
		if (Math.random() < 0.5) box.position.x = 800 + 400 * Math.random();
		else box.position.x = -400 * Math.random() + 200;

		box.position.y = 300 + 200 - 400 * Math.random();
		box.position.z = -500 + 5000 * Math.random();
		box.scale.set(size, size, size);

		box.rotation.x = Math.random() * Math.PI * 2;
		box.rotation.y = Math.random() * Math.PI * 2;
		box.rotation.z = Math.random() * Math.PI * 2;

		scene2.add(box);
		window.box = box;
	}
}
three.jsですとわずかこれだけで完了します。やはり便利ですね。
立方体レンダリング
生WebGLではdrawBoxという関数を毎フレーム呼び、立方体をレンダリングします。
function drawBox() {
	gl.useProgram(boxProgram);

	gl.bindBuffer(gl.ARRAY_BUFFER, boxPositionBuffer);
	gl.vertexAttribPointer(boxPositionBufferLocation, 3, gl.FLOAT, false, 0, 0);
	gl.enableVertexAttribArray(boxPositionBufferLocation);

	gl.bindBuffer(gl.ARRAY_BUFFER, boxNormalBuffer);
	gl.vertexAttribPointer(boxNormalBufferLocation, 3, gl.FLOAT, false, 0, 0);
	gl.enableVertexAttribArray(boxNormalBufferLocation);

	gl.uniformMatrix4fv(boxUniforms.projectionMatrix, false, perspectiveCamera.projectionMatrix);

	let modelViewMatrix = mat4.create();
	let normalMatrix = mat3.create();

	for (let ii = 0; ii < boxes.length; ii++) {
		mat4.multiply(modelViewMatrix, perspectiveCamera.viewMatrix, boxes[ii].modelMatrix);

		gl.uniformMatrix4fv(boxUniforms.modelViewMatrix, false, modelViewMatrix);
		mat3.fromMat4(normalMatrix, modelViewMatrix);
		mat3.invert(normalMatrix, normalMatrix);
		mat3.transpose(normalMatrix, normalMatrix);

		gl.uniformMatrix3fv(boxUniforms.normalMatrix, false, normalMatrix);

		gl.drawArrays(gl.TRIANGLES, 0, boxVertexNum);
	}
}
1つの立方体について1回draw関数を呼んでいます。行列計算はできる限りviewMatrixとmodelMatrixの積であるmodelViewMatrix、立方体の法線ベクトルの行列normalMatrixはjavascriptの方で計算しています。
今回はビデオにシンクロさせて立方体を紹介する方法・サンプルを紹介しました。
違うライティングの手法を試したり、全ての立方体を一度ドロー関数する手法など色々と試すことはありそうです。謎にフレームが1-2秒周期にFPSが55に落ちたりするので(生WebGとthree.js両方共)、改良してみようと思います。
コピペで慣れるWebGL
#00 はじめに
#01 ディストーションエフェクト
#02パーティクル
この記事が気に入ったらサポートをしてみませんか?