
freezedみたいなコード生成を伴うパッケージはどうやって作るの?という話

Dartでのコード生成
こんにちは。 Showcase Gig でエンジニアをしている、鈴木です。
Flutter(Dart)のパッケージの中にはfreezedやauto_routeのようにbuild_runnerを使ってコードを生成するものがあります。 今回はこのようにbuild_runnerを通してコード生成するパッケージはどのように作るのかについて紹介します。
サンプルではbuild_runnerと、buildのAPIをラップしてコード生成しやすくするパッケージであるsource_genを使って簡単なコードを生成してみます。
作成するサンプル
@Greeter()
class TestClass {}
というようにクラスにアノテーションを付加してbuild_runnerを実行すると以下のようなファイルを生成するジェネレータを作ってみます。
extension TestClassExt on TestClass {
  String greet() {
    return 'hello TestClass';
  }
}
パラメータを指定すると「hello」を置き換えたり、末尾に言葉を追加したりできるようにもしてみます。
ディレクトリ構成
以下のような構成で作成していきます。
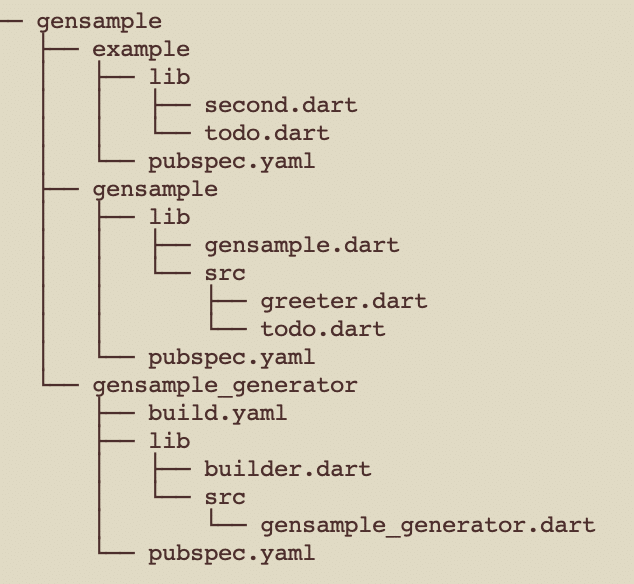
example、gensample、gensample_generatorで構成しています。
gensampleで「@Greeter()」のようなアノテーションを定義します。
gensample_generatorがbuild_runnerから駆動されてコードを生成するモジュールになります。
上記で定義したアノテーションを使ってみた例をexampleに書きます。
コード生成を伴うパッケージは大抵このような構成になっており、利用時はpubspec.yamlでアノテーション定義をdependenciesに、ジェネレータ部分をdev_dependenciesに記述します。 例えばfreezedを利用するときは以下のように定義します。
dependencies:
  freezed_annotation:

dev_dependencies:
  freezed:
  build_runner:
ジェネレータとbuild_runnerは開発時にしか利用しないのでdev_dependenciesへの記述になります。
アノテーションの定義
まずはアノテーションそのものを定義していきます。gensampleの下にpubspec.yamlを用意します。
name: gensample
descrpition: a generator sample

environment:
  sdk: ">=2.14.0 <3.0.0"

dev_dependencies:
  test: ^1.20.1
同じ階層に「lib」ディレクトリを作成して「gensample.dart」を作成します。 さらに「lib」の下に「src」ディレクトリを作成して「greeter.dart」を作成します。 それぞれ以下のようになります。
library gensample;

export 'src/greeter.dart';
class Greeter {
const Greeter({this.message = 'hello', this.ps});
final String message;
final String? ps;
}今回はシンプルな例ですので、アノテーションの定義はこれだけです。
ジェネレータの実装
次にジェネレータを作成します。 まずは先程と同様にgensample_generatorの下にpubspec.yamlを作成します。
name: gensample_generator
description: a sample generator
version: 1.0.0

environment:
  sdk: ">=2.14.0 <3.0.0"

dependencies:
  analyzer:
  build:
  build_config:
  source_gen:
  gensample:
    path: ../gensample/

dev_dependencies:
  test: ^1.20.1
ジェネレータでは「build.yaml」でコード生成するための情報を与える必要があります。 以下のように作成しておきます。
targets:
  $default:
    builders:
      gensample_generator|gensample:
        enabled: true

builders:
  gensample:
    import: "package:gensample_generator/builder.dart"
    builder_factories: ["genSample"]
    build_extensions: {".dart": [".gensample.g.part"]}
    auto_apply: dependents
    build_to: cache
    applies_builders: ["source_gen|combining_builder"]
build.yamlで指定している内容についてはbuild_configのREADMEを参照してください。
「builder_factories」にはBuilderを返す関数を記述します。ここで記述した関数が返すBuilderを使ってコード生成が進みます。 ここでは「genSample」という名前で定義しました。 「lib」ディレクトリを作成し、直下に「builder.dart」を作成して「genSample」を記述します。
import 'package:build/build.dart';
import 'package:gensample_generator/src/gensample_generator.dart';
import 'package:source_gen/source_gen.dart';

Builder genSample(BuilderOptions options) =>
    SharedPartBuilder([GenSampleGenerator()], 'gen_sample');
返すBuilderインスタンスはSharedPartBuilderのほかにPartBuilder、LibraryBuilderがあります。 part of でファイルを分割する場合はSharedPartBuilderかPartBuilderになりますが、PartBuilderは非推奨のようです(ちなみにfreezedはPartBuilderを使っています)。 ここではSharedPartBuilderを返しています。パラメータにはジェネレータ(これから定義します)と一意の識別子を渡しています。
libの下に「src」ディレクトリを作成して、その下に「gensample_generator.dart」を作成します。 ここにジェネレータ(GenSampleGenerator)を定義していきましょう。
import 'package:analyzer/dart/element/element.dart';
import 'package:build/src/builder/build_step.dart';
import 'package:gensample/gensample.dart';
import 'package:source_gen/source_gen.dart';

class GenSampleGenerator extends GeneratorForAnnotation<Greeter> {
  @override
  Stream<String> generateForAnnotatedElement(
      Element element, ConstantReader annotation, BuildStep buildStep) async* {
    final annotation = const TypeChecker.fromRuntime(Greeter)
        .firstAnnotationOf(element, throwOnUnresolved: false);
    final message = annotation?.getField('message')?.toStringValue() ?? '';
    final ps = annotation?.getField('ps')?.toStringValue() ?? '';

    yield '''
    extension ${element.name}Ext on ${element.name} {
      String greet() {
        return '${message} ${element.name}${ps.isNotEmpty ? ',${ps}' : ''}';
      }
    }
    ''';
  }
}
アノテーションを見つけるとgenerateForAnnotatedElementが呼ばれるのでそこで適切なコードを返してあげます。 今回定義したアノテーションのGreeterクラスではmessageとpsというフィールドを持っていますが、以下のようにして ジェネレータからアクセスしています。
final annotation = const TypeChecker.fromRuntime(Greeter)
    .firstAnnotationOf(element, throwOnUnresolved: false);
final message = annotation?.getField('message')?.toStringValue() ?? '';
final ps = annotation?.getField('ps')?.toStringValue() ?? '';
また、アノテーションが付与された要素(今回の例ではTestClassなど)はパラメータで渡されてくるelementで情報にアクセスできます。 このようにアノテーションの情報と定義された対象の要素の情報を組み合わせてコード生成していきます。
使ってみる
ではexampleの下にアノテーションを使ったコード生成を試してみます。 exampleの直下にpubsplec.yamlを作成します。
name: example
description: demo
version: 1.0.0

environment:
  sdk: ">=2.14.0 <3.0.0"

dependencies:
  gensample:
    path: ../gensample/

dev_dependencies:
  build_runner:
  gensample_generator:
    path: ../gensample_generator/
libディレクトリを作成してその下にアノテーションを使ったサンプルクラスを定義してみます。
import 'package:gensample/gensample.dart';

part "one.g.dart";

@Greeter()
class TestClass {}
import 'package:gensample/gensample.dart';

part 'two.g.dart';

@Greeter(message: 'こんにちは', ps: '牛乳買ってきて')
class Two {
  const Two(this.something);

  final String something;
}
oneはデフォルトで、twoはパラメータを指定してアノテーションを使いました。 exampleディレクトリに移動して flutter pub run build_runner build としてみましょう。 成功するとexample/libの下に「one.g.dart」と「two.g.dart」が生成されます。
// GENERATED CODE - DO NOT MODIFY BY HAND

part of 'one.dart';

// **************************************************************************
// GenSampleGenerator
// **************************************************************************

extension TestClassExt on TestClass {
  String greet() {
    return 'hello TestClass';
  }
}
// GENERATED CODE - DO NOT MODIFY BY HAND
part of 'two.dart';
// **************************************************************************
// GenSampleGenerator
// **************************************************************************
extension SecondTodoExt on Two {
String greet() {
return 'こんにちは Two,牛乳買ってきて';
}
}このように生成できました。 とても簡単なサンプルですが、build_runnerを通じてコード生成するパッケージはこの応用です。 freezedのように共通の処理を手広く導入したいケースやauto_routeのように煩雑な処理をスッキリ見せるケースなどうまく使えばとても便利なしくみなので利用シーンを探してみてはどうでしょうか。
この記事が気に入ったらサポートをしてみませんか?