
『JavaScriptを極める3ヶ月 アプリ開発に使える知識を徹底的に学ぶ』という勉強会の4~8日目をまとめる(後編)

このnoteではX-HACK様の主催する勉強会の『JavaScriptを極める3ヶ月 アプリ開発に使える知識を徹底的に学ぶ』という勉強会の学んだことについて備忘録&復習としてまとめてみようと思います。
※この記事を見る前提知識としてJavaScriptの基本文法とオブジェクト指向&プロパティの概念、簡単なchromeデベロッパー・ツールの使い方を覚えておくと読みやすいと思います。
また、今回からVue.jsというフレームワークを使います。
どのようなものか、簡単ですが解説しております。今回はチュートリアルの解説をしていき、後半はコードを読んでいきます。
あ、あと「JavaScriptを極める3ヶ月 アプリ開発に使える知識を徹底的に学ぶ」の第2期生も募集しているらしいです。
第二期の募集を開始しました!
— 松田信介@JavaScriptスクール2期生募集中 (@XHACK20) January 21, 2020
12名のみの募集です
【少人数制・4月開始】JavaScriptを極める3ヶ月!アプリ開発に使える知識を徹底的に学ぶ https://t.co/i41cs2UTdt #xhack勉強会
興味があれば是非行ってみてくださいね(ダイレクトマーケティング)
前回はこちら
1.今回の内容とゴール
・Vue.jsでToDoリストを完成する。
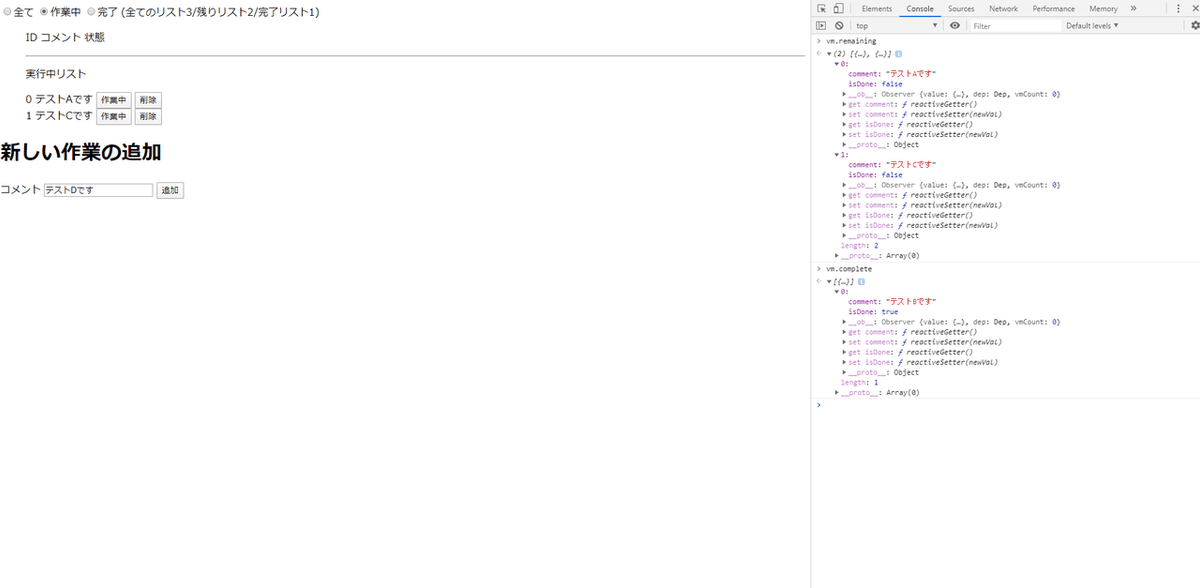
今回はこのようなTodoリストを作っていきます。
GitHubはこちら。参考にどうぞ。
コードは以下のとおりです。
<!DOCTYPE html>
<html lang="ja">

<head>
 <meta charset="UTF-8">
 <meta name="viewport" content="width=device-width, initial-scale=1.0">
 <meta http-equiv="X-UA-Compatible" content="ie=edge">
 <title>Todo_list</title>
</head>

<body>
 <div class="filters" id="todo">
   <section class="panel">
     <label><input type="radio" value="allLists" v-model="selectLists" checked="checked">全て</label>
     <label><input type="radio" value="remainingLists" v-model="selectLists">作業中</label>
     <label><input type="radio" value="completeLists" v-model="selectLists">完了</label>
     <span class="info">(全てのリスト{{ todoList.length }}/残りリスト{{ remaining.length }}/完了リスト{{ complete.length }})</span>
   </section>
   <ul class="list" style="list-style: none;">
   <p class="head">ID コメント 状態</p>
   <hr>

   <div v-show ="selectLists === 'allLists'">
     <p>全てのリスト</p>
     <li v-for="(item, index) in todoList">
       <span class="index">{{ index }}</apan>
       <span class="comment">{{ item.comment }}</apan>
       <button class="status" @click="done(index)" v-if="item.isDone">完了</button>
       <button class="status" @click="done(index)" v-else>作業中</button>
       <button class="delete" @click="remove(index)">削除</button>
     </li>
   </div>

   <div v-show ="selectLists === 'remainingLists'">
     <p>実行中リスト</p>
     <li v-for="(item, index) in remaining">
       <span class="index">{{ index }}</apan>
       <span class="comment">{{ item.comment }}</apan>
       <button class="status" @click="done(index)" v-if="item.isDone">完了</button>
       <button class="status" @click="done(index)" v-else>作業中</button>
       <button class="delete" @click="remove(index)">削除</button>
     </li>
   </div>

   <div v-show ="selectLists === 'completeLists'">
     <p>完了リスト</p>
     <li v-for="(item, index) in complete">
       <span class="index">{{ index }}</apan>
       <span class="comment">{{ item.comment }}</apan>
       <button class="status" @click="done(index)" v-if="item.isDone">完了</button>
       <button class="status" @click="done(index)" v-else>作業中</button>
       <button class="delete" @click="remove(index)">削除</button>
     </li>
   </div>

   </ul>
   <h1>新しい作業の追加</h1>
   <p>コメント
     <input type="text" class="text-input" v-model="inputData" />
     <button @click="addtodo">追加</button>
   </p>
 </div>
 <script src="https://cdn.jsdelivr.net/npm/vue/dist/vue.js"></script>
 <script src="js/todoList.js"></script>
</body>
</html>
var vm = new Vue({
 el: "#todo",
 data: {
   inputData: "テストDです",
   selectLists: "",
   todoList: [
     { comment: "テストAです", isDone: false },
     { comment: "テストBです", isDone: true },
     { comment: "テストCです", isDone: false }
   ]
 },
 methods: {
   addtodo: function() {
     let item = {
       comment: this.inputData,
       isDone: false
     };
     this.todoList.push(item);
     this.inputData = "";
   },
   remove: function(index) {
     this.todoList.splice(index, 1);
   },
   done: function(index) {
     console.log(this.todoList[index].isDone);
     this.todoList[index].isDone = !this.todoList[index].isDone;
   }
 },

 computed: {
   remaining: function() {
     return this.todoList.filter(function(item) {
       return !item.isDone;
     });
   },
   complete: function() {
     return this.todoList.filter(function(item) {
       return item.isDone;
     });
   }
 }
});
機能を上部から見てみたら。
①ラジオボタンで表示するリストを指定して収納されている
タスクを表示する
②各タスクに作業中or完了ボタンのスイッチングをする
③全て、作業中、完了のタスクの数を表示する
④削除ボタンを付ける
⑤追加ボタンを押すと作業中リストに、テキストボックスに入力したタスクが追加される
以上の機能が搭載されています。
これらの仕組みを見ていく前にインスタンスの生成
コンポーネントオプションを解説します。
2.Vue インスタンスの生成&よく使われる
コンポーネントオプション
さて、まずVue.jsを使うとき新しい Vue インスタンスを作成することによって使えるようになります。
var vm = new Vue({
 // オプション
})そこから、data,methods等のコンポーネントオプション
をどんどん追加していく事になります。
今回使った機能を書いていきます。
※今回説明文を引用するのに以下のリンクを使いましたがversionが0.12.16
なのでリファレンスとして使うのは非奨励です。
現在(2020/01/30)のversionはv2.6.11です
3.el
まずHTMLのどの部分をVue.jsに適用していくのか指定する必要があります。
一番簡単なのは<div id="todo">のように
id指定してHTMLをラップすることです。
今回のコードの場合だとBodyタグ内の
 <div class="filters" id="todo">
    ・・・・・
</div>
で・・・・・のHTMLをラップしています。
そして、指定したidを
el: "#todo"のように指定して適用するようにします。
4.data
次はdataの説明です。リファレンスを見てみると...
Vue インスタンスが作成されると、自身の data オブジェクトの全てのプロパティをリアクティブシステムに追加します。これらのプロパティの値を変更すると、ビューが”反応”し、新しい値に一致するように更新します。
パッと見分かりにくいですね笑。
まず、ここでいう「 data オブジェクトの全てのプロパティ」というのは
・inputData
・selectLists
・todoList
の3つです。
それらの内容がユーザーの入力などの操作により現在進行形で
に変更されると、HTMLなどにセットされているプロパティの内容が
「リアクティブ」変更されるということです。
また、detaプロパティtodoListを見てみると
todoList: [
{ comment: "テストAです", isDone: false },
{ comment: "テストBです", isDone: true },
{ comment: "テストCです", isDone: false }
]
となっています。中身も配列の形にできますし、
オブジェクトの形にもできます。
5.methots
methotsオプションは、メソッド(動き)を直接読み込める(発火する)
ようにする場所です。例えば
    addtodo: function() {
     let item = {
       comment: this.inputData,
       isDone: false
     };
     this.todoList.push(item);
     this.inputData = "";
   },
のように関数の形でメソッドを指定することができます。
詳しいコードの解説は後述しますが
    <p>コメント
     <input type="text" class="text-input" v-model="inputData" />
     <button @click="addtodo">追加</button>
   </p>
のHTMLの追加のボタンに「@click="addtodo"」(@clickはv-on:clickと
同じ)というディレクティブがあるので、追加ボタンを押せば
「addtodo」メソッドが発火されます。
6.computed
ここに、ロジックを書くことで自動的に算出し、結果を出力する働きを持ちます。算出プロパティともいわれていますね。
今回は、Todoリストの実行中のタスクと完了のタスクの数を配列データとして出力している働きをしていますね。
  computed: {
   remaining: function() {
     return this.todoList.filter(function(item) {
       return !item.isDone;
     });
   },
   complete: function() {
     return this.todoList.filter(function(item) {
       return item.isDone;
     });
   }
 }
7.コードを見てみる
さて、これらのコンポーネントオプションを解説したうえでコードを見てみましょう。
<!DOCTYPE html>
<html lang="ja">

<head>
 <meta charset="UTF-8">
 <meta name="viewport" content="width=device-width, initial-scale=1.0">
 <meta http-equiv="X-UA-Compatible" content="ie=edge">
 <title>Todo_list</title>
</head>

<body>
 <div class="filters" id="todo">
   <section class="panel">
     <label><input type="radio" value="allLists" v-model="selectLists" checked="checked">全て</label>
     <label><input type="radio" value="remainingLists" v-model="selectLists">作業中</label>
     <label><input type="radio" value="completeLists" v-model="selectLists">完了</label>
     <span class="info">(全てのリスト{{ todoList.length }}/残りリスト{{ remaining.length }}/完了リスト{{ complete.length }})</span>
   </section>
   <ul class="list" style="list-style: none;">
   <p class="head">ID コメント 状態</p>
   <hr>

   <div v-show ="selectLists === 'allLists'">
     <p>全てのリスト</p>
     <li v-for="(item, index) in todoList">
       <span class="index">{{ index }}</apan>
       <span class="comment">{{ item.comment }}</apan>
       <button class="status" @click="done(index)" v-if="item.isDone">完了</button>
       <button class="status" @click="done(index)" v-else>作業中</button>
       <button class="delete" @click="remove(index)">削除</button>
     </li>
   </div>

   <div v-show ="selectLists === 'remainingLists'">
     <p>実行中リスト</p>
     <li v-for="(item, index) in remaining">
       <span class="index">{{ index }}</apan>
       <span class="comment">{{ item.comment }}</apan>
       <button class="status" @click="done(index)" v-if="item.isDone">完了</button>
       <button class="status" @click="done(index)" v-else>作業中</button>
       <button class="delete" @click="remove(index)">削除</button>
     </li>
   </div>

   <div v-show ="selectLists === 'completeLists'">
     <p>完了リスト</p>
     <li v-for="(item, index) in complete">
       <span class="index">{{ index }}</apan>
       <span class="comment">{{ item.comment }}</apan>
       <button class="status" @click="done(index)" v-if="item.isDone">完了</button>
       <button class="status" @click="done(index)" v-else>作業中</button>
       <button class="delete" @click="remove(index)">削除</button>
     </li>
   </div>

   </ul>
   <h1>新しい作業の追加</h1>
   <p>コメント
     <input type="text" class="text-input" v-model="inputData" />
     <button @click="addtodo">追加</button>
   </p>
 </div>
 <script src="https://cdn.jsdelivr.net/npm/vue/dist/vue.js"></script>
 <script src="js/todoList.js"></script>
</body>
</html>
var vm = new Vue({
el: "#todo",
data: {
inputData: "テストDです",
selectLists: "",
todoList: [
{ comment: "テストAです", isDone: false },
{ comment: "テストBです", isDone: true },
{ comment: "テストCです", isDone: false }
]
},
methods: {
addtodo: function() {
let item = {
comment: this.inputData,
isDone: false
};
this.todoList.push(item);
this.inputData = "";
},
remove: function(index) {
this.todoList.splice(index, 1);
},
done: function(index) {
console.log(this.todoList[index].isDone);
this.todoList[index].isDone = !this.todoList[index].isDone;
}
},
computed: {
remaining: function() {
return this.todoList.filter(function(item) {
return !item.isDone;
});
},
complete: function() {
return this.todoList.filter(function(item) {
return item.isDone;
});
}
}
});以下の機能に沿って解説します。
①ラジオボタンで表示するリストを指定して収納されている
タスクを表示する
②各タスクに作業中or完了ボタンのスイッチングをする
③全て、作業中、完了のタスクの数を表示する
④削除ボタンを付ける
⑤追加ボタンを押すと作業中リストに、テキストボックスに入力したタスクが追加される
8.ラジオボタンで表示するリストを指定して
収納されているタスクを表示する
<label><input type="radio" value="allLists" v-model="selectLists" checked="checked">全て</label>
<label><input type="radio" value="remainingLists" v-model="selectLists">作業中</label>
<label><input type="radio" value="completeLists" v-model="selectLists">完了</label>
これらのラジオボタンを見てみます。ここで注目してほしいのは
<value>と<v-model>です。すべてのラジオボタンに
<v-model="selectLists">とあり、これらはvm.selectListに
バインディングされています。
これらをチェックしたラジオボタンにvalueを渡します。
例:全てにチェックしたら「vm.selectLists:"allLists"」となる。
    <div v-show ="selectLists === 'allLists'">
     <p>全てのリスト</p>
     <li v-for="(item, index) in todoList">
       <span class="index">{{ index }}</apan>
       <span class="comment">{{ item.comment }}</apan>
       <button class="status" @click="done(index)" v-if="item.isDone">完了</button>
       <button class="status" @click="done(index)" v-else>作業中</button>
       <button class="delete" @click="remove(index)">削除</button>
     </li>
   </div>
つぎに、上記のHTMLに注目してください。「v-show」という
ディレクティブが出てきましたが、これは、ラップされている部分で
ある条件を満たしたら描画したい場合に使用されます。
これはboolean型になり、真の場合描写されます。
ここでは<div v-show ="selectLists === 'allLists'">とあり
条件を満たしているので描写されるというわけです。
裏を返せば
<div v-show ="selectLists === 'remainingLists'">
<div v-show ="selectLists === 'completeLists'">
は偽となるので、
これらにラップされたHTMLは描写されません。
他のボタンも同じ仕組みなので、各タスクボタンに対応して
リストが表示されるようになっています。
9.各タスクに作業中or完了ボタンのスイッチング
をする
 todoList: [
     { comment: "テストAです", isDone: false },
     { comment: "テストBです", isDone: true },
     { comment: "テストCです", isDone: false }
   ]
vm.todoListを見てみましょう。配列の中に3つのオブジェクトがあります。
その中にisDoneというプロパティがあります。これはboolean型として
指定しています。(スイッチングの動きはboolean型が都合いいから)
このようにして「true=完了・false=作業中」と指定するのですが
どのようにスイッチングをするのでしょうか?HTMLを見てみましょう。
      <li v-for="(item, index) in todoList">
       <span class="index">{{ index }}</apan>
       <span class="comment">{{ item.comment }}</apan>
       <button class="status" @click="done(index)" v-if="item.isDone">完了</button>
       <button class="status" @click="done(index)" v-else>作業中</button>
v-forというディレクティブがありますね。
<li v-for="(item, index) in todoList">はtodoList配列内にある
オブジェクト(=item)をループさせ、{{ item.comment }}のように
オブジェクトの中身を指定し描写させています。
<button class="status" @click="done(index)" v-if="item.isDone">完了</button>
<button class="status" @click="done(index)" v-else>作業中</button>
< v-if="item.isDone"><v-else>に注目してください。
item.isDone=trueの場合「完了」
item.isDone=falseの場合「作業中」
という風にv-ifで分岐しています。
これを「@click」で「done(index)"」というメソッドを呼び出し
スイッチングしています。
    done: function(index) {
     console.log(this.todoList[index].isDone);
     this.todoList[index].isDone = !this.todoList[index].isDone;
   }
ここまで見てくださった皆さんには解説するコードではないと思いますね笑
スイッチングによく使われる、否定(!)の演算子を利用した
「真の場所に偽を代入」
「偽の場所に真を代入」
のコードです。
(テストためのコンソールログがありますが消し忘れてました笑)
このメソッドを使いitem.isDoneのスイッチングをしています。
10.全て、作業中、完了のタスクの数を表示する
  computed: {
   remaining: function() {
     return this.todoList.filter(function(item) {
       return !item.isDone;
     });
   },
   complete: function() {
     return this.todoList.filter(function(item) {
       return item.isDone;
     });
   }
 }
computedに注目しましょう。
・「remaining」は作業中のタスクを計算している関数
・「complete」は完了しているタスクを計算している関数
です。
this.todoListの中身をfilterメソッドにかけていることが分かります。
(this.todoList = vm.todoListを指定している)
そして、引数(this.todoList = item)のコールバック関数を
呼び出しています。
「remaining」→falseであるタスクの数を返すコールバック関数
「complete」→trueであるタスクの数を返すコールバック関数
となっています。
また、少しややこしいですがreturnは両方とも戻り値の役割を
果たしています。そうしないと後述する配列が作られません。
そして、computedによりフィルターされたものは
配列として収納されます。
HTMLを見てください
<span class="info">(全てのリスト{{ todoList.length }}/残りリスト{{ remaining.length }}/完了リスト{{ complete.length }})</span>このように、各配列のlengthを表示させることによりタスク数を
表示しているのです。
12.削除ボタンを付ける
HTMLを見てみましょう。
      <li v-for="(item, index) in todoList">
       <span class="index">{{ index }}</apan>
       <span class="comment">{{ item.comment }}</apan>
       <button class="status" @click="done(index)" v-if="item.isDone">完了</button>
       <button class="status" @click="done(index)" v-else>作業中</button>
       <button class="delete" @click="remove(index)">削除</button>
<button class="delete" @click="remove(index)">削除</button>に
注目してください。<@click="remove(index)">というディレクティブが
ついていることがわかります。削除ボタンを押すことにより
「remove(index)」メソッドが発火します。
引数はv-forのindex = vm.todoListの配列の番号です。
<v-for="(item, index)>によって取り出せるようにしているのですね。
次はメソッドを見てみましょう。
    remove: function(index) {
     this.todoList.splice(index, 1);
   },
JavaScriptの基礎ができている人ならば、すぐに理解できるでしょう。
indexという配列番号を引数にしてspliceメソッドを使っています。
ここではthis.todoList.indexでタスクを指定して削除しているのですね。
12.追加ボタンを押すと作業中リストに、
テキストボックスに入力したタスクが追加される
HTMLを見てください。
    <h1>新しい作業の追加</h1>
   <p>コメント
     <input type="text" class="text-input" v-model="inputData" />
     <button @click="addtodo">追加</button>
   </p>
ここでは、テキストボックスに<v-model="inputData">としてvm.inputData
にバインディングしていますね。
   inputData: "テストDです",
   selectLists: "",
   todoList: [
     { comment: "テストAです", isDone: false },
     { comment: "テストBです", isDone: true },
     { comment: "テストCです", isDone: false }
   ]
 },
addtodoメソッドを見てみましょう。
    addtodo: function() {
     let item = {
       comment: this.inputData,
       isDone: false
     };
     this.todoList.push(item);
     this.inputData = "";
   },
ここでは、let itemをオブジェクトとして定義して、this.todoList=タスクの配列にpushしています。
その後this.inputData = ""でテキストボックスを空にしています。
以上になります。お疲れさまでした。
13.まとめ
今回は簡単なTodoリストを書きましたが、これらを生のJavaScriptだけで
書こうとすると「document.getelementbyid」でDOM操作したり等コードが冗長になります。
Vue.jsやReactなどのフレームワークでは仮想DOMという仕組みを使い
コードの煩雑さを解決しています。
「(コーディングが)はやい、(色々なコストが)やすい
(上手くDOM操作ができてができて)うまい」を実現しているのですね!
(吉○家かよ)
この後の予定ですが。
・Strapi
・firebase
・Nuxt
等のツールと実際に作ったアプリのコードを紹介していきたいと思います。
お楽しみに!
この記事が気に入ったらサポートをしてみませんか?