openFrameworksとShaderについてメモ

このノートは随時更新されていきます。更新日付を書いておきます。
更新 2020/10/21 15:00
ぜひ、間違いなどありましたらコメントお願いします。
以前、GLSL(Shader)についてのメモというものを書いた(メモった)。
調べて触れば触るほど、意味がわかなくなっていくのがこのShader。
そこで気づいた。
これは、実行環境ごとにメモを残さなければならい。
p5.jsやGLSL Editor系とのtipsみたいのが全然通用しない場合がある。(versionや組み込み変数周りが特に、)
調べても、記録に残しとかないとすぐ忘れるのでここに、
openFrameworks with Shaderのメモを残す。
GLSL Version確認
まずは、前回のntoeでも書いた、openFrameworksで使用できるGLSLのバージョンの確認。
こちらの記事に方法がのっている。非常にわかりやすい。
簡単に書いとくと、
まずは自分の環境(ハードウェア)の確認の方法だが、
OF公式のサンプル(example)にある、
examples/gl/glInfoExample
これをビルドしてみるとウィンドウが開き、”スペースを押せ”と出てくるので押すと別ウィンドウ(.txtファイル)が開く。
別ウィンドウにでてきたことが詳細となっている。
下の方に行くと、GL_VERSION という項目がある。
ここでOKが出ているものはとりあえず使えるということが確認できる。
ちなみにメインウィンドウにでてきている opengl version **というのは、今実行されているOpenGLのバージョンだ。
プロジェクトのmain.cppで以下を記入すると、コンソールから確認することもできる。
// main.cpp
ofSetupOpenGL(1024,768, OF_WINDOW);

cout << "Vendor :" << glGetString(GL_VENDOR) << '\n';
cout << "GPU : " << glGetString(GL_RENDERER) << '\n';
cout << "OpenGL ver. " << glGetString(GL_VERSION) << '\n';
cout << "GLSL ver. " << glGetString(GL_SHADING_LANGUAGE_VERSION) << '\n';
Vendor :Intel Inc.
GPU : Intel HD Graphics 4000 OpenGL Engine
OpenGL ver. 2.1 INTEL-8.28.32
GLSL ver. 1.20
OpenGL とGLSL#versionの対応表はこちらから参照できる
自分の使っているPCでの最新のGLを利用する方法
GPUとoFのバージョンによって変わってくる。
oF上で最新のGLを使うには
main.cpp
 #include  "ofGLProgrammableRenderer.h"
int main( ){
   ofSetCurrentRenderer(ofGLProgrammableRenderer::TYPE);
   ofSetupOpenGL(1024,768, OF_WINDOW);
どのバージョンを使うか
 #include  "ofMain.h" #include  "ofApp.h"
int main( ){
   ofGLFWWindowSettings settings;
   settings.setGLVersion(3, 2); //we define the OpenGL version we want to use
   settings.setSize(1024, 768);
   ofCreateWindow(settings);
   // this kicks off the running of my app
   ofRunApp(new ofApp());
}
settings.setGLVersion(3,2);
と書かれている関数の引数(メジャー、マイナー)を変えることで、OpenGLのバージョンンを変更できる。
対応するGLSLのバージョンは以下のリンクから参照。
どのバージョンを使うべきなのか?
GLSL2.0系のサンプルをよく見かける。
addon等によっては2.0系で動いているのもよく見かける。
逆に3.0系で動いているものもよくみかける。
4.0系はあまり見かけない。
どれを使うのも自由だが、自由に変換できるように書き換えれれば一番いい。
ここでは、それができるような情報を集めてメモしていきたい。
oFでのshaderの読み込み
ofApp.hppでまずシェーダーようのインスタンスを作る。
ofShader shader;
ofShader something;
ofShader anyName;

作る個数によっていくつものshader fileを使うことができる。
ofApp.cppではshaderを読み込む
shader.load("shader");
something.load("shaders/shader");
anyName.load("myCrazyVertFile.vert","myyCrazyFragFile.frag");
このようになパターンで記述すれば読み込むことができる。
shaderfileはoFの仕様上でプロジェクトファイルのbin/dataの中からのパスの記入となっている。画像や音声ファイルを読み込む際と同じだ。
基本的には、ほかのファイルと混ざって保管されないようにShader用のフォルダをつくるのがよいだろう。
oFでのshaderの使用
draw関数内で、
shader.begin();
....
....
....
shader.end();
something.begin();
...
...
..
something.end();
vertexを扱うように、begin()とend()で挟んだところが、shaderに影響してくる。
oFでのuniform変数の作り方
shaderの方で扱えるuniform変数をoFから送ることができる。
shader.setUniform1f("myUnifom", 3.42f);
このようにして送ることができる。
この場合で言えば、myUniformというのがshader上での変数名になる。
shader.begin(),end()内で宣言すること。
変数型は色々変えることができる。
setUniform1f 1つのfloatデータ
setUniform1fv floatデータの配列
setUniform2f 2次元のfloatデータ
setUniform2fv 2次元のfloatデータの配列
setUniform3f 3次元のfloatデータ
setUniform3fv 3次元のfloatデータの配列
setUniform4f 4次元のfloatデータ
setUniform4fv 4次元のfloatデータの配列
setUniformTexture テクスチャーデータ
よくある、resoltuion , time , mouseは、
自分でsetUniformで送らないといけない。
最初から搭載されていないので、気をつけて。
oFでのofPlanePrimitiveとshader
ofApp.hpp
...
...
ofShader shader;
ofPlanePrimitive plane;
ofPlanePrimitiveというクラスからのインスタンスplaneを作る。
ofApp.cpp
...
..
void ofApp::setup(){
    float planeScale = 0.75;
   int planeWidth = ofGetWidth() * planeScale;
   int planeHeight = ofGetHeight() * planeScale;
   int planeGridSize = 20;
   int planeColumns = planeWidth / planeGridSize;
   int planeRows = planeHeight / planeGridSize;

   plane.set(planeWidth, planeHeight, planeColumns, planeRows, OF_PRIMITIVE_TRIANGLES);
}
このようなplane.setに任意の引数を入れてあげる。
引数を確認しておくと、
1 : width
2 : height
3 : column
4 : row
5 : glで用意しているvertexのつなぎ方,メッシュの作り方,ofPrimitiveMode
ofPrimitiveModeについては、以下を参照してくれれば分かる
OF_PRIMITIVE_TRIANGLES
OF_PRIMITIVE_TRIANGLE_STRIP
OF_PRIMITIVE_TRIANGLE_FAN
OF_PRIMITIVE_LINES
OF_PRIMITIVE_LINE_STRIP
OF_PRIMITIVE_LINE_LOOP
OP_PRIMITIVE_POINTS
がOpenGLでいうと
GL_TRIANGLES
GL_TRIANGLE_STRIP
GL_TRIANGLE_FAN
GL_TRIANGLE_LINES
GL_TRIANGLE_LINE_STRIP
GL_TRIANGLE_ILNE_LOOP
GL_TRIANGLE_POINT
(GL_QUADS)
(GL_POLYGON)
引用 : http://okasuke.hatenablog.com/entry/2014/01/12/224943
void ofApp::draw(){

   float percentX = mouseX / (float)ofGetWidth();
   percentX = ofClamp(percentX, 0, 1);

   // the mouse/touch X position changes the color of the plane.
   // please have a look inside the frag shader,
   // we are using the globalColor value that OF passes into the shader everytime you call ofSetColor().
   ofColor colorLeft = ofColor::magenta;
   ofColor colorRight = ofColor::cyan;
   ofColor colorMix = colorLeft.getLerped(colorRight, percentX);
   ofSetColor(colorMix);

   shader.begin(); // start shading!

   // a lot of the time you have to pass in variables into the shader.
   // in this case we need to pass it the elapsed time for the sine wave animation.
   shader.setUniform1f("time", ofGetElapsedTimef());

   // translate plane into center screen.
   float tx = ofGetWidth() / 2;
   float ty = ofGetHeight() / 2;
   ofTranslate(tx, ty);

   // the mouse/touch Y position changes the rotation of the plane.
   float percentY = mouseY / (float)ofGetHeight();
   float rotation = ofMap(percentY, 0, 1, -60, 60, true) + 60;
   ofRotate(rotation, 1, 0, 0);

   plane.drawWireframe();

   shader.end(); // end shading!
}
※oF公式のexampleのコードだ。
ここで注目したいのは、
shader.begin() end()の中で
plane.drawWireframe();
という関数が書かれているということ。
drawWireframe()はplane.setで書かれた設定からワイヤーフレームを作るものだ。
shader.begin(),end()をコメントアウトして実行すればどういう状況かわかる。
drawWireframeが呼び出される前に、translate, rotationが呼び出されている。つまり、translateやrotationで座標が動いた後の、ワイヤーフレームの頂点(vertex)がvertex shaderに送られるということだ。
vertex shader
 #version  150

// these are for the programmable pipeline system
uniform mat4 modelViewProjectionMatrix;
in vec4 position;

// the time value is passed into the shader by the OF app.
uniform float time;


void main()
{
   // the sine wave travels along the x-axis (across the screen),
   // so we use the x coordinate of each vertex for the calculation,
   // but we displace all the vertex along the y axis (up the screen)/
   float displacementHeight = 100.0;
   float displacementY = sin(time + (position.x / 100.0)) * displacementHeight;

   vec4 modifiedPosition = modelViewProjectionMatrix * position;
   modifiedPosition.y += displacementY;
   gl_Position = modifiedPosition;
}
modelViewProjectionMatrixについては、下で説明しているので先に見たら分かりやすいかも。
modifiedPositionにクリップ座標に変換したそれぞれの頂点座標が入っている。
そこに、sin waveをあててポジションをずらしている。
その際、modifiedPositionはクリップ座標に変換した数値なので、oF上の座標感覚・数値感覚とはまた別なものなので気をつけること。
逆にPositionはoF上の座標感覚・数値感覚になっている。
忘れやすいのでメモ
meshにおける、vertexとindecesの違いは以下のリンクで解説されている
oFでのTextureとShader
ofImage img;
にテクスチャとして使いたい画像をロードする。
img.load("img.jpg");
このimgに
img.getTexture().bind();
とすることで、shaderにテクスチャとしてバインド(関連付け)される。
img.getTexture()でimgのテクスチャ情報(テクセル、カラー情報)が得られる。
実は、ofImageのメソッドのdraw()をコールすると、自動的にバインドされるようになっている。
ofTextureやtexture全般に入れるが、GPUにはさまざまなものがいっぱいあるので、バインドする。
画像をバインドすることで、テクスチャを保持しているメモリをシェーダーで利用できるようにしている。
oFでは、こうすることで、デフォルトでtex0という名前でバインドされます。
img.getTexture().unbind();
これでバインドを解除できる。
テクスチャをoFでバインドする方法は3つに分けて考えられる。
・上記のように.bind()を利用して、バインドし、名前のなくバインドされたものであれば、tex0としてアクセスできるようになる。textureLocationは0
・setUniformTexture("variable_name", img.getTexture(), 1);
のように呼び出してテクスチャを渡す
・img.draw();を呼び出して、tex0としてbindする。textureLocationは0
setUniformTexture()に関しては、
第一引数 : 変数名
第二引数 : ofTexture or ofBaseHasTexture
第三引数 : textureLocation 数字, ID
第二引数は、Textureとなるオブジェクトを渡すこともできる。
ofFboのインスタンスも、一枚の絵として作った後、引数として入れることでshaderに渡せる。
ofBaseHasTextureを継承しているクラスなら指定可能
ofImageもgetTexture()でofBaseHasTextureを継承したofTextureにアクセスできるので使える。
getTexture()について
oF9.0から変更がかかり、
img.getTextureReference()だったものが、img.getTextureに変更がかかった。
他にも語尾にreferenceがつくメソッドの名前が変更になったみたいなので、
以下のリンクから参照できる。
ofVideoPlayer,ofImage,ofVideoGrabberのテクスチャとピクセルのgetメソッドが主だ。
//vertex shader #version  150

// these are for the programmable pipeline system and are passed in
// by default from OpenFrameworks
uniform mat4 modelViewMatrix;
uniform mat4 projectionMatrix;
uniform mat4 textureMatrix;
uniform mat4 modelViewProjectionMatrix;

in vec4 position;
in vec4 color;
in vec4 normal;
in vec2 texcoord;
// this is the end of the default functionality

// this is something we're creating for this shader
out vec2 varyingtexcoord;

// this is coming from our C++ code
uniform float mouseX;

void main()
{
   // here we move the texture coordinates
   varyingtexcoord = vec2(texcoord.x + mouseX, texcoord.y);

   // send the vertices to the fragment shader
   gl_Position = modelViewProjectionMatrix * position;
}
//fragment shader #version 150
//this is how we receive the texture
uniform sampler2DRect tex0;
in vec2 varyingtexcoord;
out vec4 outputColor;
void main()
{
outputColor = texture(tex0, varyingtexcoord);
}shader上ではtex0という名前がついて、sampler2DRect型として送られる。
uniform sampler2DRect tex0;
shaderでテクスチャを扱える変数、sampler2D型とsampler2DRect型というのがある。
画像のサイズによって変わってくるようです。
テクスチャが高さと幅の両方が1024や2048の256や512のような2のn乗のサイズであれば、sampler2Dを使ってテクスチャデータを表現することができます。
しかし、oFでは、4x1837や381x293のような2のn乗では表せれないようなサイズの画像でも使用させたいので、sampler2DRectだと動作するようになっているようです。
ofEnableArbTex() / ofDisableArbTex()
テクスチャを生成する際のフォーマットを決めます。
これらの手sくすちゃ参照方法に影響があるので注意が必要で、それぞれの挙動は以下になる。
ofEnableArbTex()を読んだ後のテクスチャはGL_TEXTURE_RECTANGLE_ARBで生成される(デフォルト)
ofDisableArbTex()を読んだ後のテクスチャはGL_TEXTURE_2Dで生成される
それぞれについては、
GL_TEXTURE_RCTANGLE_ARB
GL_TEXTURE_RECTANGLE
特徴 : Non-power-of-two-sized(NPOTS)
glsl内のsampler型 : sample2DRect
テクスチャ参照座標 : [0....w]x[0....h] (非正規化座標、矩形座標)
GL_TEXTURE_2D
GL_TEXTURE_2D
glsl内のsampler型 : sampler2D
テクスチャ参照座標 : [0...1]x[0....1](正規化座標)
となっていて、
OpenGLの用意するテクスチャはもっとたくさんあるが、openFrameworksではこの二つが想定されている。
sampler2DRect型を使う、GL_TEXTURE_RECTANGLEのテクスチャ座標は画像と一致するため、ディスプレイ上の画素の位置、すなわちgl_FragCoordのxy成分をテクスチャ座標としてサンプリングすれば、キャプチャした画像と等しいサイズの画像を表示することができる。
 #fragment  shader

uniform sampler2DRect image;
out vec4 fc;

void main(void)
{
 fc = texture(image, gl_FragCoord.xy);
}
in vec2 texcoord
openFrameworksでtextureを何かの形でバインドされると、in(attribute)変数でtexCoord(テクスチャ座標)がシェーダーに飛んでくる。
sampler2DRect型のテクスチャの場合のtexCoordは、正規化されていない[0...texture_width][0...texture_height] vec2型の座標が飛んでくる。
//ofApp.cpp

shader.begin();

image.draw(0,0);

shader.end();
image.draw()が宣言されているので、勝手にimageの画像がtex0,textureLocationは0でバインドされます。
そうなることで、in(attribute) vec2 texcoordも飛んできます。
このtexcoordの中身は、[0...image.width][0....image.height]の範囲で飛んできます。
//ofApp.cpp

shader.begin();

image.draw(100,200);

shader.end();
こちらも、mage.draw()が宣言されているので、勝手にimageの画像がtex0,textureLocationは0でバインドされます。
同じように、in(attribute) vec2 texcoordも飛んできます。
このtexcoordの中身は、[100...(image.width+100) ] [ 200....(image.height + 200) ]の範囲の座標で飛んできます。
つまり、
//ofApp.cpp

shader.begin();


shader.setUniform2f("img_resolution", image.getWidth(), image.getHeight());

image.draw(0,0);


shader.end();
//vertex shader
#version 150
uniform mat4 modelViewPorjectionMatrix;
in vec4 positiion;
in vec2 texcoord;
out vec2 texCoordVarying;
void main(){
texCoordVarying = texcoord;
gl_Position = modelViewProjectionMatrix * position;
}//fragment shader
#version 150
uniform sampler2DRect tex0;
uniform vec2 img_resolution;
in vec2 texCoordVarying;
out vec4 outputColor;
void main(){
vec4 texl = vec4(texCoordVarying / (img_resolution) ,0.0, 1.0);
outputColor = texl;
}
わかりやすくするため、img.widthとimg.heightは、画面サイズとは違うサイズになっています。
//ofApp.cpp

shader.begin();


shader.setUniform2f("img_resolution", image.getWidth(), image.getHeight());

image.draw(100,150);


shader.end();
//vertex shader
#version 150
uniform mat4 modelViewPorjectionMatrix;
in vec4 positiion;
in vec2 texcoord;
out vec2 texCoordVarying;
void main(){
texCoordVarying = texcoord;
gl_Position = modelViewProjectionMatrix * position;
}//fragment shader
#version 150
uniform sampler2DRect tex0;
uniform vec2 img_resolution;
in vec2 texCoordVarying;
out vec4 outputColor;
void main(){
vec4 texl = vec4(texCoordVarying / (img_resolution + vec2(100,150)) ,0.0, 1.0);
outputColor = texl;
}
textureOffset()
この関数はtextureOffset(texture, texcoord, offset)
texture : sampler2D or sampler2DRect型のテクスチャ
texcoord : texcoord.xy sampler2DRectの場合は、gl_FragCoord。
offset : ivec2(1, 0)を入れた場合、xが1ずれたテクスチャ座標から画素単位にオフセットした色をサンプリング
fc = abs(texture(image, gl_FragCoord.xy) - textureOffset(image, gl_FragCoord.xy, ivec2(1, 0)));こんな感じでかいたら隣との差分の色がサンプリングされる。
fc = abs(texture(image, gl_FragCoord.xy) - textureOffset(image, gl_FragCoord.xy, ivec2(1, 0)))
    + abs(texture(image, gl_FragCoord.xy) - textureOffset(image, gl_FragCoord.xy, ivec2(0, 1)));
縦と横の差分がサンプリングされて、エッジ検出のようなことができる。
oFにはmapTexCoordsFromTexture()という関数がある
plane.mapTexCoordsFromTexture(img.getTextureReference());
imgのテクスチャを使って、このメソッドでplaneにtexture referenceを渡すことで、UV、テクスチャの各部分がどこに行くべきかを自動で計算(マッピング)してくれる。
これはplaneの大きさでimgの画像をテクスチャとしてUVを作成する。
ofでのMovieとTexture
webCam等からの映像や映像ファイルからの映像をテクスチャとしてShaderに渡すことが可能だ。
//ofApp.cpp
setup(){
    int camWidth = 320;
    int camHeight = 240;

    camera.initGrabber(camWidth, camHeight);


    movie.loadMovie("movie.mov");
    movie.play();
}

update(){
    camera.update();
    movie.update();
}


draw(){
    shader.begin();

    shader.setUniformTexture("cameraTexture", camera.getTexture(), 1);
    shader.setUniformTexture("movieTexture", movie.getTexture(), 2);


    shader.end();
}
このように渡すこともできるし、imageと同じく、draw()でも飛んでいく。
draw(){
    shader.begin();

    camera.draw(0, 0);

    shader.end();
}
ofFbo と Texture と Shader
まずは、ofFboはimageのようにshaderからの描画をすることができる。
//ofApp.cpp

setup(){
    int camWidth = 320;
    int camHeight = 240;

    camera.initGrabber(camWidth, camHeight);


    movie.loadMovie("movie.mov");
    movie.play();

    fbo.allocate(camWidth, camHeight);
}

update(){
    camera.update();
}


draw(){
    fbo.begin();
    ofClear(0, 0, 0, 255);

    shader.begin();

    shader.setUniformTexture("cameraTexture", camera.getTexture(), 1);

    ofDrawRectangle(0,0, camWidth, cameHeight);

    shader.end();

    fbo.end();


    fbo.draw(0,0, camWidth, camHeight);
}
ofFboのシステムとして、fbo.begin()とend()の間に描画いたものは、fboのバッファに書き込まれる。スクリーンには描画されない。
rectangleにはshaderの描画がされ、それがfboに入る。
fbo.draw(x, y, w, h)でfboのバッファに書き込まれたものを描画することができる。
oFでの#version 150 shader
OpenGL3.2等の3系でのoFで扱うシェーダーの使用について書く。
vertex shader
uniform mat4 modelViewProjectionMatrix;
このやたらと長い、modelViewProjectionMatrixというのがoFを使うとUniform変数として利用できる。
これは、座標系の変換をしてくれる行列をoFの方で用意してくれている。
こちらのリンクにmodelViewProjectionMatrixについて説明している人がいるのでぜひ。
Object Space -> World Space -> Eye Spaceと変換をしていくのに、ModelViewMatrixが必要。さらに、Eye Space -> Clip Spaceに変換していくのにProjectionMatrixが必要なのだ。modelViewProjectionMatrixは、それを一緒にしてしまったものなのかもしれないと考えてみた。
引用 : https://mactkg.hateblo.jp/entry/2014/02/05/013421
どうやら
uniform mat4 modelViewMatrix;
uniform mat4 projectionMatrix;
のように、分けて二つの行列も用意されているみたいだ。
in vec4 position
こちらは、頂点の座標が飛んでくるin (attribute)変数
この頂点の座標は、oF上での座標がそのまま飛んできているはず。(あんまり自信はない)。
なので、このpositionにuniformでoFから飛ばしてきたmousePositionなどを足したり、引いたり、乗算してみても狂いは起きない(はず)
で、このoF上の座標空間(例えば、position)に、modelViewProjectionMatrixを掛けると
gl_Position = modelViewProjectionMatrix * position;
gl_Positionに入れることで基本の変換が行われる。
一応行列とベクトルの計算なので、順番は崩さない方が無難だろう。
modelViewProjectionMatrix * position;での座標は、クリップ空間に変換した座標なので、oF上での数値感覚とはまた異なるものだ。
in vec4 normal;
fragment shader
uniform vec4 globalColor;
こちらのuniform 変数を受け取ると、shader.begin();shader.end()内の
ofSetColor(color)で設定した色を受け取れるみたいだ。
実際に試してみたところ
ofSetColor(0,255,0,255);とshader.begin endの間で宣言した時、
fragment shader内で
outputColor = globalColor;
とそのまま記述すると、緑色になった。
oF上で、255という8bitで打ったとしても、
frag上でのglobalColorには、0-1に変換されているみたいだ。
ofApp.cpp

void ofApp::draw(){

    ofSetColor(0,0,255,255);

    shader.begin();

    ofSetColor(0, 255, 0,255);
    ofDrawRectangle(0,0,ofGetWidth(), ofGetHeight());

    shader.end();

}
ここの仕様が不思議なのだが、
こうすると、begin()より前にある青色がglobalColorに入ってくるみたいだ。
画面が青くなる。
そういう仕様らしい。理屈は分からない。
ofSetColorの第四引数のalphaを書かないと、255に設定されてちゃんと動くようだ。
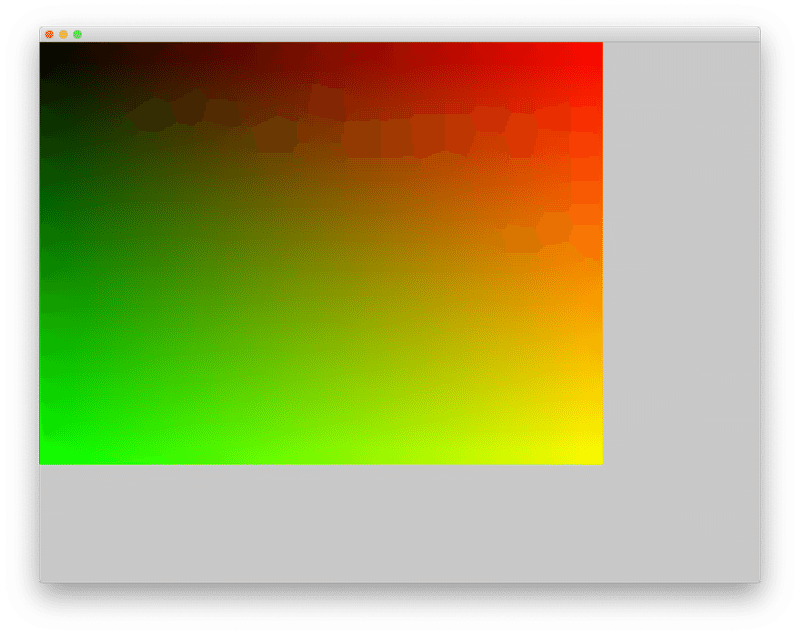
gl_FragCoordはofのウィンドウサイズに対応したピクセル座標が飛んでくる。
oFでのウィンドウサイズを(1280,720)にしている場合、
gl_FragCoordは(0,0)のピクセルから(1280,720)のピクセルまでが入ってくるということになる。
ofApp.cpp

void ofApp::draw(){


    shader.begin();

    //ofDrawRectangle(0,0,ofGetWidth(), ofGetHeight());
    ofDrawRectangle(0, 0, 500,500);

    shader.end();

}
このようなrectangleを書いたとき、fragの方で、このようなものを書いたとする。
// fragment shader
 #version  150

out vec4 outputColor;

void main()
{

   float windowWidth = 1280.0;
   float windowHeight = 720.0;

   float r = gl_FragCoord.x / windowWidth;
   float g = gl_FragCoord.y / windowHeight;
   float b = 1.0;
   float a = 1.0;
   outputColor = vec4(r, g, b, a);
}
gl_FragCoordにはウィンドウに対応するピクセル座標がくるので、
ウィンドウ全体のグラデーションから、rect(0,0,500,500)に切り取られた形で表示される。
決して、rectangleに対応した比率のピクセル座標が入ってくるわけではない。
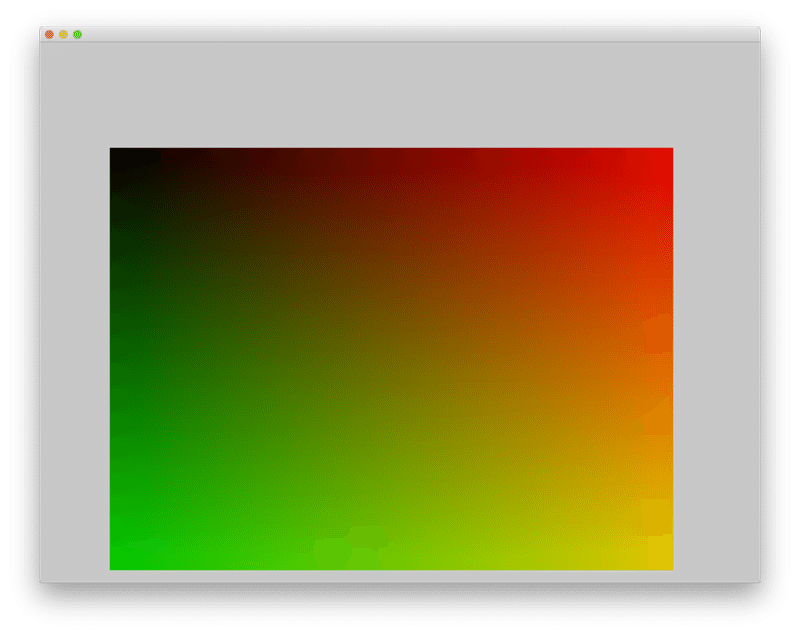
この場合に対応させたいなら、
// fragment shader
 #version  150

out vec4 outputColor;

void main()
{

   float windowWidth = 500.0;
   float windowHeight = 500.0;

   float r = gl_FragCoord.x / windowWidth;
   float g = gl_FragCoord.y / windowHeight;
   float b = 1.0;
   float a = 1.0;
   outputColor = vec4(r, g, b, a);
}
のように記述しないといけない。
(0,0)からスタートしているのでこのコードで大丈夫だが
任意の場所から描画させたいとするなら、コードに変更が必要だ。
Atomic Counter Buffer
GLSL4.2から追加されたatomic counter buffer
これはGPUの並列処理の中で、インクリメントしていってカウントできる変数のようなものを作れる機能。
openFrameworksではatomic counter bufferのための関数が用意されていないため、自分で定義して行わないといけない。
実装してテストしてみた人のリンクがあるからここから真似すれば使える。
References
ofBook - Introducing Shaders
Introducing Shaders - openFrameworks
Introducing OpenGL for OF
https://openframeworks.cc/ofBook/chapters/openGL.html
openFrameworksでシェーダを扱う
openFrameworksでofShader(GLSL)を使用してみる
ofShaderでジオメトリシェーダーを使ってみた
Accessing Color in vertex shader
ofMesh documentation
ofMeshメモ
(Mac・iPhone)プリミティブについて
描画系プログラミング環境のShaderの違いメモ
テクスチャ
OpenGLのバインドとアクティブとは
2015-11-30
openFrameworks で ポストエフェクト
oFでのTextureMapping#01
[openFrameworks] ofDisableArbTex() の挙動
oFでのTextureMapping#02
2014年08月01日 [OpenGL][GLSL] GLSL で画像処理 (3) ワーピング
GLSLで遊ぶポイントスプライト
oF WS 2014 に参加してきたよ。
頂点座標と頂点インデックスを取得しよう - CodeLabo
openFrameworksのshaderでGLSL4.2のatomic counter bufferを使って画素の数をカウントしてみる
この記事が気に入ったらサポートをしてみませんか?