TensorFlow.jsによる画像分類

「TensorFlow.js」を使って、ブラウザで「画像分類」を行います。Chromeで動作確認しています。
1. TensorFlow.jsとMobileNetのインポート
エディタで「index.html」を作成し、以下のように編集します。
<html>
<head>
<!-- TensorFlow.jsとMobileNetのインポート -->
<script src="https://cdn.jsdelivr.net/npm/@tensorflow/tfjs"></script>
<script src="https://cdn.jsdelivr.net/npm/@tensorflow-models/mobilenet"></script>
</head>
<body>
<!-- 結果の出力先 -->
<div id="console"></div>
<!-- テストに使用する画像の追加 -->
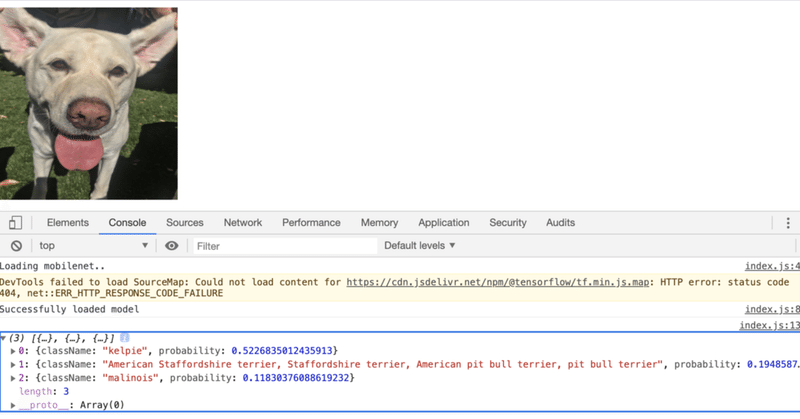
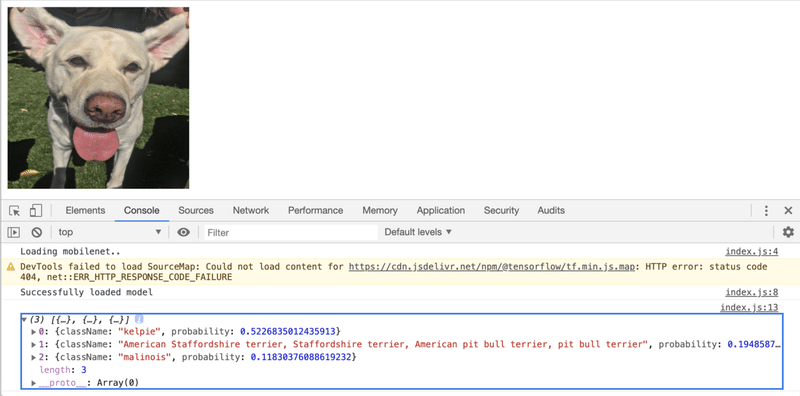
<img id="img" crossorigin src="https://i.imgur.com/JlUvsxa.jpg" width="227" height="227"/>
<!-- index.jsのインポート -->
<script src="index.js"></script>
</body>
</html>2. MobileNetによる画像分類
エディタで「index.js」を作成し、以下のように編集します。
let net;

async function app() {
    console.log('Loading mobilenet..');

    // MobileNetの読み込み
    net = await mobilenet.load();
    console.log('Successfully loaded model');

    // 画像分類の実行
    const imgEl = document.getElementById('img');
    const result = await net.classify(imgEl);
    console.log(result);
}

app();
実行は、Webブラウザで「index.html」を開くだけです。ページには犬の写真、「JavaScriptコンソール」には画像分類の上位の予測が表示されます。メニュー「表示 → 開発/管理 → JavaScriptコンソール」でJavaScriptコンソールを開くことができます。
◎ mobilenet.load()
mobilenet.load({
    version: 1,
    alpha?: 0.25 | .50 | .75 | 1.0,
    modelUrl?: string
    inputRange?: [number, number]
})


・version: MobileNetのバージョン番号。 デフォルトは1。
・alpha: alphaを小さくすると、精度が低下し、パフォーマンスが向上。 デフォルトは1。
・modelUrl: カスタムモデルのURL。
・inputRange: 予測するピクセル値の範囲を指定。[0, 1]または[-1, 1]。
3. Webカメラの利用
Webカメラでリアルタイムに画像分類を実行します。
(1) 「index.html」を開き、<body>内にWebカメラの「video要素」を追加。
<video autoplay playsinline muted id="webcam" width="224" height="224"></video>(2) 犬の画像の<img>を削除。
(3) 「index.js」を開き、ファイル上端に「webcamElement」を追加。
const webcamElement = document.getElementById('webcam');(4) app()の画像による予測を削除し、Webカメラによる予測の無限ループを追加。
async function app() {
    console.log('Loading mobilenet..');

    // MobileNetの読み込み
    net = await mobilenet.load();
    console.log('Successfully loaded model');

    // WebカメラからTensorとして画像をキャプチャ
    const webcam = await tf.data.webcam(webcamElement);
    while (true) {
        // 画像分類の実行
        const img = await webcam.capture();
        const result = await net.classify(img);

        // 結果の出力
        document.getElementById('console').innerText = `
            prediction: ${result[0].className}\n
            probability: ${result[0].probability}
        `;

        // Tensorを破棄してメモリを解放
        img.dispose();

        // 次のアニメーションフレームを待つことで少し余裕を持たせる
        await tf.nextFrame();
   }
}
◎ model.classify()
model.classify(
    img: tf.Tensor3D | ImageData | HTMLImageElement | HTMLCanvasElement | HTMLVideoElement,
    topk?: number
)


・img:分類を行う画像要素。
・topk:返す上位確率の数。 デフォルトは3。
4. KNNによる転移学習
Webカメラを使用して転移学習を行い、3クラスのカスタム分類子を作成します。
「K-Nearest Neighbors Classifier」(KNN Classifier)と呼ばれるモジュールを使用します。これにより、Webカメラの画像をさまざまなクラスに効果的に配置できます。具体的には、予測しているクラスと最も類似するクラスを選択するだけになります。
(1) 「index.html」の<head>の最後に「KNN Classifier」を追加。
<script src="https://cdn.jsdelivr.net/npm/@tensorflow-models/knn-classifier"></script>(2) 「index.html」の「video要素」の下にボタンを3つ追加。
訓練画像をモデルに追加するために使用します。
<button id="class-a">Add A</button>
<button id="class-b">Add B</button>
<button id="class-c">Add C</button>
(3) 「index.js」の上部に分類子を追加。
const classifier = knnClassifier.create();(4) app()関数を以下のように変更。
async function app() {
    console.log('Loading mobilenet..');

    // モデルの読み込み
    net = await mobilenet.load();
    console.log('Successfully loaded model');

    // WebカメラからTensorとして画像をキャプチャ
    const webcam = await tf.data.webcam(webcamElement);

    // Webカメラから画像を読み取り、特定のクラスに関連付ける
    const addExample = async classId => {
        // Webカメラから画像をキャプチャ
        const img = await webcam.capture();

        // MobileNet 'conv_preds'の中間アクティベーションを取得
        const activation = net.infer(img, true);

        // 中間アクティベーションをKNN分類子に渡す
        classifier.addExample(activation, classId);

        // Tensorを破棄してメモリを解放
        img.dispose();
    };

    // ボタンのクリック時に、そのクラスの例を追加
    document.getElementById('class-a').addEventListener('click', () => addExample(0));
    document.getElementById('class-b').addEventListener('click', () => addExample(1));
    document.getElementById('class-c').addEventListener('click', () => addExample(2));

    while (true) {
        if (classifier.getNumClasses() > 0) {
            // Webカメラから画像をキャプチャ
            const img = await webcam.capture();

            // アクティベーションの取得
            const activation = net.infer(img, 'conv_preds');

            // 分類子モジュールから最も可能性の高いクラスと信頼度を取得
            const result = await classifier.predictClass(activation);

            // 予測結果の出力
            const classes = ['A', 'B', 'C'];
            document.getElementById('console').innerText = `
                prediction: ${classes[result.label]}\n
                probability: ${result.confidences[result.label]}
            `;

            // Tensorを破棄してメモリを解放
            img.dispose();
        }

        // 次のアニメーションフレームを待つことで少し余裕を持たせる
        await tf.nextFrame();
    }
}
一般的なオブジェクトまたは顔/体のジェスチャーを使用して、3つのクラスの画像をキャプチャできます。「Add」ボタンをクリックするたびに、訓練例としてそのクラスに追加されます。モデルは受信するWebカメラ画像を予測し続け、結果をリアルタイムで表示します。
この記事が気に入ったらサポートをしてみませんか?