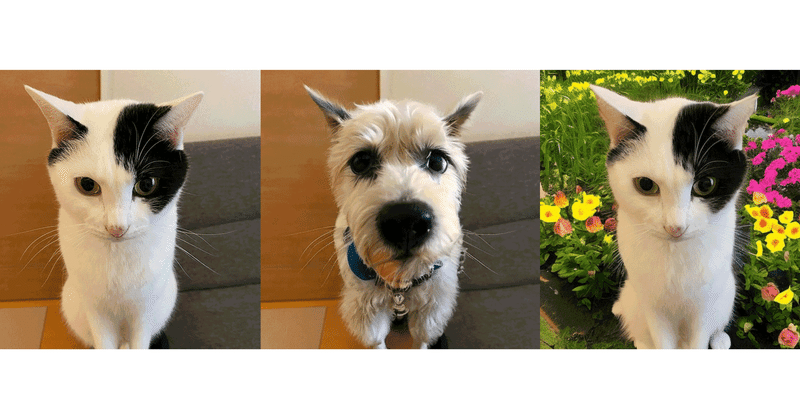
CLIPSeg によるインペインティングを試す

CLIPSeg によるインペインティングを試したので、まとめました。
前回
1. CLIPSegによるマスク画像の作成
「CLIPSeg」でStable Diffusionのインペインティングで利用するマスク画像を作成します。
(1) メニュー「編集→ノートブックの設定」で、「ハードウェアアクセラレータ」に「GPU」を選択。
(2) パッケージのインポート。
# パッケージのインポート
!pip install -q transformers
(3) プロセッサとモデルの準備。
from transformers import CLIPSegProcessor, CLIPSegForImageSegmentation

# プロセッサとモデルの準備
processor = CLIPSegProcessor.from_pretrained("CIDAS/clipseg-rd64-refined")
model = CLIPSegForImageSegmentation.from_pretrained("CIDAS/clipseg-rd64-refined")
(4) 画像のアップロード。
左端のフォルダアイコンでファイル一覧を表示し、画像をアップロードします。

アップロードするのは、次の画像になります。
・image.jpg

(5) 画像の読み込み。
from PIL import Image

# 画像の読み込み
image = Image.open("image.jpg")
image
(6) プロンプトの準備。
# プロンプトの準備
prompts = ["cat"]
(7) 推論の実行。
今回は、プロンプトが1つだけなので、unsqueeze(0)を2回呼んでシェイプを [1, 1, 352, 352] に整えています。
import torch

# 推論の実行
inputs = processor(
    text=prompts,
    images=[image] * len(prompts),
    padding="max_length",
    return_tensors="pt")
with torch.no_grad():
  outputs = model(**inputs)
preds = outputs.logits.unsqueeze(0).unsqueeze(0)
(8) 結果の表示。
import matplotlib.pyplot as plt

# 結果の表示
_, ax = plt.subplots(1, len(prompts) + 1, figsize=(3*(len(prompts) + 1), 4))
[a.axis('off') for a in ax.flatten()]
ax[0].imshow(image)
[ax[i+1].imshow(torch.sigmoid(preds[i][0])) for i in range(len(prompts))];
[ax[i+1].text(0, -15, prompt) for i, prompt in enumerate(prompts)];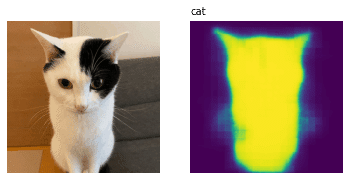
(9) マスク画像の生成。
cv2.threshold()の第2引数 (以下では160) で、しきい値を調整します。オブジェクトのインペインティングは160、背景のインペインティングは100と、範囲を調整しています。
import cv2

# マスクの生成
plt.imsave("seg.png", torch.sigmoid(preds[0][0]))
gray_image = cv2.cvtColor(cv2.imread("seg.png"), cv2.COLOR_BGR2GRAY)
(thresh, bw_image) = cv2.threshold(gray_image, 160, 255, cv2.THRESH_BINARY)
cv2.imwrite("mask.png", bw_image)
Image.open("mask.png")
"cat"のマスク画像が生成されます。
・mask.png

2. Stable Diffusion のインペインティングの準備
「Stable Diffusion」のインペインティングの準備手順は、次のとおりです。
(1) パッケージのインポート。
# パッケージのインポート
!pip install diffusers[torch] transformers accelerate scipy safetensors
(2) パイプラインの準備。
from diffusers import StableDiffusionInpaintPipeline
import torch

# パイプラインの準備
pipe = StableDiffusionInpaintPipeline.from_pretrained(
    "stabilityai/stable-diffusion-2-inpainting",
    torch_dtype=torch.float16,
).to("cuda")
3. オブジェクトのインペインティング
"cat"のマスク + "dog in the room" で、猫を犬に描き換えます。
(1) オブジェクトのインペインティング。
from PIL import Image

# パラメータ
prompt = "dog in the room"
init_image = Image.open("image.jpg").convert("RGB")
mask_image = Image.open("mask.png").resize((512,512)).convert("RGB")

# インペインティング
image = pipe(
    prompt=prompt,
    image=init_image,
    mask_image=mask_image,
    num_inference_steps=25
).images[0]
image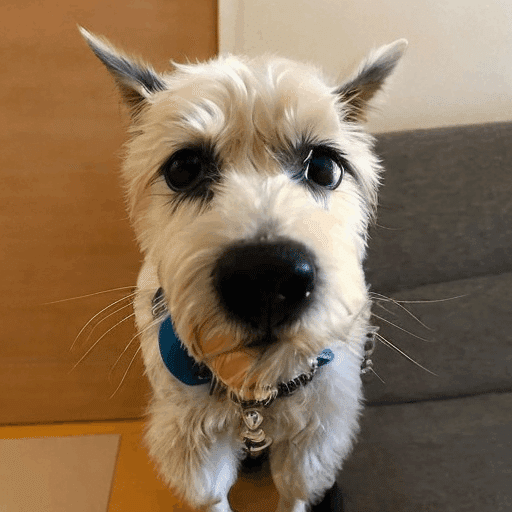
4. 背景のインペインティング
"cat"以外のマスク + "cat in the flower garden" で、背景を花畑に描き換えます。
(1) 背景のインペインティング。
cat以外とするため、ImageOps.invert()で白黒を反転しています。
from PIL import Image, ImageOps

# パラメータ
prompt = "cat in the flower garden"
init_image = Image.open("image.jpg").convert("RGB")
mask_image = Image.open("mask.png").resize((512,512)).convert("RGB")
mask_image = ImageOps.invert(mask_image)

# インペインティング
image = pipe(
    prompt=prompt,
    image=init_image,
    mask_image=mask_image,
    num_inference_steps=25
).images[0]
image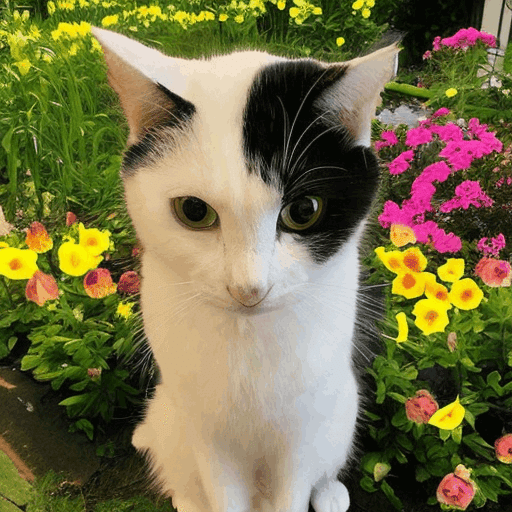
この記事が気に入ったらサポートをしてみませんか?