
ComfyUI で IPAdapter + ControlNet を試す

「ComfyUI」で「IPAdapter + ControlNet」を試したので、まとめました。
1. ComfyUI_IPAdapter_plus
「ComfyUI_IPAdapter_plus」は、「IPAdapter」モデルの「ComfyUI」リファレンス実装です。メモリ効率が高く、高速です。
・IPAdapter + ControlNet
「IPAdapter」と「ControlNet」の組み合わせることができます。

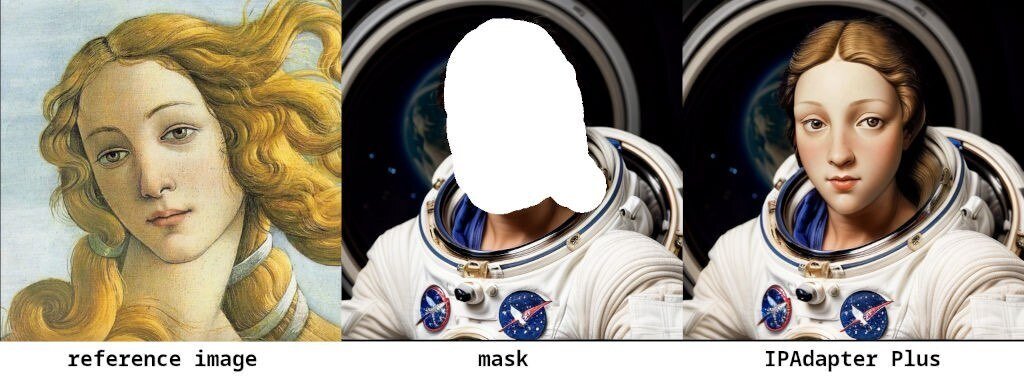
・IPAdapter Face
顔を参照画像として設定し、テキストプロンプトを入力することで、「Face Swap」することができます。ノイズ除去を高くすれば、img2img でも動作します。

・Masking (Inpainting)
IPAdapter を領域に適用する最も効果的な方法は、Inpaintワークフローを使用することです。Inpaintには特定のチェックポイントを使用する必要があります。
・Image Batches
Batch Images ノードを使用して、複数の画像を条件付けに渡すことができます。

2. モデルの準備
2-1. IPAdapterモデル
IPAdapterモデルごとに、使用できるイメージエンコーダ (ViT-H or Vit-bigG) が決まっています。
・v1.5
・ip-adapter_sd15 (ViT-H) : ベーシックモデル。平均的な強さ
・ip-adapter_sd15_light (ViT-H) : ライトモデル。非常に軽い
・ip-adapter-plus_sd15 (ViT-H) : plusモデル。とても強い
・ip-adapter-plus-face_sd15 (ViT-H) : フェイスモデル。フェイスでのみ利用
・ip-adapter-full-face_sd15 (ViT-H) : より強力なフェイスモデル。必ずしも優れているわけではない
・ip-adapter_sd15_vit-G (ViT-bigG) : bigGエンコーダーで学習したベースモデル
・SDZL
・ip-adapter_sdxl (ViT-bigG) : ベースモデル。非推奨
・ip-adapter_sdxl_vit-h (ViT-H) : 新ベースモデル
・ip-adapter-plus_sdxl_vit-h (ViT-H) : plusモデル, stronger
・ip-adapter-plus-face_sdxl_vit-h (ViT-H) : フェイスモデル
2-2. IPAdapterモデルの配置
以下に配置します。
「extra_model_paths.yaml」の「ipadapter」で配置場所を指定できます。
・ComfyUI/models/ipadapter
・StabilityMatrix/Models/IpAdapter (Stability Matrixの場合)
2-3. イメージエンコーダ
・CLIP- "ViT-H" -14-laion2B-s32B-b79K
・CLIP- "ViT-bigG" -14-laion2B-39B-b160k
2-4. イメージエンコーダの配置
以下に配置します。
・ComfyUI/models/clip_vision/
2-5. フェイスモデル
FaceID には Insightface が必要なので、ComfyUI 環境にインストールする必要があります。
・v1.5
・FaceID (not used¹) : FaceID Lora
・FaceID Plus (ViT-H) : FaceID Plus Lora
・FaceID Plus v2 (ViT-H) : FaceID Plus v2 Lora
・FaceID Portrait (not used¹) : not needed
・SDXL
・FaceID (not used¹) : FaceID SDXL Lora
・FaceID Plus v2 (ViT-H) : FaceID SDXL Lora
2-6. フェイスモデルの配置
以下に配置します。
・ComfyUI/models/loras/
3. ComfyUIでの実行
「ComfyUI」での実行手順は、次のとおりです。
(1) 「ComfyUI」のインストール。
(2) 「ComfyUI Manager」のインストール。
「ComfyUI/custom_nodes」で以下のコマンドを実行します。
!git clone https://github.com/ltdrdata/ComfyUI-Manager.git「CompyUI」起動時に左のメニューに「Manager」が追加されます。
(3) モデルの準備。
各モデルを以下の場所に配置します。上2つが「IPAdapter」のモデルとイメージエンコーダです。下2つは任意のSD1.5モデルとVAEになります。
・ip-adapter-plus_sd15.safetensors : StabilityMatrix/Models/IpAdapter
・model.safetensors : ComfyUI/models/clip_vision
・IrisMix-v3.safetensors : ComfyUI/models/checkpoints
・vae-ft-mse-840000-ema-pruned.safetensors : ComfyUI/models/vae
(4) 「ComfyUI_IPAdapter_plus」リポジトリからWorkflow「IPAdapter_Canny.json」をダウンロードして、「ComfyUI」の画面にドロップ。
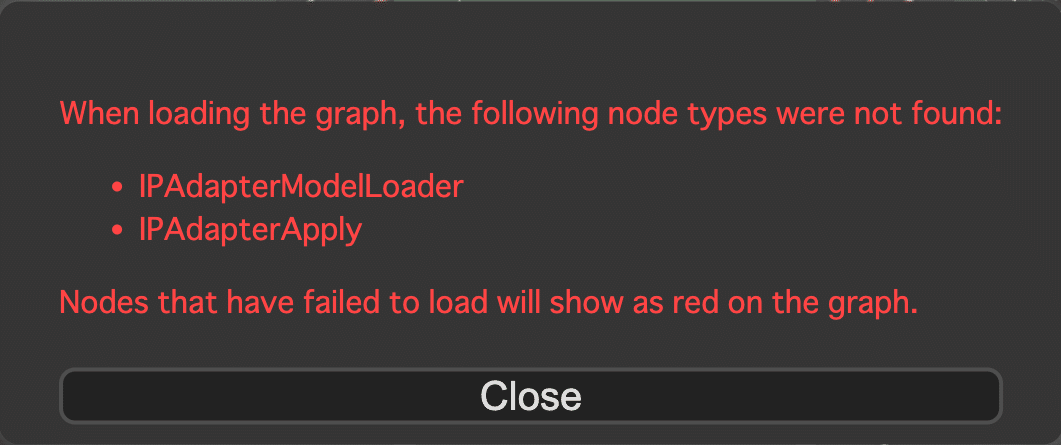
(5) エラーメッセージから足りないノードを確認。
・IPAdapterModelLoarder
・IPAdapterApply
(6) 「Manager」ボタンを押し、「Install Custom Nodes」ボタンを押し、以下の1つを検索して「Install」ボタンを押して、「ComfyUI」を再起動。
・ComfyUI_IPAdapter_plus

(7) エラーがでなくなったことを確認してから、2つの入力画像と4つのモデルとプロンプト (cute cat ear maid) を設定。
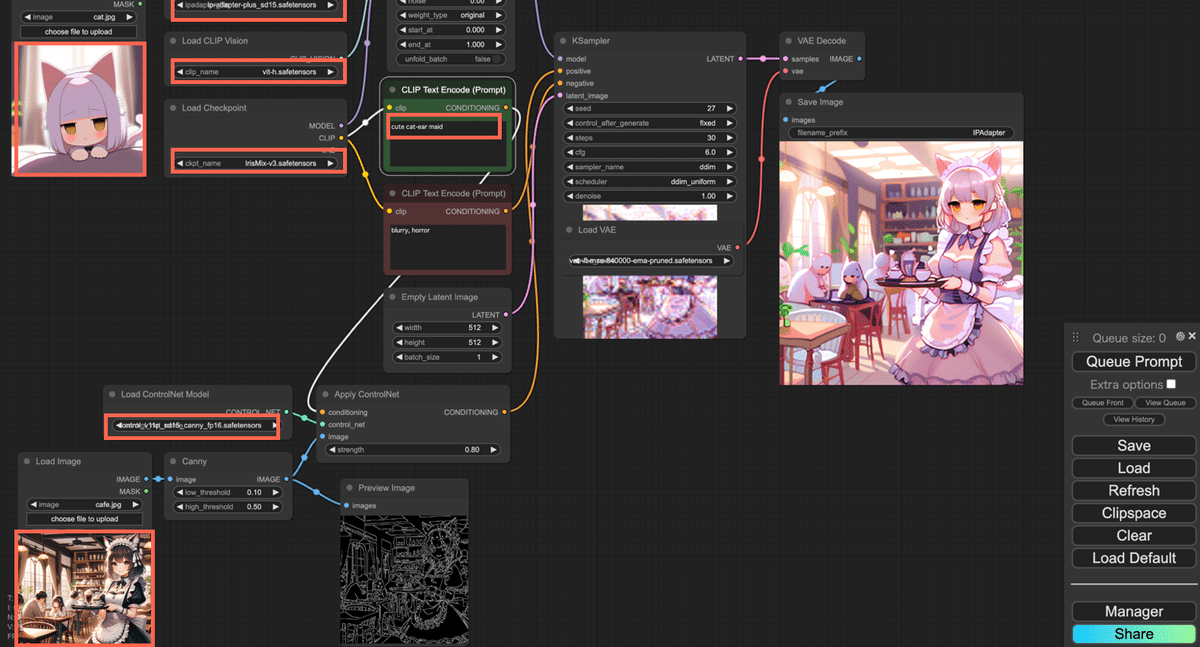
・cat.jpg (IPAdapterの入力画像)

・cafe.jpg (ControlNetの入力画像)

(8) 「Queue Prompt」を押す。

この記事が気に入ったらサポートをしてみませんか?