
Unity Perception 入門 (2) - ランダム化ツール

Unityの「Perception」の「ランダム化ツール」の使い方をまとめました。
・Unity 2019.4.5f1
1. ランダム化ツール
「Perception」の「ランダム化ツール」は、合成データのランダム化を容易にします。
2. Perceptionのインストール
「Perception」を利用するには、「Unity 2019.3以降」が必要です。
「ランダム化ツール」はまだ最新リリース(Perception 0.3.0)に含まれてなかったので、「master」から取得しています。
(1) 「URP」または「HDRP」でUnityプロジェクトを作成。
(2) 「Perception」のサイトで「Code → Download Zip」で「master」をダウンロードして解凍。
(3) メニュー「Window → Package Manager」で「Package Manager」を開く。
(4) 「+ → Add package from disk」を選択し、先程ダウンロードした「master」の「com.unity.perception/package.json」を選択。
3. チュートリアル
「単色背景」から「立方体」を識別するモデルを訓練するために必要な「データセット」を生成します。
【1】 新規シーンの作成
(1) メニュー「File → New Scene」でシーンを作成。
(2) 「Main」と名前を指定して保存。
【2】 立方体と背景カメラの作成
(1) Hierarchyウィンドウの「+ → 3D Object → Cube」で「Cube」を作成し、名前を「Cube」と指定。
(2) 「Cube」のTransformを以下のように指定。
Position = (0, 0, 0)
Rotation = (0, 0, 0)
Scale = (1, 1, 1)
(3) Hierarchyウィンドウの「+ → 3D Object → Quad」で「Quad」を作成し、名前を「Background」と指定。
(4) 「Background」のTransformを以下のように指定。
Position = (0, 0, 2)
Rotation = (0, 0, 0)
Scale = (30, 30, 1)
(5) 「Cube」と「Background」の「MeshRendere → Lighting → Cast Shadows」を「Off」に指定。
オブジェクトが互いに影を落とさないようにします。
【3】 Parameter Configurationの作成
(1) Hierarchyウィンドウの「+ → Create Empty」で空のゲームオブジェクトを作成し、名前を「Config」と指定。
(2)「Config」に「Parameter Configuration」コンポーネントを追加。
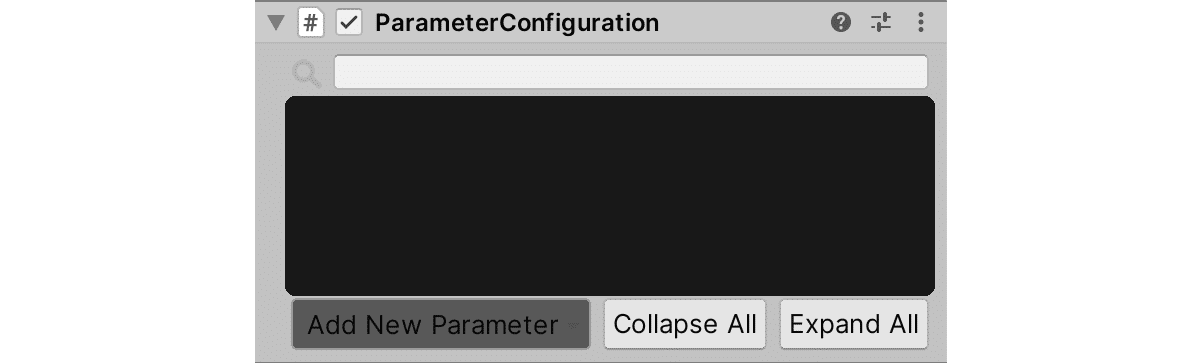
ここに、シーンをランダム化する6つのパラメータを設定していきます。
・CubePosition : 立方体の位置
・CubeRotation : 立方体の方向
・CubeScale : 立方体のスケール
・CubeColor : 立方体の色
・BackgroundColor : 背景の色
・CameraRotation : カメラの方向
◎ CubePosition
(1) 「Parameter Configuration」で「Add New Parameter → Vector3」を選択し、「Vector3パラメータ」を作成。
(2) パラメータ型を示す青テキストの横のパラメータ名に「CubePosition」を指定。
(3) 「Target GameObject」に「Cube」、「Target Property」に「Transform.position」を指定。
(4) 次のサンプラー値を指定。
・X : Uniform [-5, 5]
・Y : Uniform [-5, 5]
・Z : Constant [Value = 0]

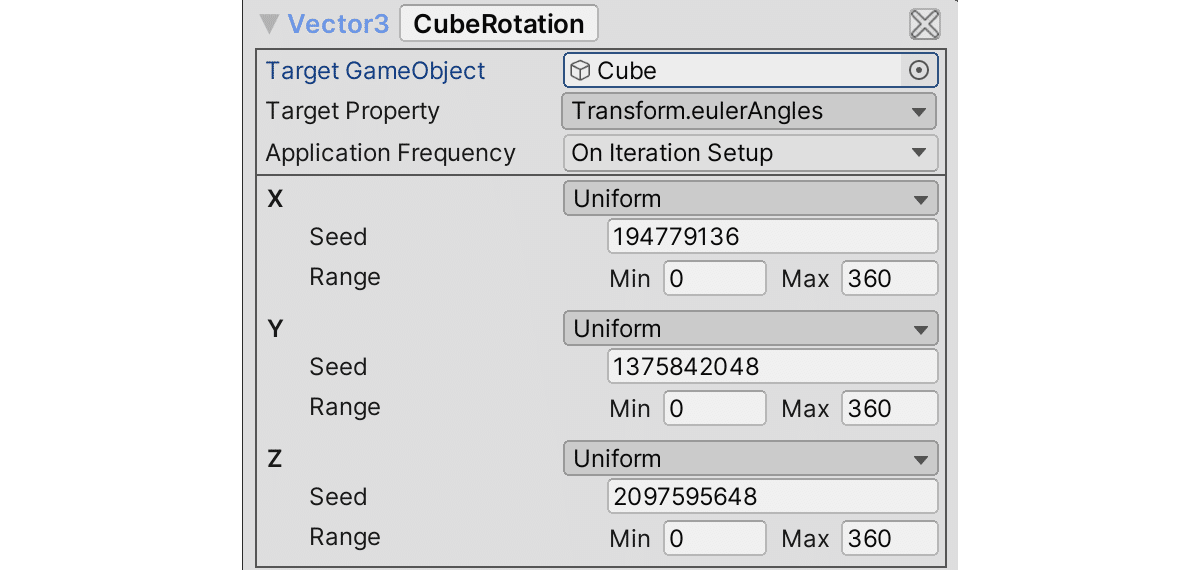
◎ CubeRotation
(1) 「CubeRotation」という名前で「Vector3パラメータ」を作成。
(2) 「Target GameObject」に「Cube」、「Target Property」に「Transform.eulerAngles」を指定。
(3) 次のサンプラー値を指定。
・X : Uniform [0, 360]
・Y : Uniform [0, 360]
・Z : Uniform [0, 360]
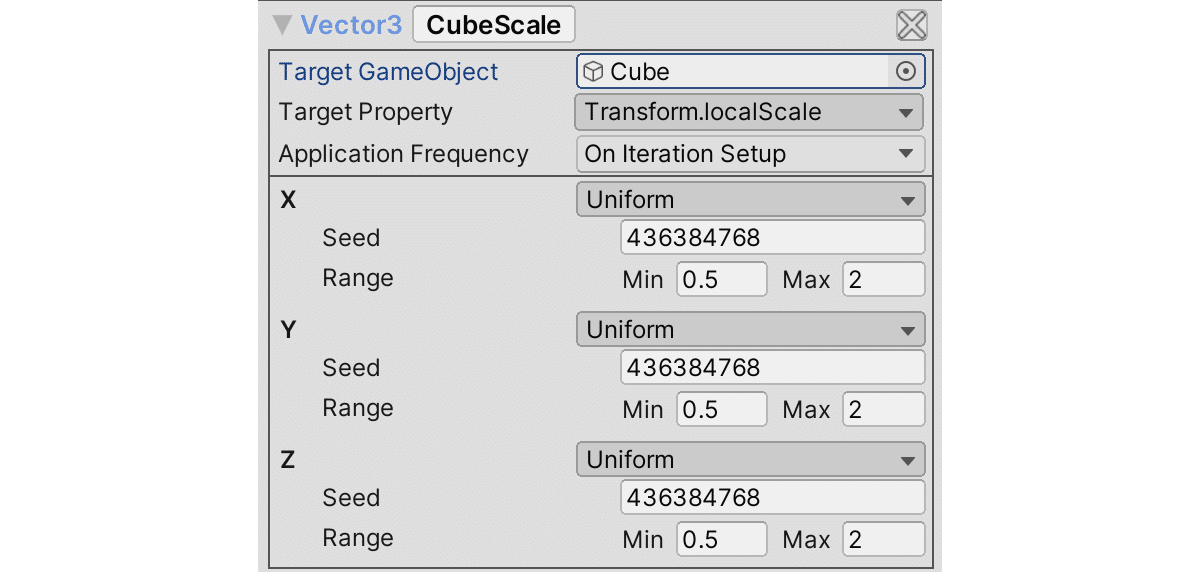
◎ CubeScale
(1) 「CubeScale」という名前で「Vector3パラメータ」を作成。
(2) 「Target GameObject」に「Cube」、「Target Property」に「Transform.localScale」を指定。
(3) 次のサンプラー値を指定。
・X : Uniform [0.5, 2]
・Y : Uniform [0.5, 2]
・Z : Uniform [0.5, 2]
(4) Xの「Seed」をYとZにコピー。
XYZがすべて同じ値になります。
◎ CubeColor
(1) 「CubeColor」という名前で「ColorHSVAパラメータ」を作成。
(2) 「Target GameObject」は設定しない。
「シナリオ」で設定します。
(3) 次のサンプラー値を指定。
・Hue : Uniform [0, 1]
・Saturation : Uniform [0, 1]
・Value : Uniform [0.25, 1]
・Alpha : Constant [Value = 0]

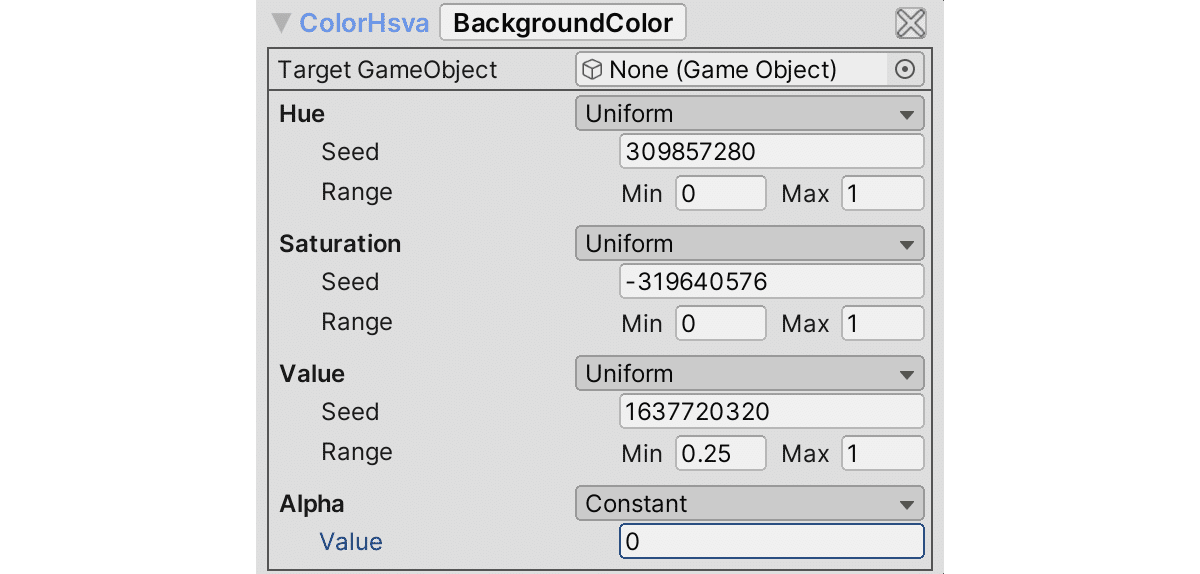
◎ BackgroundColor
(1)「BackgroundColor」という名前で「ColorHSVAパラメータ」を作成。
(2) 「Target GameObject」は設定しない。
「シナリオ」で設定します。
(3) 次のサンプラー値を指定。
・Hue : Uniform [0, 1]
・Saturation : Uniform [0, 1]
・Value : Uniform [0.25, 1]
・Alpha : Constant [Value = 0]
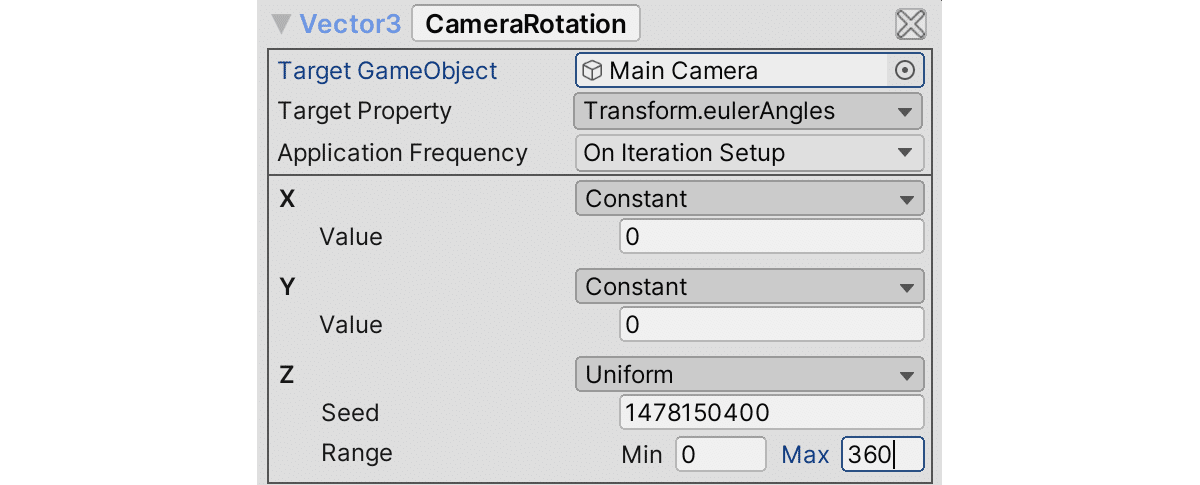
◎ CameraRotation
(1)「CameraRotation」という名前で「Vector3パラメータ」を作成。
(2) 「Target GameObject」に「Main Camera」、「Target Property」に「Transform.eulerAngles」を指定。
(3) 次のサンプラー値を指定。
・X : Constant [Value = 0]
・Y : Constant [Value = 0]
・Z : Uniform [0, 360]
【4】 シナリオの作成
(1) 「Config」に新規スクリプトを作成し、「CubeScenario」と名前を指定し、以下のように編集。
using System;
using UnityEngine;
using UnityEngine.Perception.Randomization.Configuration;
using UnityEngine.Perception.Randomization.Parameters;
using UnityEngine.Perception.Randomization.Scenarios;

// シナリオ
public class CubeScenario : Scenario<CubeScenario.Constants>
{
    // 公開パラメータ
    [Serializable]
    public class Constants
    {
        public int totalIterations = 1000; // シナリオの完了までの反復回数
    }

    // 現在のシナリオの反復が完了したかどうか
    public override bool isIterationComplete => currentIterationFrame >= 1;

    // シナリオ全体が完了したかどうか
    public override bool isScenarioComplete => currentIteration >= constants.totalIterations;

    // 参照
    public ParameterConfiguration config; // Config
    public GameObject background; // 背景
    public GameObject cube; // 立方体

    // キャッシュ
    ColorHsvaParameter m_BackgroundColorParameter; // 背景色パラメータ
    ColorHsvaParameter m_CubeColorParameter; // 立方体色パラメータ
    Material m_BackgroundMaterial; // 背景マテリアル
    Material m_CubeMaterial; // 立方体マテリアル

    // ベースカラー
    static readonly int k_BaseColor = Shader.PropertyToID("_BaseColor");

    // シナリオ反復の開始前に呼ばれる
    public override void OnInitialize()
    {
        // キャッシュの保持
        m_BackgroundColorParameter = config.GetParameter<ColorHsvaParameter>("BackgroundColor");
        m_CubeColorParameter = config.GetParameter<ColorHsvaParameter>("CubeColor");
        m_BackgroundMaterial = background.GetComponent<MeshRenderer>().material;
        m_CubeMaterial = cube.GetComponent<MeshRenderer>().material;
    }

    // シナリオ反復の開始毎に呼ばれる
    public override void OnIterationSetup()
    {
        // 背景色と立方体色の指定
        m_BackgroundMaterial.SetColor(k_BaseColor, m_BackgroundColorParameter.Sample());
        m_CubeMaterial.SetColor(k_BaseColor, m_CubeColorParameter.Sample());
    }
}
◎ 公開パラメータ
「Constantsクラス」には、「公開パラメータ」を定義します。
「公開パラメータ」は、JSONシリアル化が可能で、外部から変更できます。
今回は、「シナリオの完了までの反復回数」を定義しています。
◎ ScenarioBaseのプロパティ
isIterationComplete と isScenarioComplete
オーバーライドプロパティ「isIterationComplete」「isScenarioComplete」は、シナリオの実行フローを制御するために、フレーム開始毎にチェックされるプロパティです。ScenarioBaseにはシナリオで利用する各種プロパティが定義されています。
・bool isIterationComplete : 現在のシナリオの反復が完了したかどうか
・bool isScenarioComplete : シナリオ全体が完了したかどうか
・int currentIteration : シナリオの現在の反復インデックス
・int currentIterationFrame : 現在のシナリオの反復がセットアップされてから経過したフレーム数
◎ マテリアルの色の操作
Unityでのマテリアルの色の操作は、シェーダー固有のタスクで、ターゲットとなるGameObjectから直接操作することはできません。代わりに以下の手順で操作します。
(a) ParameterConfigurationへの参照を公開。
(b) _BaseColorシェーダープロパティのIDをキャッシュ。
(c) OnInitialize()をオーバーライドして、いくつかの参照をキャッシュ。
(d) OnIterationSetup()をオーバーライドして、反復の開始時に、サンプリングしたカラー値をキャッシュしたマテリアルのシェーダーに適用。
(2) 「CubeScenario」の「Config」「Background」「Cube」に参照を追加し、「Total Iterations」に1000を指定。
「Total Iterations」はコードの「Constants」で定義した公開パラメータです。公開パラメータはここで指定します。
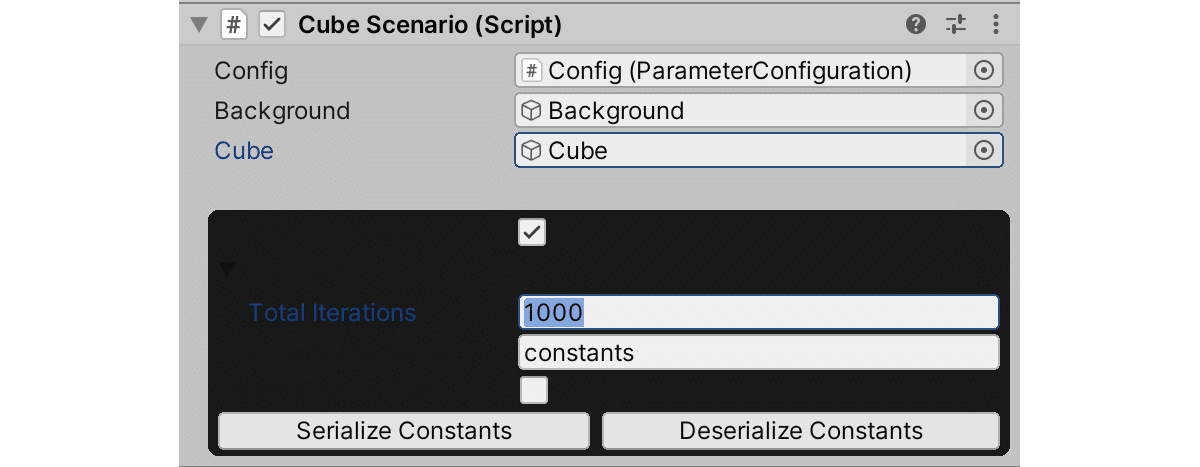
(3) 「公開パラメータ」をJSONにシリアル化するには、「Serialize Constants」をクリック。
【5】PerceptionCameraの設定
「Unity Perception 入門(1) - チュートリアル」と同様に、「PerceptionCamera」の設定を行います。
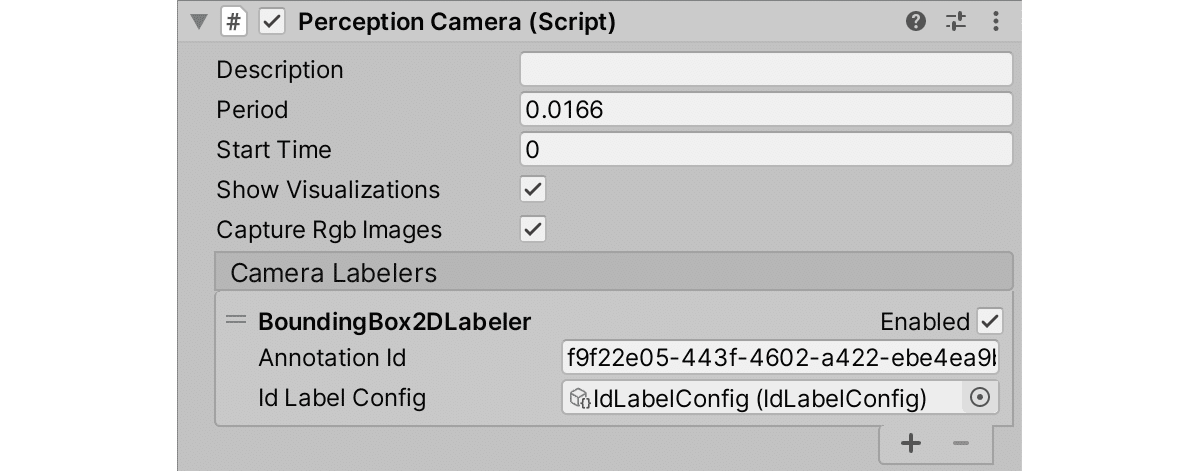
(1)(URPプロジェクトの場合)「GroundTruthRendererFeature」を追加。
(2) 「PerceptionCameraコンポーネント」を「MainCamera」に追加。
(3) 「Cube」に「Labelingコンポーネント」を追加し、「Cube」というラベルを指定。

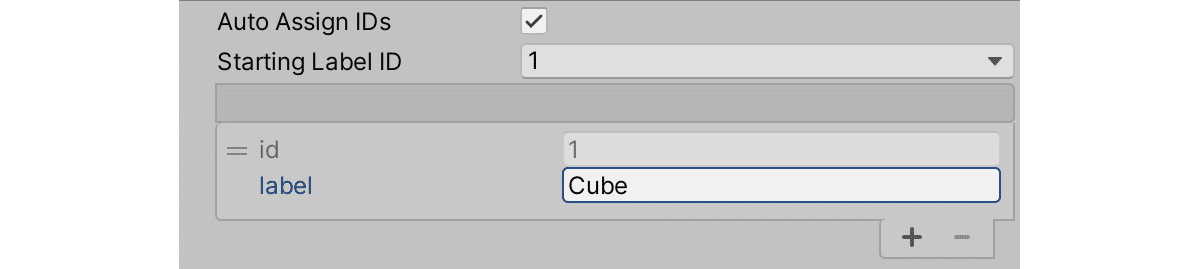
(4) Projectウィンドウの「+ → Perception→ IdLabelConfig」で「IdLabelConfig」を生成し、labelとして「Cube」を追加。
(5) 「PerceptionCamera」の「+ → CameraLabelers → BoundingBox2dLabeler」で「BoundingBox2dLabeler」を追加し、「IdLabelConfig」に先程生成した「IdLabelConfig」を指定。
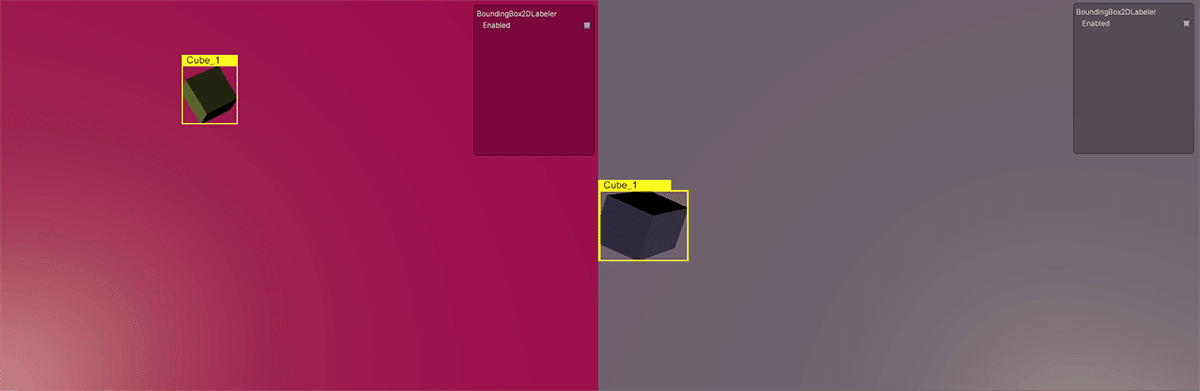
【6】 実行
ランダム化で様々な「位置」「方向」「サイズ」「色」のデータセットが生成されます。
この記事が気に入ったらサポートをしてみませんか?