iOSアプリ開発 入門 (12) - UIImagePickerControllerによるカメラ撮影

「UIImagePickerController」によるカメラ撮影の手順をまとめました。
・iOS14
前回
1. iOSのカメラ撮影
iOSのカメラ撮影の実装方法には、「UIImagePickerController」と「AVCapturePhotoOutput」の2つの方法があります。
・UIImagePickerController
・実装が簡単
・画面カスタマイズ不可
・AVCapturePhotoOutput
・実装が手間
・画面カスタマイズ可
今回は、簡単な「UIImagePickerController」で実装します。
2. Info.plist
「Info.plist」に以下の項目を設定します。
・Localization native development region : Japan
・イメージピッカーのUIを日本語にする設定。
・Privacy - Camera Usage Description : カメラの用途の説明。
・Privacy - Photo Library Usage Description : フォトライブラリの用途の説明。
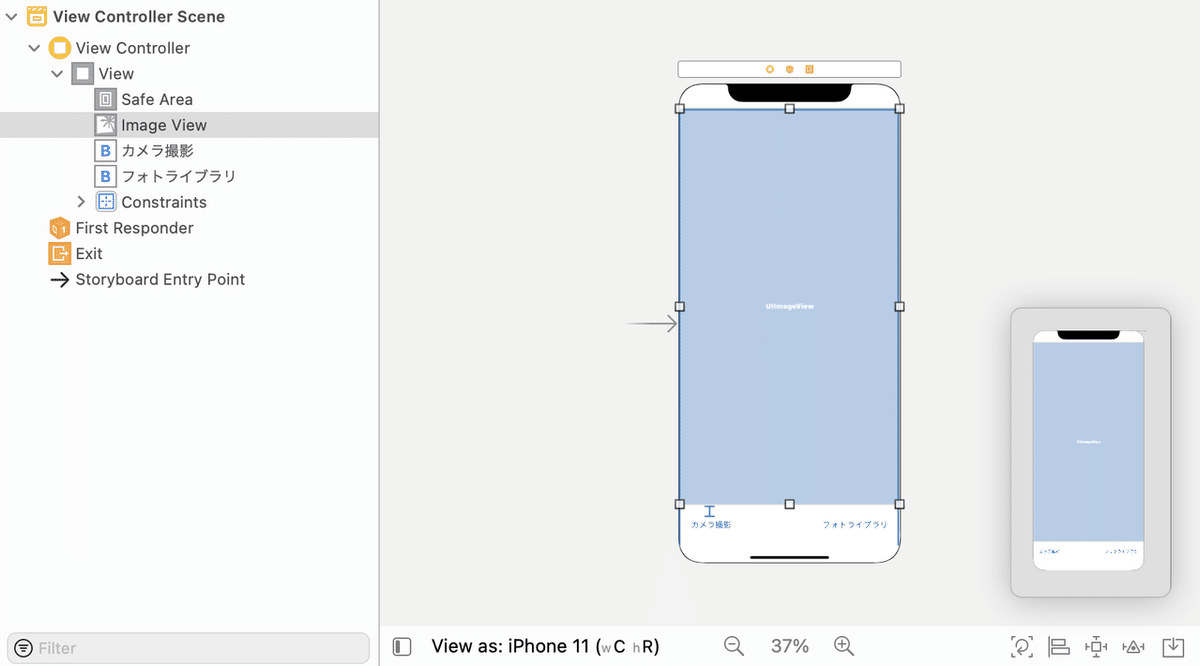
3. UI
Main.storyboardに「ImageView」を1つ、「Button」を2つ配置します。ボタンのテキストには「カメラ撮影」と「フォトライブラリ」を指定します。
4. コード
コードは、次のとおりです。
import UIKit

// ViewController
class ViewController: UIViewController,
    UIImagePickerControllerDelegate,
    UINavigationControllerDelegate {
    @IBOutlet weak var imageView: UIImageView!


//====================
// 初期化
//====================
    // ビューロード時に呼ばれる
    override func viewDidLoad() {
        super.viewDidLoad()
    }


//====================
// イベント
//====================
    // カメラ撮影ボタン押下時に呼ばれる
    @IBAction func onTakePicture(_ sender: UIButton) {
        let sourceType = UIImagePickerController.SourceType.camera
        if UIImagePickerController.isSourceTypeAvailable(sourceType){
            // イメージピッカーのオープン
            let imagePicker = UIImagePickerController()
            imagePicker.sourceType = sourceType
            imagePicker.delegate = self
            self.present(imagePicker, animated: true, completion: nil)
        }
    }

    // フォトライブラリボタン押下時に呼ばれる
    @IBAction func onOpenPhotoLibrary(_ sender : UIButton) {
        let sourceType = UIImagePickerController.SourceType.photoLibrary
        if UIImagePickerController.isSourceTypeAvailable(sourceType) {
            // イメージピッカーのオープン
            let imagePicker = UIImagePickerController()
            imagePicker.sourceType = sourceType
            imagePicker.delegate = self
            self.present(imagePicker, animated: true, completion: nil)
        }
    }

//====================
// UIImagePickerControllerDelegate
//====================
    // カメラ撮影完了時に呼ばれる
    func imagePickerController(_ imagePicker: UIImagePickerController,
        didFinishPickingMediaWithInfo info: [UIImagePickerController.InfoKey : Any]){
        // イメージの表示
        if let pickedImage = info[.originalImage]
            as? UIImage {
            self.imageView.contentMode = .scaleAspectFit
            self.imageView.image = pickedImage
        }

        // イメージピッカーのクローズ
        imagePicker.dismiss(animated: true, completion: nil)
    }

    // カメラ撮影キャンセル時に呼ばれる
    func imagePickerControllerDidCancel(_ imagePicker: UIImagePickerController) {
        // イメージピッカーのクローズ
        imagePicker.dismiss(animated: true, completion: nil)
    }
}
イメージビューの参照と、ボタンイベントの関連付けも行います。
【おまけ】 フォトライブラリへの画像の保存
フォトライブラリへの画像の保存を行うコードは、次のとおりです。
// フォトライブラリに画像を保存
UIImageWriteToSavedPhotosAlbum(image, nil,nil,nil)
次回
この記事が気に入ったらサポートをしてみませんか?