WebXR入門 (2) - コントローラでの操作

「three.js」を使って「WebXR」のコンテンツを作り、「Oculus Quest 2」のコントローラで操作する方法をまとめました。
・Oculus Quest 2
・three.js@0.135.0
・Node.js v16.13.0
前回
1. VR空間の作成
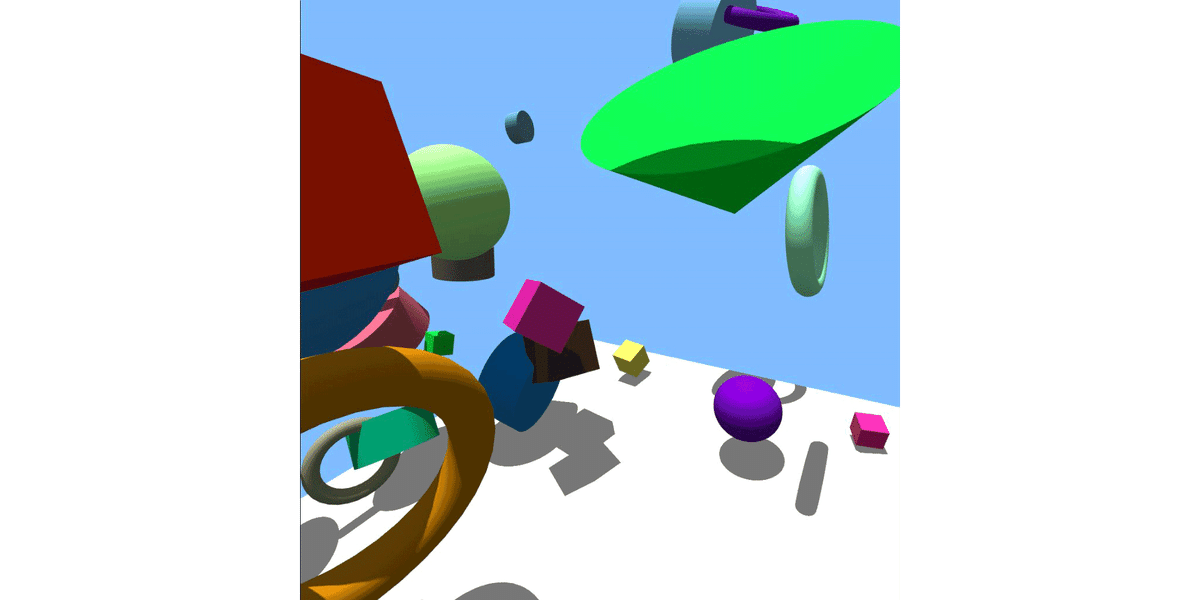
はじめに、ランダムにシェイプを配置したVR空間を作成します。
(1) 「index.js」を以下のように編集。
・src/index.js
import * as THREE from "three";
import { VRButton } from "three/examples/jsm/webxr/VRButton.js";

// シーンの準備
const scene = new THREE.Scene();
scene.background = new THREE.Color(0x7fbfff);

// カメラの準備
const camera = new THREE.PerspectiveCamera(
  50,
  window.innerWidth / window.innerHeight,
  0.1,
  10
);
camera.position.set(0, 1.6, 3);

// 床の準備
const floorGeometry = new THREE.PlaneGeometry(4, 4);
const floorMaterial = new THREE.MeshStandardMaterial({
  color: 0xeeeeee,
  roughness: 1.0,
  metalness: 0.0,
});
const floor = new THREE.Mesh(floorGeometry, floorMaterial);
floor.rotation.x = -Math.PI / 2;
floor.receiveShadow = true;
scene.add(floor);

// 半球光源の準備
scene.add(new THREE.HemisphereLight(0x808080, 0x606060));

// 並行光源の準備
const light = new THREE.DirectionalLight(0xffffff);
light.position.set(0, 6, 0);
light.castShadow = true;
light.shadow.camera.top = 2;
light.shadow.camera.bottom = -2;
light.shadow.camera.right = 2;
light.shadow.camera.left = -2;
light.shadow.mapSize.set(4096, 4096);
scene.add(light);

// グループの準備
const group = new THREE.Group();
scene.add(group);

// ランダムに50個のシェイプを生成
const geometries = [
  new THREE.BoxGeometry(0.2, 0.2, 0.2),
  new THREE.ConeGeometry(0.2, 0.2, 64),
  new THREE.CylinderGeometry(0.2, 0.2, 0.2, 64),
  new THREE.IcosahedronGeometry(0.2, 8),
  new THREE.TorusGeometry(0.2, 0.04, 64, 32),
];
for (let i = 0; i < 50; i++) {
  const geometry = geometries[Math.floor(Math.random() * geometries.length)];
  const material = new THREE.MeshStandardMaterial({
    color: Math.random() * 0xffffff,
    roughness: 0.7,
    metalness: 0.0,
  });
  const object = new THREE.Mesh(geometry, material);
  object.position.x = Math.random() * 4 - 2;
  object.position.y = Math.random() * 2;
  object.position.z = Math.random() * 4 - 2;
  object.rotation.x = Math.random() * 2 * Math.PI;
  object.rotation.y = Math.random() * 2 * Math.PI;
  object.rotation.z = Math.random() * 2 * Math.PI;
  object.scale.setScalar(Math.random() + 0.5);
  object.castShadow = true;
  object.receiveShadow = true;
  group.add(object);
}

// レンダラーの準備
const renderer = new THREE.WebGLRenderer({ antialias: true });
renderer.setPixelRatio(window.devicePixelRatio);
renderer.setSize(window.innerWidth, window.innerHeight);
renderer.outputEncoding = THREE.sRGBEncoding;
renderer.shadowMap.enabled = true;
renderer.xr.enabled = true;
document.body.appendChild(renderer.domElement);

// VRボタンの追加
document.body.appendChild(VRButton.createButton(renderer));

// アニメーションループの開始
function animate() {
  renderer.render(scene, camera);
}
renderer.setAnimationLoop(animate);
(2) 「Oculus Quest 2」で実行。
2. コントローラの表示
次に、コントローラを表示するコードを追加します。
(1) 「index.js」に以下のコードを追加。
・src/index.js
import { XRControllerModelFactory } from "three/examples//jsm/webxr/XRControllerModelFactory.js";

// コントローラモデルファクトリーの準備
const controllerModelFactory = new XRControllerModelFactory();

// コントローラの光線の準備
const geometry = new THREE.BufferGeometry().setFromPoints([
  new THREE.Vector3(0, 0, 0),
  new THREE.Vector3(0, 0, -1),
]);
const line = new THREE.Line(geometry);
line.name = "line";
line.scale.z = 5;

// コントローラの追加
function addController(index) {
  // コントローラの追加
  const controller = renderer.xr.getController(index);
  scene.add(controller);

  // コントローラモデルの追加
  const controllerGrip = renderer.xr.getControllerGrip(index);
  controllerGrip.add(
    controllerModelFactory.createControllerModel(controllerGrip)
  );
  scene.add(controllerGrip);

  // コントローラの光線の追加
  controller.add(line.clone());
  return controller;
}

// コントローラの準備
const controller0 = addController(0);
const controller1 = addController(1);
各コントローラに、以下の3つのオブジェクトを準備します。
・コントローラ : コントローラのイベント処理を行うオブジェクトです。renderer.xr.getController()で取得します。
・コントローラモデル : コントローラの見た目を表示するオブジェクトです。XRControllerModelFactory.createControllerModel()で生成します。
・コントローラの光線 : コントローラの光線を表すモデルです。THREE.Lineで生成し、コントローラモデルに追加します。
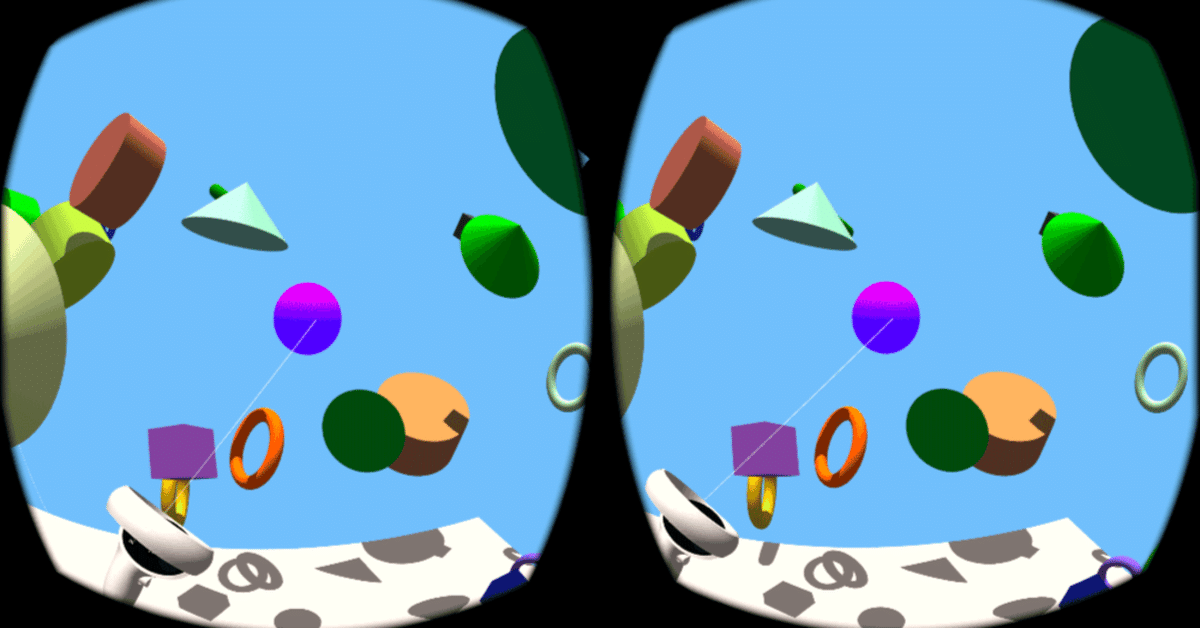
(2) 「Oculus Quest 2」で実行。
コントローラが表示されます。シェイプのドラッグはできません。

4. コントローラでの操作
最後に、コントローラでシェイプをドラッグする機能を追加します。
(1) 「index.js」に以下のコードを追加。
・src/index.js
// コントローラのイベントリスナーの追加
controller0.addEventListener("selectstart", onSelectStart);
controller0.addEventListener("selectend", onSelectEnd);
controller1.addEventListener("selectstart", onSelectStart);
controller1.addEventListener("selectend", onSelectEnd);

// トリガーを押した時に呼ばれる
function onSelectStart(event) {
  const controller = event.target;

  // レイと交差しているシェイプの取得
  const intersections = getIntersections(controller);

  // シェイプをコントローラにアタッチし、シェイプを青くする
  if (intersections.length > 0) {
    const intersection = intersections[0];
    const object = intersection.object;
    object.material.emissive.b = 1;
    controller.attach(object);
    controller.userData.selected = object;
  }
}

// トリガーを離した時に呼ばれる
function onSelectEnd(event) {
  const controller = event.target;

  // シェイプをグループにアタッチし、シェイプの色を戻す
  if (controller.userData.selected !== undefined) {
    const object = controller.userData.selected;
    object.material.emissive.b = 0;
    group.attach(object);
    controller.userData.selected = undefined;
  }
}

// レイと交差しているシェイプの一覧
const intersected = [];

// シェイプとコントローラのレイの交差判定のクリア
function cleanIntersected() {
  while (intersected.length) {
    const object = intersected.pop();
    object.material.emissive.r = 0;
  }
}

// シェイプとコントローラのレイの交差判定
function intersectObjects(controller) {
  // 選択時は無処理
  if (controller.userData.selected !== undefined) return;

  // 光線の取得
  const line = controller.getObjectByName("line");

  // レイと交差しているシェイプの取得
  const intersections = getIntersections(controller);

  if (intersections.length > 0) {
    // 交差時は赤くする
    const intersection = intersections[0];
    const object = intersection.object;
    object.material.emissive.r = 1;
    intersected.push(object);

    // 交差時は光線の長さをシェイプまでにする
    line.scale.z = intersection.distance;
  } else {
    // 光線の長さを固定長に戻す
    line.scale.z = 5;
  }
}

// ワーク行列
const tempMatrix = new THREE.Matrix4();

// レイキャスターの準備
const raycaster = new THREE.Raycaster();

// レイと交差しているシェイプの取得
function getIntersections(controller) {
  tempMatrix.identity().extractRotation(controller.matrixWorld);
  raycaster.ray.origin.setFromMatrixPosition(controller.matrixWorld);
  raycaster.ray.direction.set(0, 0, -1).applyMatrix4(tempMatrix);
  return raycaster.intersectObjects(group.children, false);
}
コントローラには、以下のイベントリスナーを追加します。
・selectstart : トリガーを押した時に呼ばれる
・selectend : トリガーを離した時に呼ばれる
シェイプとレイの交差判定は、レイキャスターを利用します。今回はグループの子になっているシェイプとの交差判定を行い、交差しているシェイプを取得しています。
// ワーク行列
const tempMatrix = new THREE.Matrix4();

// レイキャスターの準備
const raycaster = new THREE.Raycaster();

// レイと交差しているシェイプの取得
function getIntersections(controller) {
  tempMatrix.identity().extractRotation(controller.matrixWorld);
  raycaster.ray.origin.setFromMatrixPosition(controller.matrixWorld);
  raycaster.ray.direction.set(0, 0, -1).applyMatrix4(tempMatrix);
  return raycaster.intersectObjects(group.children, false);
}
(2) アニメーションループに、以下の3つのメソッドを追加します。
・cleanIntersected() : シェイプとコントローラのレイの交差判定のクリア
・intersectObjects(controller0) : シェイプとコントローラ0のレイの交差判定を行い、交差時はシェイプを赤くする。
・intersectObjects(controller1) : シェイプとコントローラ1のレイの交差判定を行い、交差時はシェイプを赤くする。
・src/index.js
// アニメーションループの開始
function animate() {
cleanIntersected();
intersectObjects(controller0);
intersectObjects(controller1);
renderer.render(scene, camera);
}
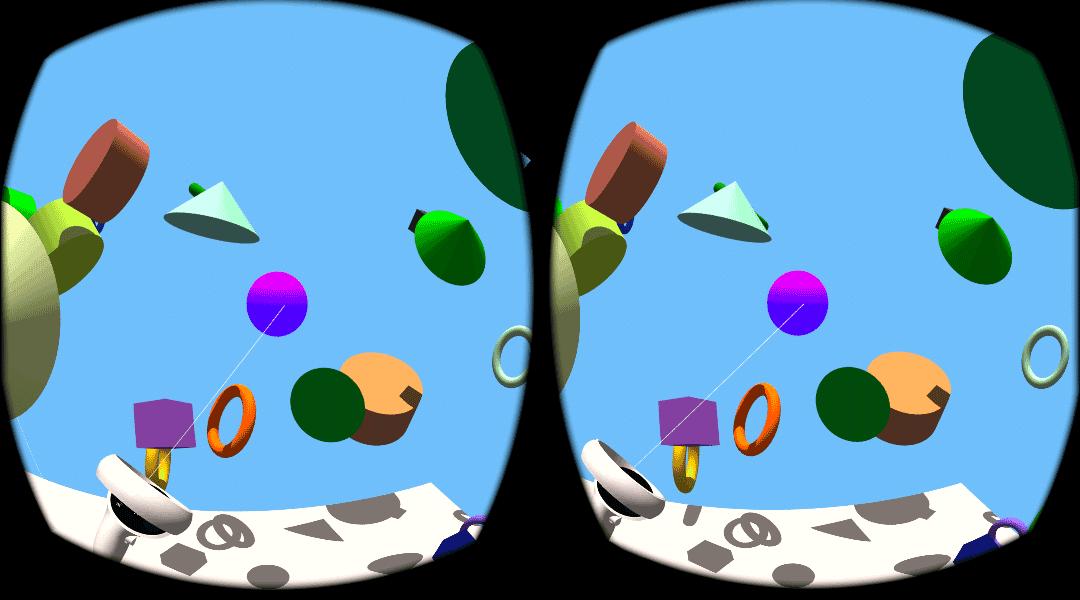
renderer.setAnimationLoop(animate);(3) 「Oculus Quest 2」で実行。
シェイプにレイを交差させると赤くなり、シェイプにレイを交差させながらトリガーを引くと青くなり、ドラッグできるようになります。
5. 全コード
・src/index.js
import * as THREE from "three";
import { VRButton } from "three/examples//jsm/webxr/VRButton.js";
import { XRControllerModelFactory } from "three/examples//jsm/webxr/XRControllerModelFactory.js";

// シーンの準備
const scene = new THREE.Scene();
scene.background = new THREE.Color(0x7fbfff);

// カメラの準備
const camera = new THREE.PerspectiveCamera(
  50,
  window.innerWidth / window.innerHeight,
  0.1,
  10
);
camera.position.set(0, 1.6, 3);

// 床の準備
const floorGeometry = new THREE.PlaneGeometry(4, 4);
const floorMaterial = new THREE.MeshStandardMaterial({
  color: 0xeeeeee,
  roughness: 1.0,
  metalness: 0.0,
});
const floor = new THREE.Mesh(floorGeometry, floorMaterial);
floor.rotation.x = -Math.PI / 2;
floor.receiveShadow = true;
scene.add(floor);

// 半球光源の準備
scene.add(new THREE.HemisphereLight(0x808080, 0x606060));

// 並行光源の準備
const light = new THREE.DirectionalLight(0xffffff);
light.position.set(0, 6, 0);
light.castShadow = true;
light.shadow.camera.top = 2;
light.shadow.camera.bottom = -2;
light.shadow.camera.right = 2;
light.shadow.camera.left = -2;
light.shadow.mapSize.set(4096, 4096);
scene.add(light);

// グループの準備
const group = new THREE.Group();
scene.add(group);

// ランダムに50個のシェイプを生成
const geometries = [
  new THREE.BoxGeometry(0.2, 0.2, 0.2),
  new THREE.ConeGeometry(0.2, 0.2, 64),
  new THREE.CylinderGeometry(0.2, 0.2, 0.2, 64),
  new THREE.IcosahedronGeometry(0.2, 8),
  new THREE.TorusGeometry(0.2, 0.04, 64, 32),
];
for (let i = 0; i < 50; i++) {
  const geometry = geometries[Math.floor(Math.random() * geometries.length)];
  const material = new THREE.MeshStandardMaterial({
    color: Math.random() * 0xffffff,
    roughness: 0.7,
    metalness: 0.0,
  });
  const object = new THREE.Mesh(geometry, material);
  object.position.x = Math.random() * 4 - 2;
  object.position.y = Math.random() * 2;
  object.position.z = Math.random() * 4 - 2;
  object.rotation.x = Math.random() * 2 * Math.PI;
  object.rotation.y = Math.random() * 2 * Math.PI;
  object.rotation.z = Math.random() * 2 * Math.PI;
  object.scale.setScalar(Math.random() + 0.5);
  object.castShadow = true;
  object.receiveShadow = true;
  group.add(object);
}

// レンダラーの準備
const renderer = new THREE.WebGLRenderer({ antialias: true });
renderer.setPixelRatio(window.devicePixelRatio);
renderer.setSize(window.innerWidth, window.innerHeight);
renderer.outputEncoding = THREE.sRGBEncoding;
renderer.shadowMap.enabled = true;
renderer.xr.enabled = true;
document.body.appendChild(renderer.domElement);

// VRボタンの追加
document.body.appendChild(VRButton.createButton(renderer));

// アニメーションループの開始
function animate() {
  cleanIntersected();
  intersectObjects(controller0);
  intersectObjects(controller1);
  renderer.render(scene, camera);
}
renderer.setAnimationLoop(animate);

// コントローラファクトリーの準備
const controllerModelFactory = new XRControllerModelFactory();

// コントローラの光線の準備
const geometry = new THREE.BufferGeometry().setFromPoints([
  new THREE.Vector3(0, 0, 0),
  new THREE.Vector3(0, 0, -1),
]);
const line = new THREE.Line(geometry);
line.name = "line";
line.scale.z = 5;

// コントローラの追加
function addController(index) {
  // コントローラの追加
  const controller = renderer.xr.getController(index);
  scene.add(controller);

  // コントローラモデルの追加
  const controllerGrip = renderer.xr.getControllerGrip(index);
  controllerGrip.add(
    controllerModelFactory.createControllerModel(controllerGrip)
  );
  scene.add(controllerGrip);

  // コントローラの光線の追加
  controller.add(line.clone());
  return controller;
}

// コントローラの準備
const controller0 = addController(0);
const controller1 = addController(1);

// コントローラのイベントリスナーの追加
controller0.addEventListener("selectstart", onSelectStart);
controller0.addEventListener("selectend", onSelectEnd);
controller1.addEventListener("selectstart", onSelectStart);
controller1.addEventListener("selectend", onSelectEnd);

// トリガーを押した時に呼ばれる
function onSelectStart(event) {
  const controller = event.target;

  // レイと交差しているシェイプの取得
  const intersections = getIntersections(controller);

  // シェイプをコントローラにアタッチし、シェイプを青くする
  if (intersections.length > 0) {
    const intersection = intersections[0];
    const object = intersection.object;
    object.material.emissive.b = 1;
    controller.attach(object);
    controller.userData.selected = object;
  }
}

// トリガーを離した時に呼ばれる
function onSelectEnd(event) {
  const controller = event.target;

  // シェイプをグループにアタッチし、シェイプの色を戻す
  if (controller.userData.selected !== undefined) {
    const object = controller.userData.selected;
    object.material.emissive.b = 0;
    group.attach(object);
    controller.userData.selected = undefined;
  }
}

// レイと交差しているシェイプの一覧
const intersected = [];

// シェイプとコントローラのレイの交差判定のクリア
function cleanIntersected() {
  while (intersected.length) {
    const object = intersected.pop();
    object.material.emissive.r = 0;
  }
}

// シェイプとコントローラのレイの交差判定
function intersectObjects(controller) {
  // 選択時は無処理
  if (controller.userData.selected !== undefined) return;

  // 光線の取得
  const line = controller.getObjectByName("line");

  // レイと交差しているシェイプの取得
  const intersections = getIntersections(controller);

  if (intersections.length > 0) {
    // 交差時は赤くする
    const intersection = intersections[0];
    const object = intersection.object;
    object.material.emissive.r = 1;
    intersected.push(object);

    // 交差時は光線の長さをシェイプまでにする
    line.scale.z = intersection.distance;
  } else {
    // 光線の長さを固定長に戻す
    line.scale.z = 5;
  }
}

// ワーク行列
const tempMatrix = new THREE.Matrix4();

// レイキャスターの準備
const raycaster = new THREE.Raycaster();

// レイと交差しているシェイプの取得
function getIntersections(controller) {
  tempMatrix.identity().extractRotation(controller.matrixWorld);
  raycaster.ray.origin.setFromMatrixPosition(controller.matrixWorld);
  raycaster.ray.direction.set(0, 0, -1).applyMatrix4(tempMatrix);
  return raycaster.intersectObjects(group.children, false);
}