
Petoi Bittle 入門 (23) - ROS2によるBittleの制御

「Petoi Bittle」を「ROS2」で制御する方法をまとめました。
前回
1. BittleをROS2で制御
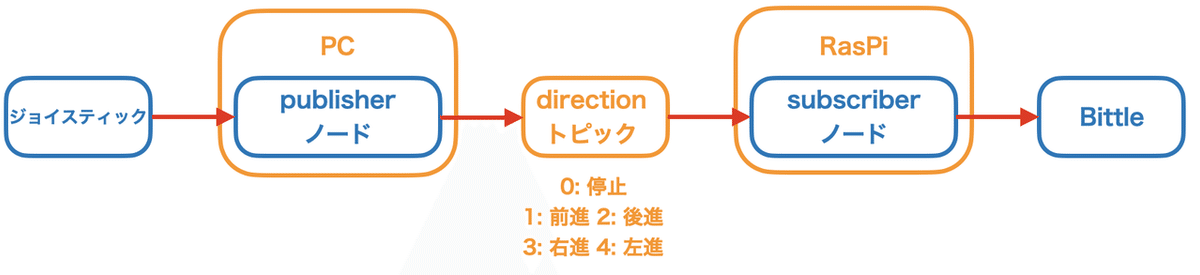
ジョイスティックでBittleの遠隔操作を行うROS2アプリケーションを作成します。PCにジョイスティックを接続、RasPiにBittleを接続して、その間をROS2のノード間通信でやりとりします。
作成するノードは2つです。
◎ publisherノード
PCで実行する。ジョイスティックの入力情報をトピックに書き込む。
◎ subscriberノード
Raspiで実行する。トピックの情報に応じてBittleのスキルを実行する。
2. PCとRasPiの準備
◎ VirtualBox + Ubuntu 20.04
PCとしてはMac上で、「VirtualBox」の「Ubuntu 20.04」を使っています。MacのVirtualBoxへのUbuntuのインストール方法は、以下でまとめています。ROS2のノード間通信を行うには、「ブリッジアダプター」の設定が必要になります。
◎ RasPi + Ubuntu 20.04
RasPiのOSはUbuntu 20.04を使っています。RasPiへのUbuntuのインストール方法は、以下でまとめてます。
3. パッケージの雛形の作成
「ROS2 入門 (8) - パッケージの作成 Python編」と同様です。
ジョイスティックを使うので、追加で「pygame」をインストールします。
$ pip install pygame4. package.xmlの編集
依存関係を追加します。
・<exec_depend>rclpy</exec_depend>
・<exec_depend>std_msgs</exec_depend>
<?xml version="1.0"?>
<?xml-model href="http://download.ros.org/schema/package_format3.xsd" schematypens="http://www.w3.org/2001/XMLSchema"?>
<package format="3">
  <name>helloworld</name>
  <version>0.0.0</version>
  <description>TODO: Package description</description>
  <maintainer email="npaka@todo.todo">npaka</maintainer>
  <license>TODO: License declaration</license>

  <exec_depend>rclpy</exec_depend>
  <exec_depend>std_msgs</exec_depend>

  <test_depend>ament_copyright</test_depend>
  <test_depend>ament_flake8</test_depend>
  <test_depend>ament_pep257</test_depend>
  <test_depend>python3-pytest</test_depend>

  <export>
    <build_type>ament_python</build_type>
  </export>
</package>
5. publisher.pyの追加
「helloworld/helloworld」に「publisher.py」を追加します。
import rclpy
from rclpy.node import Node
from std_msgs.msg import Int32
import pygame
from pygame.locals import *

class PublisherNode(Node):
    # 初期化
    def __init__(self):
        super().__init__("publisher")

        # メッセージの準備
        self.msg = Int32()
        self.msg.data = 0

        # パブリッシャの準備
        self.pub = self.create_publisher(Int32, "direction", 0)

        # ジョイスティックの準備
        self.joystick = self.setupJoystick()

        # タイマーの準備
        self.tmr = self.create_timer(0.2, self.onTick)

    # ジョイスティックの準備
    def setupJoystick(self):
        # ジョイスティックの準備
        pygame.joystick.init()
        joystick = pygame.joystick.Joystick(0)
        joystick.init()

        # pygameの初期化
        pygame.init()

        # 画面の生成
        screen = pygame.display.set_mode((160, 160))
        screen.fill('white')
        pygame.display.update()
        return joystick

    # 定期的に呼ばれる
    def onTick(self):
        # イベントの取得
        for e in pygame.event.get():
            # ジョイスティックのボタンの入力
            dx = self.joystick.get_axis(0)
            dy = self.joystick.get_axis(1)
            if e.type == pygame.locals.JOYAXISMOTION:
                if dy >= 0.5:
                    self.msg.data = 2
                elif dx < -0.5:
                    self.msg.data = 3
                elif dx > 0.5:
                    self.msg.data = 4
                elif dy < -0.5:
                    self.msg.data = 1
                else:
                    self.msg.data = 0

        # パブリッシュ
        self.get_logger().info("publish : {0}".format(self.msg.data))
        self.pub.publish(self.msg)

def main(args=None):
    # プロセスの初期化
    rclpy.init(args=args)

    # ノードの生成
    node = PublisherNode()

    # ノードの処理をループ実行
    rclpy.spin(node)

    # ノードの破棄
    node.destroy_node()

    # プロセスの終了
    rclpy.shutdown()

if __name__ == "__main__":
    main()
Pythonでジョイスティックを使う方法については、以下でまとめています。
6. subscriber.pyの追加
「helloworld/helloworld」に「subscriber.py」を追加します。
import rclpy
from rclpy.node import Node
from std_msgs.msg import Int32
import serial
import time

class SubscriberNode(Node):
    # 初期化
    def __init__(self):
        super().__init__("subscriber")

        # シリアル通信のオープン
        self.ser = serial.Serial(
            port='/dev/ttyUSB0', # デバイス名
            baudrate=115200, # ポート番号
            parity=serial.PARITY_NONE,
            stopbits=serial.STOPBITS_ONE,
            bytesize=serial.EIGHTBITS,
            timeout=1
        )
        time.sleep(2)

        # サブスクライブの準備
        self.direction = 0
        self.create_subscription(Int32, "direction", self.onSubscribed, 10)

    # サブスクライブ時に呼ばれる
    def onSubscribed(self, msg):
        self.get_logger().info("subscribe : {0}".format(msg.data))
        if self.direction != msg.data:
            self.direction = msg.data

            # スキルの実行
            if self.direction == 0:
                self.ser.write(str.encode('kbalance\n'))
            elif self.direction == 1:
                self.ser.write(str.encode('kwkF\n'))
            elif self.direction == 2:
                self.ser.write(str.encode('kbk\n'))
            elif self.direction == 3:
                self.ser.write(str.encode('kwkL\n'))
            elif self.direction == 4:
                self.ser.write(str.encode('kwkR\n'))
            time.sleep(0.2)

def main(args=None):
    # プロセスの初期化
    rclpy.init(args=args)

    # ノードの生成
    node = SubscriberNode()

    # ノードの処理をループ実行
    rclpy.spin(node)

    # ノードの破棄
    node.destroy_node()

    # プロセスの終了
    rclpy.shutdown()

if __name__ == "__main__":
    main()
RasPiによるBittleの制御方法は、以下でまとめています。
7. setup.pyの確認
エントリーポイントを追加します。
entry_points={
'console_scripts': [
'publisher = helloworld.publisher:main',
'subscriber = helloworld.subscriber:main',
],
},
from setuptools import setup

package_name = 'helloworld'

setup(
    name=package_name,
    version='0.0.0',
    packages=[package_name],
    data_files=[
        ('share/ament_index/resource_index/packages',
            ['resource/' + package_name]),
        ('share/' + package_name, ['package.xml']),
    ],
    install_requires=['setuptools'],
    zip_safe=True,
    maintainer='npaka',
    maintainer_email='npaka@todo.todo',
    description='TODO: Package description',
    license='TODO: License declaration',
    tests_require=['pytest'],
    entry_points={
        'console_scripts': [
            'publisher = helloworld.publisher:main',
            'subscriber = helloworld.subscriber:main',
        ],
    },
)
8. setup.cfgの確認
「setup.cfg」の中身を確認します。
[develop]
script-dir=$base/lib/helloworld
[install]
install-scripts=$base/lib/helloworld
9. ビルド
ワークスペースフォルダに移動してビルドします。
$ cd ~/ros2_ws
$ colcon build --packages-select helloworld
10. 実行
(1) PCでpublisherノードを実行。
$ source ~/ros2_ws/install/setup.bash
$ ros2 run helloworld subscriber
(2) RasPiでsbscriberノードを実行。
$ source ~/ros2_ws/install/setup.bash
$ ros2 run helloworld subscriber
【おまけ】 同一ネットワークであることの確認
ROS2は、同一ネットワークに接続していれば、ノードを起動するだけでデータのやりとりを行うことができます。同一ネットワークであることの一般的な確認方法は、次のとおりです。
(1) IPアドレスを調べる。
「inet 192.168.X.X」な感じに表示されます。
$ ifconfig(2) 通信相手のIPアドレスにpingする。
$ ping <相手のIPアドレス>【おまけ】 USB機器が認識されてるかどうかの確認
USBに差したのジョイスティックが認識されているかどうかは、以下のコマンドで確認できます。
$ lsusbBus 001 Device 001: ID 1d6b:0002 Linux Foundation 2.0 root hub
Bus 002 Device 010: ID 0f0d:00c1 Hori Co., Ltd Pro Controller