
Google Colab で Florence 2 を試す

「Google Colab」で「Florence 2」を試したので、まとめました。
1. Florence 2
「Florence 2」は、Microsoftが開発した軽量なVLM (Vision Language Model) です。キャプション、物体検出、OCRなど、さまざまなビジョンタスクを単一モデルで処理することができます。
・microsoft/Florence-2-base
・microsoft/Florence-2-large
・microsoft/Florence-2-base-ft
・microsoft/Florence-2-large-ft
2. Colabでの実行
Colabでのセットアップ手順は、次のとおりです。
2-1. セットアップ
(1) パッケージのインストール。
# パッケージのインストール
!pip install -U transformers
!pip install flash_attn timm
(2) モデルとプロセッサの準備。
import torch
from transformers import AutoProcessor, AutoModelForCausalLM

# モデルとプロセッサの準備
model = AutoModelForCausalLM.from_pretrained(
    "microsoft/Florence-2-large",
    torch_dtype=torch.float16,
    trust_remote_code=True
).to("cuda:0")
processor = AutoProcessor.from_pretrained(
    "microsoft/Florence-2-large",
    trust_remote_code=True
)
(3) 推論実行の関数の準備
# 推論実行の関数
def run_inference(task_prompt, text_input=None):
    if text_input is None:
        prompt = task_prompt
    else:
        prompt = task_prompt + text_input
    inputs = processor(text=prompt, images=image, return_tensors="pt").to("cuda:0", torch.float16)
    generated_ids = model.generate(
      input_ids=inputs["input_ids"],
      pixel_values=inputs["pixel_values"],
      max_new_tokens=1024,
      num_beams=3
    )
    generated_text = processor.batch_decode(generated_ids, skip_special_tokens=False)[0]
    result = processor.post_process_generation(generated_text, task=task_prompt, image_size=(image.width, image.height))
    return result
(4) 左端のフォルダアイコンから画像をアップロード。
今回は以下の画像を使いました。
・sample.jpg
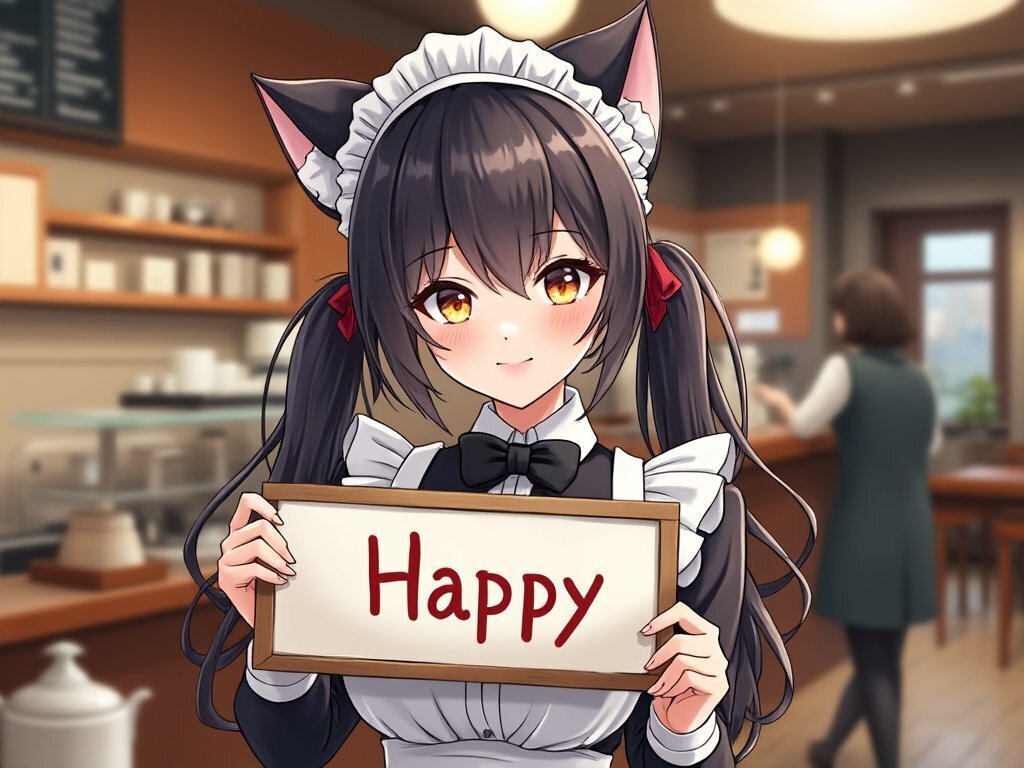
(5) 画像の読み込み。
from PIL import Image

# 画像の準備
image = Image.open("sample.jpg")

# 確認
image
2-2. キャプション
(1) 「キャプション」タスクの実行
# キャプション
prompt = "<CAPTION>"
result = run_inference(prompt)
print(result)
{'<CAPTION>': 'A girl holding a sign that says "Happy" in a restaurant.'}【翻訳】
レストランで「Happy」と書かれた看板を持っている女の子。
2-3. 詳細なキャプション
(1) 「詳細なキャプション」タスクの実行
# 詳細なキャプション
prompt = "<DETAILED_CAPTION>"
result = run_inference(prompt)
print(result){'<DETAILED_CAPTION>': 'The image shows a girl in a maid outfit holding a sign that says "Happy" while standing in front of a table with a kettle on it. Behind her, there is another person walking on the floor, and in the background there are tables, chairs, a door, lights, and a board on the wall. On the left side of the image, there are shelves with various objects.'}【翻訳】
画像には、メイド服を着た女の子が「Happy」と書かれた看板を持ち、やかんが置かれたテーブルの前に立っている様子が写っている。彼女の後ろには床を歩く人物がおり、背景にはテーブル、椅子、ドア、照明、壁に掛かっている板がある。画像の左側には、さまざまな物が置かれた棚がある。
2-4. より詳細なキャプション
(1) 「より詳細なキャプション」タスクの実行。
# より詳細なキャプション
prompt = "<MORE_DETAILED_CAPTION>"
result = run_inference(prompt)
print(result){'<MORE_DETAILED_CAPTION>': 'The image is an illustration of a young girl in a restaurant or cafe. She is wearing a white apron with a black bowtie and a white bonnet with cat ears on top. She has long black hair and is holding a sign that reads "Happy" in red letters. The girl has a big smile on her face and is looking directly at the camera. In the background, there is a counter with a menu board and a woman walking by. The overall mood of the image is cheerful and happy.'}【翻訳】
この画像は、レストランやカフェにいる若い女の子のイラストです。彼女は黒い蝶ネクタイが付いた白いエプロンを着て、猫耳が付いた白いボンネットをかぶっています。彼女は長い黒髪で、赤い文字で「Happy」と書かれた看板を持っています。女の子は顔に大きな笑顔を浮かべ、カメラをまっすぐ見ています。背景には、メニューボードのあるカウンターと、通り過ぎる女性があります。画像全体の雰囲気は明るくて幸せです。
2-5. キャプションからフレーズへの接地
(1) 「キャプションからフレーズへの接地」タスクの実行。
# キャプションからフレーズへの接地
prompt = "<CAPTION_TO_PHRASE_GROUNDING>"
text_input = 'A girl holding a sign that says "Happy" in a restaurant.'
result = run_inference(prompt, text_input)
print(result){'<CAPTION_TO_PHRASE_GROUNDING>': {'bboxes': [[181.760009765625, 0.3840000033378601, 820.7360229492188, 766.8480224609375], [250.36801147460938, 481.1520080566406, 684.5440063476562, 696.1920166015625], [361.9840087890625, 528.0, 611.8400268554688, 653.9520263671875]], 'labels': ['A girl', 'a sign', 'Happy']}}(2) バウンディングボックス画像で確認。
from PIL import ImageDraw

# バウンディングボックス画像の生成の関数
def draw_bounding_boxes(image, bboxes, labels):
    image = image.copy()
    draw = ImageDraw.Draw(image)
    for bbox, label in zip(bboxes, labels):
        draw.rectangle(bbox, outline="red", width=3)
        draw.text((bbox[0], bbox[1] - 10), label, fill="red")
    return image

# バウンディングボックス画像の生成
bbox_image = draw_bounding_boxes(
    image,
    result['<CAPTION_TO_PHRASE_GROUNDING>']['bboxes'],
    result['<CAPTION_TO_PHRASE_GROUNDING>']['labels'])

# 確認
bbox_image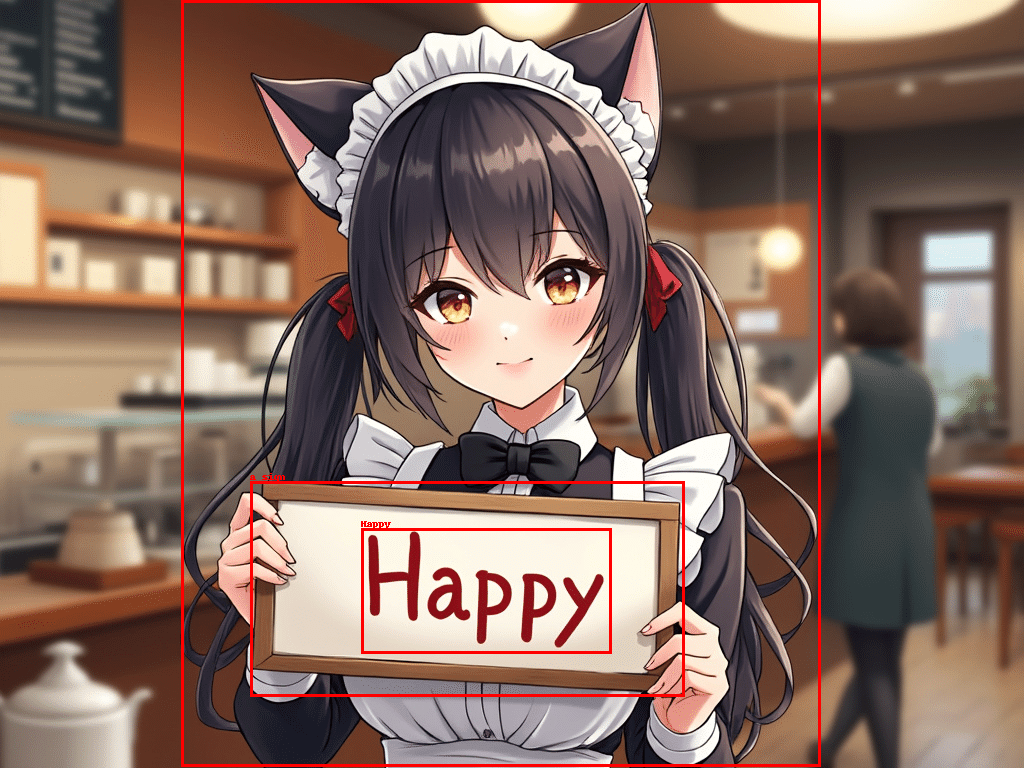
2-6. 物体検出
(1) 「物体検出」タスクの実行。
# 物体検出
prompt = "<OD>"
result = run_inference(prompt)
print(result){'<OD>': {'bboxes': [[181.760009765625, 3.4560000896453857, 820.7360229492188, 766.8480224609375], [404.99200439453125, 210.8159942626953, 611.8400268554688, 408.9599914550781], [752.1280517578125, 266.11199951171875, 947.7120361328125, 766.8480224609375]], 'labels': ['girl', 'human face', 'woman']}}(2) バウンディングボックス画像で確認。
# バウンディングボックス画像の生成
bbox_image = draw_bounding_boxes(
    image,
    result['<OD>']['bboxes'],
    result['<OD>']['labels'])

# 確認
bbox_image
2-7. 高密度領域キャプション
(1) 「高密度領域キャプション」タスクの実行。
# 高密度領域キャプション
prompt = "<DENSE_REGION_CAPTION>"
result = run_inference(prompt)
print(result)
{'<DENSE_REGION_CAPTION>': {'bboxes': [[181.760009765625, 5.760000228881836, 819.7120361328125, 766.8480224609375], [755.2000122070312, 267.64801025390625, 948.7360229492188, 766.8480224609375], [407.0400085449219, 213.88800048828125, 611.8400268554688, 406.656005859375]], 'labels': ['anime girl with cat ears holding happy sign in cafe', 'woman in green dress with red square in front of blurred background', 'human face']}}(2) バウンディングボックス画像で確認。
# バウンディングボックス画像の生成
bbox_image = draw_bounding_boxes(
    image,
    result['<DENSE_REGION_CAPTION>']['bboxes'],
    result['<DENSE_REGION_CAPTION>']['labels'])

# 確認
bbox_image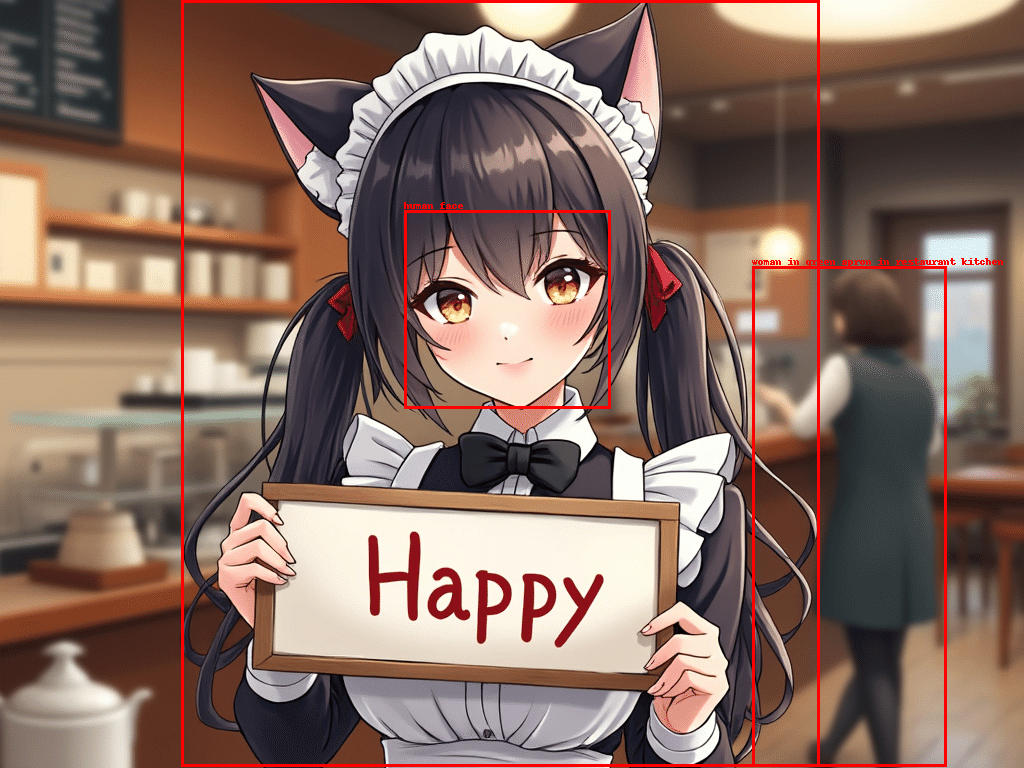
2-8. 領域提案
(1) 「領域提案」タスクの実行。
# 領域提案
prompt = "<REGION_PROPOSAL>"
result = run_inference(prompt)
print(result){'<REGION_PROPOSAL>': {'bboxes': [[179.71200561523438, 0.3840000033378601, 819.7120361328125, 766.8480224609375], [335.3600158691406, 79.48799896240234, 664.0640258789062, 410.4960021972656], [752.1280517578125, 266.8800048828125, 945.6640625, 766.8480224609375], [404.99200439453125, 210.8159942626953, 609.7920532226562, 408.9599914550781], [0.5120000243186951, 640.89599609375, 154.1120147705078, 766.8480224609375], [926.2080688476562, 459.64801025390625, 1022.4640502929688, 646.2720336914062], [636.416015625, 600.9600219726562, 736.7680053710938, 735.3599853515625], [211.4560089111328, 491.1360168457031, 300.54400634765625, 629.3759765625], [825.8560180664062, 267.64801025390625, 919.0400390625, 348.2879943847656], [527.8720092773438, 253.82400512695312, 607.7440185546875, 306.8160095214844], [406.0160217285156, 276.864013671875, 481.7920227050781, 326.0159912109375], [495.1040344238281, 300.6719970703125, 526.8480224609375, 341.3760070800781], [805.3760375976562, 739.968017578125, 836.0960693359375, 766.8480224609375], [495.1040344238281, 314.4960021972656, 522.7520141601562, 341.3760070800781], [494.08001708984375, 355.968017578125, 535.0400390625, 369.0240173339844]], 'labels': ['', '', '', '', '', '', '', '', '', '', '', '', '', '', '']}}(2) バウンディングボックス画像で確認。
# バウンディングボックス画像の生成
bbox_image = draw_bounding_boxes(
    image,
    result['<REGION_PROPOSAL>']['bboxes'],
    result['<REGION_PROPOSAL>']['labels'])

# 確認
bbox_image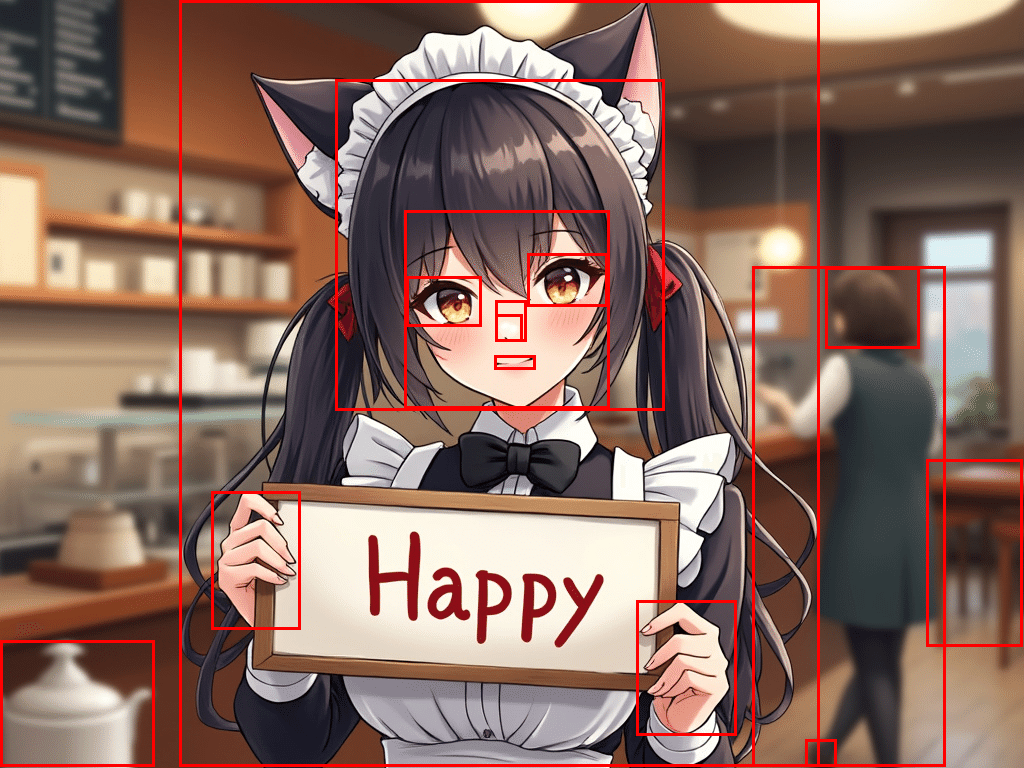
2-9. OCR
(1) 「OCR」タスクの実行。
# OCR
prompt = "<OCR>"
result = run_inference(prompt)
print(result){'<OCR>': 'Happy'}2-10. OCR+領域
(1) 「OCR+領域」タスクの実行。
# OCR+領域
prompt = "<OCR_WITH_REGION>"
result = run_inference(prompt)
print(result){'<OCR_WITH_REGION>': {'quad_boxes': [[367.10400390625, 530.3040161132812, 606.7200317382812, 560.2559814453125, 596.4800415039062, 653.1840209960938, 359.9360046386719, 624.0]], 'labels': ['</s>Happy']}}(2) バウンディングボックス画像で確認。
from PIL import ImageDraw

# クアッドボックス画像の生成の関数
def draw_quad_boxes(image, qboxes, labels):
    image = image.copy()
    draw = ImageDraw.Draw(image)
    for quad_box, label in zip(qboxes, labels):
        draw.polygon(quad_box, outline="red", width=3)
        text_position = (quad_box[0], quad_box[1] - 10)
        draw.text(text_position, label, fill="red")
    return image

# クアッドボックス画像の生成
qbox_image = draw_quad_boxes(
    image,
    result['<OCR_WITH_REGION>']['quad_boxes'],
    result['<OCR_WITH_REGION>']['labels'])

# 確認
qbox_image
この記事が気に入ったらサポートをしてみませんか?