
Android CameraX

1. CameraX
「CameraX」は、カメラアプリの開発を『簡単』に行うための「Jetpack」のサポートライブラリです。Android端末で動作する、使いやすく一貫性のあるAPIを提供します。「Android 5.0」(API レベル 21)への下位互換性も備えています。「Camera API」「Camera2 API」で煮え湯を飲まされた人には大変ありがたいAPIになります。
「CameraX」はライフサイクルに対応しているため、onPause()やonResume()での一時停止や再開の処理は必要ありません。現在サポートされている機能は、次の3つになります。
・プレビュー : プレビューの表示。
・分析 : コンピュータビジョンまたは機械学習関連タスクの画像処理。
・キャプチャ— : 高品質の画像の保存。
2. 対応バージョン
対応バージョンは、次のとおりです。
・Android API 21以降
・Android Studio 3.3以降
3. サンプルプログラム
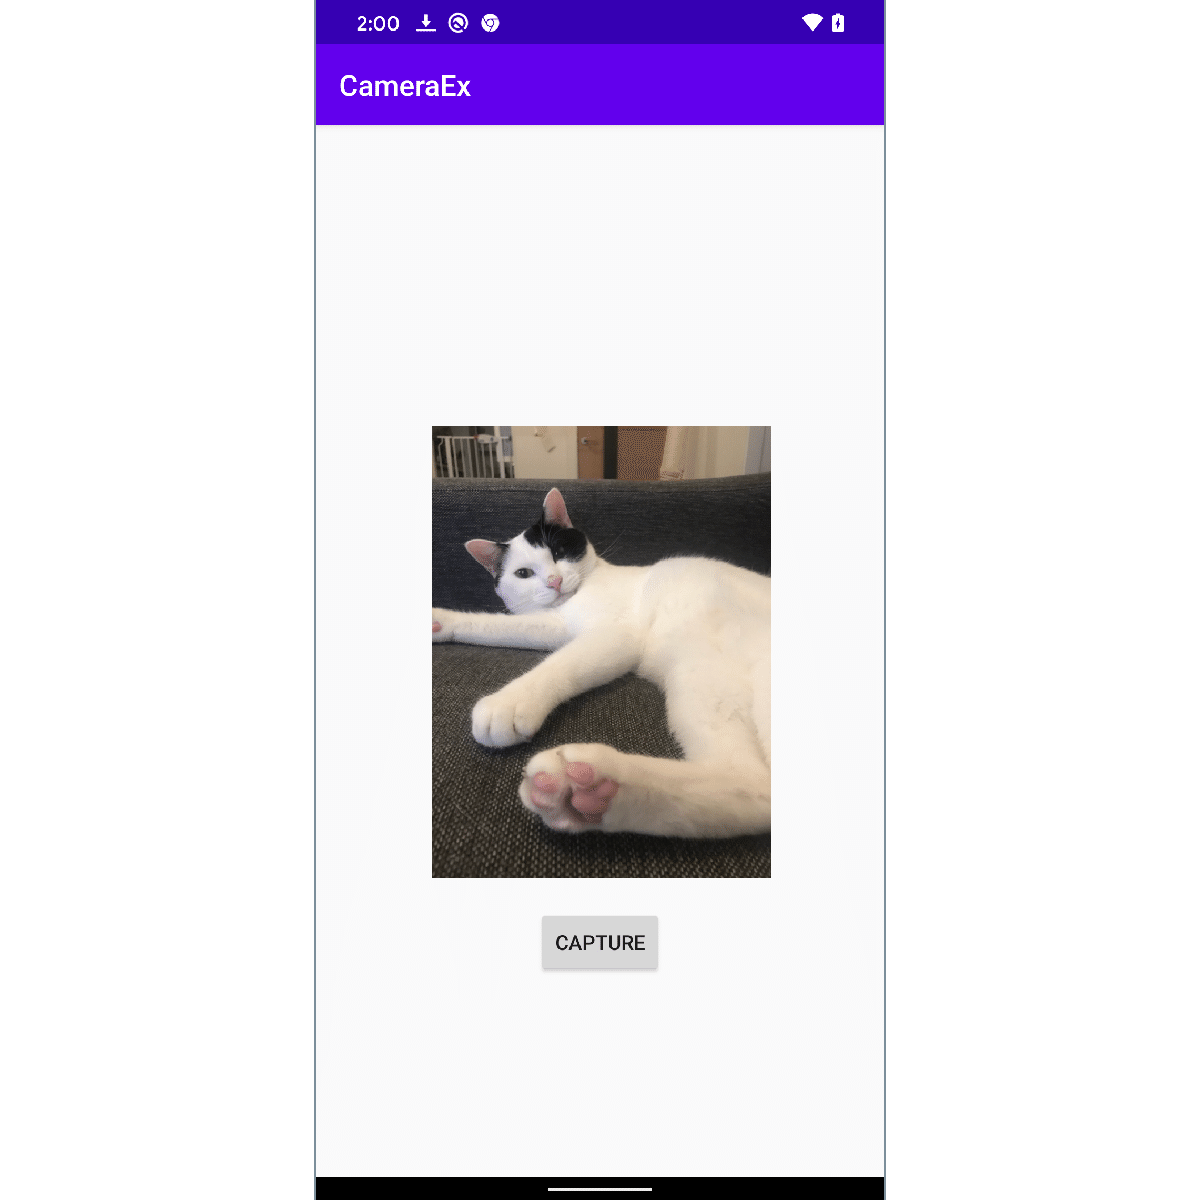
カメラ撮影するアプリを作ります。
4. プロジェクトの作成
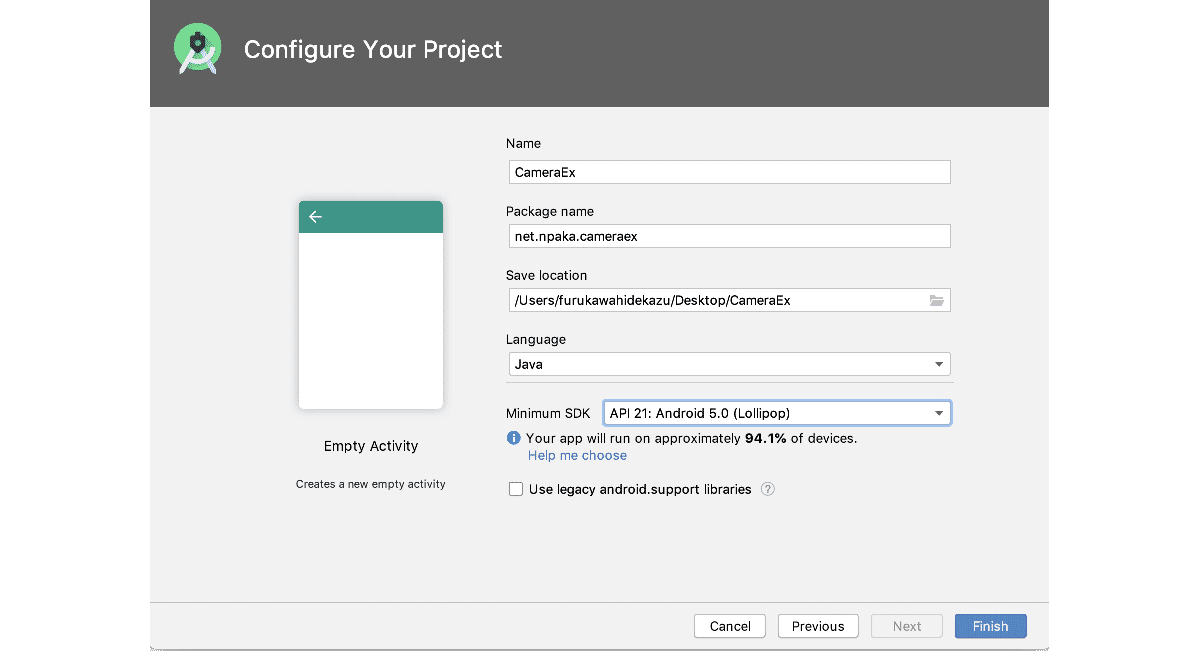
「Android Studio」で「Empty Activity」のプロジェクトを作成します。「Language」に「Java」、「Minimun SDK」に「21」を指定します。
4. Gradleの設定
「build.gradle(Mopdule: app)」の「dependencies」ブロックに以下を設定します。
// CameraXの最新バージョン(現在はalpha06)を使用
def camerax_version = '1.0.0-alpha06'
implementation "androidx.camera:camera-core:${camerax_version}"
implementation "androidx.camera:camera-camera2:${camerax_version}"
「CameraX」は「Java 8」の一部であるいくつかのメソッドが必要なので、
それに応じてコンパイルオプションを設定する必要があります。「android」ブロックの最後の「buildTypes」の直後に、以下を追加します。
compileOptions {
    sourceCompatibility JavaVersion.VERSION_1_8
    targetCompatibility JavaVersion.VERSION_1_8
}
5. レイアウトの設定
「activity_main.xml」に「TextureView」と「Button」を設定します。
<?xml version="1.0" encoding="utf-8"?>
<androidx.constraintlayout.widget.ConstraintLayout xmlns:android="http://schemas.android.com/apk/res/android"
    xmlns:app="http://schemas.android.com/apk/res-auto"
    xmlns:tools="http://schemas.android.com/tools"
    android:layout_width="match_parent"
    android:layout_height="match_parent"
    tools:context=".MainActivity">

    <TextureView
        android:id="@+id/texture_view"
        android:layout_width="640px"
        android:layout_height="640px"
        app:layout_constraintTop_toTopOf="parent"
        app:layout_constraintBottom_toBottomOf="parent"
        app:layout_constraintStart_toStartOf="parent"
        app:layout_constraintEnd_toEndOf="parent" />

    <Button
        android:id="@+id/capture_button"
        android:layout_height="wrap_content"
        android:layout_width="wrap_content"
        android:text="Capture"
        android:layout_marginTop="22dp"
        android:layout_marginBottom="22dp"
        app:layout_constraintTop_toBottomOf="@+id/texture_view"
        app:layout_constraintStart_toStartOf="parent"
        app:layout_constraintEnd_toEndOf="parent" />

</androidx.constraintlayout.widget.ConstraintLayout>
6. マニフェストファイルの設定
「CAMERA」のパーミッションを追加します。
<uses-permission android:name="android.permission.CAMERA" />7. UIの準備とパーミッション
UIの準備とパーミッションを実装します。
package net.npaka.cameraex;

import androidx.appcompat.app.AppCompatActivity;
import androidx.camera.core.CameraX;
import androidx.camera.core.ImageAnalysis;
import androidx.camera.core.ImageAnalysisConfig;
import androidx.camera.core.ImageCapture;
import androidx.camera.core.ImageCaptureConfig;
import androidx.camera.core.ImageProxy;
import androidx.camera.core.Preview;
import androidx.camera.core.PreviewConfig;
import androidx.core.app.ActivityCompat;
import androidx.core.content.ContextCompat;

import android.Manifest;
import android.content.pm.PackageManager;
import android.os.Bundle;
import android.util.Size;
import android.view.TextureView;
import android.view.View;
import android.view.ViewGroup;
import android.widget.Button;
import android.widget.Toast;

import java.io.File;
import java.util.concurrent.Executors;

// MainActivity
public class MainActivity extends AppCompatActivity {
    // 定数
    private final int REQUEST_CODE_PERMISSIONS = 101;
    private final String[] REQUIRED_PERMISSIONS = new String[]{
        Manifest.permission.CAMERA};

    // UI
    private TextureView textureView;
    private Button captureButton;

    // アクティビティ生成時に呼ばれる
    @Override
    protected void onCreate(Bundle savedInstanceState) {
        super.onCreate(savedInstanceState);
        setContentView(R.layout.activity_main);

        // UI
        this.textureView = findViewById(R.id.texture_view);
        this.captureButton = findViewById(R.id.capture_button);

        // パーミッションのチェック
        if (allPermissionsGranted()) {
            this.textureView.post(() -> startCamera());
        } else {
            ActivityCompat.requestPermissions(this,
                REQUIRED_PERMISSIONS, REQUEST_CODE_PERMISSIONS);
        }
    }

    // パーミッション許可のリクエスト結果の取得
    @Override
    public void onRequestPermissionsResult(int requestCode,
        String[] permissions, int[] grantResults) {
        if (requestCode == REQUEST_CODE_PERMISSIONS) {
            if (allPermissionsGranted()) {
                startCamera();
            } else {
                Toast.makeText(this, "ユーザーから権限が許可されていません。",
                    Toast.LENGTH_SHORT).show();
                finish();
            }
        }
    }

    // 全てのパーミッション許可
    private boolean allPermissionsGranted() {
        for (String permission : REQUIRED_PERMISSIONS) {
            if (ContextCompat.checkSelfPermission(this, permission)
                != PackageManager.PERMISSION_GRANTED) {
                return false;
            }
        }
        return true;
    }

    // カメラの開始
    private void startCamera() {
        // 後ほど実装
    }
}
8. プレビューの表示
カメラのプレビューを表示します。
「Preview」を生成し、CameraX.bindToLifecycle()に追加します。
TextureViewとプレビュー画像のアスペクト比が違うと、歪んで表示されます。output.getTextureSize()でプレビュー画像のサイズ、output.getRotationDegrees()でプレビュー画像の回転が取得できるので、それに応じてTextureViewのサイズを変更しています。
    // カメラの開始
    private void startCamera() {
        // プレビューの表示
        PreviewConfig pConfig = new PreviewConfig.Builder().build();
        Preview preview = new Preview(pConfig);
        preview.setOnPreviewOutputUpdateListener(
            output -> {
                // SurfaceTextureの更新
                ViewGroup parent = (ViewGroup)this.textureView.getParent();
                parent.removeView(this.textureView);
                parent.addView(this.textureView, 0);

                // SurfaceTextureをTextureViewに指定
                this.textureView.setSurfaceTexture(output.getSurfaceTexture());

                // TextureViewのサイズの調整
                int w = output.getTextureSize().getWidth();
                int h = output.getTextureSize().getHeight();
                int degree = output.getRotationDegrees();
                if (degree == 90 || degree == 270) {
                    w = output.getTextureSize().getHeight();
                    h = output.getTextureSize().getWidth();
                }
                h = h * textureView.getWidth() / w;
                w = textureView.getWidth();
                ConstraintLayout.LayoutParams params = new ConstraintLayout.LayoutParams(w,h);
                params.startToStart = ConstraintLayout.LayoutParams.PARENT_ID;
                params.endToEnd = ConstraintLayout.LayoutParams.PARENT_ID;
                params.topToTop = ConstraintLayout.LayoutParams.PARENT_ID;
                params.bottomToBottom = ConstraintLayout.LayoutParams.PARENT_ID;
                textureView.setLayoutParams(params);;
            });

        // カメラのライフサイクルのバインド
        CameraX.bindToLifecycle(this, preview);
   }
PreviewConfig.Builder()のメソッドは次のとおり。
PreviewConfig.Builder setBackgroundExecutor(Executor executor)
 説明: Executerの指定。
 ・Executors.newSingleThreadExecutor(): 1つのスレッド
 ・Executors.newFixedThreadPool(num): 固定数の複数スレッド
 ・Executors.newCachedThreadPool(): 必要に応じてスレッド生成

PreviewConfig.Builder setLensFacing(CameraX.LensFacing lensFacing)
 説明: プライマリカメラの指定。
 ・CameraX.LensFacing.BACK
 ・CameraX.LensFacing.FRONT

PreviewConfig.Builder setTargetAspectRatio(AspectRatio aspectRatio)
 説明: アスペクト比の指定。
 ・AspectRatio.RATIO_16_9
 ・AspectRatio.RATIO_4_3

PreviewConfig.Builder setTargetName(String targetName)
 説明: ターゲット名の指定。

PreviewConfig.Builder setTargetResolution(Size resolution)
 説明: 解像度の指定。

PreviewConfig.Builder setTargetRotation(int rotation)
 説明: 回転の指定。
 ・Surface.ROTATION_0
 ・Surface.ROTATION_90
 ・Surface.ROTATION_180
 ・Surface.ROTATION_270
ここで実行すると、プレビューの表示を見ることができます。
9. 画像の解析
フレーム毎の画像を解析します。「画像処理」「コンピュータビジョン」「機械学習推論」などに利用します。
「ImageAnalysis」を生成し、CameraX.bindToLifecycle()に追加します。
    // カメラの開始
    private void startCamera() {
        // プレビューの表示
        <<省略>>

        // 画像の解析
        ImageAnalysisConfig config = new ImageAnalysisConfig.Builder()
            .setImageReaderMode(ImageAnalysis.ImageReaderMode.ACQUIRE_LATEST_IMAGE)
            .build();
        ImageAnalysis imageAnalysis = new ImageAnalysis(config);
        imageAnalysis.setAnalyzer(Executors.newSingleThreadExecutor(),
            new ImageAnalysis.Analyzer() {
                @Override
                public void analyze(ImageProxy image, int rotationDegrees) {
                    android.util.Log.d("debug",+image.getWidth()+"x"+image.getHeight());
                }
            });

        // カメラのライフサイクルのバインド
        CameraX.bindToLifecycle(this, imageAnalysis, preview);
    }
ImageAnalysisConfig.Builder()のメソッドは次のとおり。
ImageAnalysisConfig.Builder setBackgroundExecutor(Executor executor)
 説明: Executerの指定。
 ・Executors.newSingleThreadExecutor(): 1つのスレッド
 ・Executors.newFixedThreadPool(num): 固定数の複数スレッド
 ・Executors.newCachedThreadPool(): 必要に応じてスレッド生成

ImageAnalysisConfig.Builder setImageQueueDepth(int depth)
 説明: ACQUIRE_NEXT_IMAGEモードのカメラパイプラインで使用可能な画像数の指定

ImageAnalysisConfig.Builder setImageReaderMode(ImageAnalysis.ImageReaderMode mode)
 説明: ImageReaderから画像を取得するモードの指定。
・ACQUIRE_LATEST_IMAGE : キュー内の最新のイメージを取得し、その他のイメージを破棄
・ACQUIRE_NEXT_IMAGE : キュー内の次の画像の取得

ImageAnalysisConfig.Builder setLensFacing(CameraX.LensFacing lensFacing)
 説明: プライマリカメラの指定。
 ・CameraX.LensFacing.BACK
 ・CameraX.LensFacing.FRONT

ImageAnalysisConfig.Builder setTargetAspectRatio(AspectRatio aspectRatio)
 説明: アスペクト比の指定。
 ・AspectRatio.RATIO_16_9
 ・AspectRatio.RATIO_4_3

ImageAnalysisConfig.Builder setTargetName(String targetName)
 説明: ターゲット名の指定。

ImageAnalysisConfig.Builder setTargetResolution(Size resolution)
 説明: 解像度の指定。

ImageAnalysisConfig.Builder setTargetRotation(int rotation)
 説明: 回転の指定。
 ・Surface.ROTATION_0
 ・Surface.ROTATION_90
 ・Surface.ROTATION_180
 ・Surface.ROTATION_270
ImageAnalysis.Analyzerのオーバーライドメソッドは次のとおりです。
void analyze(ImageProxy image, int rotationDegrees)
 説明: 画像の解析時に呼ばれる
 引数: image イメージ
    rotateDegrees 回転
ここで実行すると、画像の解析を見ることができます。
10. 画像のキャプチャ
画像のキャプチャを行います。
「ImageAnalysis」を生成し、CameraX.bindToLifecycle()に追加します。
    // カメラの開始
    private void startCamera() {
        // プレビューの表示
        <<省略>>

        // 画像の解析
        <<省略>>

        // 画像のキャプチャ
        ImageCaptureConfig cConfig = new ImageCaptureConfig.Builder()
            .setTargetRotation(getWindowManager().getDefaultDisplay().getRotation())
            .build();
        ImageCapture imageCapture = new ImageCapture(cConfig);

        // ボタンのイベントリスナー
        captureButton.setOnClickListener(new View.OnClickListener() {
            @Override
            public void onClick(View v) {
                // 画像のキャプチャ
                File file = new File(getFilesDir(), "captured.jpg");
                imageCapture.takePicture(file, Executors.newSingleThreadExecutor(),
                    new ImageCapture.OnImageSavedListener() {
                        // 成功時に呼ばれる
                        @Override
                        public void onImageSaved(File file) {
                            android.util.Log.d("debug","success");
                        }

                        // エラー時に呼ばれる
                        @Override
                        public void onError(
                            ImageCapture.ImageCaptureError imageCaptureError,
                            String message, Throwable cause) {
                            android.util.Log.d("debug","error");
                        }
                    });
            }
        });

        // カメラのライフサイクルのバインド
        CameraX.bindToLifecycle(this, imageCapture, imageAnalysis, preview);
    }
ImageCaptureConfig.Builder()のメソッドは次のとおり。
ImageCaptureConfig.Builder setBackgroundExecutor(Executor executor)
 説明: Executerの指定。
 ・Executors.newSingleThreadExecutor(): 1つのスレッド
 ・Executors.newFixedThreadPool(num): 固定数の複数スレッド
 ・Executors.newCachedThreadPool(): 必要に応じてスレッド生成

ImageCaptureConfig.Builder setCaptureMode(ImageCapture.CaptureMode captureMode)
 説明: 画像キャプチャモードの指定。
 ・MAXIMIZE_QUALITY: 待ち時間よりも画質を優先
 ・MINIMIZE_LATENCY: 画質よりも待ち時間優先

ImageCaptureConfig.Builder setFlashMode(FlashMode flashMode)
 説明: フラッシュモードの指定。
 ・AUTO
 ・OFF
 ・ON

ImageCaptureConfig.Builder setLensFacing(CameraX.LensFacing lensFacing)
 説明: プライマリカメラの指定。
 ・CameraX.LensFacing.BACK
 ・CameraX.LensFacing.FRONT

ImageCaptureConfig.Builder setTargetAspectRatio(AspectRatio aspectRatio)
 説明: アスペクト比の指定。
 ・AspectRatio.RATIO_16_9
 ・AspectRatio.RATIO_4_3

ImageCaptureConfig.Builder setTargetName(String targetName)
 説明: ターゲット名の指定。

ImageCaptureConfig.Builder setTargetResolution(Size resolution)
 説明: 解像度の指定。

ImageCaptureConfig.Builder setTargetRotation(int rotation)
 説明: 回転の指定(Exifに影響)。
 ・Surface.ROTATION_0
 ・Surface.ROTATION_90
 ・Surface.ROTATION_180
 ・Surface.ROTATION_270
画像キャプチャはtakePicture()で行います。
void takePicture(Executor executor, ImageCapture.OnImageCapturedCallback callback)
 説明: メモリアクセス用の静止画像をキャプチャ。
 引数: executer Executer
    callback コールバック

void takePicture(ImageCapture.OutputFileOptions outputFileOptions, Executor executor, ImageCapture.OnImageSavedCallback imageSavedCallback)
 説明: 静止画像をキャプチャし、アプリケーション指定のメタデータと共にファイルに保存。
 引数: outputFileOptions 出力先(File, MediaStore, OutputStream)
    executer Executer
    callback コールバック
ImageCapture.OnImageCapturedCallbackのオーバーライドメソッドは次のとおりです。
void onCaptureSuccess(ImageProxy image)
 説明: 画像がキャプチャされたときのコールバック。
 引数: image イメージ

void onError(ImageCaptureException exception, String message, Throwable cause)
 説明: 画像キャプチャ中にエラーが発生したときのコールバック。
 引数: exception 例外
    message メッセージ
    cause Throwable
ここで実行すると、「CAPTURE」ボタンで写真撮影ができます。
【おまけ】 Android10 のカメラフォルダへの保存
◎ マニフェストファイル
「WRITE_EXTERNAL_STORAGE」を追加。
<uses-permission android:name="android.permission.WRITE_EXTERNAL_STORAGE" />◎ パーミッション
「WRITE_EXTERNAL_STORAGE」を追加。
    private final static String[] PERMISSIONS = new String[]{
        Manifest.permission.CAMERA,
        Manifest.permission.WRITE_EXTERNAL_STORAGE};
◎ カメラフォルダへの保存
    // キャラリーへの保存
    private void savePhoto(File file) {
        ContentResolver resolver = getApplicationContext().getContentResolver();
        ContentValues contentValues = new ContentValues();
        contentValues.put(MediaStore.MediaColumns.DISPLAY_NAME, "captured.jpg");
        contentValues.put(MediaStore.MediaColumns.MIME_TYPE, "image/png");
        Uri imageUri = resolver.insert(MediaStore.Images.Media.EXTERNAL_CONTENT_URI, contentValues);
        try {
            OutputStream fos = resolver.openOutputStream(imageUri);
            Bitmap bitmap = BitmapFactory.decodeFile(file.getAbsolutePath());
            bitmap.compress(Bitmap.CompressFormat.JPEG, 100, fos);
            fos.flush();
            fos.close();
        } catch (Exception e) {
            e.printStackTrace();
        }
    }
【おまけ】 シャッター音を鳴らす
MediaActionSound sound = new MediaActionSound();
sound.play(MediaActionSound.SHUTTER_CLICK);
【おまけ】 Exifを考慮した画像の読み込み
    // Exifを考慮した画像を読み込み
    public Bitmap readBitmap(File file) {
        Bitmap bitmap = BitmapFactory.decodeFile(file.getAbsolutePath());
        if (bitmap == null) return null;
        try {
            FileInputStream in = new FileInputStream(file);
            ExifInterface ei = new ExifInterface(in);
            int orientation = ei.getAttributeInt(ExifInterface.TAG_ORIENTATION,
                ExifInterface.ORIENTATION_NORMAL);
            if (orientation == ExifInterface.ORIENTATION_ROTATE_90) {
                return rotate(bitmap, 90);
            } else if (orientation == ExifInterface.ORIENTATION_ROTATE_180) {
                return rotate(bitmap, 180);
            } else if (orientation == ExifInterface.ORIENTATION_ROTATE_270) {
               return rotate(bitmap, 270);
            }
        } catch (IOException e) {
            e.printStackTrace();
        }
        return bitmap;
    }

    // 画像の回転
    public static Bitmap rotate(Bitmap bitmap, float degrees) {
        Matrix matrix = new Matrix();
        matrix.postRotate(degrees);
        return Bitmap.createBitmap(bitmap, 0, 0,
            bitmap.getWidth(), bitmap.getHeight(), matrix, true);
}この記事が気に入ったらサポートをしてみませんか?