
HuggingFace Diffusers v0.24.0の新機能

「Diffusers v0.24.0」の新機能についてまとめました。
前回
1. Diffusers v0.24.0 のリリースノート
情報元となる「Diffusers 0.24.0」のリリースノートは、以下で参照できます。
2. Stable Diffusion Video
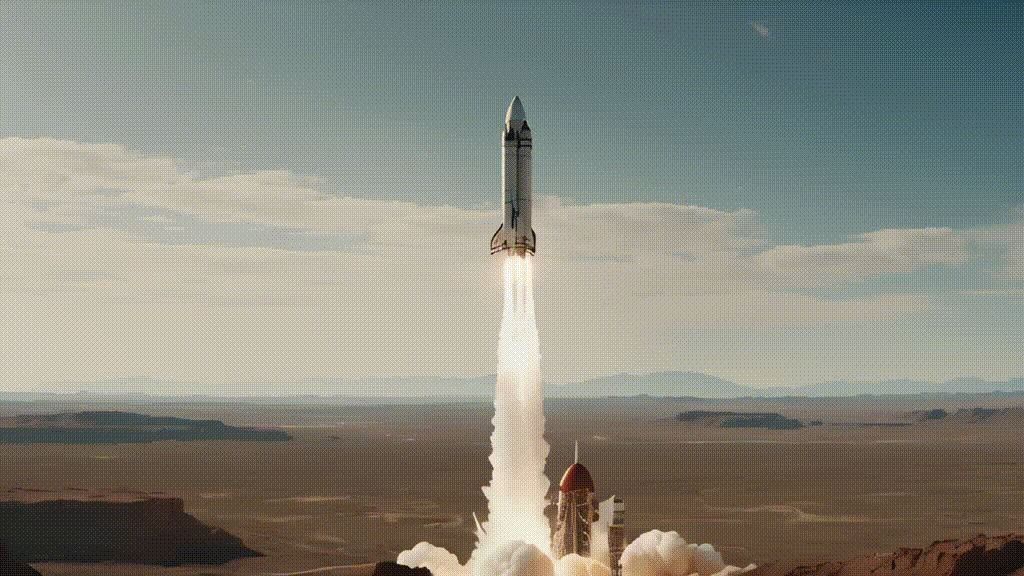
「Stable Video Diffusion」は、入力画像に応じて高解像度 (576x1024) の 2~4秒の動画を生成できるImage-to-Videoの生成モデルです。
2-1. Image-to-Video
「SVD」には2つのバリエーションがあります。
・SVD : 14フレームの生成を学習
・SVD-XT : 25フレームの生成を学習
入力画像で生成を条件付ける必要があります。
import torch

from diffusers import StableVideoDiffusionPipeline
from diffusers.utils import load_image, export_to_video

pipe = StableVideoDiffusionPipeline.from_pretrained(
    "stabilityai/stable-video-diffusion-img2vid-xt",
    torch_dtype=torch.float16,
    variant="fp16"
)
pipe.enable_model_cpu_offload()

# 画像の読み込み
image = load_image("https://huggingface.co/datasets/huggingface/documentation-images/resolve/main/diffusers/svd/rocket.png?download=true")
image = image.resize((1024, 576))

generator = torch.manual_seed(42)
frames = pipe(image, decode_chunk_size=8, generator=generator).frames[0]

export_to_video(frames, "generated.mp4", fps=7)動画生成はメモリをより多く消費するため、decode_chunk_sizeで、一度にデコードされるフレーム数を制御できます。これにより、メモリ使用量が削減されます。decode_chunk_size=1 に設定すると、一度に1フレームずつデコードされ、使用するメモリ量は最小限になりますが、動画がちらつく可能性があります。
さらに、モデルのCPU オフロードも使用してメモリ使用量を削減できます。
3. SDXL Turbo
「SDXL Turbo」は、敵対的時間蒸留を適用した「SDXL」です。わずか1ステップで推論を実行できます。また、分類子を使用しないため、速度がさらに向上します。高性能な家庭用GPUでは、わずか100ms秒で画像生成できるようになりました。
3-1. Text-to-image
height と width を 768x768 または 1024x1024 に設定できますが、これを行うと品質が低下することが予想されます。
モデルはそれなしで学習したため、無効にする場合は必ず guide_scale を0.0に設定してください。高品質な画像を生成するには、1ステップで十分です。ステップ数を2、3、4に増やすと、画質が向上します。
from diffusers import AutoPipelineForText2Image
import torch

pipeline_text2image = AutoPipelineForText2Image.from_pretrained(
    "stabilityai/sdxl-turbo",
    torch_dtype=torch.float16,
    variant="fp16"
)
pipeline_text2image = pipeline_text2image.to("cuda")

prompt = "A cinematic shot of a baby racoon wearing an intricate italian priest robe."

image = pipeline_text2image(
    prompt=prompt,
    guidance_scale=0.0,
    num_inference_steps=1
).images[0]
image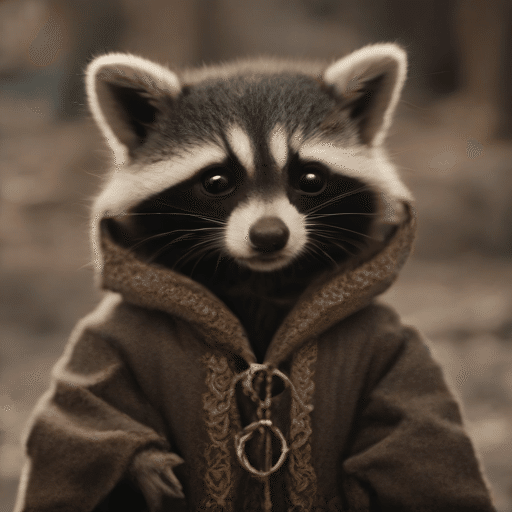
3-2. Image-to-Image
Image-to-Imageの画像生成では、num_inference_steps * strength が 1 以上であることを確認してください。int(num_inference_steps * 強度) ステップで実行されます。
from diffusers import AutoPipelineForImage2Image
from diffusers.utils import load_image, make_image_grid

# from_pipeでチェックポイントを読み込む時に追加のメモリを消費しないようにする
pipeline = AutoPipelineForImage2Image.from_pipe(
    pipeline_text2image
).to("cuda")

init_image = load_image("https://huggingface.co/datasets/huggingface/documentation-images/resolve/main/diffusers/cat.png")
init_image = init_image.resize((512, 512))

prompt = "cat wizard, gandalf, lord of the rings, detailed, fantasy, cute, adorable, Pixar, Disney, 8k"

image = pipeline(
    prompt, image=init_image,
    strength=0.5,
    guidance_scale=0.0,
    num_inference_steps=2
).images[0]
make_image_grid([init_image, image], rows=1, cols=2)
4. IP Adapter
「IP Adapter」は、他の画像に条件付けされた画像に対して、非常に強力であることが示されています。重要なパイプラインに「IP Adapter」が追加され、さまざまなワークフローにそれらを組み合わせることができるようになりました。「Img2Img2」「ControlNet」「LCM-LoRA」で動作します。
4-1. LCM-LoRA
from diffusers import DiffusionPipeline, LCMScheduler
import torch
from diffusers.utils import load_image

model_id =  "sd-dreambooth-library/herge-style"
lcm_lora_id = "latent-consistency/lcm-lora-sdv1-5"

pipe = DiffusionPipeline.from_pretrained(
    model_id,
    torch_dtype=torch.float16
)

pipe.load_ip_adapter(
    "h94/IP-Adapter",
    subfolder="models",
    weight_name="ip-adapter_sd15.bin"
)
pipe.load_lora_weights(lcm_lora_id)
pipe.scheduler = LCMScheduler.from_config(pipe.scheduler.config)
pipe.enable_model_cpu_offload()

prompt = "best quality, high quality"
image = load_image("https://user-images.githubusercontent.com/24734142/266492875-2d50d223-8475-44f0-a7c6-08b51cb53572.png")
images = pipe(
    prompt=prompt,
    ip_adapter_image=image,
    num_inference_steps=4,
    guidance_scale=1,
).images[0]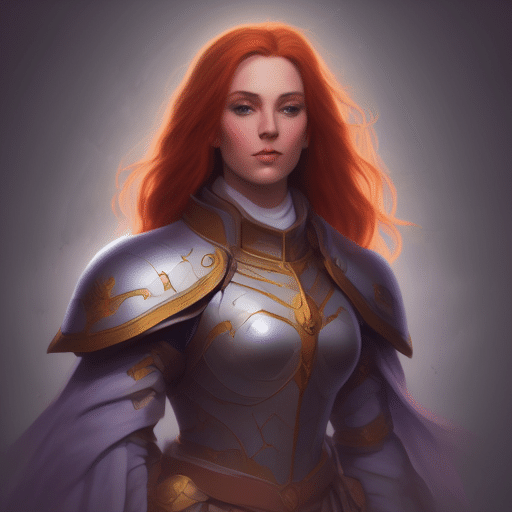
4-2. ControlNet
from diffusers import StableDiffusionControlNetPipeline, ControlNetModel
import torch
from diffusers.utils import load_image

controlnet_model_path = "lllyasviel/control_v11f1p_sd15_depth"
controlnet = ControlNetModel.from_pretrained(
    controlnet_model_path,
    torch_dtype=torch.float16
)

pipeline = StableDiffusionControlNetPipeline.from_pretrained(
    "runwayml/stable-diffusion-v1-5",
    controlnet=controlnet,
    torch_dtype=torch.float16
)
pipeline.to("cuda")

image = load_image("https://huggingface.co/datasets/YiYiXu/testing-images/resolve/main/statue.png")
depth_map = load_image("https://huggingface.co/datasets/YiYiXu/testing-images/resolve/main/depth.png")

pipeline.load_ip_adapter(
    "h94/IP-Adapter",
    subfolder="models",
    weight_name="ip-adapter_sd15.bin"
)

generator = torch.Generator(device="cpu").manual_seed(33)
images = pipeline(
    prompt='best quality, high quality',
    image=depth_map,
    ip_adapter_image=image,
    negative_prompt="monochrome, lowres, bad anatomy, worst quality, low quality",
    num_inference_steps=50,
    generator=generator,
).images
images[0].save("yiyi_test_2_out.png")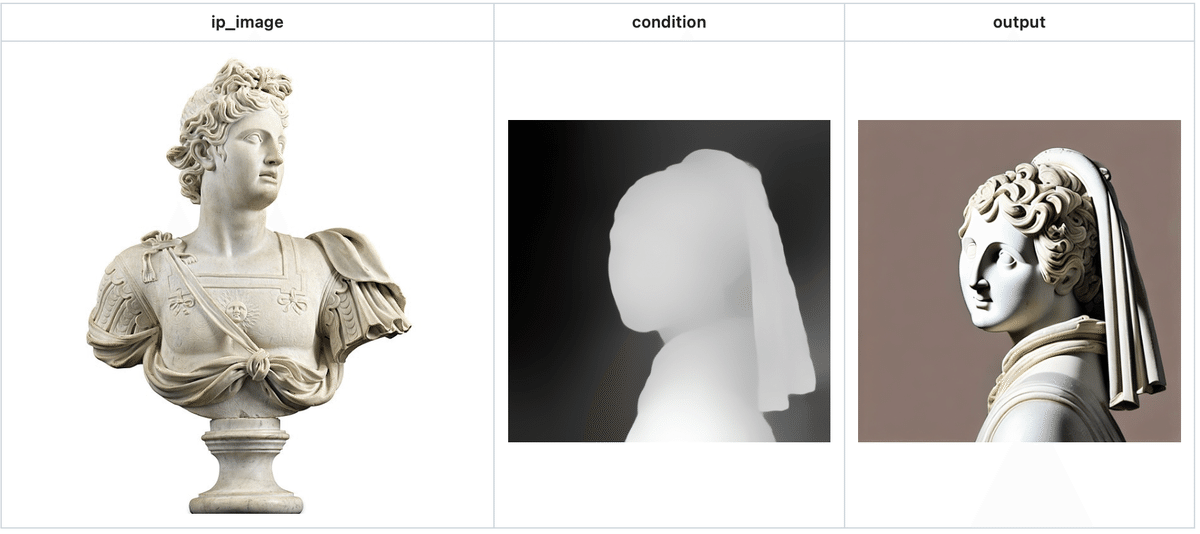
詳しくは、ドキュメントを参照。
5. Kandinsky 3.0
「Kandinsky」は、テキストエンコーダで「Flan-T5」を使用することで、テキストと画像の位置合わせが大幅に改善されたバージョン3をリリースしました。
5-1. Text-to-Image
from diffusers import AutoPipelineForText2Image
import torch

pipe = AutoPipelineForText2Image.from_pretrained(
    "kandinsky-community/kandinsky-3",
    variant="fp16",
    torch_dtype=torch.float16
)
pipe.enable_model_cpu_offload()

prompt = "A photograph of the inside of a subway train. There are raccoons sitting on the seats. One of them is reading a newspaper. The window shows the city in the background."

generator = torch.Generator(device="cpu").manual_seed(0)
image = pipe(
    prompt,
    num_inference_steps=25,
    generator=generator
).images[0]
5-2. Image-to-Image
from diffusers import AutoPipelineForImage2Image
from diffusers.utils import load_image
import torch

pipe = AutoPipelineForImage2Image.from_pretrained(
    "kandinsky-community/kandinsky-3",
    variant="fp16",
    torch_dtype=torch.float16
)
pipe.enable_model_cpu_offload()

prompt = "A painting of the inside of a subway train with tiny raccoons."
image = load_image("https://huggingface.co/datasets/hf-internal-testing/diffusers-images/resolve/main/kandinsky3/t2i.png")

generator = torch.Generator(device="cpu").manual_seed(0)
image = pipe(
    prompt,
    image=image,
    strength=0.75,
    num_inference_steps=25,
    generator=generator
).images[0]詳しくは、ドキュメントを参照。
次回
この記事が気に入ったらサポートをしてみませんか?