iOSアプリ開発 入門 (13) - AVCapturePhotoOutputによるカメラ撮影

「AVCapturePhotoOutput」によるカメラ撮影の手順をまとめました。
・iOS14
前回
1. iOSのカメラ撮影
iOSのカメラ撮影の実装方法には、「UIImagePickerController」と「AVCapturePhotoOutput」の2つの方法があります。
・UIImagePickerController
・実装が簡単
・画面カスタマイズ不可
・AVCapturePhotoOutput
・実装が手間
・画面カスタマイズ可
今回は、画面カスタマイズ可な「AVCapturePhotoOutput」で実装します。
2. Info.plist
「Info.plist」に以下の項目を設定します。
・Privacy - Camera Usage Description : カメラの用途の説明。
・Privacy - Photo Library Usage Description : フォトライブラリの用途の説明。
3. UI
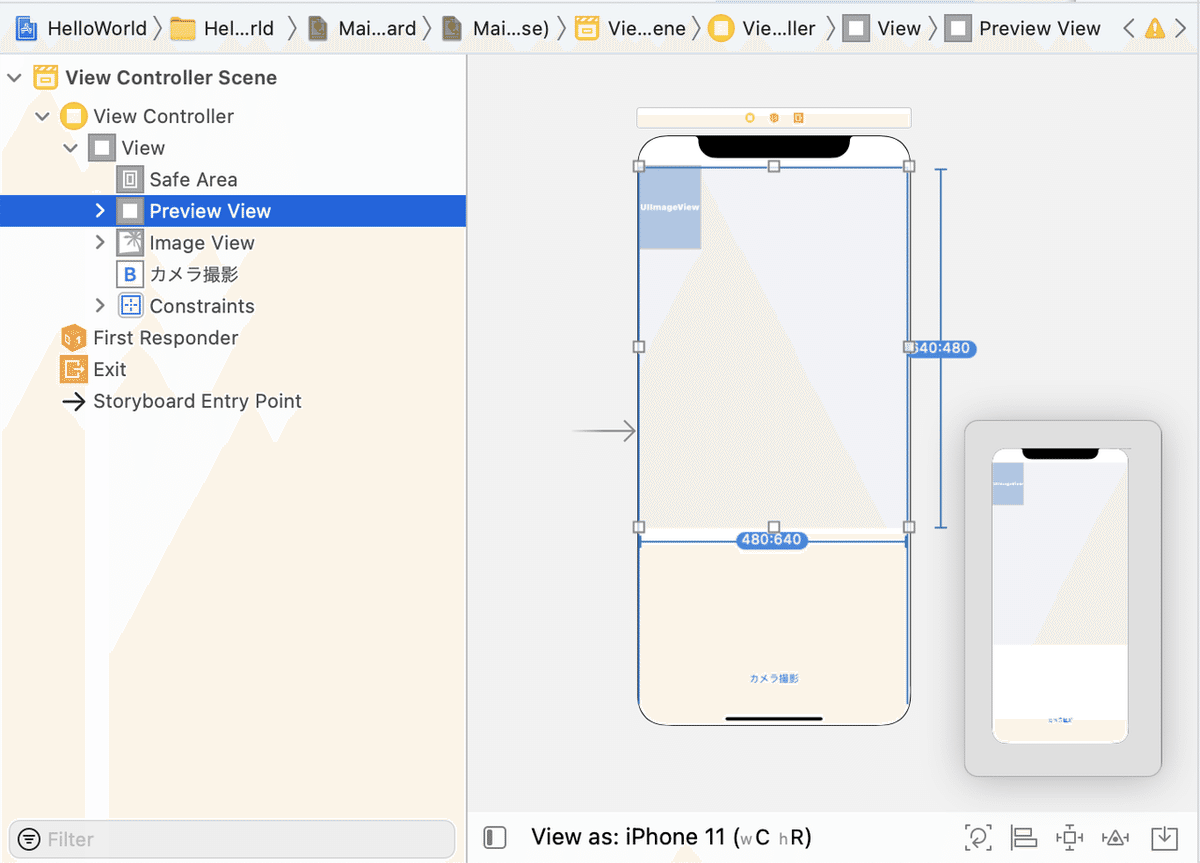
Main.storyboardに「View」(プレビュー用)を1つ、「ImageView」(結果確認用)を1つ、「Button」を1つ配置します。「View」と「ImageView」はアスペクト比を480:640とします。ボタンのテキストには「カメラ撮影」を指定します。
4. コード
コードは、次のとおりです。
import UIKit
import AVFoundation

// ViewController
class ViewController: UIViewController, AVCapturePhotoCaptureDelegate {
    //参照
    @IBOutlet weak private var previewView: UIView!
    @IBOutlet weak private var imageView: UIImageView!

    // ビデオキャプチャー
    var session: AVCaptureSession!
    var input: AVCaptureDeviceInput!
    var output: AVCapturePhotoOutput!
    var camera: AVCaptureDevice!


//====================
// ライフサイクル
//====================
    // ロード時に呼ばれる
    override func viewDidLoad() {
        super.viewDidLoad()

        // ビデオキャプチャーのセットアップ
        setupAVCapture()
    }


//====================
// ビデオキャプチャー
//====================
    // ビデオキャプチャーのセットアップ
    func setupAVCapture() {
        // セッションの生成
        self.session = AVCaptureSession()

        // セッションの設定開始
        self.session.beginConfiguration()

        // 画像解像度の設定
        self.session.sessionPreset = .vga640x480

        // カメラの取得
        self.camera = AVCaptureDevice.default(
            AVCaptureDevice.DeviceType.builtInWideAngleCamera,
            for: AVMediaType.video,
            position: .back)

        // ビデオ入力の生成
        do {
            self.input = try AVCaptureDeviceInput(device: camera!)
        } catch {
            self.session.commitConfiguration()
            print("ビデオ入力の生成に失敗しました。")
            return
        }

        // ビデオ入力の追加
        if self.session.canAddInput(input) {
            self.session.addInput(input)
        } else {
            self.session.commitConfiguration()
            print("ビデオ入力の追加に失敗しました。")
            return
        }

        // ビデオ出力の生成
        self.output = AVCapturePhotoOutput()

        // ビデオ出力の追加
        if session.canAddOutput(self.output) {
            session.addOutput(self.output)
        } else {
            self.session.commitConfiguration()
            print("ビデオ出力の追加に失敗しました。")
            return
        }

        // セッションの設定終了
        self.session.commitConfiguration()

        // セッションからプレビューを表示を
        let previewLayer = AVCaptureVideoPreviewLayer(session: session)

        // プレビューの追加
        previewLayer.frame = previewView.bounds
        previewLayer.videoGravity = .resizeAspectFill
        self.previewView.layer.addSublayer(previewLayer)

        // セッションの開始
        self.session.startRunning()
    }


//====================
// カメラ撮影
//====================
    // カメラ撮影ボタン押下時に呼ばれる
    @IBAction func onTakePicture(_ sender: UIButton) {
        let settings = AVCapturePhotoSettings()
        settings.flashMode = .auto
        settings.isHighResolutionPhotoEnabled = false
        self.output.capturePhoto(with: settings, delegate: self)
    }

    // カメラ撮影による画像取得時に呼ばれる
    func photoOutput(_ output: AVCapturePhotoOutput,
        didFinishProcessingPhoto photo: AVCapturePhoto, error: Error?) {
        let imageData = photo.fileDataRepresentation()
        let image = UIImage(data: imageData!)

        // イメージビューに表示
        self.imageView.image = image
    }
}
ビューとイメージビューの参照と、ボタンイベントの関連付けも行います。
◎ AVCaptureSession.Preset
AVCaptureSession.Presetの設定項目は、次のとおりです。
・low : 3Gの共有に適した設定。
・medium : WiFiの共有に適した設定。
・high : 高品質の出力に適した設定。
・photo : 高解像度の写真品質出力に適した設定。
・inputPriority : 制御なし。
・qHD960x540 : QHD品質(960 x 540ピクセル)のビデオ出力に適した設定。
・hd1280x720 : 720p品質(1280 x 720ピクセル)のビデオ出力に適した設定。
・hd1920x1080 : 1080p品質(1920 x 1080ピクセル)のビデオ出力に適した設定。
・hd4K3840x2160 : 2160p品質(3840 x 2160ピクセル)のビデオ出力に適した設定。
・iFrame960x540 : AACオーディオで約30Mbits/secで960x540品質のiFrameH.264ビデオを実現するための設定。
・iFrame1280x720 : AACオーディオで約40Mbits/secで1280x720品質のiFrameH.264ビデオを実現するための設定。
・qvga320x240 : 320 x240ピクセルのビデオ出力に適した設定。
・vga640x480 : VGA品質(640 x 480ピクセル)のビデオ出力に適した設定。
・cif352x288 : CIF品質(352 x 288ピクセル)のビデオ出力に適した設定。
◎ AVCapturePhotoCaptureDelegate
AVCapturePhotoCaptureDelegateの主なコールバックは、次のとおりです。
func photoOutput(AVCapturePhotoOutput, didFinishProcessingPhoto: AVCapturePhoto, error: Error?)
カメラ撮影終了時に呼ばれる。画像とメタデータが渡される。
func photoOutput(AVCapturePhotoOutput, didFinishRecordingLivePhotoMovieForEventualFileAt: URL, resolvedSettings: AVCaptureResolvedPhotoSettings)
ライブフォトの動画コンテンツの録画終了時に呼ばれる。
func photoOutput(AVCapturePhotoOutput, didFinishProcessingLivePhotoToMovieFileAt: URL, duration: CMTime, photoDisplayTime: CMTime, resolvedSettings: AVCaptureResolvedPhotoSettings, error: Error?)
ライブフォト撮影結果の動画ファイルのURLが渡される。
◎ AVCapturePhotoSettings
設定項目は、次のとおりです。
・flashMode : 写真撮影時にフラッシュを発光させるかどうか。
・photoQualityPrioritization : 写真の速度より品質を優先するかどうか。
・isAutoRedEyeReductionEnabled : フラッシュキャプチャで自動red-eye軽減を使用するかどうか。
・isHighResolutionPhotoEnabled : 最高の解像度で静止画像をキャプチャするかどうか。
・isCameraCalibrationDataDeliveryEnabled : カメラキャリブレーションデータも配信するかどうか。
・isAutoContentAwareDistortionCorrectionEnabled : 歪み補正を使用するかどうか。
・isAutoVirtualDeviceFusionEnabled : 自動仮想デバイス画像融合を使用するかどうか。
・virtualDeviceConstituentPhotoDeliveryEnabledDevices : 仮想デバイスが写真を配信する必要がある構成デバイス。
【おまけ】 UIImageのimageOrientationの修正
MLKitなどに画像を渡す場合は、UIImageのimageOrientationを.upに揃える必要がある。
このコードを参考に、iOS14に対応したコードは、次のとおり。
extension UIImage {
    func fixedOrientation() -> UIImage? {
        guard imageOrientation != UIImage.Orientation.up else {
            return self.copy() as? UIImage
        }

        guard let cgImage = self.cgImage else {
            return nil
        }

        guard let colorSpace = cgImage.colorSpace, let ctx = CGContext(data: nil, width: Int(size.width), height: Int(size.height),  bitsPerComponent: cgImage.bitsPerComponent, bytesPerRow: 0, space: colorSpace, bitmapInfo: CGImageAlphaInfo.premultipliedLast.rawValue) else {
            return nil
        }

        var transform: CGAffineTransform = CGAffineTransform.identity

        if imageOrientation == .down || imageOrientation == .downMirrored {
            transform = transform.translatedBy(x: size.width, y: size.height)
            transform = transform.rotated(by: CGFloat.pi)
        } else if imageOrientation == .left || imageOrientation == .leftMirrored {
            transform = transform.translatedBy(x: size.width, y: 0)
            transform = transform.rotated(by: CGFloat.pi / 2.0)
        } else if imageOrientation == .right || imageOrientation == .rightMirrored {
            transform = transform.translatedBy(x: 0, y: size.height)
            transform = transform.rotated(by: CGFloat.pi / -2.0)
        }

        if imageOrientation == .upMirrored || imageOrientation == .downMirrored {
            transform.translatedBy(x: size.width, y: 0)
            transform.scaledBy(x: -1, y: 1)
        } else if imageOrientation == .leftMirrored || imageOrientation == .rightMirrored {
            transform.translatedBy(x: size.height, y: 0)
            transform.scaledBy(x: -1, y: 1)
        }

        ctx.concatenate(transform)

        if imageOrientation == .left || imageOrientation == .leftMirrored ||
            imageOrientation == .right || imageOrientation == .rightMirrored {
            ctx.draw(self.cgImage!, in: CGRect(x: 0, y: 0, width: size.height, height: size.width))
        } else {
            ctx.draw(self.cgImage!, in: CGRect(x: 0, y: 0, width: size.width, height: size.height))
        }
        guard let newCGImage = ctx.makeImage() else { return nil }
        return UIImage.init(cgImage: newCGImage, scale: 1, orientation: .up)
    }
}
次回
この記事が気に入ったらサポートをしてみませんか?