Google Colab で Visual ChatGPT を試す

「Google Colab」で「Visual ChatGPT」を試したので、まとめました。
1. Visual ChatGPT
「Visual ChatGPT」は、「ChatGPT」と一連の「Visual Foundation Models」を接続することで、チャットで画像生成を行うパッケージになります。
具体的には、LangChainのToolとして、以下の機能を利用できるようにしています。
詳しくは、論文「Visual ChatGPT: Talking, Drawing and Editing with Visual Foundation Models」を参照。
2. Colabでの実行
Google Colabでの実行手順は、次のとおりです。
(1) パッケージのクローン。
# パッケージのクローン
!git clone https://github.com/microsoft/visual-chatgpt.git
%cd visual-chatgpt
(2) 「requirement.txt」を以下のように書き換える。
こちらを参考にさせてもらいました。
・requirement.txt
transformers==4.26.1
albumentations==1.3.0
opencv-contrib-python
imageio==2.9.0
imageio-ffmpeg==0.4.2
pytorch-lightning
omegaconf==2.1.1
test-tube>=0.7.5
streamlit==1.12.1
einops==0.3.0
webdataset==0.2.5
kornia==0.6
open_clip_torch==2.0.2
invisible-watermark>=0.1.5
streamlit-drawable-canvas==0.8.0
torchmetrics==0.6.0
timm==0.6.12
addict==2.4.0
yapf==0.32.0
prettytable==3.6.0
safetensors==0.2.7
basicsr==1.4.2
langchain==0.0.101
diffusers
gradio
openai==0.27.0
accelerate
(3) パッケージのインストール。
# パッケージのインストール
!pip install -r requirement.txt
(4) 環境変数の準備。
以下のコードの <OpenAI_APIのトークン> にはOpenAI APIのトークンを指定します。(有料)
import os
os.environ["OPENAI_API_KEY"] = "<OpenAI_APIのトークン>"
(5) モデルのダウンロード。
7分ほどかかりました。
# モデルのダウンロード
!bash download.sh
(6) imageフォルダの生成。
# imageフォルダの生成
!mkdir ./image
(7) 「visual_chatgpt.py」のLangChainのToolを減らす。
「visual_chatgpt.py」の中身を見ると、LangChainのToolがたくさんあり、GPUも0〜7まで使ってることがわかります。Colabはメモリに限りがあり、GPUも1つ(0)のみなので、Toolを減らします。
◎ Toolのインスタンスを減らす
        self.edit = ImageEditing(device="cuda:6")
        self.i2t = ImageCaptioning(device="cuda:4")
        self.t2i = T2I(device="cuda:1")
        self.image2canny = image2canny()
        self.canny2image = canny2image(device="cuda:1")
        self.image2line = image2line()
        self.line2image = line2image(device="cuda:1")
        self.image2hed = image2hed()
        self.hed2image = hed2image(device="cuda:2")
        self.image2scribble = image2scribble()
        self.scribble2image = scribble2image(device="cuda:3")
        self.image2pose = image2pose()
        self.pose2image = pose2image(device="cuda:3")
        self.BLIPVQA = BLIPVQA(device="cuda:4")
        self.image2seg = image2seg()
        self.seg2image = seg2image(device="cuda:7")
        self.image2depth = image2depth()
        self.depth2image = depth2image(device="cuda:7")
        self.image2normal = image2normal()
        self.normal2image = normal2image(device="cuda:5")
        self.pix2pix = Pix2Pix(device="cuda:3")
↓
        self.i2t = ImageCaptioning(device="cuda:0")
        self.t2i = T2I(device="cuda:0")
        self.image2canny = image2canny()
        self.BLIPVQA = BLIPVQA(device="cuda:0")
◎ エージェントへのTool設定を減らす
        self.tools = [
            :
        ]
↓
        self.tools = [
            Tool(name="Get Photo Description", func=self.i2t.inference,
                 description="useful when you want to know what is inside the photo. receives image_path as input. "
                             "The input to this tool should be a string, representing the image_path. "),
            Tool(name="Generate Image From User Input Text", func=self.t2i.inference,
                 description="useful when you want to generate an image from a user input text and save it to a file. like: generate an image of an object or something, or generate an image that includes some objects. "
                             "The input to this tool should be a string, representing the text used to generate image. "),
            Tool(name="Answer Question About The Image", func=self.BLIPVQA.get_answer_from_question_and_image,
                 description="useful when you need an answer for a question based on an image. like: what is the background color of the last image, how many cats in this figure, what is in this figure. "
                             "The input to this tool should be a comma seperated string of two, representing the image_path and the question"),
            Tool(name="Edge Detection On Image", func=self.image2canny.inference,
                 description="useful when you want to detect the edge of the image. like: detect the edges of this image, or canny detection on image, or peform edge detection on this image, or detect the canny image of this image. "
                             "The input to this tool should be a string, representing the image_path")
        ]
(8) 「visual_chatgpt.py」の最終行を次のように変更。
Colabではローカルでなくshare=Trueでシェアして利用します。<user>と<password>は新規のユーザー名とパスワード (公開コンテンツにアクセスするために利用) を指定してください。
demo.launch(server_name="0.0.0.0", server_port=7860)↓
demo.launch(auth=("<user>", "<password>"), share=True)(9) 「Visual ChatGPT」の実行。
# Visual ChatGPTの実行
!python visual_chatgpt.py
(10) 「public URL」が表示されたら、クリック。
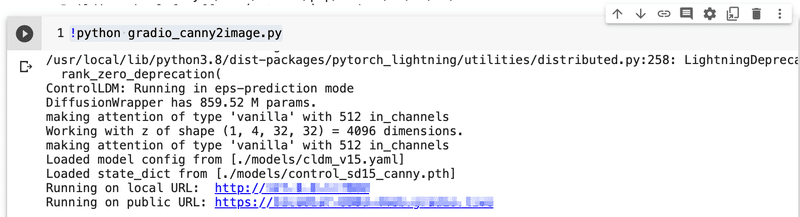
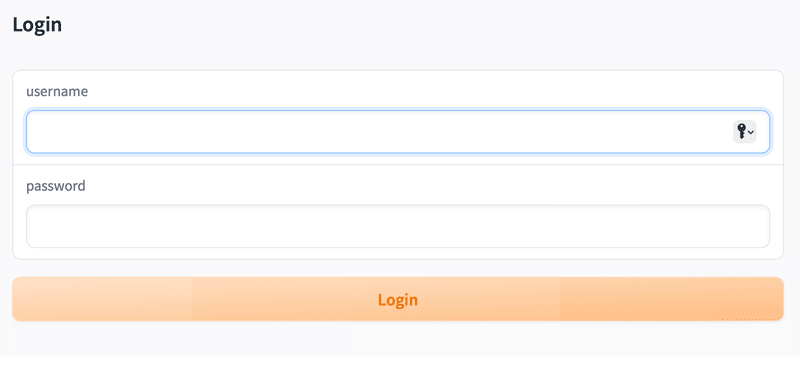
(11) 先程指定したユーザー名とパスワードでログイン。
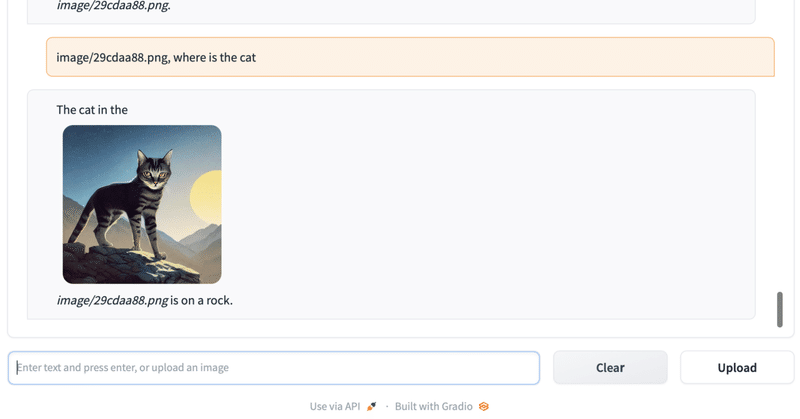
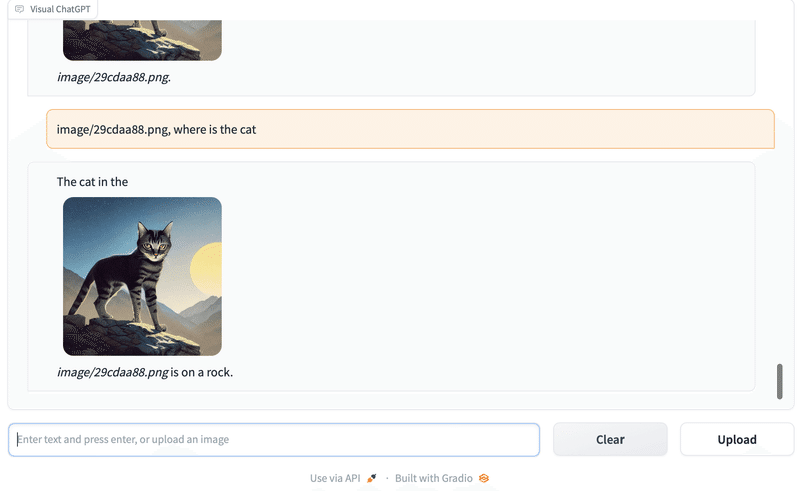
(12) 「Can i generate a cat for me?」と入力してEnterキー。
猫の画像を生成してくれます。「<image_path>, <質問>」で画像について質問することもできます。
3. Visual ChatGPTで提供されているTool
「Visual ChatGPT」で提供されている主なTool (今回残したもの) は、次のとおりです。
◎ テキストから画像生成
テキストから画像を生成してファイルに保存する場合に便利です。オブジェクトまたは何かの画像を生成するか、いくつかのオブジェクトを含む画像を生成します。
このツールへの入力は、画像の生成に使用されるテキストを表す文字列である必要があります。
◎ 写真の説明の取得
写真の中身を知りたいときに便利です。入力として image_path を受け取ります。
このツールへの入力は、image_path を表す文字列である必要があります。
◎ 画像に関する質問応答
画像に基づく質問応答が必要な場合に便利です (例 : what is the background color of the last image, how many cats in this figure, what is in this figure.)。
このツールへの入力は、image_path と質問を表す、カンマで区切られた 2 つの文字列である必要があります。
◎ 画像のエッジ検出
画像のエッジを検出したい場合に便利です (例 : detect the edges of this image, or canny detection on image, or peform edge detection on this image, or detect the canny image of this image.)。
このツールへの入力は、image_path を表す文字列である必要があります。
他のToolは、「visual_chatgpt.py」のToolのdescriptionを参照。
この記事が気に入ったらサポートをしてみませんか?