diffusers で LoRA を試す

「diffusers」で「LoRA」を試したので、まとめました。
・diffusers v0.24.0
1. LoRA
「LoRA」(Low-Rank Adaptation)は、AIモデルの効率的な調整やカスタマイズのための手法です。手法は、モデルの重みを直接調整するのではなく、低ランク(小さい次元)の行列を用いてモデルの一部の重みを調整することにより、モデルの振る舞いを変更します。
この手法には、多くの利点があります。
・効率性 : AIモデルを効率的にファインチューニングすることを可能にします。
・カスタマイズ : 特定のタスクや用途に合わせてAIモデルをカスタマイズするのに適しています。
・柔軟性 : AIモデルの基本的なアーキテクチャを保ちながら、その振る舞いを変更することができるため、柔軟性が高いです。
「LoRA」は小型で学習が高速ですが、ベースモデルとLoRAウェイト (アダプタ) を別々にロードするため、推論で遅延が発生する可能性があります。ベースモデルとLoRAウェイトとマージしてスタンドアロンモデルに変換することで、遅延を排除することができます。
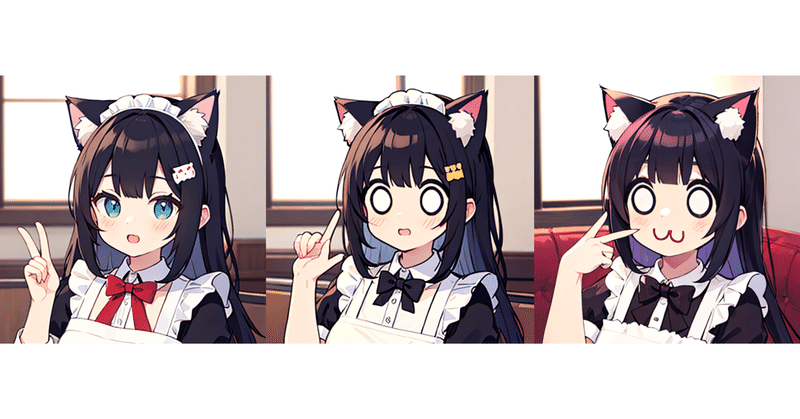
2. 画像の生成
はじめに、通常の画像生成を行います。
(1) パッケージのインストール。
# パッケージのインストール
!pip install diffusers transformers omegaconf accelerate peft
(2) モデルのダウンロード。
今回は、「IrisMix-v3」を使います。
# モデルのダウンロード
!wget https://huggingface.co/natsusakiyomi/IrisMix/resolve/main/IrisMix-v3.safetensors
(3) パイプラインの準備。
from diffusers import StableDiffusionPipeline
import torch

# パイプラインの準備
pipe = StableDiffusionPipeline.from_single_file(
    "IrisMix-v3.safetensors",
    torch_dtype=torch.float16,
).to("cuda")

# EasyNegativeV2の準備
pipe.load_textual_inversion("embed/negative",weight_name="EasyNegativeV2.safetensors",token="EasyNegative")

# NSFWの無効化
pipe.safety_checker = lambda images, **kwargs: (images, [False] * len(images))
(4) 画像生成。
prompt = "cute cat ear maid"
negative_prompt = "EasyNegativeV2, bad face"

# 画像生成の実行
image = pipe(
    prompt,
    negative_prompt=negative_prompt,
    generator = torch.Generator(device="cuda").manual_seed(1696208023)
).images[0]

# 画像の保存と表示
image.save("output.png")
image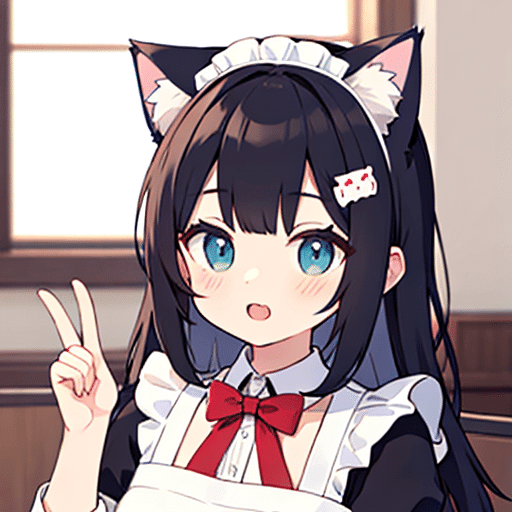
3. LoRAウェイトの適用
LoRAウェイトの適用手順は、次のとおりです。
(1) LoRAウェイトのダウンロード。
今回は、「JujoHotaru/lora」の白目を使います。
# LoRAウェイトのダウンロード
!wget https://huggingface.co/JujoHotaru/lora/resolve/main/hotarueye_whiteeye9_v100.safetensors
(2) LoRAウェイトの読み込み。
# LoRAウェイトの読み込み
pipe.load_lora_weights(".", weight_name="hotarueye_whiteeye9_v100.safetensors")
(3) 画像生成。
prompt = "cute cat ear maid"
negative_prompt = "EasyNegativeV2, bad face"

# 推論の実行
image = pipe(
    prompt,
    negative_prompt=negative_prompt,
    generator = torch.Generator(device="cuda").manual_seed(1696208023)
).images[0]

# 画像の保存と表示
image.save("output.png")
image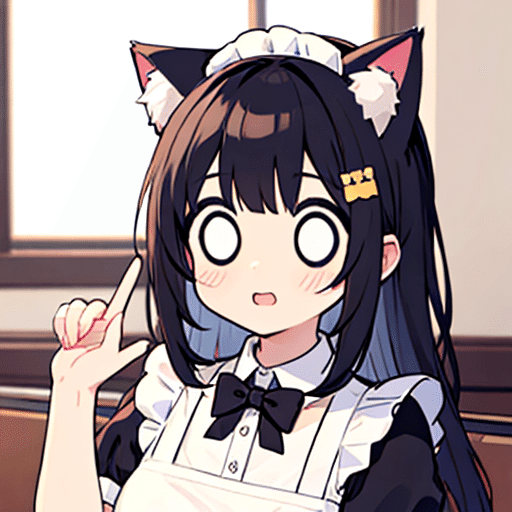
4. 複数のLoRAウェイトの適用
LoRAウェイトの適用手順は、次のとおりです。
(1) モデルを再読み込み。
読み込んだLoRAウェイトをリセットします。
from diffusers import StableDiffusionPipeline
import torch

# パイプラインの準備
pipe = StableDiffusionPipeline.from_single_file(
    "IrisMix-v3.safetensors",
    torch_dtype=torch.float16,
).to("cuda")

# EasyNegativeV2の準備
pipe.load_textual_inversion("embed/negative",weight_name="EasyNegativeV2.safetensors",token="EasyNegative")

# NSFWの無効化
pipe.safety_checker = lambda images, **kwargs: (images, [False] * len(images))
(2) 複数のLoRAウェイトのダウンロード。
今回は、「JujoHotaru/lora」の白目と猫口を使います。
# 複数のLoRAウェイトのダウンロード
!wget https://huggingface.co/JujoHotaru/lora/resolve/main/hotarueye_whiteeye9_v100.safetensors
!wget https://huggingface.co/JujoHotaru/lora/resolve/main/catmouth_v100.safetensors
(3) 複数のLoRAウェイトの読み込み。
# 複数のLoRAウェイトの読み込み
pipe.load_lora_weights(".", weight_name="hotarueye_whiteeye9_v100.safetensors", adapter_name="hotarueye_whiteeye9_v100")
pipe.load_lora_weights(".", weight_name="catmouth_v100.safetensors", adapter_name="catmouth_v100")
pipe.set_adapters(["hotarueye_whiteeye9_v100", "catmouth_v100"], adapter_weights=[1.0, 1.0])
(4) 画像生成。
prompt = "cute cat ear maid, cat mouth"
negative_prompt = "EasyNegativeV2, bad face"

# 推論の実行
image = pipe(
    prompt,
    negative_prompt=negative_prompt,
    generator = torch.Generator(device="cuda").manual_seed(1696208023)
).images[0]

# 画像の保存と表示
image.save("output.png")
image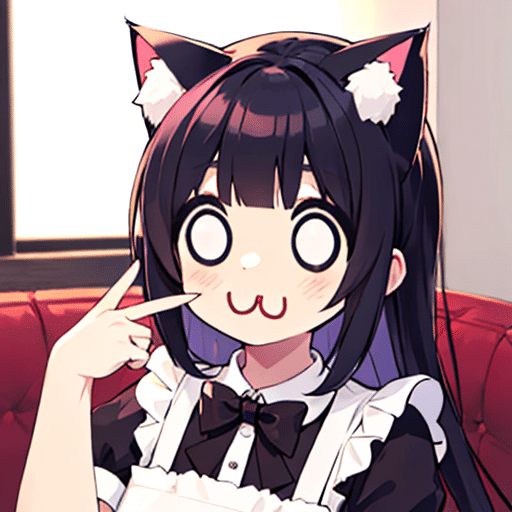
この記事が気に入ったらサポートをしてみませんか?