UbuntuでMusePoseを試してみる

「仮想人間生成のためのポーズ駆動型イメージ-to-ビデオ フレームワーク」であるらしいMusePoseを試してみます。
1. 準備
環境構築
python3 -m venv musepose
cd $_
source bin/activate
リポジトリをクローンして、パッケージをインストールします。
# clone
git clone https://github.com/TMElyralab/MusePose
cd MusePose

# requirements.txt
pip install -r requirements.txt

# mmlabパッケージのインストール
pip install --no-cache-dir -U openmim
mim install mmengine
mim install "mmcv>=2.0.1"
mim install "mmdet>=3.1.0"
mim install "mmpose>=1.1.0"
モデルのダウンロード
READMEにある以下のモデル(weights)を、指定されたディレクトリに配置します。
pythonコマンドを実行し、
$ python
>>> 以下を流し込みます。こういう形でREADMEに書いてくれると楽なんですがねぇ。
from huggingface_hub import snapshot_download

snapshot_download(
    repo_id="TMElyralab/MusePose",
    revision="main",
    local_dir="./pretrained_weights",
    local_dir_use_symlinks=True,
    allow_patterns="*.pth"
)

snapshot_download(
    repo_id="stabilityai/sd-vae-ft-mse",
    revision="main",
    local_dir="./pretrained_weights/sd-vae-ft-mse",
    local_dir_use_symlinks=True,
    allow_patterns=["config.json", "diffusion_pytorch_model.bin"]
)

snapshot_download(
    repo_id="yzd-v/DWPose",
    revision="main",
    local_dir="./pretrained_weights/dwpose",
    local_dir_use_symlinks=True,
    allow_patterns=["dw-ll_ucoco_384.pth"]
)

snapshot_download(
    repo_id="lambdalabs/sd-image-variations-diffusers",
    revision="main",
    local_dir="./pretrained_weights/sd-image-variations-diffusers",
    local_dir_use_symlinks=True,
    allow_patterns=["unet/*"]
)

snapshot_download(
    repo_id="lambdalabs/sd-image-variations-diffusers",
    revision="main",
    local_dir="./pretrained_weights/",
    local_dir_use_symlinks=True,
    allow_patterns=["image_encoder/*"]
)

quit()
続いて、wgetコマンドを使用して、dwposeディレクトリ下にyoloxのweightsを格納します。
# こちらはpythonではなく、shell上で実行。
wget https://download.openmmlab.com/mmdetection/v2.0/yolox/yolox_l_8x8_300e_coco/yolox_l_8x8_300e_coco_20211126_140236-d3bd2b23.pth -O ./pretrained_weights/dwpose/yolox_l_8x8_300e_coco.pth
これで配置は完了です。
結果、以下のような構成になっているはずです。
$ tree pretrained_weights/
pretrained_weights/
├── MusePose
│   ├── denoising_unet.pth
│   ├── motion_module.pth
│   ├── pose_guider.pth
│   └── reference_unet.pth
├── dwpose
│   ├── dw-ll_ucoco_384.pth
│   └── yolox_l_8x8_300e_coco.pth
├── image_encoder
│   ├── config.json
│   └── pytorch_model.bin
├── put_models_here.txt
├── sd-image-variations-diffusers
│   └── unet
│       ├── config.json
│       └── diffusion_pytorch_model.bin
└── sd-vae-ft-mse
    ├── config.json
    └── diffusion_pytorch_model.bin

6 directories, 13 files
2. 試してみる
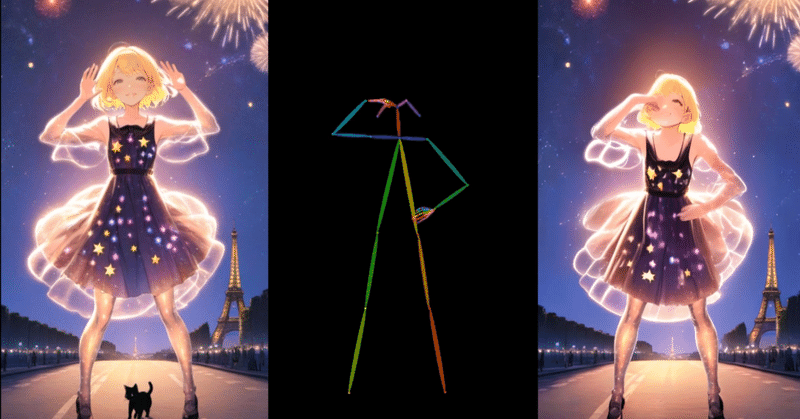
サンプルで提供されている画像(png)と動画(mp4)を使って試してみましょう。
大まかな手順は、(1)撮影した動画からPose Alignmentを抽出し、(2)静止画像とPose Alignemntを指定して推論する、です。
(1) Pose Alignment
time CUDA_VISIBLE_DEVICES=0 python pose_align.py --imgfn_refer ./assets/images/ref.png --vidfn ./assets/videos/dance.mp4実行時のログは以下です。VRAMの使用は1.6GBほど、時間は30秒ほどでした。
height: 1920.0
width: 1080.0
fps: 24.0
Loads checkpoint by local backend from path: ./pretrained_weights/dwpose/yolox_l_8x8_300e_coco.pth
Loads checkpoint by local backend from path: ./pretrained_weights/dwpose/dw-ll_ucoco_384.pth
/mnt/data/shoji_noguchi/venv/musepose/lib/python3.10/site-packages/torch/functional.py:504: UserWarning: torch.meshgrid: in an upcoming release, it will be required to pass the indexing argument. (Triggered internally at ../aten/src/ATen/native/TensorShape.cpp:3483.)
  return _VF.meshgrid(tensors, **kwargs)  # type: ignore[attr-defined]
pose_list len: 288
Moviepy - Building video ./assets/poses/align_demo/img_ref_video_dance.mp4.
Moviepy - Writing video ./assets/poses/align_demo/img_ref_video_dance.mp4

Moviepy - Done !
Moviepy - video ready ./assets/poses/align_demo/img_ref_video_dance.mp4
Moviepy - Building video ./assets/poses/align/img_ref_video_dance.mp4.
Moviepy - Writing video ./assets/poses/align/img_ref_video_dance.mp4

Moviepy - Done !
Moviepy - video ready ./assets/poses/align/img_ref_video_dance.mp4
pose align done

real    0m31.231s
user    2m24.904s
sys     0m29.872s
画像、動画それぞれから、pose alignmentが生成されました。
(2) Inferring MusePose
続いて生成されたpose alignmentから、推論を行います。ここで使用される設定ファイルは、configs/test_stage_2.yamlです。
# weights
pretrained_base_model_path: './pretrained_weights/sd-image-variations-diffusers'
pretrained_vae_path: './pretrained_weights/sd-vae-ft-mse'
image_encoder_path: './pretrained_weights/image_encoder'
denoising_unet_path: "./pretrained_weights/MusePose/denoising_unet.pth"
reference_unet_path: "./pretrained_weights/MusePose/reference_unet.pth"
pose_guider_path: "./pretrained_weights/MusePose/pose_guider.pth"
motion_module_path: "./pretrained_weights/MusePose/motion_module.pth"

inference_config: "./configs/inference_v2.yaml"
weight_dtype: 'fp16'

test_cases:
  "./assets/images/ref.png":
    - "./assets/poses/align/img_ref_video_dance.mp4"
test_caseセクションにある、サンプルの./assets/images/ref.pngが入力となる静止画です。
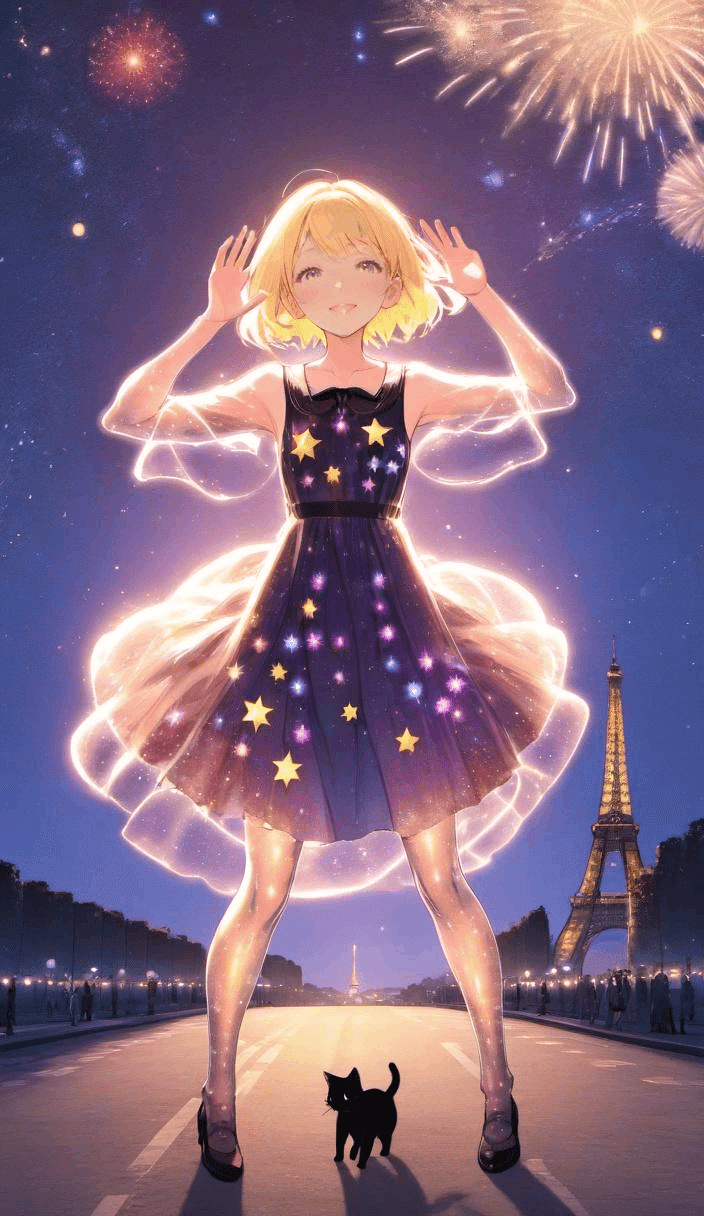
この静止画と、先ほどサンプル動画から生成したPose Alignmentの動画("./assets/poses/align/img_ref_video_dance.mp4")とを組み合わせて推論させるようです。

では、推論しましょう。
time CUDA_VISIBLE_DEVICES=0 python test_stage_2.py --config ./configs/test_stage_2.yamlRTX 4090(24GB)ですとVRAMが溢れてしまって全然進みません。5%進むのに 56分52秒かかりました。どうやら、18時間かかるようです…。
5%|████ (snip) | 1/20 [56:52<18:00:34, 3412.33s/it]このため、虎の子のA100(80GB)を使用し、以降は進めます。
実行時のログは以下です。VRAMは 28,395 MiB(約28GB)使用で、推論時間は 10分30秒ほどでした。
Width: 768
Height: 768
Length: 300
Slice: 48
Overlap: 4
Classifier free guidance: 3.5
DDIM sampling steps : 20
skip 1
/home/snoguchi/venv/musepose/lib/python3.11/site-packages/diffusers/models/lora.py:306: FutureWarning: `LoRACompatibleConv` is deprecated and will be removed in version 1.0.0. Use of `LoRACompatibleConv` is deprecated. Please switch to PEFT backend by installing PEFT: `pip install peft`.
  deprecate("LoRACompatibleConv", "1.0.0", deprecation_message)
Some weights of the model checkpoint were not used when initializing UNet2DConditionModel:
 ['conv_norm_out.weight, conv_norm_out.bias, conv_out.weight, conv_out.bias']
/home/snoguchi/venv/musepose/lib/python3.11/site-packages/torch/_utils.py:776: UserWarning: TypedStorage is deprecated. It will be removed in the future and UntypedStorage will be the only storage class. This should only matter to you if you are using storages directly.  To access UntypedStorage directly, use tensor.untyped_storage() instead of tensor.storage()
  return self.fget.__get__(instance, owner)()
handle=== ./assets/images/ref.png ./assets/poses/align/img_ref_video_dance.mp4
pose video has 288 frames, with 24 fps
processing length: 144
fps 12
/home/snoguchi/venv/musepose/MusePose/musepose/pipelines/pipeline_pose2vid_long.py:406: FutureWarning: Accessing config attribute `in_channels` directly via 'UNet3DConditionModel' object attribute is deprecated. Please access 'in_channels' over 'UNet3DConditionModel's config object instead, e.g. 'unet.config.in_channels'.
  num_channels_latents = self.denoising_unet.in_channels
  0%|                                                                                               | 0/20 [00:00<?, ?it/s]/home/snoguchi/venv/musepose/lib/python3.11/site-packages/diffusers/models/resnet.py:328: FutureWarning: `scale` is deprecated and will be removed in version 1.0.0. The `scale` argument is deprecated and will be ignored. Please remove it, as passing it will raise an error in the future. `scale` should directly be passed while calling the underlying pipeline component i.e., via `cross_attention_kwargs`.
  deprecate("scale", "1.0.0", deprecation_message)
/home/snoguchi/venv/musepose/lib/python3.11/site-packages/diffusers/models/downsampling.py:136: FutureWarning: `scale` is deprecated and will be removed in version 1.0.0. The `scale` argument is deprecated and will be ignored. Please remove it, as passing it will raise an error in the future. `scale` should directly be passed while calling the underlying pipeline component i.e., via `cross_attention_kwargs`.
  deprecate("scale", "1.0.0", deprecation_message)
/home/snoguchi/venv/musepose/lib/python3.11/site-packages/diffusers/models/upsampling.py:147: FutureWarning: `scale` is deprecated and will be removed in version 1.0.0. The `scale` argument is deprecated and will be ignored. Please remove it, as passing it will raise an error in the future. `scale` should directly be passed while calling the underlying pipeline component i.e., via `cross_attention_kwargs`.
  deprecate("scale", "1.0.0", deprecation_message)
100%|██████████████████████████████████████████████████████████████████████████████████████| 20/20 [09:51<00:00, 29.58s/it]
100%|████████████████████████████████████████████████████████████████████████████████████| 180/180 [00:19<00:00,  9.37it/s]

real    10m32.377s
user    11m33.114s
sys     0m22.493s
生成されたファイルは2つあり、output ディレクトリに保存されています。
$ ls -lR output/video-20240603/1344-3.5--/
output/video-20240603/1344-3.5--/:
total 8164
-rw-rw-r-- 1 snoguchi snoguchi 3900331  6月  3 13:54 ref_img_ref_video_dance_3.5_20_1.mp4
-rw-rw-r-- 1 snoguchi snoguchi 4455369  6月  3 13:54 ref_img_ref_video_dance_3.5_20_1__.mp4
$
(1)ファイルのベース名が __ で終わっていない(サイズが小さい)ほう
純粋な推論結果のみ。
(2) アンダースコア付きのほう
入力の静止画とPose Alignment、推論結果の3つをひとつに。
以下は、3つをひとつにした生成された動画ファイルです。
遅い昼休みなので MusePose を試している。 https://t.co/VEsxjlyeqC
— NOGUCHI, Shoji (@noguchis) June 3, 2024
推論に28GBほど必要。VRAMが溢れない場合は10分30秒ほど、4090(24GB)で溢れた場合は少なくとも18時間かかる。サンプルの画像・動画を用いた推論結果はこちら。
8頭身のドラえもんで試してみたい。あとでnoteにまとめよう。 pic.twitter.com/u1BtYmHY9l
以下の8頭身?ドラえもんで試してみたのですが、顔以外はとてもいい感じです。そもそも、このMusePoseは「仮想人間生成のため」ですからね…。
(注)著作権に触れてしまうので、公開いたしませぬ。
3. まとめ
VRAMは、RTX 4090(24GB)では溢れます。推論にかかる時間は約18時間です。
推論に必要となるVRAMは28,395 MiB(約28GB)で A100(80GB)であれば10分30秒ほどで生成可能でした。
なお、生成にかかる時間は入力画像のサイズに依ります。サイズが小さければ短くなります。
この記事が気に入ったらサポートをしてみませんか?