
intertia.js + filepond + spatie media lib決定版 (2) ー ファイルを添付してゆく

いよいよfilepondを使ってファイルを添付できるようにしていくぞい。
まずはfilepondを導入する
% ./vendor/bin/sail npm install filepond react-filepond filepond-plugin-image-previewここでは以下のパッケージを同時installしている
filepond
react-filepond
filepond-plugin-image-preview
まずはこれだけあればいいだろう。
formにfilepondを付ける
まず、importからしていこう
resources/js/Pages/Posts/Index.jsx
import AuthenticatedLayout from '@/Layouts/AuthenticatedLayout';
import { Head, Link, useForm, router } from '@inertiajs/react';
import InputError from '@/Components/InputError';
import InputLabel from '@/Components/InputLabel';
import PrimaryButton from '@/Components/PrimaryButton';
import TextInput from '@/Components/TextInput';
import { formatDistanceToNow } from 'date-fns';
import { ja } from 'date-fns/locale';

// この辺から追加ゾーン
import { useState } from 'react';
import { FilePond, registerPlugin } from 'react-filepond';
import 'filepond/dist/filepond.min.css';
import FilePondPluginImagePreview from 'filepond-plugin-image-preview';
import 'filepond-plugin-image-preview/dist/filepond-plugin-image-preview.css';useStateも使っているけどあとは大体追加された部類のやつをimportしている。
その次に
registerPlugin(FilePondPluginImagePreview); // これ

export default function PostIndex({ auth, posts }) {
// ...
registerPlugin() でImagePreviewプラグインを追加する。
formへの追記
とりあえずベタっと追記しちゃうよ
<div>
  <InputLabel htmlFor="content" value="Content" />
  <TextInput
    id="content"
    type="text"
    name="content"
    value={data.content}
    className="mt-1 block w-full"
    isFocused={true}
    onChange={(e) => setData('content', e.target.value)}
  />
  <InputError message={errors.content} className="mt-2" />
</div>
{/* ここから*/}
<div className="mt-4">
  <FilePond
    files={files}
    onupdatefiles={setFiles}
    allowMultiple={true}
    maxFiles={4}
    name="files"
    labelIdle='Drag & Drop your files or <span class="filepond--label-action">Browse</span>'
  />
</div>ということでFilePondコンポーネントを追加できた
ここで
allowMultiple={true}
maxFiles={4}
により4ファイル同時uploadも許可している。なお、labelIdlesはdefaultを再定義しているだけなので必要ないっちゃそう。
uploadしてみる
まず、storeで確認できるようにdd()で止めている
    public function store(Request $request)
    {
        $data = $request->all();
        dd($data);
        Post::create($data);

        return redirect(route('posts.index'))
            ->with('success', 'Posted');
    }
何か適当なものをuploadしてみよう。
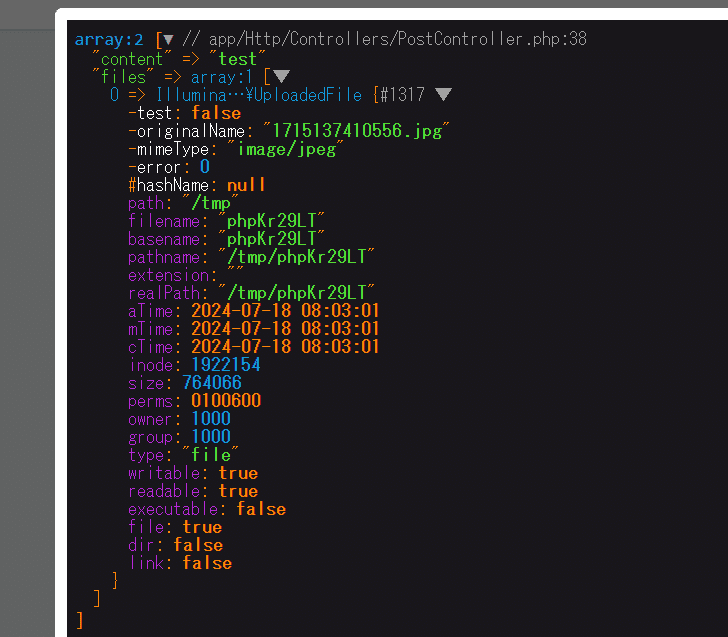
このように、受信できていればokだ。複数だと
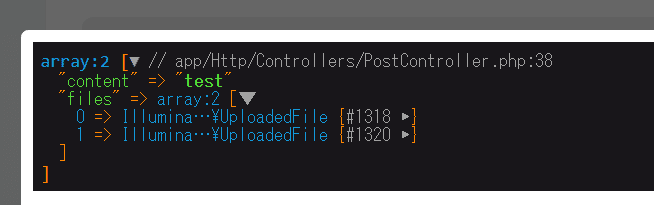
このようになる。
受信したfileを保存するためのspatie/laravel-medialibrary
install
% ./vendor/bin/sail composer require spatie/laravel-medialibrary
% ./vendor/bin/sail artisan vendor:publish --provider="Spatie\MediaLibrary\MediaLibraryServiceProvider"
すると
  Copying file [vendor/spatie/laravel-medialibrary/config/media-library.php] to [config/media-library.php]  DONE
  Copying directory [vendor/spatie/laravel-medialibrary/resources/views] to [resources/views/vendor/media-library]  DONE
  Copying file [vendor/spatie/laravel-medialibrary/database/migrations/create_media_table.php.stub] to [database/migrations/2024_07_18_080626_create_media_table.php]  DONE
などとなる。これで
database/migrations/xxxx_create_media_table.php
とかのmigrationが作成されるので中を一応みると
    public function up(): void
    {
        Schema::create('media', function (Blueprint $table) {
            $table->id();

            $table->morphs('model');
            $table->uuid()->nullable()->unique();
            $table->string('collection_name');
            $table->string('name');
            $table->string('file_name');
            $table->string('mime_type')->nullable();
            $table->string('disk');
            $table->string('conversions_disk')->nullable();
            $table->unsignedBigInteger('size');
            $table->json('manipulations');
            $table->json('custom_properties');
            $table->json('generated_conversions');
            $table->json('responsive_images');
            $table->unsignedInteger('order_column')->nullable()->index();

            $table->nullableTimestamps();
        });
    }
};
とまあこのようにメタデーターを保存するためのtableが作られている。従ってとりあえずmigrateする。こんな感じになるだろう
% ./vendor/bin/sail artisan migrate

   INFO  Running migrations.

2024_07_18_080626_create_media_table ......................... 159.28ms DONEあとconfig/media-library.php に細かいチューニングのための設定があるのだがとりあえず使い出すにあたってはここを弄る必要はあんまない。productionレベルでまともに運用したい場合は一字一句目を通す事。
実際に保存してみる
これは特殊な構造を持たず、そのままmediaという中央集権適なtableに保存できるので楽っちゃ楽っすよ。
まずモデルを改造する
<?php

namespace App\Models;

use Illuminate\Database\Eloquent\Factories\HasFactory;
use Illuminate\Database\Eloquent\Model;
use Spatie\MediaLibrary\HasMedia;
use Spatie\MediaLibrary\InteractsWithMedia;

class Post extends Model implements HasMedia
{
    use HasFactory, InteractsWithMedia;

    protected $fillable = [
        'content'
    ];
}
diffが欲しい人はこれ
 use Illuminate\Database\Eloquent\Factories\HasFactory;
 use Illuminate\Database\Eloquent\Model;
+use Spatie\MediaLibrary\HasMedia;
+use Spatie\MediaLibrary\InteractsWithMedia;

-class Post extends Model
+class Post extends Model implements HasMedia
 {
-    use HasFactory;
+    use HasFactory, InteractsWithMedia;

     protected $fillable = [
         'content'
いよいよ保存
use Illuminate\Support\Facades\DB;しといての
    public function store(Request $request)
    {
        DB::beginTransaction();

        try {
            $post = Post::create([
                'content' => $request->content,
            ]);

            if ($request->hasFile('files')) {
                foreach ($request->file('files') as $file) {
                    $post->addMedia($file)->toMediaCollection('files');
                }
            }

            DB::commit();

            return redirect()->route('posts.index')->with('success', 'Post created successfully.');
        } catch (\Exception $e) {
            DB::rollBack();

            return redirect()->route('posts.index')->with('error', 'There was an error creating the post.');
        }
    }
みたいな、あ、そうそうflash messageは出してないだけで一応ちゃんと保存はされてますよ。
確認
まだviewに引き渡していないので、この段階で確認するにはtinkerしかない
./vendor/bin/sail artisan tinkertinkerを起動したら
> $p = Post::latest()->first()
= App\Models\Post {#6146
    id: 4,
    content: "てすと",
    created_at: "2024-07-18 08:21:00",
    updated_at: "2024-07-18 08:21:00",
  }
最新の書き込みを取ってくる。ここにファイルがついてると仮定し
> $p->getMedia('files');
= Spatie\MediaLibrary\MediaCollections\Models\Collections\MediaCollection {#6184
    all: [
      Spatie\MediaLibrary\MediaCollections\Models\Media {#6196
        id: 2,
        model_type: "App\Models\Post",
        model_id: 4,
        uuid: "c7d0b871-fa58-49ff-915e-a00b90fe1674",
        collection_name: "files",
        name: "1715137410556",
        file_name: "1715137410556.jpg",
        mime_type: "image/jpeg",
        disk: "public",
        conversions_disk: "public",
        size: 764066,
        manipulations: "[]",
        custom_properties: "[]",
        generated_conversions: "[]",
        responsive_images: "[]",
        order_column: 1,
        created_at: "2024-07-18 08:21:00",
        updated_at: "2024-07-18 08:21:00",
        +original_url: "http://localhost/storage/2/1715137410556.jpg",
        +preview_url: "",
      },
      Spatie\MediaLibrary\MediaCollections\Models\Media {#6278
        id: 3,
        model_type: "App\Models\Post",
        model_id: 4,
        uuid: "b626d985-988e-41fb-a47c-b94cf52f2527",
        collection_name: "files",
        name: "1715137409359",
        file_name: "1715137409359.jpg",
        mime_type: "image/jpeg",
        disk: "public",
        conversions_disk: "public",
        size: 272035,
        manipulations: "[]",
        custom_properties: "[]",
        generated_conversions: "[]",
        responsive_images: "[]",
        order_column: 2,
        created_at: "2024-07-18 08:21:00",
        updated_at: "2024-07-18 08:21:00",
        +original_url: "http://localhost/storage/3/1715137409359.jpg",
        +preview_url: "",
      },
    ],
  }
とまあこのようにファイル情報を取得できるというわけだな。
ファイル情報をpostの横に表示してみる
今、ファイルを展開するrouteは付けてないので、とりあえずpostの横に出すだけ。
まずIndexでリレーションを読みこむように修正する
app/Http/Controllers/PostController.php
    public function index(): Response
    {
        $posts = Post::with('media')->latest()->get();
        return Inertia::render('Posts/Index', [
            'posts' => $posts
        ]);
    }
そしたらこんな感じでコードを追記する
resources/js/Pages/Posts/Index.jsx
<div className="mt-2 flex justify-end space-x-4">
  {post.media.map((mediaItem) => (
    <div key={mediaItem.id}>
      <a href="" target="_blank" className="text-blue-500 hover:text-blue-700 transition-colors duration-300">
        {mediaItem.file_name}
      </a>
    </div>
  ))}
</div>
とまあとりあえずはこんな感じであーる

なおファイルはstorage/app/publicに保存されており、これはsymbolic linkで表示可能な準備ができているのであるが今回は直リンクをしないのでこの機能は使わない(だから本来はstorage/publicじゃない方がいいのかもしれないが)
この辺の設定はconfig/media-library.php
'disk_name' => env('MEDIA_DISK', 'public'),ファイルを表示できるように
今、リンク先がないので、これを作成する
Route::get('/posts/{post}/{media}/download', [PostController::class, 'download'])->name('posts.download');としたら
 use Spatie\MediaLibrary\MediaCollections\Models\Media;
 // ...
    public function download(Post $post, Media $media)
    {
        if ($post->id !== $media->model_id) {
            abort(404);
        }

        $filePath = $media->getPath();
        $fileName = $media->file_name;
        $fileMime = $media->mime_type;

        $isImage = in_array($fileMime, ['image/jpeg', 'image/png', 'image/gif', 'image/bmp', 'image/svg+xml']);

        $headers = [
            'Content-Type' => $fileMime,
        ];

        if ($isImage) {
            $headers['Content-Disposition'] = 'inline; filename="' . $fileName . '"';
        } else {
            $headers['Content-Disposition'] = 'attachment; filename="' . $fileName . '"';
        }

        return response()->file($filePath, $headers);
    }
とかして(この処理は賛否両論ありそう)
resources/js/Pages/Posts/Index.jsx
<div className="mt-2 flex justify-end space-x-4">
  {post.media.map((mediaItem) => (
    <div key={mediaItem.id}>
      <a href={route("posts.download", { post: post.id, media: mediaItem.id })} className="text-blue-500 hover:text-blue-700 transition-colors duration-300">
        {mediaItem.file_name}
      </a>
    </div>
  ))}
</div>
などする。これでファイルが表示できたはずだ
ハマりポイント
ファイルのダウンロードにはLinkを使ってはいけない。aタグで直接表示する。Linkはreactコンポーネントをシームレスに繋ぐためだけ利用する事。
まとめ
これで新規投稿時にファイルを表示する事ができるようになった。次は編集時の問題をクリアしていく。次回の方がよっぽど本番やけどな。
この記事が気に入ったらサポートをしてみませんか?