近未来感のあるEVAというAIリレーショナルデータベースシステムを使ってみた(コード付き)
githubを見ていたら、動画や画像に対して、物体検出、感情分析、数字認識などをリレーショナルデータベースと同じような感覚で行うことができる近未来感のあるEVAというシステムを見つけました。
上記ページを見てみますと、Demoページがありますので、感覚的にどのようなことを検出しているのかがわかりますので、一度見てみることをお勧めします。
いくつかチュートリアルがありますので、興味を持ったチュートリアルを実行してみるのも良いと思います。
Analysing traffic flow at an intersection
Examining the emotion palatte of actors in a movie
Classifying images based on their content
Image Segmentation using Hugging Face
Recognizing license palates
Analyzing toxicity of social media memes
今回は、上記の交差点におけるトラフィックフロー分析から、交差点を撮影した動画から自動車、バスなどを検出する仕組みについて紹介していきます。
自動車の検出のコードは下記を参考にしております。
まずは、下記を実行します。なぜか初回は失敗することが多いですので、失敗しましたらもう一度実行してみましょう。
!wget -nc "https://raw.githubusercontent.com/georgia-tech-db/eva/master/tutorials/00-start-eva-server.ipynb"
%run 00-start-eva-server.ipynb
cursor = connect_to_server()
次に、今回使用する動画をダウンロードします。
# Getting the video files
!wget -nc https://www.dropbox.com/s/k00wge9exwkfxz6/ua_detrac.mp4?raw=1 -O ua_detrac.mp4
# Getting the Yolo object detector
!wget -nc https://raw.githubusercontent.com/georgia-tech-db/eva/master/eva/udfs/yolo_object_detector.py
次に、ダウンロードしたビデオを、ObjectDetectionVideosというテーブルにロードしてくださいと指示します。この仕組みの特徴としては、cursor.executeの中に、DBを操作する言語を書くイメージとなります。
cursor.execute('DROP TABLE ObjectDetectionVideos')
response = cursor.fetch_all()
print(response)
cursor.execute('LOAD VIDEO "ua_detrac.mp4" INTO ObjectDetectionVideos;')
response = cursor.fetch_all()
print(response)
次に、ダウンロードした動画を表示します。
from IPython.display import Video
Video("ua_detrac.mp4", embed=True)
yoloという物体検出アルゴリズム登録しています。ここの仕組はよくわかりませんでした。おまじない程度だと思っていてください。
cursor.execute("""CREATE UDF IF NOT EXISTS YoloV5
      INPUT  (frame NDARRAY UINT8(3, ANYDIM, ANYDIM))
      OUTPUT (labels NDARRAY STR(ANYDIM), bboxes NDARRAY FLOAT32(ANYDIM, 4),
                scores NDARRAY FLOAT32(ANYDIM))
      TYPE  Classification
      IMPL  'yolo_object_detector.py';
      """)
response = cursor.fetch_all()
print(response)
ここは、20個ほど、id, YoloV5を動画から出力しています。
cursor.execute("""SELECT id, YoloV5(data)
                  FROM ObjectDetectionVideos
                  WHERE id < 20""")
response = cursor.fetch_all()
response.as_df()
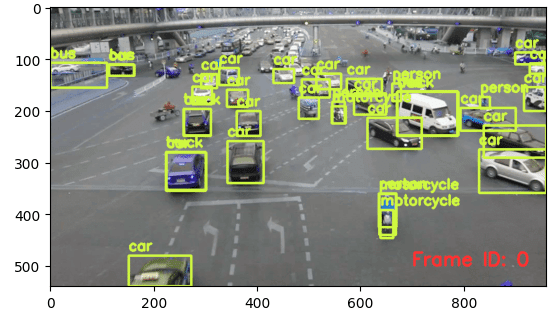
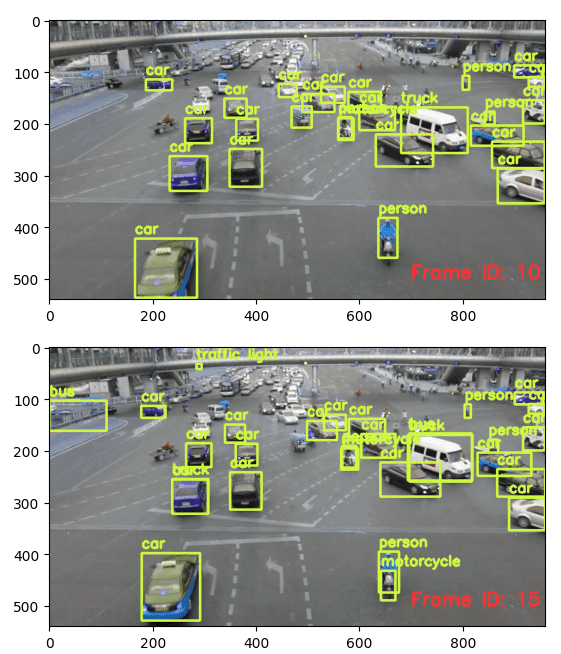
ビデオにおけるオブジェクトの検出を行っています。
import cv2
from pprint import pprint
from matplotlib import pyplot as plt

def annotate_video(detections, input_video_path, output_video_path):
    color1=(207, 248, 64)
    color2=(255, 49, 49)
    thickness=4

    vcap = cv2.VideoCapture(input_video_path)
    width = int(vcap.get(3))
    height = int(vcap.get(4))
    fps = vcap.get(5)
    fourcc = cv2.VideoWriter_fourcc('m', 'p', '4', 'v') #codec
    video=cv2.VideoWriter(output_video_path, fourcc, fps, (width,height))

    frame_id = 0
    # Capture frame-by-frame
    # ret = 1 if the video is captured; frame is the image
    ret, frame = vcap.read()

    while ret:
        df = detections
        df = df[['yolov5.bboxes', 'yolov5.labels']][df.index == frame_id]
        if df.size:
            dfLst = df.values.tolist()
            for bbox, label in zip(dfLst[0][0], dfLst[0][1]):
                x1, y1, x2, y2 = bbox
                x1, y1, x2, y2 = int(x1), int(y1), int(x2), int(y2)
                # object bbox
                frame=cv2.rectangle(frame, (x1, y1), (x2, y2), color1, thickness)
                # object label
                cv2.putText(frame, label, (x1, y1-10), cv2.FONT_HERSHEY_SIMPLEX, 0.9, color1, thickness)
                # frame label
                cv2.putText(frame, 'Frame ID: ' + str(frame_id), (700, 500), cv2.FONT_HERSHEY_SIMPLEX, 1.2, color2, thickness)
            video.write(frame)

            # Stop after twenty frames (id < 20 in previous query)
            if frame_id == 20:
                break

            # Show every fifth frame
            if frame_id % 5 == 0:
                plt.imshow(frame)
                plt.show()


        frame_id+=1
        ret, frame = vcap.read()

    video.release()
    vcap.release()
そして、最後は検出した車の可視化です。
from ipywidgets import Video, Image
input_path = 'ua_detrac.mp4'
output_path = 'video.mp4'

dataframe = response.as_df()
annotate_video(dataframe, input_path, output_path)
Video.from_file(output_path)
結果は、検出した物体がcar、motorcycle、busかを表示してくれています。


使用してみた感想としては、実行してみて普通に使えるのは良いです。ときどき、サンプルコードがありそのまま実行してもうまく動かない場合が多いですが、今回はそのまま使えたのが良かったです。
また、Yolo系は物体検出では良く見かけますので、YoloをDBを使うように使用できるのは素晴らしかったです。
