Two-Tower ModelでEmbeddingsを作成してMatching Engineで法人名寄せを試す(前半)
Two-Tower Modelに興味を持ち、そこからVertex AIのMatching Engineを知ったので試してみたメモです。
割と中途半端になったので「前編」とせずに「前半」としてます。また取り組む際に思い出せるようにこのメモを残しておこうと思っています。
ただ、今回クレジットをそこそこ使ってしまったので、続きは目的をしっかり持ってからになるかなと思ってます。
モチベーション
Google デベロッパーアドボケイトの佐藤さんがLTされていたオンラインイベントに参加した際に気になるキーワード(Googleを支えるベクトル近傍検索技術、Two-Tower Model、ScaNN)が気になり、理解を進めるために自分で試してみました。
LTと内容がほぼ同じ動画はこちらにありました(同じ佐藤さんの動画)
本来はメディア検索をしたかったのですが、まずは試しやすいところから法人の名寄せを選択しました。
環境
Google Colab Pro
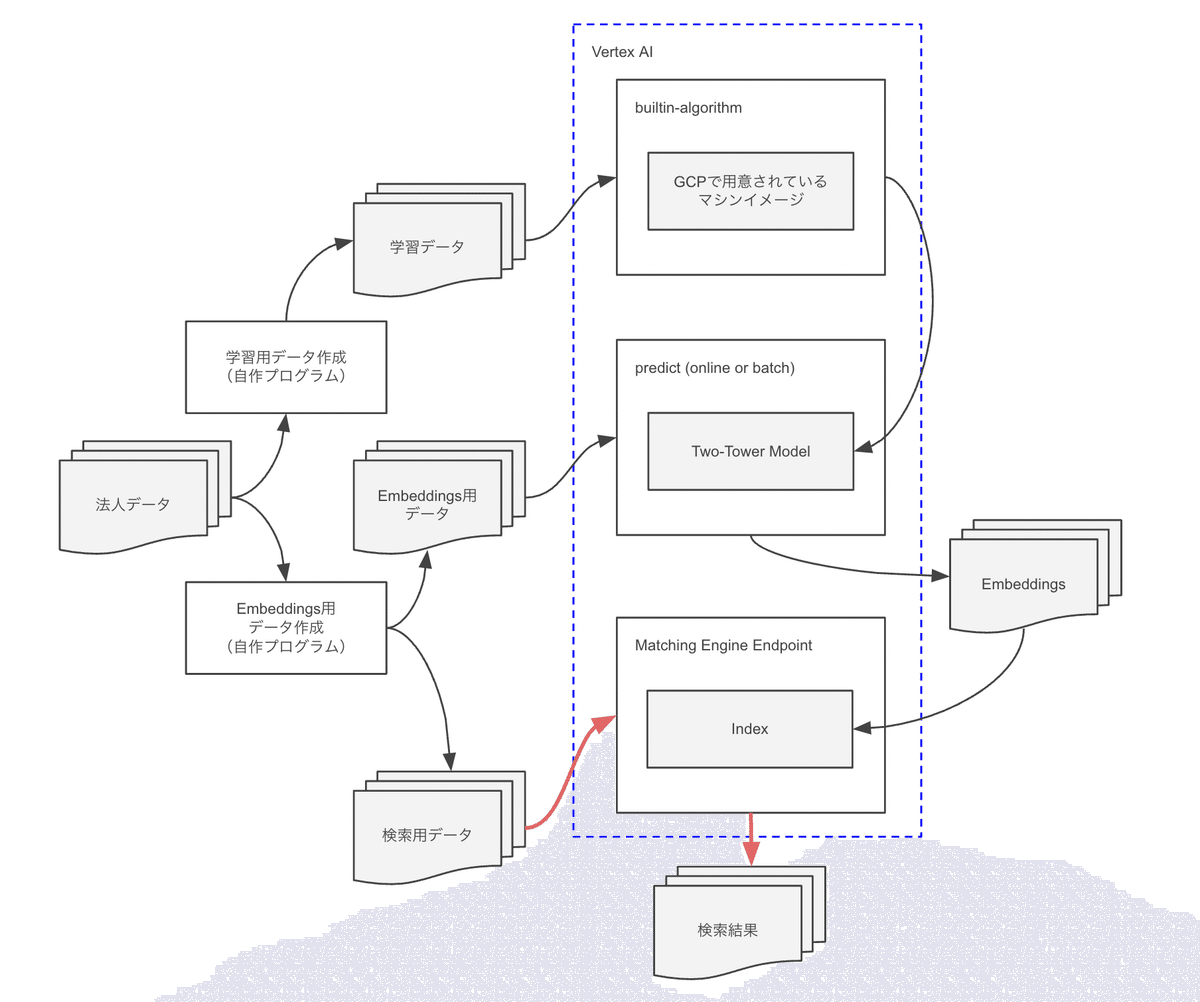
全体イメージ
ちょっとまだ正しく理解している自信がありませんが、一旦進めてみた構成を残しておきます。
とりあえず、諸々のデータは同じデータセットから作成し、Matching Engine Endpointでの検索を行えるところを目指します。

データの準備
国税庁 法人番号公表サイトからダウンロードしてきます。
全件だと500万件以上となるので、ひとまずデータ量の少ない鳥取県のCSVをダウンロードしました(家系のルーツでもある鳥取県)
また、そこから以下のデータに加工しました。
Two-Tower Model学習用データ(jsonl形式、拡張子はjsonl、内容後述)
Embeddings作成用データ(jsonl形式、拡張子はjson)
Matching Engineでの検索を試す用のデータ(jsonl形式)
Two-Tower Modelの学習
Two-Tower 組み込みアルゴリズムを使用してエンベディングをトレーニングするを参考にしました。
ドキュメント内にGoogle Colabのサンプルがあるので、同様にGoogle Colabを利用しましたが、ローカルでVS Codeでノートブックでも良かったと思いました(後工程でMatching EngineのためにVPCを作成したので)
Two-Tower Modelを学習するための以下のデータが必要です。
入力スキーマ
トレーニングデータ
入力スキーマはTwo-Towerの「query」と「candidate」をどうするか決めて定義します。これによってEmbeddingsが出来るので、ここを色々と試すことになるかと思います。
ひとまず、シンプルに試してみたいので、以下のようにしてみました。
def _create_schema(df):
  schema = {
    'query': {
      'name': {
        'feature_type': 'Text',
        'config': {
          'embedding_module': 'https://tfhub.dev/google/universal-sentence-encoder-multilingual/3'
        }
      },
      'furigana': {
        'feature_type': 'Text',
        'config': {
          'embedding_module': 'https://tfhub.dev/google/universal-sentence-encoder-multilingual/3'
        }
      },
    },
    'candidate': {
      'corporate_number': {
        'feature_type': 'Id',
        'config': {
          'num_buckets': len(df.index)
        }
      },
      'kind': {
        'feature_type': 'Numeric'
      },
      'prefecture_code': {
        'feature_type': 'Numeric'
      },
      'city_code': {
        'feature_type': 'Numeric'
      },
      'post_code': {
        'feature_type': 'Numeric'
      },
    }
  }

  f = open('embeddings/input_schema.json', 'w')
  f.write(json.dumps(schema))
f.close()日本語が入る項目のテキストエンコーダーの指定は、こちらで検索して「universal-sentence-encoder-multilingual」を選択しました。
ちなみにサンプルノートブックで利用される入力スキーマは以下のようになっていました。
{
  "query": {
  	"user_id": {
  		"feature_type": "Id",
  		"config": {
  			"num_buckets": 943
  		}
  	}
  },
  "candidate": {
  	"movie_id": {
  		"feature_type": "Id",
  		"config": {
  			"num_buckets": 1682
  		}
  	},
  	"movie_title": {
  		"feature_type": "Text"
  	}
  }
}
トレーニングデータはダウンロードしてきた法人データから作成しました。
TokenizerはSudachiを利用です。CSVから読み込んでDataFrameとして扱っています。
import pathlib
import json
from sudachipy import tokenizer
from sudachipy import dictionary

tokenizer_obj = dictionary.Dictionary(dict_type='full').create()
tokenizer_mode = tokenizer.Tokenizer.SplitMode.C

def create_training_data(df):
  pathlib.Path('embeddings/training_data').mkdir(parents=True, exist_ok=True)
  _create_data(df)

def _create_data(df):
  f = open('embeddings/training_data/data.jsonl', 'w')
  for _, row in df.iterrows():
    name_tokens = _tokenize(row['name'])
    furigana_tokens = _tokenize(row['furigana'])
    furigana_tokens = furigana_tokens if len(furigana_tokens) > 0 else name_tokens
    if len(name_tokens) > 0:
      data = {
        'query': {
          'name': name_tokens,
          'furigana': furigana_tokens
        },
        'candidate': {
          'corporate_number': [str(row['corporateNumber'])],
          'kind': [int(row['kind'])],
          'prefecture_code': [int(row['prefectureCode'])],
          'city_code': [int(row['cityCode'])],
          'post_code': [int(row['postCode'])]
        }
      }
      f.write(f"{json.dumps(data, ensure_ascii=False)}\n")
  f.close()

def _tokenize(text):
  try:
    return [m.surface() for m in tokenizer_obj.tokenize(text, tokenizer_mode)]
  except:
    return []
作成した入力スキーマとトレーニングデータを用いて、サンプルノートブックの「Train on Vertex Training」を参考に学習させました。
Vertex AIのモデルとエンドポイントのデプロイ
学習結果のモデルをVertex AIにデプロイしていきます。
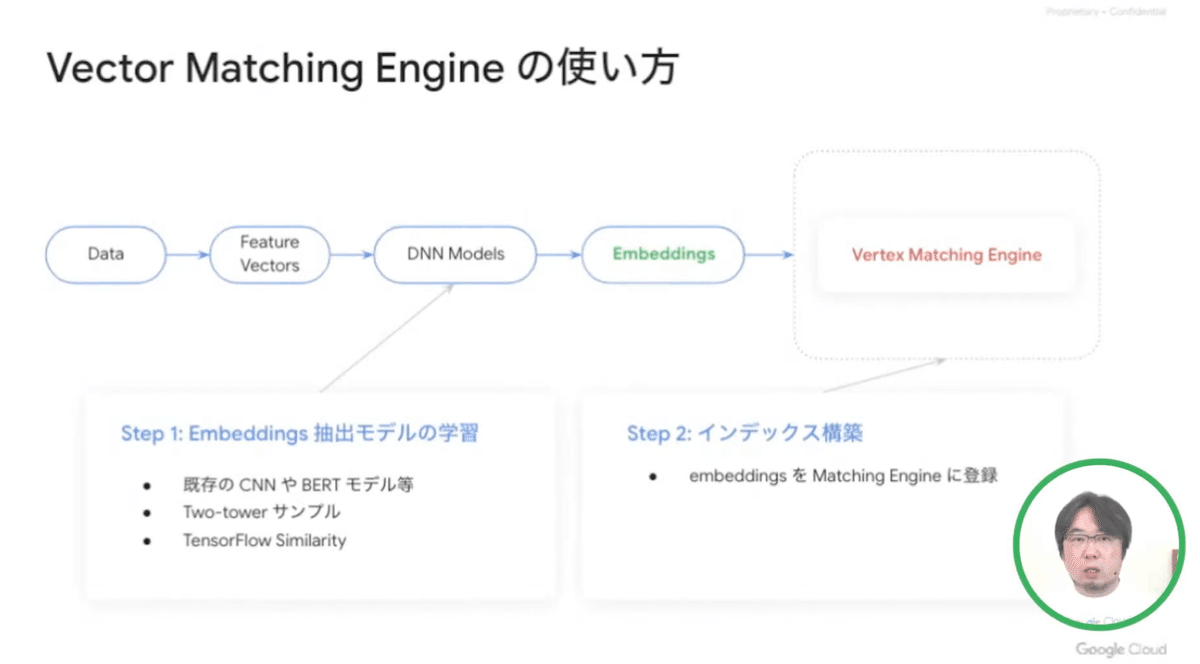
このモデルを使ってEmbeddingsを作成するのですが、最初全体の流れが分かっておらず、この辺りが混乱しました。
動画からの抜粋ですが、以下の「DNN Models」にあたる部分です。

モデルだけデプロイしてバッチでも出来ましたが、エンドポイントまでデプロイしてオンラインでEmbeddingsを作成出来ることも試しました。
サンプルノートブックの「Deploy on Vertex Prediction」の通りですが、一点だけ以下の「MODEL_TYPE」がポイントなのかなと思いました。
# The following imports the query (user) encoder model.
MODEL_TYPE = "query"
# Use the following instead to import the candidate (movie) encoder model.
# MODEL_TYPE = 'candidate'
後々Matching Engineで検索する際に「query」のベクトルを渡して検索することになるのですが、その際の「検索条件からqueryのベクトル化」もこのエンドポイントを利用することになりそうです。
そのためには「MODEL_TYPE = "query"」のモデルとエンドポイントが必要になるかと思います。
逆に、まずEmbeddings(検索対象)を作成するためには
「MODEL_TYPE = 'candidate'」をデプロイしました。
ちなみにエンドポイントをデプロイするとComputing Engineが起動するのでコストが・・・、個人的には「candidate」でEmbeddingsを作成するのはバッチで、「query」はエンドポイントをデプロイしてオンラインという使い方がいいのかなと思いました(もしくは動画デモのようにクライアント側でベクトル化など)
Embeddings作成のためにモデルに渡すデータは先の入力スキーマで定義した「candidate」と同じ形式+「key」の項目となります。「key」は最終的に検索結果から元データを取り出す必要があると思うので法人番号にしておきます。
入力データは一旦Cloud Storageにアップロードして、model.batch_predictを実行しています。結果はCloud Storageに保存されます。
import pathlib
import json
from typing import Dict, List, Union
from google.cloud import aiplatform
from google.cloud import storage

def create_index_data(df):
  pathlib.Path('embeddings/batch').mkdir(parents=True, exist_ok=True)
  _predict(df)

def _predict(df):
  file_name = 'embeddings/batch/input.jsonl'
  f = open(file_name, 'w')
  instances = []
  for index, row in df.iterrows():
    instance = {
      'data': '{"corporate_number":["' + str(row['corporateNumber']) + '"],'\
            + '"kind":[' + str(row['kind']) + '],'\
            + '"prefecture_code":[' + str(row['prefectureCode']) + '],'\
            + '"city_code":[' + str(row['cityCode']) + '],'\
            + '"post_code":[' + str(row['postCode']) + ']}',
      'key': str(row['corporateNumber'])
    }
    f.write(f"{json.dumps(instance)}\n")
    instances.append(instance)
    if index == 10:
      break

  f.close()

  # predict
  _upload_file(file_name)
  _get_feature_values()

def _upload_file(file_name):
  bucket_name = 'xxxxx'
  client = storage.Client()
  bucket = client.bucket(bucket_name)
  blob = bucket.blob('batch/input.jsonl')
  blob.upload_from_filename(file_name)

def _get_feature_values():
  aiplatform.init(
    project='xxxxx',
    location='us-central1',
    staging_bucket='gs://xxxxx',
    experiment='xxxxxx',
    experiment_description='xxxxx'
  )

  model = aiplatform.Model('xxxxx')
  batch_prediction_job = model.batch_predict(
    job_display_name='xxxxx',
    machine_type='n1-standard-4',
    gcs_source=['gs://xxxxx/batch/input.jsonl'],
    gcs_destination_prefix='gs://xxxxx',
    sync=False
  )
Matching Engineのインデックスとエンドポイントのデプロイ
ここまできてやっとMatching Engineの構築に進めます。
ここからはローカルで作業しました(Google Colabでgloudコマンドの標準入力待ちなどが発生してたので)
構築されているGCPの環境によっては、最終的にエンドポイントをデプロイするVPCを作成しておく必要があります。
まず、インデックススキーマを作成します。
(ファイル名「index_metadata.json」)
「contentsDeltaUri」にCloud StorageのEmbeddingsの場所を記載します。
「dimensions」にはEmbeddingsのベクトル配列の要素数を記載しました。
{
  "contentsDeltaUri": "gs://xxxxx/index_data",
  "config": {
    "dimensions": 64,
    "approximateNeighborsCount": 100,
    "distanceMeasureType": "SQUARED_L2_DISTANCE",
    "algorithm_config": {
      "treeAhConfig": {
        "leafNodeEmbeddingCount": 500,
        "leafNodesToSearchPercent": 7
      }
    }
  }
}
gcloudのコマンドでインデックスを作成します。
gcloud ai indexes create \
  --metadata-file=/path/to/index_metadata.json \
  --display-name=xxxxx \
  --project=xxxxx \
  --region=us-central1
エンドポイントをデプロイします。
gcloud ai index-endpoints create \
  --display-name=xxxxx \
  --network=xxxxx \
  --project=xxxxx \
  --region=us-central1
エンドポイントにインデックスをデプロイします。
gcloud ai index-endpoints deploy-index xxxxx \
  --deployed-index-id=xxxxx \
  --display-name=xxxxx \
  --index=xxxxx \
  --project=xxxxx \
  --region=us-central1
ここまでしてMatching Engineで検索する準備が出来ました。
Matching Engineでの検索
Matching EngineのエンドポイントにはgRPCで接続するようで、CLIで試すにはgrpc_cliを使うと試せそうです。
そして、渡すパラメータはqueryモデルで作成したベクトルとなりそうです。
めちゃ中途半端ですが、この辺りでクレジットがかなり気になってきたので一旦エンドポイントを落としました・・・
さいごに
とても中途半端になってしまい、色々と想定で進めている部分もあったのでTwo-Tower Modelの学習なども繰り返し試して、Matching Engineの検索がどうなるかなども見て理解を深めたかったのですが、如何せんクレジットが・・・
Two-Tower ArchitectureやScaNNなどでローカル(もしくはGoogle Colab)でも構築できる部分はGCPを使わないなど節約の労力をかけるかどうか。
ただ、運用の想定だと組み込みトレーニングなども用意されていてMatching Engineのデプロイも簡単なので、目的を明確にして構築する際には集中すべきこと(Embeddingsの改善など)に集中出来そうだと思いました。
遠くない未来にまた、内容の整理とこの先の検証も出来たらと思います。
この記事が気に入ったらサポートをしてみませんか?
