
PythonでCanvas使ってみる(3) スピログラフアプリ完成!

前回
では、短い直線をつなぎ合わせて「円」が描けました。座標を順を追って求め、つなげていけば、いきなり自分の小学生時代以来長年の夢(笑)のスピログラフ
の図形だって描けちゃいそうな気がしてきました。
スピログラフ考察
・簡単のために、「外側の円」を半径1の単位円として考えます。
・内側の円の半径をr(0<r<1)とします。
・内側の円は外側の円に接しながら転がります。
・簡単のため内側の円は座標(1,0)で外側の円に接した状態から、右回りで転がり始めるとします。
・接点が(1,0)から、θ(rad)まで(つまり座標(cosθ, sinθ)になるところまで)転がったとき、
・・転がった弧の長さはθ、
・・転がった後内側の円の中心は((1-r)cosθ,(1-r)sinθ)になります。
・さて、内側の円の中心からs離れた位置にボールペンを突っ込む穴が開いていると考えます。以下「ペン先」と表現します。
・簡単のため、初期状態で、ペン先は、内側の円の中心から見て相対的に(s,0)の位置にあるとします。
つまり、ペン先の初期座標は(1-r+s,0)になります。
=============
以上のように前提をおいて、「ペン先」の座標を、r,s,θで表してみます。
内側の円の中心が((1-r)cosθ,(1-r)sinθ)
のとき内側の円は、
もし直線上を転がるのであれば
rθ’=θ
θ’=θ/rだけ「右回転」することになりますが、
外側の円と接していることで、θ分だけ向きが相殺されているので
元の座標から見れば
θ’=θ/rーθ
=θ(1/rー1)だけ「右回転」していることになりますね。
・つまり内側の円中心からのペン先の相対位置は、このθ’を使って
(scos(-θ’)、ssin(-θ’))となるはず。
まあ、このあたりを実装したら図形が描けるはず。
やってみます
解析的に解かなくていい、パラメーター入れて順ぐりに計算していくだけ。
import math

import customtkinter as ctk
import numpy as np

from mytool_lib import CoordinateTransformer


class App(ctk.CTk):
    def create_label_entry_unit(self, label_text, unit_text, row):
        # **self.grid_params
        ctk.CTkLabel(self.inputframe, text=label_text).grid(row=row, column=0, padx=20)
        entry = ctk.CTkEntry(self.inputframe)
        entry.grid(row=row, column=1, pady=5, sticky="ws")
        setattr(self, f"ctkentry_{label_text}", entry)
        ctk.CTkLabel(self.inputframe, text=unit_text).grid(
            row=row, column=2, padx=20, sticky="ws"
        )

    def __init__(self, title):

        # main window
        super().__init__()
        self.title(title)

        # widget(表示用Canvas)配置
        self.canvas = ctk.CTkCanvas(self, width=800, height=600, bg="black")
        self.canvas.pack()

        # widget(パラメータ入力用Frame)配置
        self.inputframe = ctk.CTkFrame(self, width=400, height=200)
        self.inputframe.pack(anchor="e")

        # widgetフレーム内に入力用ウィジェット配置
        self.create_label_entry_unit("刻み", "度", 0)
        self.create_label_entry_unit("param_r", "0-1", 1)
        self.create_label_entry_unit("param_s", "0-r", 2)
        ctk.CTkButton(self.inputframe, text="描画", command=self.mycommand1).grid(
            row=3, column=1, columnspan=2, sticky="es"
        )

        # 座標変換クラス (-2, -1.5) -> (0, 600), (2, 1.5) -> (800, 0) の変換
        self.tfm = CoordinateTransformer(-2, -1.5, 0, 600, 2, 1.5, 800, 0)

        # mainloop
        self.mainloop()

    def mycommand1(self):
        self.canvas.delete("all")
        ddeg = float(self.ctkentry_刻み.get())
        r = float(self.ctkentry_param_r.get())
        s = float(self.ctkentry_param_s.get())
        for deg in np.arange(0, 360, ddeg):
            self.penline(deg, ddeg, r, s)

    # 内接円の中心位置 thetaはラジアン
    def circle_s_center(self, theta, r):
        return (1 - r) * math.cos(theta), (1 - r) * math.sin(theta)

    # 内接円の中心から見たペン先位置
    def rel_pen(self, theta, r, s):
        return s * math.cos(-theta * (1.0 / r - 1)), s * math.sin(
            -theta * (1.0 / r - 1)
        )

    def abs_pen(self, theta, r, s):
        cx, cy = self.circle_s_center(theta, r)
        rpx, rpy = self.rel_pen(theta, r, s)
        return cx + rpx, cy + rpy

    def penline(self, deg, ddeg, r, s):
        theta_rad1 = math.radians(deg)
        theta_rad2 = math.radians(deg + ddeg)
        x1, y1 = self.abs_pen(theta_rad1, r, s)
        x2, y2 = self.abs_pen(theta_rad2, r, s)
        self.canvas.create_line(
            self.tfm.transform(x1, y1),
            self.tfm.transform(x2, y2),
            fill="white",
            width=1,
        )


App("My First Spirograph")
接点が外側の円をぐるりと一周するところまでです。
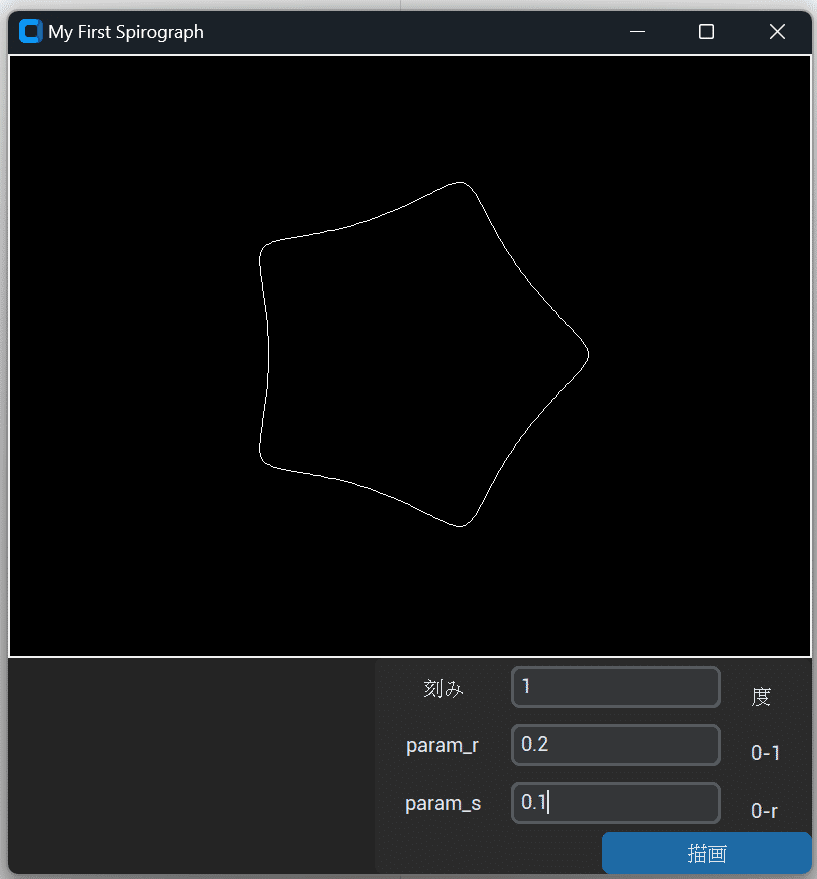
できた
例えばr=0.25 s=0.25(ペン先が内接円の円周上)なら
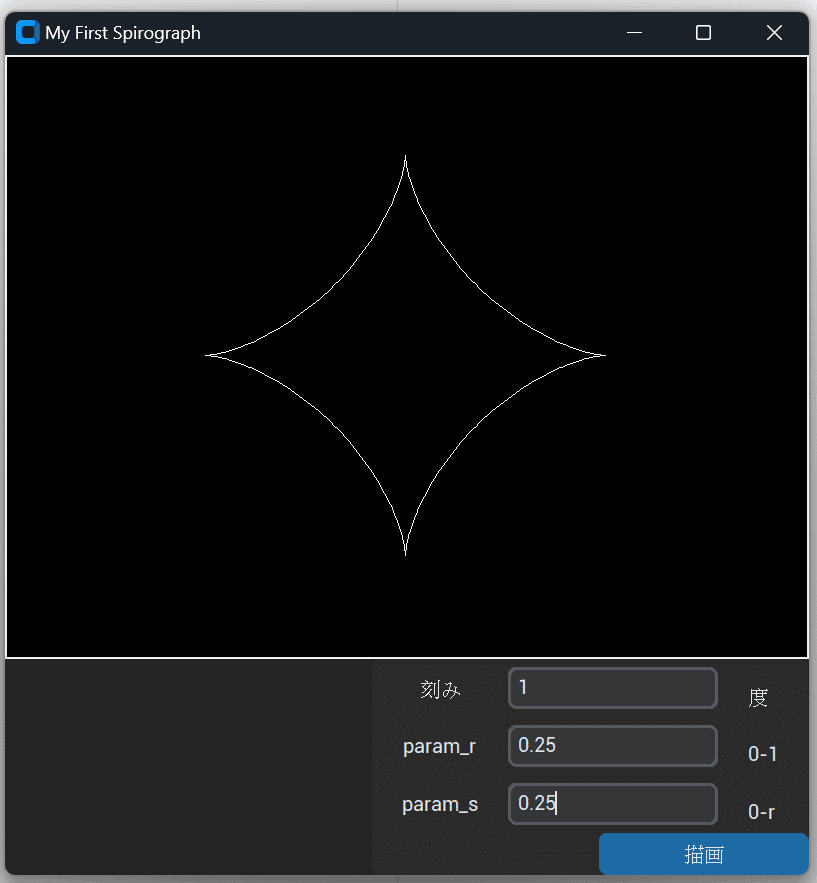
こういう図になるのは予想通り。
わはは、面白い(笑)
バグ発見
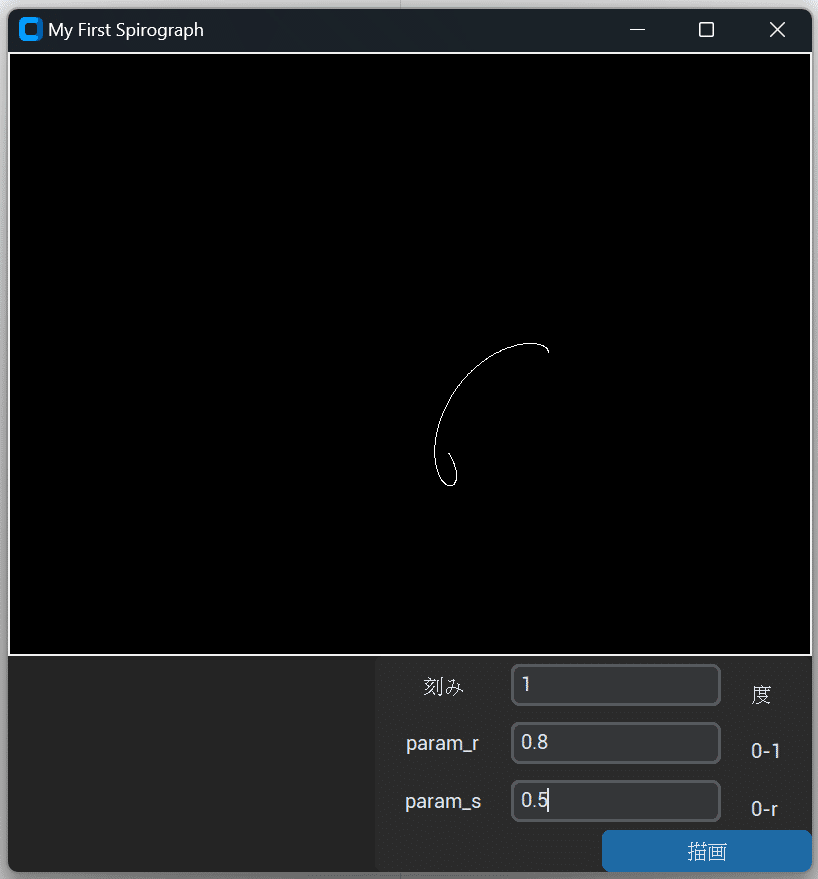
あらら、そうでした、θを0度から360度までで処理しているので、rが整数の逆数で無い場合、途中で切れてしまうのです。
改善策
外側の円は、半径1の単位円で考えています。
内接円の半径、パラメータrは小数で与えてきましたが、外側の円と、内側の円の歯車の「歯の数」を整数比で与えるのがよさそうです。
>(歯の数の最小公倍数/外側の歯車数)×360度
だけぶん回してやれば、元の位置に戻ってくるはずですね。
整数を二つ与えて最小公倍数を得るには

lcmという関数で求められるようです。sのパラメータも内側の円の半径に対しての比率で与えた方が分かりやすいですね。
完成したアプリ
自分でも納得いくアプリになりました。
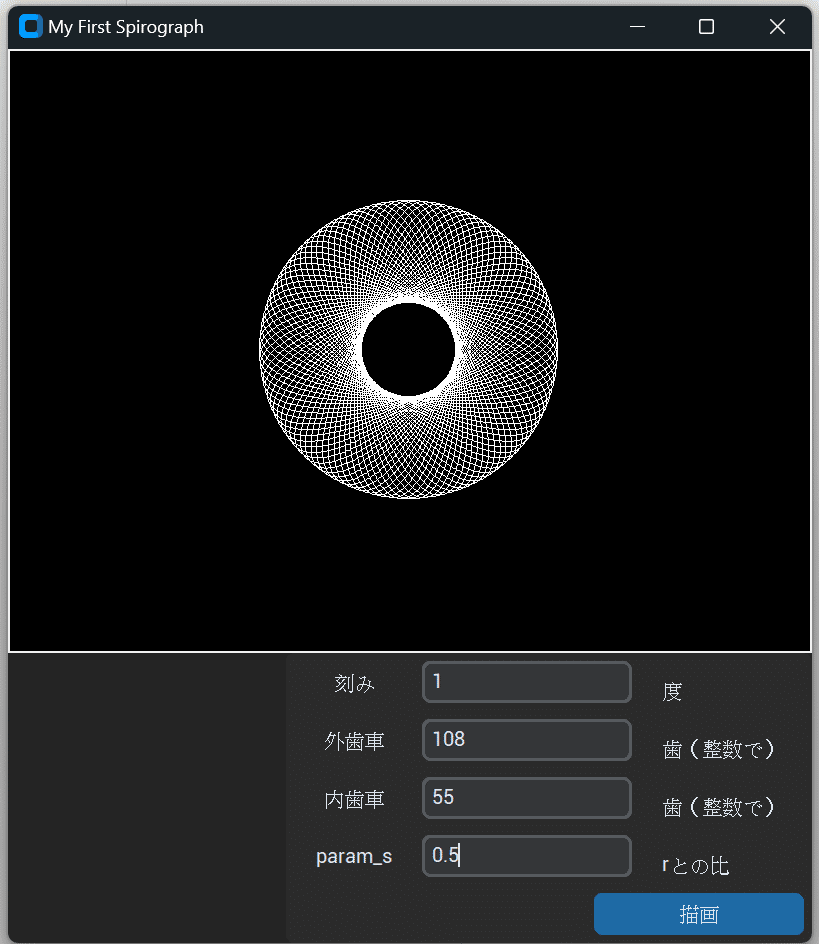


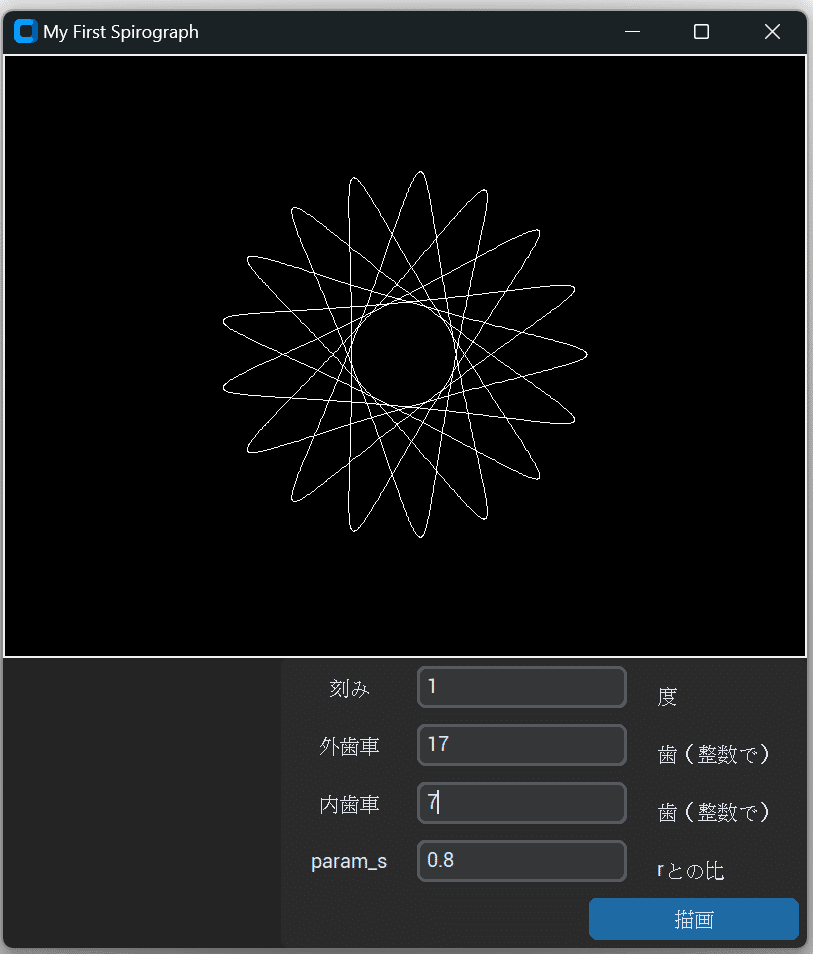
描画が失敗しないから、小学生時代に感じた「ギアずれ」のストレスから解放されます。ついにリベンジを果たせました(笑)
ソースコード
import math

import customtkinter as ctk
import numpy as np

from mytool_lib import CoordinateTransformer


class App(ctk.CTk):
    def create_label_entry_unit(self, label_text, unit_text, row):
        ctk.CTkLabel(self.inputframe, text=label_text).grid(row=row, column=0, padx=20)
        entry = ctk.CTkEntry(self.inputframe)
        entry.grid(row=row, column=1, pady=5, sticky="ws")
        setattr(self, f"ctkentry_{label_text}", entry)
        ctk.CTkLabel(self.inputframe, text=unit_text).grid(
            row=row, column=2, padx=20, sticky="ws"
        )

    def __init__(self, title):

        # main window
        super().__init__()
        self.title(title)

        # widget(表示用Canvas)配置
        self.canvas = ctk.CTkCanvas(self, width=800, height=600, bg="black")
        self.canvas.pack()

        # widget(パラメータ入力用Frame)配置
        self.inputframe = ctk.CTkFrame(self, width=400, height=200)
        self.inputframe.pack(anchor="e")

        # widgetフレーム内に入力用ウィジェット配置
        self.create_label_entry_unit("刻み", "度", 0)
        self.create_label_entry_unit("外歯車", "歯(整数で)", 1)
        self.create_label_entry_unit("内歯車", "歯(整数で)", 2)
        self.create_label_entry_unit("param_s", "rとの比", 3)
        ctk.CTkButton(self.inputframe, text="描画", command=self.mycommand1).grid(
            row=5, column=1, columnspan=2, sticky="es", padx=5, pady=5
        )

        # 座標変換クラス (-2, -1.5) -> (0, 600), (2, 1.5) -> (800, 0) の変換
        self.tfm = CoordinateTransformer(-2, -1.5, 0, 600, 2, 1.5, 800, 0)

        # mainloop
        self.mainloop()

    def mycommand1(self):
        self.canvas.delete("all")
        ddeg = float(self.ctkentry_刻み.get())

        # 外側の歯数
        gearl = int(self.ctkentry_外歯車.get())

        # 内側の歯数
        gears = int(self.ctkentry_内歯車.get())

        # ギア比
        r = gears / gearl

        # ぶん回す回数
        w = math.lcm(gearl, gears) / gearl

        s = r * float(self.ctkentry_param_s.get())
        for deg in np.arange(0, 360 * w, ddeg):
            self.penline(deg, ddeg, r, s)

    # 内接円の中心位置 thetaはラジアン
    def circle_s_center(self, theta, r):
        return (1 - r) * math.cos(theta), (1 - r) * math.sin(theta)

    # 内接円の中心から見たペン先位置
    def rel_pen(self, theta, r, s):
        return s * math.cos(-theta * (1.0 / r - 1)), s * math.sin(
            -theta * (1.0 / r - 1)
        )

    def abs_pen(self, theta, r, s):
        cx, cy = self.circle_s_center(theta, r)
        rpx, rpy = self.rel_pen(theta, r, s)
        return cx + rpx, cy + rpy

    def penline(self, deg, ddeg, r, s):
        theta_rad1 = math.radians(deg)
        theta_rad2 = math.radians(deg + ddeg)
        x1, y1 = self.abs_pen(theta_rad1, r, s)
        x2, y2 = self.abs_pen(theta_rad2, r, s)
        self.canvas.create_line(
            self.tfm.transform(x1, y1),
            self.tfm.transform(x2, y2),
            fill="white",
            width=1,
        )


App("My First Spirograph")
#mytool_lib.py

class CoordinateTransformer:
    def __init__(self, x1, y1, wx1, wy1, x2, y2, wx2, wy2):
        # 設定された2点を基に変換行列を計算
        self.scale_x = (wx2 - wx1) / (x2 - x1)
        self.scale_y = (wy2 - wy1) / (y2 - y1)
        self.translate_x = wx1 - self.scale_x * x1
        self.translate_y = wy1 - self.scale_y * y1

    def transform(self, x, y):
        # 任意の座標を変換
        wx = self.scale_x * x + self.translate_x
        wy = self.scale_y * y + self.translate_y
        return wx, wy
あとがき
今回は自分では、なかなかいいんじゃない?、と満足しています。
この記事が気に入ったらサポートをしてみませんか?