オリジナルのGrasshopperコンポーネントの開発についてやさしく解説する-基本編

Grasshopper・Rhinoには、数多くのプラグインが開発されており、その多くはフリーでインストールが可能です。すばらしいですね。
Rhino4Foodというサイトでプラグインが公開されてます。
サイの餌ということで洒落が効いてますね。
Rhino4Foodからプラグインのインストール方法はこちらの記事で解説してますので、どうぞ。
では、本題に入っていきます。
かなりマニアックな内容ですが、ここでは少し踏み込んでオリジナルのプラグインを開発する手順について解説していきます。
事前準備-プログラミング環境の構築
まずはプログラミング環境を整えましょう。
すでに開発環境が整っている場合は、読み飛ばしてください。
Visual Studioをインストールします。
2022年2月現在の最新版は2022です。無償版の『コミュニティ』でOKです。無償といえ、基本的には有償版とほぼほぼ同等の機能が使えます。
条件を満たせば商用利用も可能です。
インストーラーは下記よりダウンロードできます。
では、インストールしていきます。
ダウンロードしたインストーラーexeファイルを実行していきます。
ポイントですが、以下にチェックを入れておきましょう。
・.NETデスクトップ開発
・.NET Framework 4.8開発ツール(Rhino7の場合)
Grasshopperテンプレートのインストール
Visual Studioを開き、メニューバーの『拡張機能』から『拡張機能の管理』をクリックし、テンプレートを検索していきます。

検索窓に『grasshopper』と入力すれば、『RhinoCommon and Grasshopper templates for Rhino7』が出てきますので、インストールしておきます。
Web上で出回っている情報の多くは少し古くRhino6のときのものが多いようです。このあたり少し変わってますので、上記でOKです。私は最初ここで悩みました。
Grasshopperコンポーネント開発用の下準備がテンプレートとして用意されてるのです。そしてかなり親切にわかりやすくまとめてくれてます。
必ずこれを使いましょう。
プロジェクトを作成する
新規プロジェクトを作成していきましょう。
検索窓に『grasshopper』と検索し、『Grasshopper Assembly for Rhino7(C#)』を選択し、新規プロジェクトを作成します。

次に、プロジェクト名をここで決めます。
プログラム開発のプロジェクト名です。

コンポーネントで表示される名前等を設定
していきます。
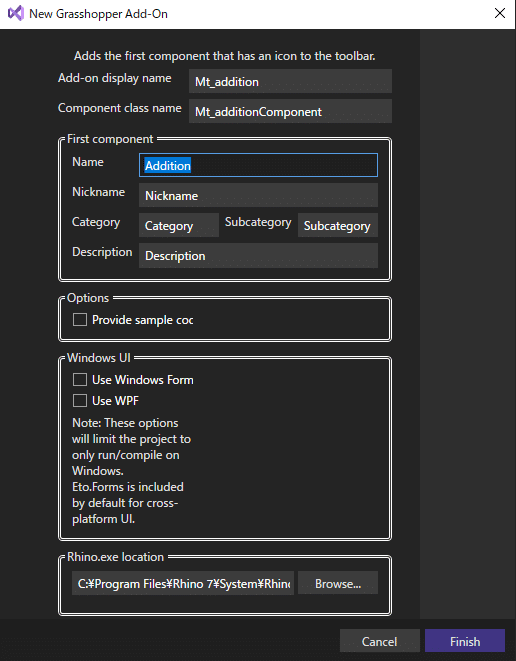
上から
・Add-on display name:.ghaファイルの名前
・Name:リボンメニューに表示される表示名(DrawFullNameのときにも)
・Nickname:DrawFullNameでないときの表示名
・Category:タブに表示される名前
・Subcategory:タブの中のサブカテゴリの名前
・Description:コンポーネントにマウスをかざした時に表示されるコメント
ここまで設定すれば、新規プロジェクトが作成されます。
Grasshopperテンプレートの中身を確認
してみましょう。
まずは、冒頭。
using Grasshopper;
using Grasshopper.Kernel;
using Rhino.Geometry;
using System;
using System.Collections.Generic;
using ~でいくつか名前空間を使用するように宣言してますね。
Grasshopperなどがあり、テンプレートで用意されてるこれらを利用することでGrasshopperとのインターフェースが簡単になってます。ありがたい。
次は、このプロジェクトの中身に入っていきます。
名前空間・クラスとして記述していきます。
namespace Mt_addition
{
   public class Mt_additionComponent : GH_Component
   {
そして、いよいよ中身に。
/// <summary>
/// Each implementation of GH_Component must provide a public
/// constructor without any arguments.
/// Category represents the Tab in which the component will appear,
/// Subcategory the panel. If you use non-existing tab or panel names,
/// new tabs/panels will automatically be created.
/// </summary>
    public Mt_additionComponent()
    : base("Addition", "Nickname",
      "Description",
      "Category", "Subcategory")
    {
    }
Grasshopperテンプレートは親切で、コメントアウトした中に説明を丁寧に書いてくれていて本当にありがたいですね。
これを読めば大体どこに何を書けばいいのかわかります。
ここには、コンポーネントの名称設定したものが並んでるので、ここでも再度設定できます。
/// <summary>
/// Registers all the input parameters for this component.
/// </summary>
protected override void RegisterInputParams(GH_Component.GH_InputParamManager pManager)
{
}
input parametersということで、ここにインプットを設定するようです。
/// <summary>
/// Registers all the output parameters for this component.
/// </summary>
protected override void RegisterOutputParams(GH_Component.GH_OutputParamManager pManager)
{
}
次はoutpt parametersということで、ここにアウトプットを設定するようです。
/// <summary>
/// This is the method that actually does the work.
/// </summary>
/// <param name="DA">The DA object can be used to retrieve data from input parameters and
/// to store data in output parameters.</param>
protected override void SolveInstance(IGH_DataAccess DA)
{
}
さらに続くのは、does the workということで、何をさせるかですね。
このコンポーネントでやりたいことは具体的にここに記述します。
/// <summary>
/// Provides an Icon for every component that will be visible in the User Interface.
/// Icons need to be 24x24 pixels.
/// You can add image files to your project resources and access them like this:
/// return Resources.IconForThisComponent;
/// </summary>
protected override System.Drawing.Bitmap Icon => null;
ここではアイコンの画像を設定します。
24x24pixelsのサイズで用意するようです。nullでもとりあえず動きます。
/// <summary>
/// Each component must have a unique Guid to identify it.
/// It is vital this Guid doesn't change otherwise old ghx files
/// that use the old ID will partially fail during loading.
/// </summary>
public override Guid ComponentGuid => new Guid("D19E71A4-5C24-458F-9212-F123B9A6BBEB");
最後は、Guidの設定ですね。
プロジェクト作成時に自動で設定してくれるので、そのままでよいでしょう。
.ghaファイルの生成設定
Grasshopperでは、アドインを認識するのに『.gha』というファイルを用います。指定のフォルダに入れておくことで、アドインとして認識できるようになる仕組みです。
では、そのための初期設定を行いましょう。
プロジェクト><プロジェクト名>のプロパティ からプロパティを開きます。
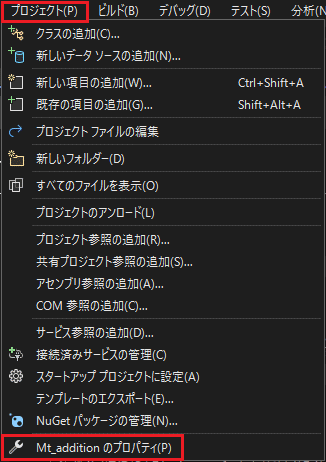
ビルドのイベント部分で設定します。

ビルド後のイベントに以下を記述します。
Copy "$(TargetPath)" "$(TargetDir)<testComponent>.gha"
Copy "$(TargetPath)" "C:\Users\<user_name>\AppData\Roaming\Grasshopper\Libraries\<testComponent>.gha"<testComponent>は生成される.ghaファイル名になりますので、適宜書き換えてください。
<user name>はPCのユーザー名に書き換えてください。
Grasshopperでアドインを読み込みに行くComponentsFolderに.ghaファイルを作成することの記述です。
プログラムの生成
プログラム内容を記述すれば、F5を押してデバッグします。
成功すれば、自動的にRhinoが起動してきます。
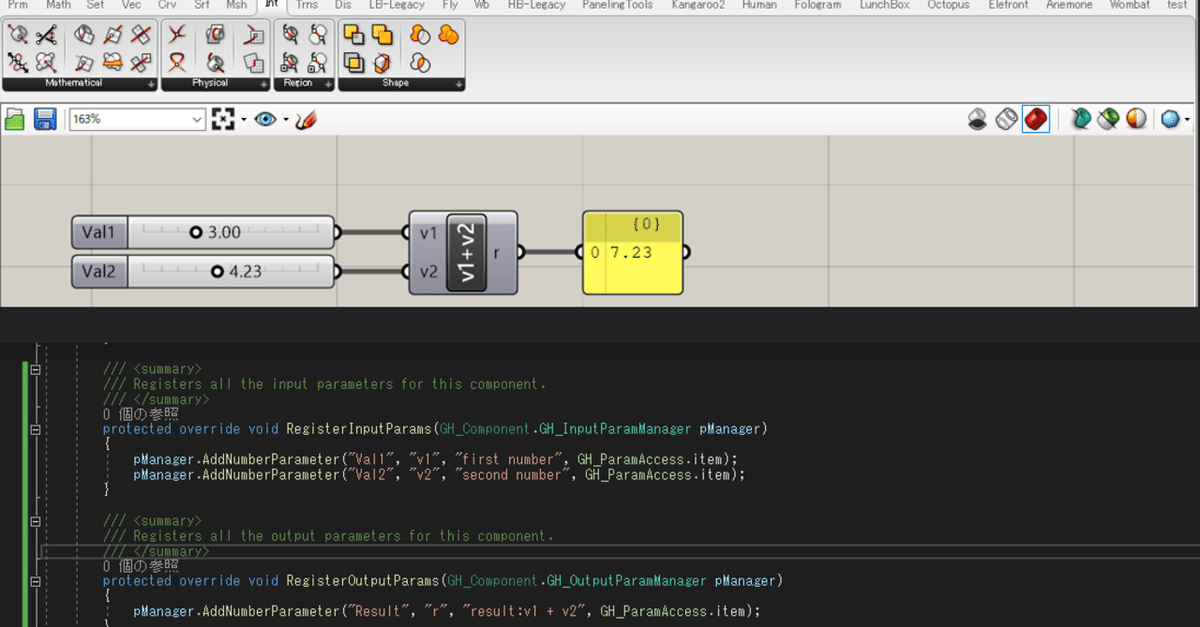
Grasshopperを起動し、確認してみます。

・Name:Addition
・Nickname:v1+v2
・Category:test
・Subcategory:Math
として設定した例。まだアイコンは設定していないので、透明に空いてますね。コンポーネントにはNameで設定したAdditionが表示されています。
ちなみに、上記はインプットに2つの値をつなぎ、アウトプットにはインプットの2つの値を足し算したシンプルなコンポーネントです。
関連記事
続編として、関連記事もありますのでぜひ。
オリジナルのGrasshopperコンポーネントの開発についてやさしく解説する-続編(2つ目以降のコンポーネント・アイコン設定)
オリジナルのGrasshopperコンポーネントの開発についてやさしく解説する-続編(インプットの方法)
参考コード
using Grasshopper;
using Grasshopper.Kernel;
using Rhino.Geometry;
using System;
using System.Collections.Generic;

namespace Mt_addition
{
   public class Mt_additionComponent : GH_Component
   {
       /// <summary>
       /// Each implementation of GH_Component must provide a public
       /// constructor without any arguments.
       /// Category represents the Tab in which the component will appear,
       /// Subcategory the panel. If you use non-existing tab or panel names,
       /// new tabs/panels will automatically be created.
       /// </summary>
       public Mt_additionComponent()
         : base("Addition", "v1+v2",
           "Description",
           "test", "Math")
       {
       }

       /// <summary>
       /// Registers all the input parameters for this component.
       /// </summary>
       protected override void RegisterInputParams(GH_Component.GH_InputParamManager pManager)
       {
           pManager.AddNumberParameter("Val1", "v1", "first number", GH_ParamAccess.item);
           pManager.AddNumberParameter("Val2", "v2", "second number", GH_ParamAccess.item);
       }

       /// <summary>
       /// Registers all the output parameters for this component.
       /// </summary>
       protected override void RegisterOutputParams(GH_Component.GH_OutputParamManager pManager)
       {
           pManager.AddNumberParameter("Result", "r", "result:v1 + v2", GH_ParamAccess.item);
       }

       /// <summary>
       /// This is the method that actually does the work.
       /// </summary>
       /// <param name="DA">The DA object can be used to retrieve data from input parameters and
       /// to store data in output parameters.</param>
       protected override void SolveInstance(IGH_DataAccess DA)
       {
           double v1 = 0.0;
           double v2 = 0.0;
           DA.GetData("Val1", ref v1);
           DA.GetData("Val2", ref v2);
           double result = v1 + v2;
           DA.SetData("Result", result);
       }

       /// <summary>
       /// Provides an Icon for every component that will be visible in the User Interface.
       /// Icons need to be 24x24 pixels.
       /// You can add image files to your project resources and access them like this:
       /// return Resources.IconForThisComponent;
       /// </summary>
       protected override System.Drawing.Bitmap Icon => null;

       /// <summary>
       /// Each component must have a unique Guid to identify it.
       /// It is vital this Guid doesn't change otherwise old ghx files
       /// that use the old ID will partially fail during loading.
       /// </summary>
       public override Guid ComponentGuid => new Guid("D19E71A4-5C24-458F-9212-F123B9A6BBEB");
   }
}いつもサポートいただきありがとうございます! これからもあなたの代わりに役立つ記事を更新し続けていきます。 どうぞよろしくお願いします。