
【第16回】Wordpress自作テーマ練習。記事の概要表示・サムネイル画像の表示

引き続きWordpress自作テーマ作成の練習をしていきます。
前回の内容はこちら↓
↓こちらの参考書を参考にしながら自作テーマの練習をしています。
本日の内容
記事の概要の表示・サムネイル画像の表示
今まで16回に渡ってWordpressの自作テーマ作成練習をしてきましたが、本講座でいよいよ見た目の整ったサイトになってきたように思います。
↑いい感じでしょ(^^)/
やっとそれっぽくなっただけです。
まずは全体のコードをお見せしましょう(記事概要を表示・サムネイル画像表示)
まずは、全体のphpファイルからお見せしましょう。
functions.php
<?php

//ウィジェット
register_sidebar();

//カスタムメニュー
register_nav_menu('navigation','ナビゲーション');

//アイキャッチ画像の追加
add_theme_support( 'post-thumbnails' );
index.php
<?php get_header(); ?>

<div class="container">

<div class="contents">

<!-- カテゴリーの表示 -->
<?php if(is_category()):?>
<h1 class="archive-title"><i class="fa fa-folder-open"></i>【<?php single_cat_title();?>】に関する記事です。</h1>
<?php endif; ?>

<!-- 月別ページの表示 -->
<?php if(is_month()):?>
<h1 class="archive-title"><i class="fa fa-clock-o"></i>【<?php echo get_the_date('Y年n月');?>】に投稿した記事です。</h1>
<?php endif; ?>

<?php if(have_posts()): while(have_posts()):
the_post(); ?>

<article <?php post_class(); ?>>

<?php if( is_single() ): ?>
	<h1><?php the_title(); ?></h1>
<?php else: ?>
	<h1><a href="<?php the_permalink(); ?>"><?php the_title(); ?></a></h1>
<?php endif; ?>

<div class="postinfo">
	<time datetime="<?php echo get_the_date( 'Y-m-d' ) ?>">
	<i class="fa fa-clock-o"></i>
	<?php echo get_the_date(); ?>
	</time>

	<span class="postcat">
	<i class="fa fa-folder-open"></i>
	<?php the_category( ', ' ); ?>
	</span>
</div>

<?php if( is_single() ): ?>

	<?php the_content(); ?>

<?php else: ?>

	<div class="excerpt">
	<?php if( has_post_thumbnail() ): ?>
		<p><?php the_post_thumbnail( 'medium' ); ?>
		</p>
	<?php endif ;?>
	<?php the_excerpt(); ?>
	<p class="more"><a href="<?php the_permalink(); ?>">続きを読む <i class="fa fa-chevron-right"></i></a></p>
	</div>

<?php endif; ?>

<?php if( is_single() ): ?>
<div class="pagenav">
	<span class="old">
	<?php previous_post_link(
	'%link',
	'<i class="fa fa-chevron-circle-left"></i> %title'
	); ?>
	</span>

	<span class="new">
	<?php next_post_link(
	'%link',
	'%title <i class="fa fa-chevron-circle-right"></i>'
	); ?>
	</span>
</div>
<?php endif; ?>

<?php comments_template(); ?>

</article>

<?php endwhile; endif; ?>


<?php if ( $wp_query->max_num_pages > 1 ): ?>
<div class="pagenav">
	<span class="old">
	<?php next_posts_link( '<i class="fa fa-chevron-circle-left"></i> 古い記事' ); ?>
	</span>

	<span class="new">
	<?php previous_posts_link( '新しい記事 <i class="fa fa-chevron-circle-right"></i>' ); ?>
	</span>
</div>
<?php endif; ?>

</div> <!-- contents -->

<div class="blogmenu">
	<ul>
		<?php dynamic_sidebar()?>
	</ul>
</div>

</div> <!-- container -->

<?php get_footer(); ?>
style.css
@charset "UTF-8";
/*
Theme Name: MY THEME (Chapter 8-B2)
Author: TRAVEL SKETCH
Description: This is my original theme.
Version: 1.0
*/


body	{margin: 0;
	font-family: 'メイリオ', 'Hiragino Kaku Gothic Pro', sans-serif}

.container	{max-width: 650px;
	margin-left: auto;
	margin-right: auto;
	padding-left: 15px;
	padding-right: 15px}


/* 記事 */
article	{margin-bottom: 40px;
	overflow: hidden}

article h1	{margin: 0;
	font-size: 32px;
	font-weight: normal}

article h1 a	{color: #000000;
	text-decoration: none}


/* 記事の付加情報 */
.postinfo	{margin-top: 15px;
	font-size: 14px}

.postinfo a	{color: #000000;
	text-decoration: none}

.postinfo .postcat	{margin-left: 20px}

.postinfo .postcom	{margin-left: 20px}

.postinfo i	{color: #888888}


/* 前後の記事へのリンク */
.pagenav a	{padding: 5px 10px;
	border: solid 1px #cccccc;
	border-radius: 10px;
	color: #666666;
	font-size: 12px;
	text-decoration: none}

.pagenav .old a	{float: left}

.pagenav .new a	{float: right}

.pagenav	{overflow: hidden;
	margin-top: 40px;
	margin-bottom: 40px;
	clear: both}


/* ヘッダー */
header	{margin-bottom: 40px;
	background-color: #1e90ff;
	color: #ffffff}

header a	{color: #ffffff;
	text-decoration: none}

.siteinfo	{overflow: hidden;
	padding-top: 14px;
	padding-bottom: 14px;
	background-color: #ffffff;
	color: #4a5f7e}

.siteinfo a	{color:  #1e90ff}

.siteinfo h1	{float: left;
	margin: 0;
	font-family: 'Acme', sans-serif;
	font-size: 20px}

.siteinfo p	{float: right;
	margin: 0;
	margin-top: 5px;
	font-size: 12px}


/* ヘッダー画像 */
header img	{width: 100%;
	height: auto;
	vertical-align: bottom}


/* ナビゲーションメニュー */
nav ul	{list-style: none;
	margin: 0;
	padding: 0;
	font-size: 12px;
	overflow: hidden}

nav li	{float: left;
	margin-right: 15px}

nav li a	{display: block;
	padding-top: 15px;
	padding-bottom: 10px;
	border-bottom: solid 5px transparent}

nav li a:hover	{border-bottom-color: #00ccff}

nav li.current-menu-item a
	{border-bottom-color: #e6cc1c}


/* フッター */
footer	{margin-top: 40px;
	padding-top: 14px;
	padding-bottom: 14px;
	background-color: #4a5f7e;
	color: #ffffff}


/* 本文中の画像 */
article img	{border: none;
	max-width: 100%;
	height: auto}

.aligncenter	{display: block;
	margin-top: 30px;
	margin-bottom: 30px;
	margin-left: auto;
	margin-right: auto}

.alignright	{float: right;
	margin-bottom: 30px;
	margin-left: 30px}

.alignleft	{float: left;
	margin-bottom: 30px;
	margin-right: 30px}

.wp-caption	{max-width: 100%}

.wp-caption-text	{margin: 0;
	color: #666666;
	font-size: 14px;
	text-align: center}


/* メニュー */
.blogmenu ul	{margin: 0;
	padding: 0;
	list-style: none}

.blogmenu .widget	{margin-bottom: 30px;
	padding: 20px;
	background-color: #e8e8e8}

.blogmenu .widgettitle	{margin-top: 10px;
	margin-bottom: 20px;
	border-right: solid 10px #4a5f7e;
	color: #4a5f7e;
	font-size: 14px}

.blogmenu li a	{display: block;
	padding: 10px 5px;
	color: #666666;
	font-size: 14px;
	text-decoration: none}

.blogmenu li a:hover	{background-color: #ffffff}


/* 見出し */
.archive-title	{margin-top: 0;
	margin-bottom: 40px;
	background-color: #eeeeee;
	font-size: 14px;
	font-weight: normal}

.archive-title i	{padding: 15px;
	background-color: #4a5f7e;
	color: #ffffff}


/* コメント投稿フォーム */
#respond p	{margin-top: 0;
	margin-bottom: 20px;
	font-size: 12px}

#respond label	{font-size: 14px}

#respond input,
#respond textarea	{width: 100%;
	padding: 5px;
	-moz-box-sizing: border-box;
	-webkit-box-sizing: border-box;
	box-sizing: border-box}

#respond input[type="submit"]
	{width: 200px;
	padding: 10px;
	border: none;
	background-color: #e6cc1c;
	-webkit-appearance: none;
	cursor: pointer}

#respond input[type="submit"]:hover
	{background-color: #ffaa00}

#respond .required	{color: #ff0000}


/* コメント */
#comments footer	{background: none;
	margin: 0;
	color: #000000;
	font-size: 12px}

#comments footer a	{color: #000000}

#comments footer div	{display: inline}

#comments ul	{list-style: none;
	margin: 0;
	padding: 0}

#comments article	{border: dotted 1px #aaaaaa;
	margin-bottom: 10px;
	padding: 10px 20px 20px 20px}

#comments .comment-content	{margin-left: 30px}


/* お問い合わせフォーム */
.wpcf7 input,
.wpcf7 textarea	{width: 100%;
	padding: 5px;
	-moz-box-sizing: border-box;
	-webkit-box-sizing: border-box;
	box-sizing: border-box}

.wpcf7 input[type="submit"]
	{width: 200px;
	padding: 10px;
	border: none;
	background-color: #e6cc1c;
	-webkit-appearance: none;
	cursor: pointer}

.wpcf7 input[type="submit"]:hover
	{background-color: #ffaa00}

/* メディアクエリの設定 */
@media (min-width: 768px) {

/* 2段組 */
.container	{max-width: 1000px;
	overflow: hidden}

.contents	{width: 65%;
	float: left}

.blogmenu	{width: 30%;
	float: right}

/* ナビゲーションメニュー */
nav li	{margin-right: 40px}

}

/* 記事の概要 */
.excerpt p	{font-size: 14px}

.excerpt .more a	{padding: 5px 20px;
	border: solid 1px #cccccc;
	border-radius: 5px;
	color: #000000;
	text-decoration: none;}

.excerpt .more a:hover
	{background-color: #e6cc1c}

.excerpt .more i	{margin-left: 10px;
	color: #cccccc}

.excerpt img{
	display:block;
	margin-left:auto;
	margin-right:auto;
}

@media (min-width: 500px) {
.excerpt img	{float: left;
	margin-right: 20px;
	width: 40%}
}

@media (max-width: 499px) {
.excerpt img	{display: block;
	margin-left: auto;
	margin-right: auto}
}
今からひとつひとつ説明します。
記事概要の表示
記事概要を表示するためには「index.php」に以下を追加します。
<?php if( is_single() ): ?>

	<?php the_content(); ?>

<?php else: ?>

	<div class="excerpt">
	<?php if( has_post_thumbnail() ): ?>
		<p><?php the_post_thumbnail( 'medium' ); ?>
		</p>
	<?php endif ;?>
	<?php the_excerpt(); ?>
	<p class="more"><a href="<?php the_permalink(); ?>">続きを読む <i class="fa fa-chevron-right"></i></a></p>
	</div>

<?php endif; ?>
if文で、「もしシングルページであれば(is_single() )」・・・・
「シングルページでなければ」・・・
という文法になっています。
the_excerpt()が記事の概要を表示する関数です。
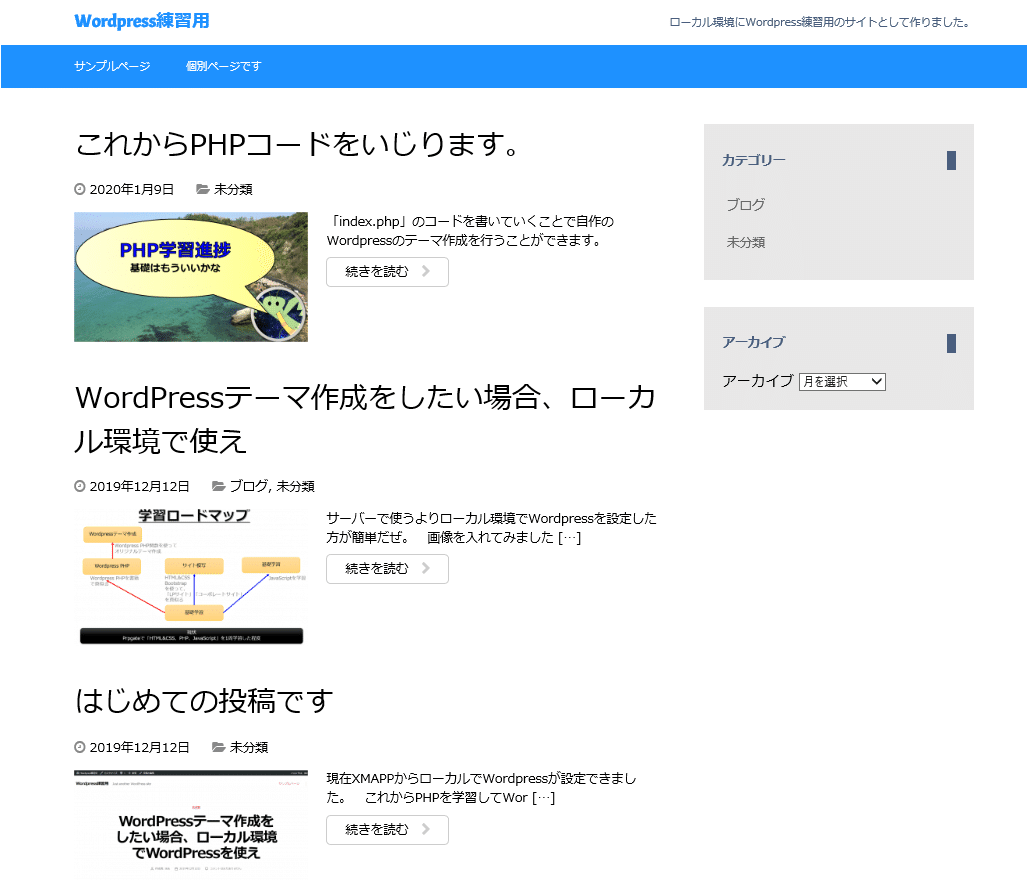
ここまでで以下のような見た目のなります。

記事概要のデザインをあてる
「style.css」を編集するにあたり、indexphpを編集出来たら、実際のコードを見てクラス名を確認しておきましょう。

何やら「more」というクラスも使われていますね。
excerptは自分で決めたクラス名です。
記事概要のcssは以下とします。
style.css
/* 記事の概要 */
.excerpt p	{font-size: 14px}

.excerpt .more a	{padding: 5px 20px;
	border: solid 1px #cccccc;
	border-radius: 5px;
	color: #000000;
	text-decoration: none;}

.excerpt .more a:hover
	{background-color: #e6cc1c}

.excerpt .more i	{margin-left: 10px;
	color: #cccccc}
cssファイルの編集が終わると以下のような見た目のなりました(^^)/

サムネイル画像の表示を行う
サムネイル画像の表示には「投稿」→「投稿記事一覧」から記事を書く際に「アイキャッチ画像の追加」というのをする必要があるのですが、現時点ではそれを行うことができません。
「アイキャッチ画像の追加」をできるようにするためには、functions.php」に以下を追加すればよいです。
functions.php
//アイキャッチ画像の追加
add_theme_support( 'post-thumbnails' );こうすることにより、以下のように「アイキャッチ画像」が出てきました(*'▽')
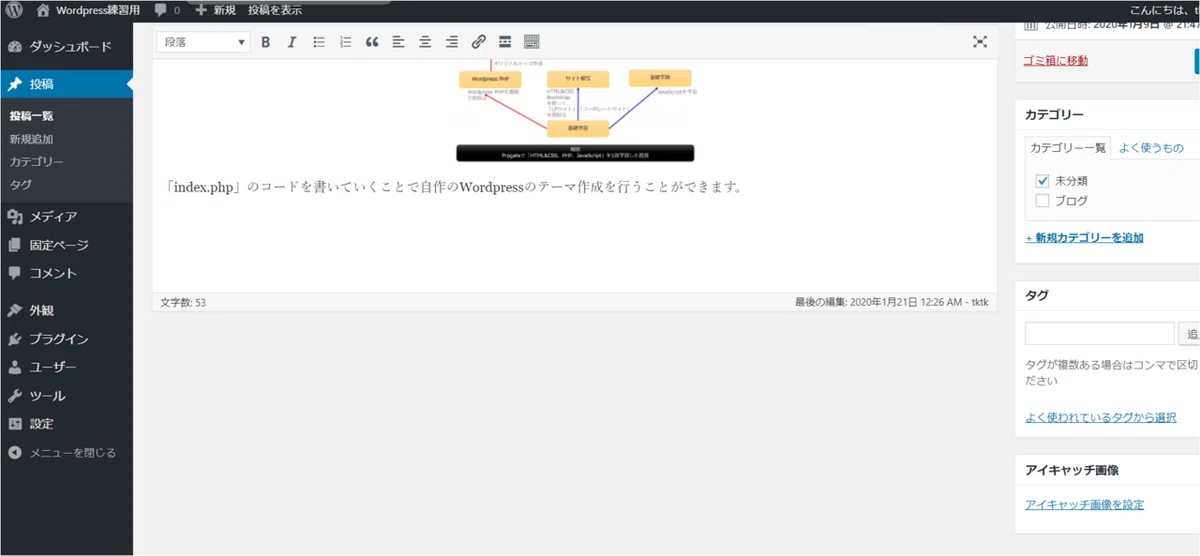
では、アイキャッチ画像の追加を行いましょう。

↑サムネイル画像の表示ができましたね(^^)/
見た目が微妙なのでstyle.cssを編集していきましょう。
サムネイル画像の表示のデザインを変更する
「style.css」に追加したのは以下の部分です。
style.css
.excerpt img{
	display:block;
	margin-left:auto;
	margin-right:auto;
}

@media (min-width: 500px) {
.excerpt img	{float: left;
	margin-right: 20px;
	width: 40%}
}

@media (max-width: 499px) {
.excerpt img	{display: block;
	margin-left: auto;
	margin-right: auto}
}●500px以上の場合(@media (min-width: 500px) )
サムネイル画像の右に記事概要が来る
幅も40%と決めている
●499px以下の場合(@media (max-width: 499px))
サムネイル画像の下に記事概要が来る
例えば、めちゃくちゃ画面幅を小さくすると以下のようになります。

などの設定を行っています。
以下が完成品です(^^)/

だいぶ見た目が良くなりまたかね(^^)
Twitter➡@t_kun_kamakiri
ブログ➡宇宙に入ったカマキリ(物理ブログ)
この記事が気に入ったらサポートをしてみませんか?