
GPTsとGoogleサービスが変える自動化の最前線

はじめに
この記事では、Google Apps Script (GAS) と OpenAPI スキーマを用いて、Googleカレンダー、Gmail、Googleドライブ、GoogleスプレッドシートなどのGoogleサービスと連携するGPTsの開発手順を説明します。このGPTを使用することで、さまざまなGoogleサービスを自動化し、業務の効率化を図ることができます。
今回は、以下のようなGoogleサービスと連携するGPTsの作成方法を紹介します:
Googleカレンダー連携: イベントの取得、追加、更新、削除
Gmail連携: メールの取得、送信、整理
Googleドライブ連携: ファイルの一覧取得、アップロード、ダウンロード
例えば、「今日の予定を教えて」「最新のメールを確認して」「特定のフォルダのファイル一覧を取得して」「スプレッドシートに新しいデータを追加して」といった命令をGPTsに出すことで、これらのタスクを自動的に実行することができます。
この記事の対象者
Googleサービスを効率的に活用して業務の自動化を図りたい方
GASやOpenAPIスキーマを用いたGPTsの開発に興味がある方
Googleカレンダー、Gmail、Googleドライブ、GoogleスプレッドシートなどのGoogleサービスとGPTsを連携したい方
手順① GASのスクリプトとOpenAPIのスキーマを作成
この記事では、OpenAIオフィシャルのActionsGPTを使用して、Google Apps Script (GAS) と OpenAPIスキーマを作成します。以下のプロンプトを使用して、必要なスクリプトとスキーマを生成します。
プロンプトの入力例:
あなたは優秀なエンジニアです。

私は、以下の機能を持ったGPTsを作成したいと考えている。そのために必要なGoogle Apps ScriptのスクリプトとOpenAPIのスキーマを作成してください。
・GASを用いてGPTsとGoogleサービスを連携させる。
・GPTsに実際にGASで実行するスクリプトを作成してもらい、それらをGASの方に送信する。
・GASでは、実際にそれらのスクリプトを実行し、GPTsに送り返す。

注意点:
実際に、Googleカレンダーでイベントなどを取得するスクリプトはGASでは書かずに、GPTsに書いてもらってください。
本記事では、実際のこちらの会話履歴のものを使用します。
手順② Google Apps Scriptの作成
次に、実際にGoogle Apps Script (GAS) を作成します。以下のスクリプトを使用して、GPTsから送信されたスクリプトを実行し、その結果を返すように設定します。
Google Apps Scriptホームページに移動し、新しいプロジェクトを作成します。
以下のコードをコピーして貼り付けます。
function doPost(e) {
  try {
    const requestBody = JSON.parse(e.postData.contents);
    const script = requestBody.script;

    if (!script) {
      return ContentService.createTextOutput(JSON.stringify({
        success: false,
        message: "No script provided"
      })).setMimeType(ContentService.MimeType.JSON);
    }

    let result;
    try {
      result = eval(script);  // Execute the script
    } catch (error) {
      return ContentService.createTextOutput(JSON.stringify({
        success: false,
        message: "Script execution error",
        error: error.toString()
      })).setMimeType(ContentService.MimeType.JSON);
    }

    return ContentService.createTextOutput(JSON.stringify({
      success: true,
      result: result
    })).setMimeType(ContentService.MimeType.JSON);

  } catch (error) {
    return ContentService.createTextOutput(JSON.stringify({
      success: false,
      message: "Invalid request",
      error: error.toString()
    })).setMimeType(ContentService.MimeType.JSON);
  }
}
このスクリプトは、POSTリクエストで送信されたスクリプトを受け取り、それを実行して結果を返すシンプルなGASです。これにより、GPTsからのスクリプトを実行し、その結果をレスポンスとして返すことができます。
手順③ Google Apps Scriptでの権限変更
サイドバーの「プロジェクト設定」を選択し、「Show "appsscript.json" manifest file in editor」をオンにします。

「Show "appsscript.json" manifest file in editor」をオンにします。

コードのページに戻り、「appscript.json」というファイルを開き、以下のコードを貼り付けます。
{
  "timeZone": "Asia/Tokyo",
  "dependencies": {
    "enabledAdvancedServices": [
      {
        "userSymbol": "YouTubeAnalytics",
        "serviceId": "youtubeAnalytics",
        "version": "v2"
      },
      {
        "userSymbol": "YouTube",
        "serviceId": "youtube",
        "version": "v3"
      },
      {
        "userSymbol": "YouTubeContentId",
        "serviceId": "youtubePartner",
        "version": "v1"
      },
      {
        "userSymbol": "BigQuery",
        "serviceId": "bigquery",
        "version": "v2"
      },
      {
        "userSymbol": "Tasks",
        "serviceId": "tasks",
        "version": "v1"
      },
      {
        "userSymbol": "AnalyticsData",
        "serviceId": "analyticsdata",
        "version": "v1beta"
      },
      {
        "userSymbol": "AnalyticsAdmin",
        "serviceId": "analyticsadmin",
        "version": "v1beta"
      },
      {
        "userSymbol": "Analytics",
        "serviceId": "analytics",
        "version": "v3"
      },
      {
        "userSymbol": "AnalyticsReporting",
        "serviceId": "analyticsreporting",
        "version": "v4"
      },
      {
        "userSymbol": "Calendar",
        "serviceId": "calendar",
        "version": "v3"
      }
    ]
  },
  "webapp": {
    "executeAs": "USER_DEPLOYING",
    "access": "ANYONE_ANONYMOUS"
  },
  "exceptionLogging": "STACKDRIVER",
  "oauthScopes": [
    "https://www.googleapis.com/auth/drive",
    "https://www.googleapis.com/auth/spreadsheets",
    "https://www.googleapis.com/auth/presentations",
    "https://www.googleapis.com/auth/forms",
    "https://www.googleapis.com/auth/script.external_request",
    "https://www.googleapis.com/auth/script.scriptapp",
    "https://www.googleapis.com/auth/calendar",
    "https://www.googleapis.com/auth/youtube",
    "https://www.googleapis.com/auth/tasks",
    "https://www.googleapis.com/auth/documents",
    "https://www.googleapis.com/auth/gmail.modify",
    "https://www.googleapis.com/auth/script.send_mail",
    "https://www.googleapis.com/auth/contacts",
    "https://www.googleapis.com/auth/classroom.courses",
    "https://www.googleapis.com/auth/classroom.rosters",
    "https://www.googleapis.com/auth/classroom.coursework.students",
    "https://www.googleapis.com/auth/photoslibrary",
    "https://www.googleapis.com/auth/photoslibrary.sharing",
    "https://www.googleapis.com/auth/drive.appfolder",
    "https://www.googleapis.com/auth/drive.metadata.readonly",
    "https://www.googleapis.com/auth/analytics",
    "https://www.googleapis.com/auth/analytics.readonly",
    "https://www.googleapis.com/auth/bigquery",
    "https://www.googleapis.com/auth/devstorage.full_control",
    "https://www.googleapis.com/auth/firebase",
    "https://www.googleapis.com/auth/firebase.readonly"
  ],
  "runtimeVersion": "V8"
}
手順④ 作成したGASをWebアプリとしてデプロイする
作成したGASスクリプトを外部からアクセス可能にするため、Webアプリとしてデプロイします。
デプロイの準備:
GASエディタの上部にある「デプロイ」ボタンをクリックし、「新しいデプロイ」を選択します。
デプロイ設定:
「⚙️設定」アイコンを選択し、「ウェブアプリ」を選びます。

以下の情報を設定欄に入れます。
新しい説明文:適切な文章
次のユーザとして実行:自分
アクセスできるユーザー:全員
デプロイの実行:
全ての設定が完了したら、「デプロイ」をクリックします。Googleによるアクセス承認が求められる場合がありますので、指示に従って承認してください。
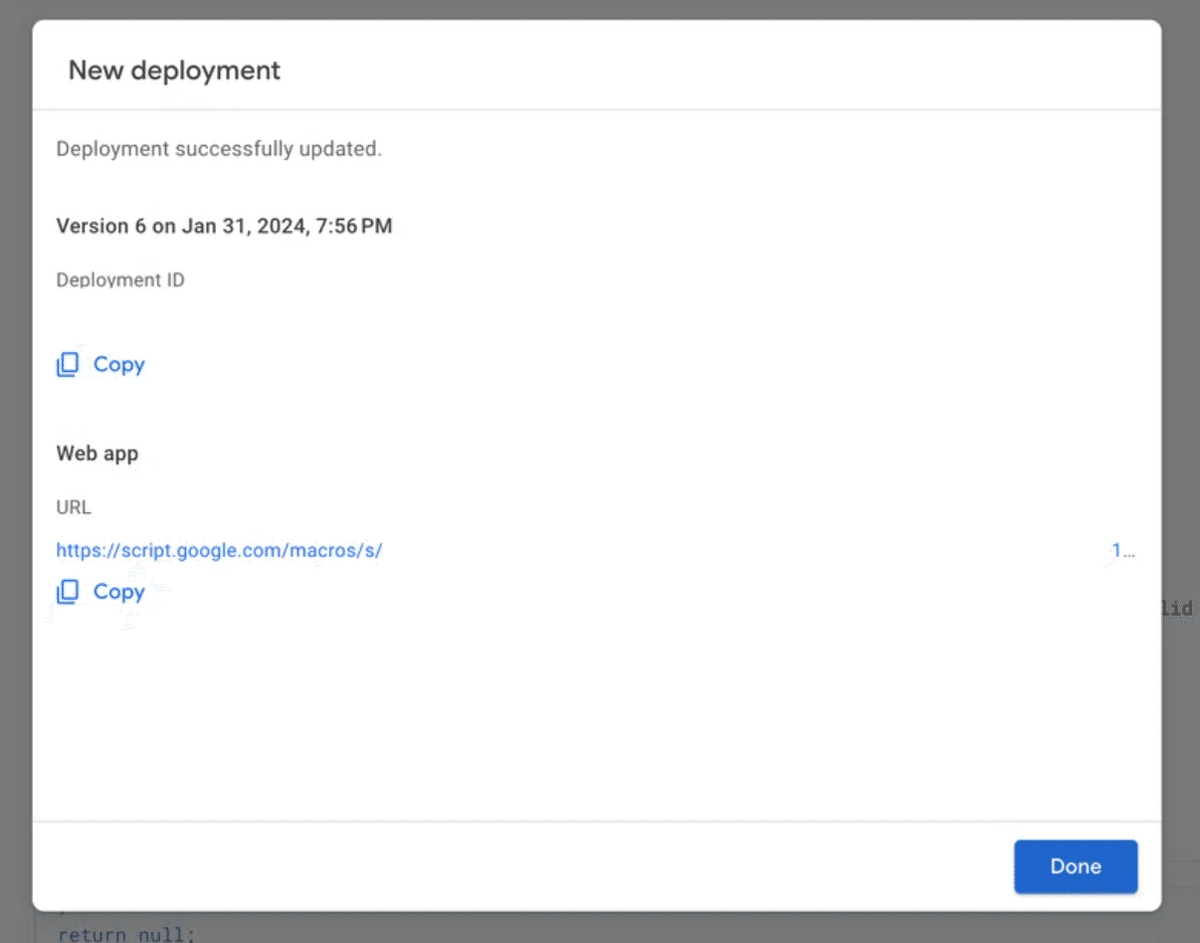
WebアプリケーションのURLを取得:
デプロイが完了すると、生成されたWebアプリケーションのURLが表示されます。このURLは、GPTsからのリクエストを受け付けるために使用しますので、メモしておいてください。
手順⑤ OpenAPIスキーマを作成する
GPTsの設定欄には以下の情報を入力します。
設定リンク:https://chat.openai.com/gpts/editor
名前:適当な名前
説明:適当な説明
Instructions:
あなたは私のGoogleカレンダー、Gmail、Googleドライブ、Googleスプレッドシートなどと連携したGoogle Apps Script (GAS) と繋がっています。ユーザーから「今日のカレンダー情報」や「最新のメール情報」といった質問があった場合は、Actions機能を使用してGASと連携し、適切な情報を取得してから回答を生成してください。基本的に、GASで可能な操作は全て実行することができますので、ユーザーのリクエストに応じて柔軟に対応してください。Knowledge:アップロードなし
Capabilities:全てOFFにする
Actionsを作成画面に移動し、「Scheme」に以下をコピペする。
openapi: 3.1.0
info:
  title: GAS Execution API
  description: API to execute Google Apps Script code via GPTs.
  version: 1.0.0
servers:
  - url: https://your-script-url/exec  # Google Apps Script Web App URL
    description: Google Apps Script Web App endpoint
paths:
  /execute:
    post:
      operationId: executeScript
      summary: Executes a provided Google Apps Script code.
      requestBody:
        required: true
        content:
          application/json:
            schema:
              type: object
              properties:
                script:
                  type: string
                  description: The Google Apps Script code to execute.
                  example: 'return CalendarApp.getDefaultCalendar().getEvents(new Date(), new Date())[0].getTitle();'
      responses:
        '200':
          description: Execution result
          content:
            application/json:
              schema:
                type: object
                properties:
                  success:
                    type: boolean
                  result:
                    type: string
                  message:
                    type: string
                  error:
                    type: string
                    nullable: true
ここで、以下の部分を変更します。
https://your-script-url/execを実際に手順④で作成されたものに変える。
`paths: /execute:`を`paths: /exec:`に変更する。
以上で、GPTsの設定は完了です。
実際にGPTsを触ってみる
例として、「8/21の予定を教えて」と命令すると、実際に自分のGoogleカレンダーと連携して予定を取得してくれます。

その他にも、予定の追加・削除、Gmailの取得、YouTube検索など様々なことに対応可能です。
終わりに
今回は、Google Apps ScriptとOpenAPIを使用して、Googleカレンダー、Gmail、Googleドライブ、Googleスプレッドシートと連携するGPTsの作成方法を紹介しました。この手法を用いることで、さまざまなGoogleサービスと連携し、効率的に業務を自動化することができます。
この記事を参考に、ご自身でカスタムGPTsを作成し、ブログや他の用途に役立てていただければ幸いです。
さらに、私のUdemy講座を特別価格で提供しています。以下のリンクから購入いただくと、期間限定で85%OFFクーポンが適用されます!
【初心者向け】ChatGPT完全ガイド:実践的な業務効率化の秘訣と人事業務への応用
ChatGPTを使った業務効率化の具体的な方法
人事業務への応用方法
効果的なプロンプトの作成術
【GPT-4o対応】初心者から上級者までのGPTsマスタークラス:基礎から実践まで - 初心者向けに優しく解説!
基本的なGPTsの使い方とそのメリット
GPTsを使用したビジネスシーンでの応用法
GASなどを使ったGPTsの外部連携方法
最後までご精読いただき、ありがとうございました。
この記事が参加している募集
この記事が気に入ったらサポートをしてみませんか?