【Objective-C】タブデザインを再現する為にViewController+CustomCellクラスだけで作ってみた。サンプルコード配布あり【Xcode12.1対応】
こういう人に向けて発信しています。
・Chromeのようなタブデザインを再現した人
・タブのような外部のアクションに応じて増減するオブジェクトを作りたい
・Objective-C中級者
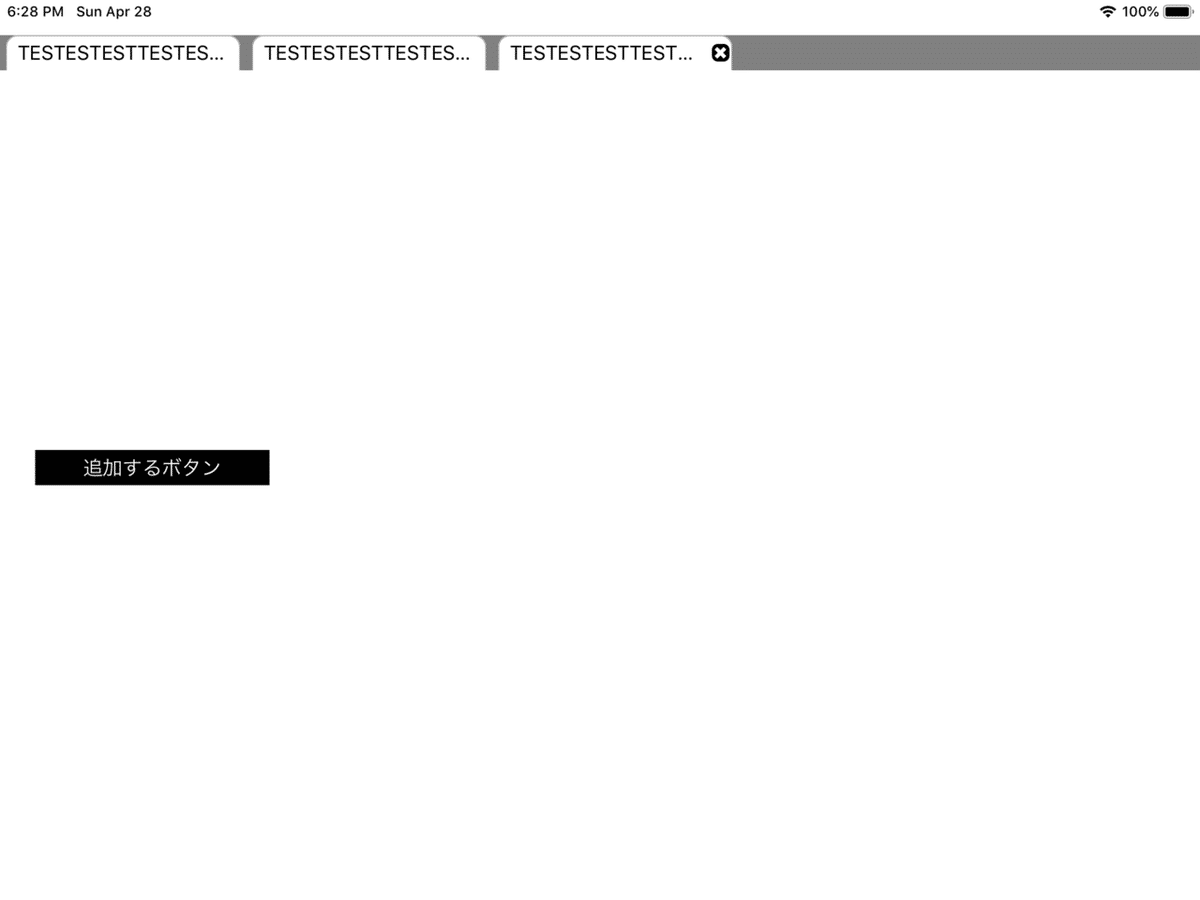
完成イメージ

仕様を整理する。
(1)タブを追加する
(2)選択中のタブのみ、削除ボタンが右端に現れて削除可能。
(3)タップする事でタブの情報を展開可能。
構成
(1)ViewController(UIViewController継承)
(2)CollectionCustomCell(UICollectionViewCell継承)
※カスタムセルのみ、xibあり。
ViewControllerにはxibが無いので、
CollectionViewをコードで入力してます。
ViewController.h
#import <UIKit/UIKit.h>

@interface ViewController : UIViewController
@end
ViewController.m
#import "ViewController.h"
#import "CollectionCustomCell.h"

typedef NS_ENUM(NSInteger, mode) {
    addTab = 0, //新規追加
    deleteTab = 1,  //削除
    tappedTab = 2, //タブを触った時
};

@interface ViewController ()<UICollectionViewDelegate,UICollectionViewDataSource>

@property (nonatomic) UIView *backView;
@property (nonatomic) UIButton *addButton;

@property (nonatomic) UICollectionView *collectionView;
@property (nonatomic) NSMutableArray *dataArray;
@property (nonatomic) NSMutableDictionary *dataDict;

@end

@implementation ViewController
#pragma mark  life cycle

- (void)viewDidLoad {
    [super viewDidLoad];
    [self loadArray];
    [self loadViewParts];
    self.collectionView.dataSource = self;
    self.collectionView.delegate = self;

    UINib *nib = [UINib nibWithNibName:@"CollectionCustomCell" bundle:nil];
    [self.collectionView registerNib:nib forCellWithReuseIdentifier:@"CustomCell"];
}

#pragma mark  loadArray
-(void)loadArray{
    self.dataArray = [self loadArchive].mutableCopy;
    if(self.dataArray == nil){
        self.dataArray = @[].mutableCopy;
    }
}

#pragma mark  loadViewParts
-(void)loadViewParts{
    [self setView];
    [self setButton];
    [self initCollectionView];

}

-(void)setView{
    CGRect rect = self.view.frame;
    self.backView = [[UIView alloc]initWithFrame:rect];
    self.backView.backgroundColor = [UIColor whiteColor];
    [self.view addSubview:self.backView];
}

-(void)setButton{
    self.addButton = [[UIButton alloc]initWithFrame:CGRectMake(30.0f, self.view.bounds.size.height/2, 200.0f, 30.0f)];
    [self.addButton setTitle:@"追加するボタン" forState:UIControlStateNormal]; //有効時
    [self.addButton addTarget:self
            action:@selector(tappedButton:) forControlEvents:UIControlEventTouchUpInside];
    self.addButton.backgroundColor = [UIColor blackColor];
    [self.view addSubview:self.addButton];
}

-(void)tappedButton:(UIButton*)button{
    NSMutableDictionary *dict = @{@"dataName":@"0123456789",
                             @"selected":@YES}.mutableCopy;
    [_dataArray addObject:dict];
    [self setArchive];
    [self changeDataArray:addTab selectedCell:nil]; //追加処理
}

#pragma mark  dataArray change

-(void)changeDataArray:(NSInteger)mode selectedCell:(NSIndexPath *)indexPath{
    for(int i=0; i<self.dataArray.count; i++){
        self.dataArray[i][@"selected"] = @NO;
    }
    switch (mode) {
        case addTab:
            self.dataArray.lastObject[@"selected"] = @YES;
            break;
        case deleteTab:
            [self.dataArray removeObjectAtIndex:indexPath.row];
            break;
        case tappedTab:
            self.dataArray[indexPath.row][@"selected"] = @YES;
            break;

        default:
            break;
    }
    [self setArchive];  //最新値を保存する
    [self.collectionView reloadData];
}

#pragma mark  CollectionView

-(void)initCollectionView{
    CGRect rect = self.view.frame;
    self.collectionView = [[UICollectionView alloc]initWithFrame:CGRectMake(0, 30.0f, rect.size.width, 30.0f) collectionViewLayout:[self collectionBrank]];
    self.collectionView.backgroundColor = [UIColor grayColor];
    self.collectionView.bounces = NO;
    [self.view addSubview:self.collectionView];
}

- (UICollectionViewFlowLayout *)collectionBrank{
    UICollectionViewFlowLayout *layout = [[UICollectionViewFlowLayout alloc]init];
    layout.sectionInset = UIEdgeInsetsMake(0.0f,5.0f,0,5.0f);
    layout.scrollDirection = UICollectionViewScrollDirectionHorizontal;
    return layout;
}

- (NSInteger)collectionView:(UICollectionView *)collectionView numberOfItemsInSection:(NSInteger)section
{
    return self.dataArray.count;
}

- (UICollectionViewCell *)collectionView:(UICollectionView *)collectionView cellForItemAtIndexPath:(NSIndexPath *)indexPath
{
    //カスタムセルの場合
    CollectionCustomCell *cell = [collectionView dequeueReusableCellWithReuseIdentifier:@"CustomCell" forIndexPath:indexPath];

    ///deleteButtonタップ時の挙動・処理準備
    cell.indexPath = indexPath;
    cell.customBlock = ^(NSIndexPath *indexPath){
        [self changeDataArray:deleteTab selectedCell:indexPath];
    };

    if([self.dataArray[indexPath.row][@"selected"] boolValue]){
        cell.deleteBtnView.hidden = NO;
    }else{
        cell.deleteBtnView.hidden = YES;
    }

    return cell;
}

- (NSInteger)numberOfSectionsInCollectionView:(UICollectionView *)collectionView
{
    return 1;
}

- (CGSize)collectionView:(UICollectionView *)collectionView
                  layout:(UICollectionViewLayout*)collectionViewLayout
  sizeForItemAtIndexPath:(NSIndexPath *)indexPath
{
    return CGSizeMake(200, 30);
}

- (void)collectionView:(UICollectionView *)collectionView didSelectItemAtIndexPath:(NSIndexPath *)indexPath{
    ///タップ時の処理
    [self changeDataArray:tappedTab selectedCell:indexPath];
}

#pragma archive

-(NSArray *)loadArchive{
    NSArray *array = @[];
    //データの読み込んでいる
    NSArray *paths = NSSearchPathForDirectoriesInDomains(NSDocumentDirectory, NSUserDomainMask, YES);
    NSString *directory = [paths objectAtIndex:0];
    NSString *filePath = [directory stringByAppendingPathComponent:@"amutableArray"];
    NSData *fileData = [NSData dataWithContentsOfFile:filePath];
    if(fileData){
        array = [NSKeyedUnarchiver unarchiveObjectWithData:fileData];
    }else{
        array = nil;
    }
    return array;
}

-(void)setArchive{
    //1件追加されたデータを保存している。オブジェクトアーカイビングしている。
    NSData *data = [NSKeyedArchiver archivedDataWithRootObject:self.dataArray];
    NSArray *paths = NSSearchPathForDirectoriesInDomains(NSDocumentDirectory, NSUserDomainMask, YES);
    NSString *directory = [paths objectAtIndex:0];
    NSString *filePath = [directory stringByAppendingPathComponent:@"amutableArray"];
    [data writeToFile:filePath atomically:NO];
}

@end
CollectionCustomCell.h
#import <UIKit/UIKit.h>

typedef void(^MyCustomBlock)(NSIndexPath *);

@interface CollectionCustomCell : UICollectionViewCell
@property (weak, nonatomic) IBOutlet UILabel *label;
@property (weak, nonatomic) IBOutlet UIView *backView;
@property (weak, nonatomic) IBOutlet UIView *deleteBtnView;

@property (nonatomic, copy) MyCustomBlock customBlock;

@property (nonatomic) NSIndexPath *indexPath;

@end
CollectionCustomCell.m
#import "CollectionCustomCell.h"

@implementation CollectionCustomCell

- (void)awakeFromNib {
    [super awakeFromNib];
    self.backView.layer.cornerRadius = 10.0;
    self.backView.layer.borderWidth = 1.0;
    self.backView.layer.borderColor = [[UIColor lightGrayColor] CGColor];
}

- (IBAction)tappedDeleteButton:(id)sender {
    self.customBlock(self.indexPath);
}

@end
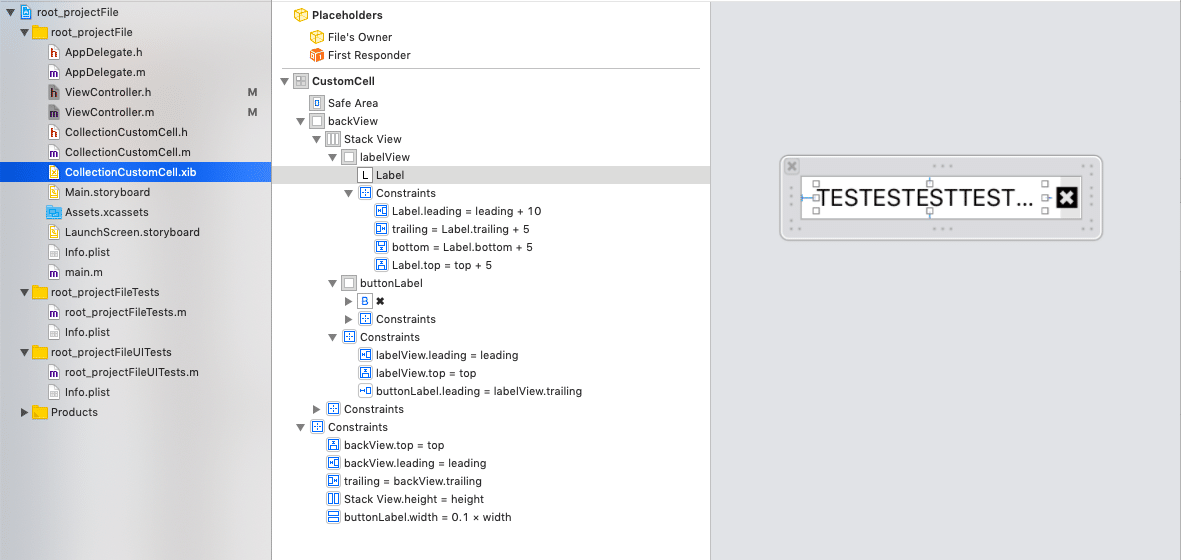
CollectionCustomCell.xib

気をつけた所
(1)カスタムセル内で制約の優先度(priority)を変更して、
トルツメを行う方法をやめた。
(2)viewController内で3modeの処理を一括にまとめて、可読性を高めた。
(3)CollectionViewCellのカスタムセル内に置いたボタンの処理
カスタムセル内で制約の優先度(priority)を変更して、
トルツメを行う方法をやめた。
トルツメでやっていたのですが、やめました。
理由はスクロールしててトルツメしたセルが再度描画される際に、
プライオリティがどうこうっていうエラーが出てきて、
調べても知見が溜まっていなくて解決できそうになかったからです。
現在はstackViewを採用しており、削除しただけで消えるような仕様です。
stackViewを利用する際は親View(LabelView的なもの)を用意しましょう。
実際のオブジェクトを置くとうまい具合に上下からどこどこという
制約がつけらません。
なので、親Viewには幅を付けて、その中に子オブジェクトを配置し、
親Viewとの制約をつけてあげましょう。
viewController内で3modeの処理を一括にまとめて、可読性を高めた。
-(void)changeDataArray:(NSInteger)mode selectedCell:(NSIndexPath *)indexPath{
    for(int i=0; i<self.dataArray.count; i++){
        self.dataArray[i][@"selected"] = @NO;
    }
    switch (mode) {
        case addTab:
            self.dataArray.lastObject[@"selected"] = @YES;
            break;
        case deleteTab:
            [self.dataArray removeObjectAtIndex:indexPath.row];
            break;
        case tappedTab:
            self.dataArray[indexPath.row][@"selected"] = @YES;
            break;

        default:
            break;
    }
    [self.collectionView reloadData];
}
行なっている事はシンプルで、
(1)とりあえず全件、辞書のvalueをNOにする。
(2)ENumで切ったmodeを参照して処理が分岐
(3)その後、collectionViewをリロードする。
引数を最初はintでやっていたのですが、
呼び出し元でわざわざNSIndexPath型をintにしてから渡しているのが
煩わしくて、直接NSIndexPath型を引数としました。
CollectionViewCellのカスタムセル内に置いたボタンの処理
- (UICollectionViewCell *)collectionView:(UICollectionView *)collectionView cellForItemAtIndexPath:(NSIndexPath *)indexPath
{
    //カスタムセルの場合
    CollectionCustomCell *cell = [collectionView dequeueReusableCellWithReuseIdentifier:@"CustomCell" forIndexPath:indexPath];

    ///deleteButtonタップ時の挙動・処理準備
    cell.indexPath = indexPath;
    cell.customBlock = ^(NSIndexPath *indexPath){
        [self changeDataArray:deleteTab selectedCell:indexPath];
    };
block構文を利用しました。
セルを初期化した直後に、プロパティで宣言してある、
NSIndexPath型のIndexPathに、ISIndexPathを格納しております。
(自分が何番目のセルかという情報を各セルに持たせる為)
補足:多分セル側で自分がどこの TableViewの何番目のセルだという情報って持っていないと思うんですけど、あったら教えてください。
CollectionViewCell側のアウトレット接続で、
押下された時に自身(self)のNSIndexPath型を返すようにしております。
これにより、削除するのが何番目かという情報が
ViewController側に伝わりますね。
